Naemon adalah rangkaian pemantauan baru yang bertujuan untuk menjadi cepat, stabil, dan inovatif sambil memberi Anda pandangan yang jelas tentang keadaan jaringan dan aplikasi Anda. Ini adalah pengganti server nagios dan sangat stabil dan menggunakan dasbor luar biasa yang disebut thruk. Menyiapkan naemon sangat mudah dan memiliki status live inbuild. Dalam tutorial ini, saya akan menunjukkan cara menginstal dan mengkonfigurasi naemon di lingkungan produksi bersama dengan pnp4nagios untuk grafik. Naemon sangat stabil, saya akan menunjukkan kepada Anda bagaimana mempertahankan konfigurasi dalam lingkungan skala besar.
Dalam tutorial ini, saya akan menggunakan empat Server
- 192.168.1.170 - Server Naemon - centos 7
- 192.168.1.21 - klien nrpe - centos 6
- 192.168.1.182 - klien nrpe - ubuntu
- 192.168.1.75 - klien nscp - server windows 2012R2
Instalasi Server Naemon
Saya menggunakan host CentOS 7 dengan penginstalan minimal, SELinux dinonaktifkan, dan firewall diaktifkan.
[[email protected] ~]# sestatus
SELinux status:                 disabled
[[email protected] ~]#
Memasang repo:
[[email protected] ~]# yum -y install https://labs.consol.de/repo/stable/rhel7/x86_64/labs-consol-stable.rhel7.noarch.rpm
mengaktifkan repo epel:
yum -y install epel-release
Menginstal paket Naemon:
[[email protected] ~]# yum install naemon*
Naemon menggunakan plugin dan nrpe Nagios yang sama untuk memantau host. Sekarang kita akan menginstalnya:
[[email protected] ~]# yum install nagios-plugins nagios-plugins-all nagios-plugins-nrpe nrpe -y
Kami akan menambahkan aturan firewall:
[[email protected] ~]# firewall-cmd --add-service=http --permanent
success
[[email protected] ~]# firewall-cmd --add-service=https --permanent
success
[[email protected] ~]# firewall-cmd --reload
success
[[email protected] ~]# firewall-cmd --list-all
public (active)
  target: default
  icmp-block-inversion: no
  interfaces: eno16777736
  sources:
  services: dhcpv6-client http https ssh
  ports:
  protocols:
  masquerade: no
  forward-ports:
  sourceports:
  icmp-blocks:
  rich rules:

[[email protected] ~]#
Pemasangan pnp4nagios.
yum install gcc-c++ rrdtool perl-Time-HiRes perl-rrdtool php-gd php php-cli wget
Mengunduh pnp4nagios.
[[email protected] ~]# wget https://svwh.dl.sourceforge.net/project/pnp4nagios/PNP-0.6/pnp4nagios-0.6.25.tar.gz
    [[email protected] ~]# tar -zxvf pnp4nagios-0.6.25.tar.gz
    [[email protected] ~]# cd pnp4nagios-0.6.25/
[[email protected] pnp4nagios-0.6.25]# ./configure --with-nagios-user=naemon --with-nagios-group=naemon
[[email protected] pnp4nagios-0.6.25]# make all
[[email protected] pnp4nagios-0.6.25]# make fullinstall
[[email protected] pnp4nagios-0.6.25]# make install-webconf
[[email protected] pnp4nagios-0.6.25]# make install-config
[[email protected] pnp4nagios-0.6.25]# make install-init
Memulai ulang dan mengaktifkan layanan.
    [[email protected] ~]# systemctl enable httpd && systemctl restart httpd
[[email protected] ~]# systemctl enable naemon && systemctl restart naemon
[[email protected] ~]# systemctl enable thruk && systemctl restart thruk
[[email protected] ~]# systemctl enable npcd && systemctl restart npcd
Anda harus dapat mengakses URL dari http://192.168.1.170/thruk
Nama pengguna default adalah thrukadmin, kata sandi adalah thrukadmin.
Jika Anda ingin mengubah kata sandi thrukadmin, jalankan:
[[email protected] ~]# htpasswd /etc/thruk/htpasswd thrukadmin
Pemasangan Klien Pemantauan untuk memantau node
Instalasi klien nrpe untuk memantau host Linux
192.168.1.21 - klien nrpe - centos 6
Pemasangan plugin Nagios dan klien nrpe:
[[email protected] ~]# yum install nagios-plugins nagios-plugins-all nagios-plugins-nrpe nrpe -y
Ambil cadangan nrpe.cfg:
[[email protected] ~]# cp /etc/nagios/nrpe.cfg /etc/nagios/nrpe.cfg.bkp
Ganti konten file nrpe.conf dengan konten di bawah ini:
[[email protected] ~]# cat /etc/nagios/nrpe.cfg
log_facility=daemon
pid_file=/var/run/nrpe/nrpe.pid
nrpe_user=nrpe
nrpe_group=nrpe
allowed_hosts=127.0.0.1,192.168.1.170
dont_blame_nrpe=1
debug=0
command_timeout=60
connection_timeout=300
include_dir=/etc/nrpe.d/

[[email protected] ~]#
Di bawah allow_host tambahkan ipaddress server naemon di sini adalah 192.168.1.170.
Sekarang kita perlu me-restart layanan nrpe:
	[[email protected] ~]# service nrpe restart
	[[email protected] ~]# chkconfig nrpe on
192.168.1.182 - klien nrpe - ubuntu
[email protected]:~# apt-get install nagios-nrpe-server nagios-plugins -y
Ambil cadangan nrpe.cfg:
[[email protected] ~]# cp /etc/nagios/nrpe.cfg /etc/nagios/nrpe.cfg.bkp
Ganti konten file nrpe.conf dengan konten di bawah ini:
[email protected]:~# cat /etc/nagios/nrpe.cfg
log_facility=daemon
pid_file=/var/run/nagios/nrpe.pid
nrpe_user=nagios
nrpe_group=nagios
allowed_hosts=127.0.0.1,192.168.1.170
dont_blame_nrpe=1
debug=0
command_timeout=60
connection_timeout=300
include_dir=/etc/nagios/nrpe.d/
[email protected]:~#
Sekarang kita perlu memulai ulang layanan nrpe:
	[email protected]:~# systemctl restart nagios-nrpe-server.service
	[email protected]:~# systemctl enable nagios-nrpe-server.service
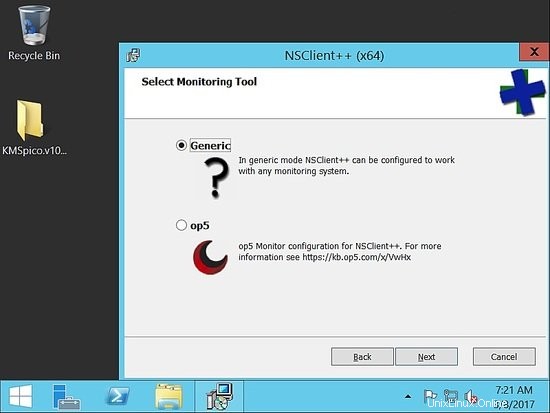
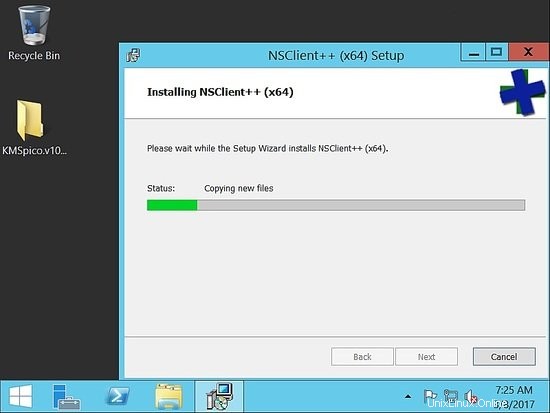
Instalasi Nscp di Windows
192.168.1.75 - klien nscp - windows server 2012R2
Unduh nscp dari situs web ini:
https://www.nsclient.org/download/
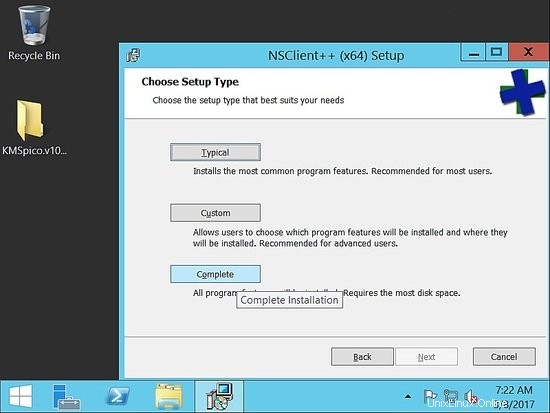
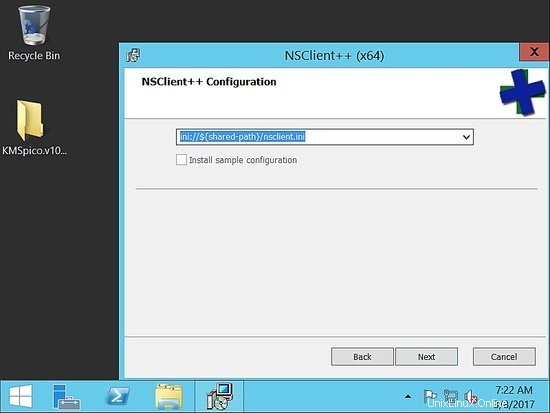
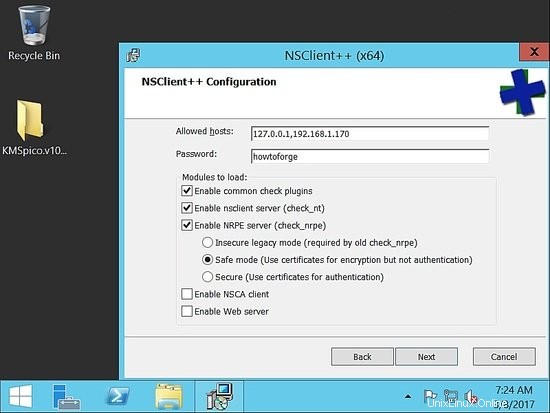
Setelah diunduh, ikuti tangkapan layar penginstalan
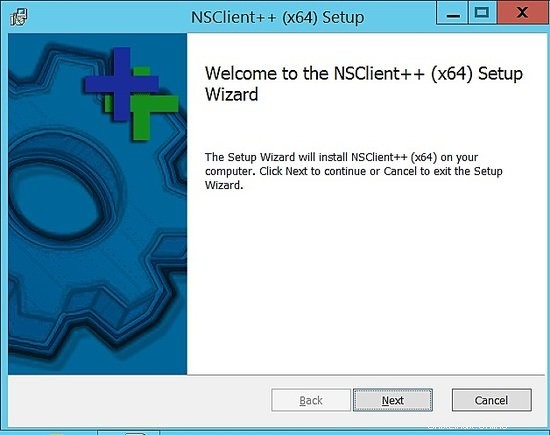
Pilih generik.
Pilih selesai:
Pilih jalur default:
Sekarang, di bawah host yang diizinkan, tambahkan host naemon. Di sini, di pengaturan kami, ini adalah 192.168.1.170.
Pastikan Anda memberikan kata sandi yang rumit. Untuk contoh ini, saya telah menggunakan kata sandi sebagai "howtoforge". Selanjutnya centang aktifkan nsclient dan nrpe.
Setelah penginstalan selesai, pastikan layanan aktif dan berjalan.
Kami sekarang akan memvalidasi dari naemon host, untuk memastikan kami dapat menjangkaunya.
Validasi nrpe dan nscp dari Server Naemon untuk memeriksa konektivitas
[[email protected] ~]# /usr/lib64/nagios/plugins/check_nrpe -H 192.168.1.182
NRPE v2.15
[[email protected] ~]# /usr/lib64/nagios/plugins/check_nrpe -H 192.168.1.21
NRPE v2.15
[[email protected] ~]#
[[email protected] ~]# /usr/lib64/nagios/plugins/check_nt -H 192.168.1.75 -p 12489 -v CLIENTVERSION -s 'howtoforge'
NSClient++ 0.5.0.62 2016-09-14
[[email protected] ~]#
Pemantauan Server
Kami akan memantau kinerja server dalam tutorial ini.
Dalam lingkungan produksi, kita perlu memantau penggunaan CPU, memori, dan harddisk, bersama dengan pemeriksaan pengaktifan host.
Menambahkan baris berikut di nrpe conf /etc/nrpe.d/base.cfg
192.168.1.21 - klien nrpe - centos 6
  [[email protected] ~]# cat /etc/nrpe.d/base.cfg
command[check_disks]=/usr/lib64/nagios/plugins/check_disk -w $ARG1$ -c $ARG2$ -p $ARG3$
command[check_disk]=/usr/lib64/nagios/plugins/check_disk -X nfs -X cifs -X none -X tmpfs -w $ARG1$ -c $ARG2$
command[memory]=/usr/lib64/nagios/plugins/check_memory -w $ARG1$ -c $ARG2$
command[load]=/usr/lib64/nagios/plugins/check_load -w $ARG1$ -c $ARG2$
command[check_total_procs]=/usr/lib64/nagios/plugins/check_procs -w $ARG1$ -c $ARG2$
command[check_procs_c]=/usr/lib64/nagios/plugins/check_procs -c $ARG1$ -C $ARG2$
command[check_procs_a]=/usr/lib64/nagios/plugins/check_procs -c $ARG1$ -a $ARG2$
Simpan dan mulai ulang file, lalu mulai ulang nrpe.
[[email protected] ~]# /etc/init.d/nrpe restart
Shutting down nrpe:                                        [FAILED]
Starting nrpe:                                             [  OK  ]
[[email protected] ~]#
Plugin memori tidak akan tersedia sebagai plugin default. Kami akan menggunakan plugin di bawah ini.
 [[email protected] ~]# cd  /usr/lib64/nagios/plugins/
 [[email protected] plugins]# vim check_memory
Tambahkan konten di bawah ini.
#! /usr/bin/perl -w
##Included Perf data
#The nagios plugins come with ABSOLUTELY NO WARRANTY. You may redistribute
#copies of the plugins under the terms of the GNU General Public License.
#
use strict;
use Getopt::Long;

my ($opt_f, $opt_h, $opt_c, $opt_w);
my ($result, $message, $ram_percent);

my $PROGNAME="check_memory";

$opt_f = "";

Getopt::Long::Configure('bundling');
GetOptions(
        "h"   => \$opt_h, "help"        => \$opt_h,
        "c=s" => \$opt_c, "Warning_Percentage"  => \$opt_c,
        "w=s" => \$opt_w, "Critical_Percentage" => \$opt_w,
);

if ($opt_h) {
        &print_help();
        exit 0;
}

$opt_w = shift unless ($opt_w);
$opt_c = shift unless ($opt_c);

if (! $opt_c && ! $opt_w) {
        print "Warning and Critical must be specified\n";
        exit 3;
}
if ($opt_c <= $opt_w){
        print "Critical must be greater than Warning CRITICAL: $opt_c WARNING: $opt_w\n";
        exit 3;
}


$result = 'OK';
open(FREE_M, "free -m|");
while (my $line = ){
        if ($line =~ /^Mem/){
                my ($junk,$total_mem,$used_mem,$free_mem,$shared_mem,$buffered_mem,$cached_mem)=split(/\s+/,$line);
                $ram_percent=int(($total_mem-($free_mem+$cached_mem+$buffered_mem))/$total_mem*100*100)/100;

        }
}
close(FREE_M);

if ($ram_percent > $opt_c){
print "Memory usage is: CRITICAL: ${ram_percent}% used | used=$ram_percent;$opt_w;$opt_c\n";
exit 2;
}elsif ($ram_percent > $opt_w) {
print "Memory usage is: WARNING: ${ram_percent}% used | used=$ram_percent;$opt_w;$opt_c\n";
exit 1;
}
else{
print "Memory usage is: $result: ${ram_percent}% used | used=$ram_percent;$opt_w;$opt_c\n";
exit 0;
}

sub print_usage () {
        print "Usage:\n";
        print "  $PROGNAME -f \n";
        print "  $PROGNAME -c \n";
        print "  $PROGNAME -w \n";
        print "  $PROGNAME [-h | --help]\n";
        print "  $PROGNAME [-V | --version]\n";
}

sub print_help () {
        print << EOF;
$PROGNAME v1.0.01
The nagios plugins come with ABSOLUTELY NO WARRANTY. You may redistribute
copies of the plugins under the terms of the GNU General Public License.
EOF
        &print_usage();
        print "\n";
        exit 3;
}
Unduh tautan plugin check_memory
Anda harus memberikan izin eksekusi ke file:
[[email protected] plugins]# chmod 755 check_memory
Menambahkan baris berikut di nrpe conf /etc/nagios/nrpe.d/base.cfg
192.168.1.182 - klien nrpe - ubuntu
Di sini jalur file berbeda:
Folder plugin adalah lib dan bukan lib64.
  [email protected]:~# cat /etc/nagios/nrpe.d/base.cfg
command[check_disks]=/usr/lib/nagios/plugins/check_disk -w $ARG1$ -c $ARG2$ -p $ARG3$
command[check_disk]=/usr/lib/nagios/plugins/check_disk -X nfs -X cifs -X none -X tmpfs -w $ARG1$ -c $ARG2$
command[memory]=/usr/lib/nagios/plugins/check_memory -w $ARG1$ -c $ARG2$
command[load]=/usr/lib/nagios/plugins/check_load -w $ARG1$ -c $ARG2$
command[check_total_procs]=/usr/lib/nagios/plugins/check_procs -w $ARG1$ -c $ARG2$
command[check_procs_c]=/usr/lib/nagios/plugins/check_procs -c $ARG1$ -C $ARG2$
command[check_procs_a]=/usr/lib/nagios/plugins/check_procs -c $ARG1$ -a $ARG2$
Tambahkan skrip check_memory yang sama di /usr/lib/nagios/plugins.
  [email protected]:~# vim /usr/lib/nagios/plugins/check_memory
[email protected]:~# chmod 755 /usr/lib/nagios/plugins/check_memory
[email protected]:~# systemctl restart nagios-nrpe-server.service
[email protected]:~#
Konfigurasi pada Server Naemon
Masuk sebagai pengguna naemon:
[[email protected] ~]# su - naemon
Last login: Thu Mar  9 17:11:39 CET 2017 on pts/0
-sh-4.2$
Ubah email admin di /etc/naemon/naemon.cfg
........
........
[email protected]
[email protected]
........
........
Sekarang kita akan mengkonfigurasi perintah kustom untuk melakukan pemeriksaan di /etc/naemon/conf.d
Buat perintah khusus yang disebut custom_commands.cfg dengan konten di bawah ini.
$ vim /etc/naemon/conf.d/custom_commands.cfg
## Host Alive check ##
# command 'check_icmp Host Alive'
define command{
    command_name                   host_alive
    command_line                   $USER1$/check_icmp -H $HOSTADDRESS$ -n 1 -w 3000.00,80% -c 5000.00,100%
    }
### Service Command ##
# command 'check_nrpe_disks'
define command{
    command_name                   check_nrpe_disks
    command_line                   $USER1$/check_nrpe -t 55 -u -H $HOSTADDRESS$ -c check_disks -a $ARG1$ $ARG2$ $ARG3$
    }

# command 'nrpe'
define command{
    command_name                   nrpe
    command_line                   $USER1$/check_nrpe -t 55 -u -H $HOSTADDRESS$ -c $ARG1$
    }

# NRPE With Arguements
define command{
    command_name                   check_nrpe_a
    command_line                   $USER1$/check_nrpe -t 55 -u -H $HOSTADDRESS$ -c $ARG1$ -a $ARG2$ $ARG3$ $ARG4$
    }
#####################################
# Windows NSClient++ Checks
# command 'check_nt'
define command{
    command_name                   nt
    command_line                   $USER1$/check_nt -H $HOSTADDRESS$ -p 12489 -v $ARG1$ $ARG2$ -s $USER4$
    }
Untuk tujuan keamanan, simpan kata sandi klien nscp di /etc/naemon/resource.cfg
...........
...........
$USER4$=howtoforge
...........
............
Sekarang kita perlu mendefinisikan konfigurasi host.
Kami membuat file bernama linux.cfg.
$ vim /etc/naemon/conf.d/linux.cfg
define host {
  host_name                      centos6.sunil.cc
  alias                          Centos
  address                        192.168.1.21
  use                            linux-server
  hostgroups                     linux-servers
}
define host {
  host_name                      ubuntu.sunil.cc
  alias                          Ubuntu
  address                        192.168.1.182
  use                            linux-server
  hostgroups                     linux-servers
}
Kami melakukan hal yang sama untuk host windows.
$ vim /etc/naemon/conf.d/windows.cfg
define host {
  host_name                      ad.sunil.cc
  alias                          My Windows Server
  address                        192.168.1.75
  use                            windows-server
}

define hostgroup {
  hostgroup_name                 windows-servers
  alias                          Windows Servers
}
Sekarang kita perlu mendefinisikan konfigurasi layanan.
$ vim linux_services.cfg
define service {
  service_description            Disks Status
  hostgroup_name                  linux-servers
  use                            generic-service
  check_command                  check_nrpe_a!check_disk!15%!5%
}
define service{
    use                            generic-service
    hostgroup_name                 linux-servers
    service_description            Load Average
    check_command                  check_nrpe_a!load!30,25,20!45,40,35
    }
define service{
    use                            generic-service
    hostgroup_name                 linux-servers
    service_description            Memory Usage
    check_command                  check_nrpe_a!memory!80!90
    }
Untuk Windows, kami membuat konfigurasi serupa.
$ vim window_services.cfg
define service{
    use                            generic-service
    hostgroup_name                 windows-servers
    service_description            Disk - C:
    check_command                  nt!USEDDISKSPACE!-l c -w 80 -c 90
     }
define service{
    use                            generic-service
    hostgroup_name                 windows-servers
    service_description            Load Average
    check_command                  nt!CPULOAD!-l 60,90,95
    }
define service{
    use                            generic-service
    hostgroup_name                 windows-servers
    service_description            Memory Usage
    check_command                  nt!MEMUSE!-w 90 -c 95
    }
Sekarang kita akan mengubah alamat email kontak.
$ vim contacts.cfg
define contact {
  contact_name                   naemonadmin                         ; Short name of user
  alias                          Naemon Admin                        ; Full name of user
  use                            generic-contact                     ; Inherit default values from generic-contact template (defined above)
  email                          [email protected]             ; <<***** CHANGE THIS TO YOUR EMAIL ADDRESS ******
}
Kami sekarang menghapus konfigurasi yang tidak perlu yang tidak diperlukan.
$ mv switch.cfg switch.cfg.bkp
$ mv printer.cfg printer.cfg.bkp
Untuk memvalidasi konfigurasi.
$ naemon -v /etc/naemon/naemon.cfg

Naemon Core 1.0.6-pkg
Copyright (c) 2013-present Naemon Core Development Team and Community Contributors
Copyright (c) 2009-2013 Nagios Core Development Team and Community Contributors
Copyright (c) 1999-2009 Ethan Galstad
License: GPL

Website: http://www.naemon.org
Reading configuration data...
   Read main config file okay...
   Read object config files okay...

Running pre-flight check on configuration data...

Checking objects...
        Checked 20 services.
        Checked 4 hosts.
        Checked 1 contacts.
        Checked 2 host groups.
        Checked 0 service groups.
        Checked 1 contact groups.
        Checked 29 commands.
        Checked 5 time periods.
        Checked 0 host escalations.
        Checked 0 service escalations.
Checking for circular paths...
        Checked 4 hosts
        Checked 0 service dependencies
        Checked 0 host dependencies
        Checked 5 timeperiods
Checking global event handlers...
Checking obsessive compulsive processor commands...
Checking misc settings...

Total Warnings: 0
Total Errors:   0

Things look okay - No serious problems were detected during the pre-flight check
-sh-4.2$
Login sebagai root dan restart layanan naemon.
[[email protected] conf.d]# systemctl restart naemon
[[email protected] conf.d]# systemctl status naemon
? naemon.service - Naemon Monitoring Daemon
   Loaded: loaded (/usr/lib/systemd/system/naemon.service; enabled; vendor preset: disabled)
   Active: active (running) since Thu 2017-03-09 19:14:36 CET; 7s ago
     Docs: http://naemon.org/documentation
  Process: 5112 ExecStart=/usr/bin/naemon --daemon /etc/naemon/naemon.cfg (code=exited, status=0/SUCCESS)
  Process: 5110 ExecStartPre=/usr/bin/chown -R naemon:naemon /var/run/naemon/ (code=exited, status=0/SUCCESS)
  Process: 5108 ExecStartPre=/usr/bin/mkdir /var/run/naemon (code=exited, status=1/FAILURE)
 Main PID: 5114 (naemon)
   CGroup: /system.slice/naemon.service
           ??5114 /usr/bin/naemon --daemon /etc/naemon/naemon.cfg
           ??5115 /usr/bin/naemon --worker /var/lib/naemon/naemon.qh
           ??5116 /usr/bin/naemon --worker /var/lib/naemon/naemon.qh
           ??5117 /usr/bin/naemon --worker /var/lib/naemon/naemon.qh
           ??5118 /usr/bin/naemon --worker /var/lib/naemon/naemon.qh
           ??5119 /usr/bin/naemon --daemon /etc/naemon/naemon.cfg

Mar 09 19:14:36 naemon.sunil.cc systemd[1]: Starting Naemon Monitoring Daemon...
Mar 09 19:14:36 naemon.sunil.cc systemd[1]: Failed to read PID from file /var/run/naemon/naemon.pid: Invalid argument
Mar 09 19:14:36 naemon.sunil.cc systemd[1]: Started Naemon Monitoring Daemon.
[[email protected] conf.d]#
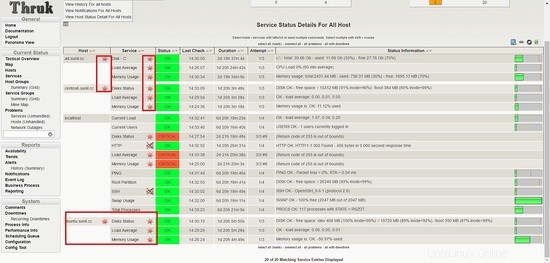
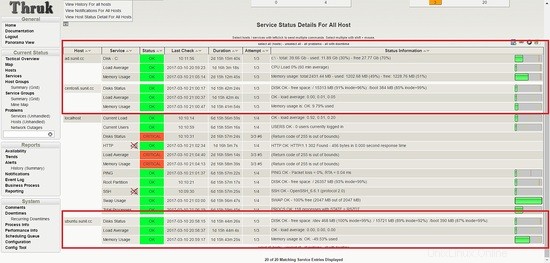
Masuk ke dasbor dan Anda akan melihat layanan aktif dan berjalan.
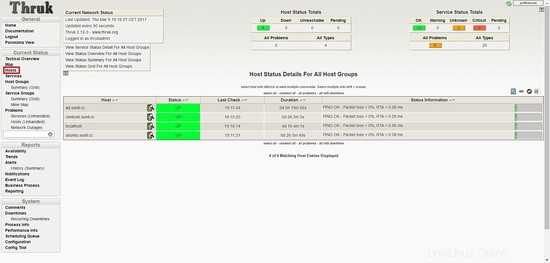
Kami melihat bahwa layanan gagal untuk host Ubuntu.
It is seen that nrpe package compiled for ubuntu had enable arguments disabled for security vulnerabily and that is the reason it is failing
Kita perlu mengkompilasi ulang paket untuk mengaktifkan argumen, untuk mengelola penyetelan dari naemon.
Tautan di bawah ini menunjukkan kepada Anda bagaimana itu dapat dikompilasi ulang. Anda juga menemukan paket yang sudah dikompilasi dengan argumen aktifkan di situs ini. Saya akan menggunakan paket yang telah dikompilasi ini untuk tutorial ini.
https://www.claudiokuenzler.com/blog/626/nrpe-debian-jessie-command-ags-arguments-not-working-error
[email protected]:~# wget https://www.claudiokuenzler.com/downloads/nrpe/nagios-nrpe-server_2.15-1ubuntu2_amd64.xenial.deb
Instal paket.
[email protected]:~# dpkg -i nagios-nrpe-server_2.15-1ubuntu2_amd64.xenial.deb
(Reading database ... 79576 files and directories currently installed.)
Preparing to unpack nagios-nrpe-server_2.15-1ubuntu2_amd64.xenial.deb ...
Unpacking nagios-nrpe-server (2.15-1ubuntu2) over (2.15-1ubuntu1) ...
Setting up nagios-nrpe-server (2.15-1ubuntu2) ...
Processing triggers for systemd (229-4ubuntu16) ...
Processing triggers for ureadahead (0.100.0-19) ...
Processing triggers for man-db (2.7.5-1) ...
[email protected]:~#
Mulai ulang NRPE.
[email protected]:~# systemctl restart nagios-nrpe-server.service
Sekarang kami memantau semua host menggunakan naemon.
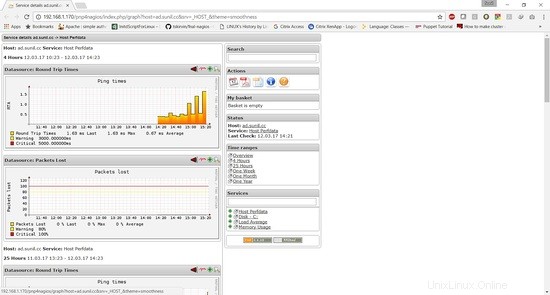
Konfigurasi pnp4nagios
Kita perlu mengonfigurasi pnp4nagios untuk grafik kinerja.
Sekarang kita akan menggunakan metode autentikasi yang sama seperti dasbor thruk, pertama-tama kita akan membuat cadangan file dan mengubah baris berikut.
[[email protected] conf.d]# cd /etc/httpd/conf.d/
[[email protected] conf.d]# cp pnp4nagios.conf pnp4nagios.conf.bkp
[[email protected] share]# cat /etc/httpd/conf.d/pnp4nagios.conf
# SAMPLE CONFIG SNIPPETS FOR APACHE WEB SERVER

Alias /pnp4nagios "/usr/local/pnp4nagios/share"

<Directory "/usr/local/pnp4nagios/share">
        AllowOverride None
        Order allow,deny
        Allow from all
        #
        # Use the same value as defined in nagios.conf
        #
        AuthName "Thruk Access"
        AuthType Basic
        AuthUserFile /etc/thruk/htpasswd
        Require valid-user

                # Turn on URL rewriting
                RewriteEngine On
                Options symLinksIfOwnerMatch
                # Installation directory
                RewriteBase /pnp4nagios/
                # Protect application and system files from being viewed
                RewriteRule "^(?:application|modules|system)/" - [F]
                # Allow any files or directories that exist to be displayed directly
                RewriteCond "%{REQUEST_FILENAME}" !-f
                RewriteCond "%{REQUEST_FILENAME}" !-d
                # Rewrite all other URLs to index.php/URL
                RewriteRule "^.*$" "index.php/$0" [PT]


[[email protected] share]#
[[email protected] conf.d]# systemctl restart httpd.service
Sekarang kita perlu mengubah halaman konfigurasi.
[[email protected] share]# cd /usr/local/pnp4nagios/share/
[[email protected] share]# mv install.php install.php.txt
Sekarang kita perlu mengubah file konfigurasi untuk pnp4nagios.
Ubah nagios menjadi naemon di file konfigurasi.
[[email protected] conf.d]# vi /usr/local/pnp4nagios/etc/config_local.php
............................
................................
$conf['nagios_base'] = "/naemon/cgi-bin";
..................................
............................
Aktifkan data kinerja dari 0 hingga 1.
[[email protected] conf.d]# vi /etc/naemon/naemon.cfg
.....................
.....................
process_performance_data=1
......................
......................
Tambahkan baris di bawah ini ke bagian bawah naemon.conf.
[[email protected] conf.d]# vi /etc/naemon/naemon.cfg
#
# service performance data
#
service_perfdata_file=/usr/local/pnp4nagios/var/service-perfdata
service_perfdata_file_template=DATATYPE::SERVICEPERFDATA\tTIMET::$TIMET$\tHOSTNAME::$HOSTNAME$\tSERVICEDESC::$SERVICEDESC$\tSERVICEPERFDATA::$SERVICEPERFDATA$\tSERVICECHECKCOMMAND::$SERVICECHECKCOMMAND$\tHOSTSTATE::$HOSTSTATE$\tHOSTSTATETYPE::$HOSTSTATETYPE$\tSERVICESTATE::$SERVICESTATE$\tSERVICESTATETYPE::$SERVICESTATETYPE$
service_perfdata_file_mode=a
service_perfdata_file_processing_interval=15
service_perfdata_file_processing_command=process-service-perfdata-file

#
#
#
host_perfdata_file=/usr/local/pnp4nagios/var/host-perfdata
host_perfdata_file_template=DATATYPE::HOSTPERFDATA\tTIMET::$TIMET$\tHOSTNAME::$HOSTNAME$\tHOSTPERFDATA::$HOSTPERFDATA$\tHOSTCHECKCOMMAND::$HOSTCHECKCOMMAND$\tHOSTSTATE::$HOSTSTATE$\tHOSTSTATETYPE::$HOSTSTATETYPE$
host_perfdata_file_mode=a
host_perfdata_file_processing_interval=15
host_perfdata_file_processing_command=process-host-perfdata-file
Sekarang kita perlu menambahkan baris di bawah ini di custom_commands.conf.
[[email protected] conf.d]# vim /etc/naemon/conf.d/custom_commands.cfg
define command{
       command_name    process-service-perfdata-file
       command_line    /bin/mv /usr/local/pnp4nagios/var/service-perfdata /usr/local/pnp4nagios/var/spool/service-perfdata.$TIMET$
}

define command{
       command_name    process-host-perfdata-file
       command_line    /bin/mv /usr/local/pnp4nagios/var/host-perfdata /usr/local/pnp4nagios/var/spool/host-perfdata.$TIMET$
}
Sekarang kita membuat template untuk kinerja host dan grafik kinerja layanan.
$ cd /etc/naemon/conf.d/templates/
$ cat pnp.cfg
define host {
   name host-pnp
   process_perf_data 1
   action_url /pnp4nagios/index.php/graph?host=$HOSTNAME$&srv=_HOST_' class='tips' rel='/pnp4nagios/index.php/popup?host=$HOSTNAME$&srv=_HOST_
   register 0
}

define service {
   name service-pnp
   process_perf_data 1
   action_url /pnp4nagios/index.php/graph?host=$HOSTNAME$&srv=$SERVICEDESC$' class='tips' rel='/pnp4nagios/index.php/popup?host=$HOSTNAME$&srv=$SERVICEDESC$
   register 0
}
Sekarang untuk mengakses grafik kinerja untuk layanan yang Anda butuhkan, kami perlu memperbarui file service.cfg.
$ cat linux_services.cfg
define service {
  service_description            Disks Status
  hostgroup_name                  linux-servers
  use                            generic-service,service-pnp                       ; Name of service template to use
  check_command                  check_nrpe_a!check_disk!15%!5%
}
define service{
    use                            generic-service,service-pnp
    hostgroup_name                 linux-servers
    service_description            Load Average
    check_command                  check_nrpe_a!load!30,25,20!45,40,35
    }
define service{
    use                            generic-service,service-pnp
    hostgroup_name                 linux-servers
    service_description            Memory Usage
    check_command                  check_nrpe_a!memory!80!90
    }
$ cat window_services.cfg
define service{
    use                            generic-service,service-pnp
    hostgroup_name                 windows-servers
    service_description            Disk - C:
    check_command                  nt!USEDDISKSPACE!-l c -w 80 -c 90
     }
define service{
    use                            generic-service,service-pnp
    hostgroup_name                 windows-servers
    service_description            Load Average
    check_command                  nt!CPULOAD!-l 60,90,95
    }
define service{
    use                            generic-service,service-pnp
    hostgroup_name                 windows-servers
    service_description            Memory Usage
    check_command                  nt!MEMUSE!-w 90 -c 95
    }
Untuk memeriksa grafik host, kita perlu memasukkannya ke dalam file di bawah ini.
$ cat linux.cfg
define host {
  host_name                      centos6.sunil.cc
  alias                          Centos
  address                        192.168.1.21
  use                            linux-server,host-pnp
  hostgroups                     linux-servers
}
define host {
  host_name                      ubuntu.sunil.cc
  alias                          Ubuntu
  address                        192.168.1.182
  use                            linux-server,host-pnp
  hostgroups                     linux-servers
}
$ cat windows.cfg
define host {
  host_name                      ad.sunil.cc
  alias                          My Windows Server
  address                        192.168.1.75
  use                            windows-server,host-pnp
}

define hostgroup {
  hostgroup_name                 windows-servers
  alias                          Windows Servers
}
Validasi konfigurasi.
$ naemon -v /etc/naemon/naemon.cfg

Naemon Core 1.0.6-pkg
Copyright (c) 2013-present Naemon Core Development Team and Community Contributors
Copyright (c) 2009-2013 Nagios Core Development Team and Community Contributors
Copyright (c) 1999-2009 Ethan Galstad
License: GPL

Website: http://www.naemon.org
Reading configuration data...
   Read main config file okay...
   Read object config files okay...

Running pre-flight check on configuration data...

Checking objects...
        Checked 20 services.
        Checked 4 hosts.
        Checked 1 contacts.
        Checked 2 host groups.
        Checked 0 service groups.
        Checked 1 contact groups.
        Checked 31 commands.
        Checked 5 time periods.
        Checked 0 host escalations.
        Checked 0 service escalations.
Checking for circular paths...
        Checked 4 hosts
        Checked 0 service dependencies
        Checked 0 host dependencies
        Checked 5 timeperiods
Checking global event handlers...
Checking obsessive compulsive processor commands...
Checking misc settings...

Total Warnings: 0
Total Errors:   0

Things look okay - No serious problems were detected during the pre-flight check
Mulai ulang layanan.
[[email protected] ~]# systemctl enable npcd
npcd.service is not a native service, redirecting to /sbin/chkconfig.
Executing /sbin/chkconfig npcd on
[[email protected] ~]# systemctl restart npcd
[[email protected] ~]# systemctl restart naemon