
Dalam tutorial ini, kami akan menunjukkan kepada Anda cara menginstal Ntopng di Ubuntu 14.04. Bagi Anda yang tidak tahu, Ntopng adalah alat yang relatif berguna jika Anda ingin memantau jaringan yang berbeda. protokol di server Anda. Ini menyediakan banyak alat untuk memantau berbagai protokol, varian lalu lintas, dan ya, bandwidth di beberapa kerangka waktu. Ntopng didasarkan pada libpcap dan telah ditulis dengan cara portabel untuk dijalankan secara virtual di setiap Unix platform, macOS, dan juga di Win32.
Artikel ini mengasumsikan Anda memiliki setidaknya pengetahuan dasar tentang Linux, tahu cara menggunakan shell, dan yang terpenting, Anda meng-host situs Anda di VPS Anda sendiri. Instalasinya cukup sederhana. Saya akan menunjukkan Anda melalui langkah-demi-langkah instalasi Ntopng di Ubuntu 14.04.
Instal Ntopng di Ubuntu 14.04
Langkah 1. Pertama, tambahkan Ntopng repo ke daftar repo kita.
sudo nano /etc/apt/sources.list.d/ntop.list
Kemudian tambahkan baris ini:
deb http://www.nmon.net/apt-stable/12.04/ x64/
deb http://www.nmon.net/apt-stable/12.04/ all/
Tambahkan kunci, lalu jalankan pembaruan:
wget -qO - http://www.nmon.net/apt-stable/ntop.key | sudo apt-key add -
sudo apt-get update
Langkah 2. Instal Ntopng dan dependensi.
sudo apt-get install libpcap-dev libglib2.0-dev libgeoip-dev redis-server libxml2-dev libnl1
sudo apt-get install ntopng pfring nprobe ntopng-data n2disk nbox
Langkah 3. Konfigurasi Ntopng.
Buat file konfigurasi Ntopng, Dalam artikel ini, kami menggunakan nano sebagai editor teks. Anda dapat menggunakan editor teks favorit Anda untuk membuat file konfigurasi Ntopng:
sudo nano /etc/ntopng/ntopng.conf
# /etc/ntopng/ntopng.conf
#
#        The  configuration  file is similar to the command line, with the exception that an equal
#        sign '=' must be used between key and value. Example:  -i=p1p2  or  --interface=p1p2  For
#        options with no value (e.g. -v) the equal is also necessary. Example: "-v=" must be used.
#
#
#       -G|--pid-path
#        Specifies the path where the PID (process ID) is saved.
#
-G=/var/tmp/ntopng.pid
#
#       -e|--daemon
#        This  parameter  causes ntop to become a daemon, i.e. a task which runs in the background
#        without connection to a specific terminal. To use ntop other than as a casual  monitoring
#        tool, you probably will want to use this option.
#
-e=
#
#       -i|--interface
#        Specifies  the  network  interface or collector endpoint to be used by ntopng for network
#        monitoring. On Unix you can specify both the interface name  (e.g.  lo)  or  the  numeric
#        interface id as shown by ntopng -h. On Windows you must use the interface number instead.
#        Note that you can specify -i multiple times in order to instruct ntopng to create  multi‐
#        ple interfaces.
#
-i=1
#
#       -w|--http-port
#        Sets the HTTP port of the embedded web server.
#
-w=3000
#
#       -m|--local-networks
#        ntopng determines the ip addresses and netmasks for each active interface. Any traffic on
#        those  networks  is considered local. This parameter allows the user to define additional
#        networks and subnetworks whose traffic is also considered local in  ntopng  reports.  All
#        other hosts are considered remote. If not specified the default is set to 192.168.1.0/24.
#
#        Commas  separate  multiple  network  values.  Both netmask and CIDR notation may be used,
#        even mixed together, for instance "131.114.21.0/24,10.0.0.0/255.0.0.0".
#
-m=192.168.1.0/24
#
#       -n|--dns-mode
#        Sets the DNS address resolution mode: 0 - Decode DNS responses  and  resolve  only  local
#        (-m)  numeric  IPs  1  -  Decode DNS responses and resolve all numeric IPs 2 - Decode DNS
#        responses and don't resolve numeric IPs 3 - Don't decode DNS responses and don't  resolve
#
-n=1
#
#       -S|--sticky-hosts
#        ntopng  periodically purges idle hosts. With this option you can modify this behaviour by
#        telling ntopng not to purge the hosts specified by -S. This parameter requires  an  argu‐
#        ment  that  can  be  "all"  (Keep  all hosts in memory), "local" (Keep only local hosts),
#        "remote" (Keep only remote hosts), "none" (Flush hosts when idle).
#
-S=
#
#       -d|--data-dir
#        Specifies the data directory (it must be writable). Default directory is ./data
#
-d=/var/tmp/ntopng
#
#       -q|--disable-autologout
#        Disable web interface logout for inactivity.
#
-q=
Buat file ntopng.start:
sudo nano /etc/ntopng/ntopng.start

##Add this line##

--local-networks "192.168.0.0/24"  ## give your local IP Ranges here.
--interface 1
Untuk melihat semua antarmuka dan opsi yang tersedia, gunakan ntopng -h pilihan:
sudo ntopng -h
Langkah 4. Mulai daemon server Ntopng dan Redis.
sudo service redis-server start
sudo service ntopng start
Langkah 5. Uji Ntopng.
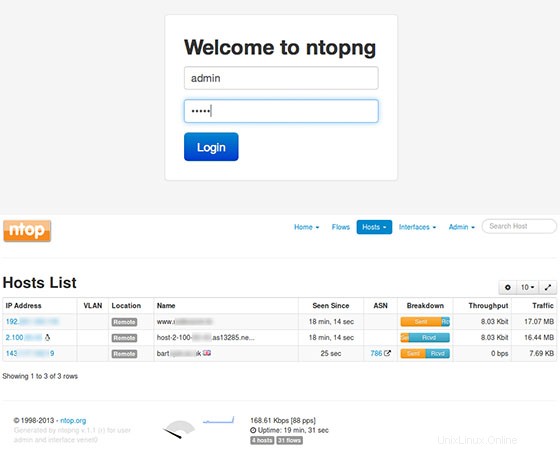
Sekarang Anda dapat menguji aplikasi Ntopng Anda dengan mengetikkan http://yourserver.name:3000. Anda akan melihat antarmuka halaman login Ntopng. Untuk pertama kalinya, Anda dapat menggunakan 'admin' pengguna dan kata sandi 'admin'.
Selamat! Anda telah berhasil menginstal Ntopng. Terima kasih telah menggunakan tutorial ini untuk menginstal pemantauan server Ntopng pada sistem Ubuntu 14.04. Untuk bantuan tambahan atau informasi berguna, kami menyarankan Anda untuk memeriksa situs web resmi Ntopng.