OpenLiteSpeed adalah versi ringan dan open-source dari LiteSpeed Server yang dikembangkan oleh LiteSpeed Technologies. Muncul dengan panel Administrasi berbasis WebGUI yang membuatnya berbeda dari server lain dan lebih mudah untuk dikelola.
Dalam tutorial ini, kita akan mempelajari cara menginstal OpenLiteSpeed Server di Ubuntu 20.04 bersama dengan PHP 7.4 dan server MariaDB.
Prasyarat
-
Server web berbasis Ubuntu 20.04.
-
Akun pengguna non-root dengan hak istimewa sudo.
Perbarui sistem Anda.
$ sudo apt update
$ sudo apt upgrade
Langkah 1 - Konfigurasi Firewall
Sebelum memulai tutorial, kita perlu mengonfigurasi Uncomplicated Firewall(UFW) yang biasanya diaktifkan secara default. Mari kita periksa status firewallnya terlebih dahulu.
Kita perlu mengaktifkan SSH, HTTP, HTTPS dan port 7080, 8088 untuk firewall.
$ sudo ufw allow OpenSSH
$ sudo ufw allow http
$ sudo ufw allow https
$ sudo ufw allow 7080/tcp
$ sudo ufw allow 8088/tcp
Periksa status firewall.
$ sudo ufw status
Status: active

To                         Action      From
--                         ------      ----
OpenSSH                    ALLOW       Anywhere
80/tcp                     ALLOW       Anywhere
443/tcp                    ALLOW       Anywhere
7080/tcp                   ALLOW       Anywhere
8088/tcp                   ALLOW       Anywhere
OpenSSH (v6)               ALLOW       Anywhere (v6)
80/tcp (v6)                ALLOW       Anywhere (v6)
443/tcp (v6)               ALLOW       Anywhere (v6)
7080/tcp (v6)              ALLOW       Anywhere (v6)
8088/tcp (v6)              ALLOW       Anywhere (v6)
Jika tidak berfungsi, maka mulai firewall.
$ sudo ufw enable
Langkah 2 - Instal OpenLiteSpeed
Ada berbagai versi OpenLiteSpeed yang dapat Anda instal. Versi yang direkomendasikan berasal dari seri 1.6.x atau 1.7.x pada saat penulisan tutorial ini.
Kami akan menggunakan Repositori resmi OpenLiteSpeed untuk tutorial kami yang hanya mempertahankan versi 1.6.x.
Tambahkan Kunci Repositori OpenLiteSpeed.
$ wget -qO - https://rpms.litespeedtech.com/debian/lst_repo.gpg | sudo apt-key add -
Tambahkan Repositori.
$ echo "deb http://rpms.litespeedtech.com/debian/ focal main" | sudo tee /etc/apt/sources.list.d/openlitespeed.list
Perbarui Repositori.
$ sudo apt update
Instal OpenLiteSpeed
$ sudo apt install openlitespeed
Periksa status server.
$ sudo /usr/local/lsws/bin/lswsctrl status
litespeed is running with PID 21825.
Jika tidak berjalan, Anda dapat memulai dengan perintah berikut.
$ sudo /usr/local/lsws/bin/lswsctrl start
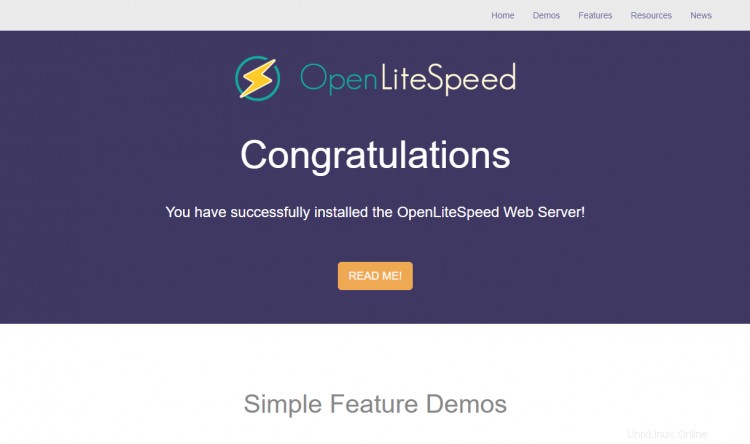
Buka http://<YOURSERVERIP>:8088 untuk mengakses server web Anda. Anda akan melihat halaman berikut.
Langkah 3 - Instal PHP
Server OpenLiteSpeed dikirimkan dengan PHP 7.3 yang telah diaktifkan sebelumnya. Tapi kami ingin menggunakan PHP 7.4 jadi kami akan menginstal salinan kami sendiri.
Instal PHP 7.4 bersama dengan beberapa paket tambahan.
$ sudo apt install lsphp74 lsphp74-common lsphp74-mysql lsphp74-curl
Verifikasi instalasi PHP Anda.
$ /usr/local/lsws/lsphp74/bin/php7.4 -v
PHP 7.4.5 (cli) (built: May  7 2020 23:08:38) ( NTS )
Copyright (c) The PHP Group
Zend Engine v3.4.0, Copyright (c) Zend Technologies
    with Zend OPcache v7.4.5, Copyright (c), by Zend Technologies
Anda dapat memeriksa modul PHP yang diaktifkan.
$ /usr/local/lsws/lsphp74/bin/php7.4 --modules
Kami akan mengonfigurasi PHP untuk bekerja dengan OpenLiteSpeed nanti.
Langkah 4 - Instal MariaDB
Instal server MariaDB.
$ sudo apt install mariadb-server
Mulai dan aktifkan layanan MariaDB.
$ sudo systemctl start mariadb
$ sudo systemctl enable mariadb
Amankan instalasi MariaDB Anda. Skrip ini akan mengatur kata sandi root Anda, menghapus pengguna anonim, melarang login root jarak jauh dan menjatuhkan tabel uji. Pilih sandi yang kuat dan jawab pertanyaan seperti yang dijelaskan di bawah ini.
$ sudo mysql_secure_installation
[sudo] password for username:

NOTE: RUNNING ALL PARTS OF THIS SCRIPT IS RECOMMENDED FOR ALL MariaDB
SERVERS IN PRODUCTION USE!  PLEASE READ EACH STEP CAREFULLY!

In order to log into MariaDB to secure it, we'll need the current
password for the root user.  If you've just installed MariaDB, and
you haven't set the root password yet, the password will be blank,
so you should just press enter here.

Enter current password for root (enter for none):
OK, successfully used password, moving on...

Setting the root password ensures that nobody can log into the MariaDB
root user without the proper authorisation.

Set root password? [Y/n] y
New password:
Re-enter new password:
Password updated successfully!
Reloading privilege tables..
 ... Success!

By default, a MariaDB installation has an anonymous user, allowing anyone
to log into MariaDB without having to have a user account created for
them.  This is intended only for testing, and to make the installation
go a bit smoother.  You should remove them before moving into a
production environment.

Remove anonymous users? [Y/n] y
 ... Success!

Normally, root should only be allowed to connect from 'localhost'.  This
ensures that someone cannot guess at the root password from the network.

Disallow root login remotely? [Y/n] y
 ... Success!

By default, MariaDB comes with a database named 'test' that anyone can
access.  This is also intended only for testing, and should be removed
before moving into a production environment.

Remove test database and access to it? [Y/n] y
 - Dropping test database...
 ... Success!
 - Removing privileges on test database...
 ... Success!

Reloading the privilege tables will ensure that all changes made so far
will take effect immediately.

Reload privilege tables now? [Y/n] y
 ... Success!

Cleaning up...

All done!  If you've completed all of the above steps, your MariaDB
installation should now be secure.

Thanks for using MariaDB!
Setelah ini selesai, Anda dapat masuk ke shell MySQL menggunakan perintah berikut.
$ sudo mysql -u root -p
Buat database pengujian dan pengguna dengan izin akses. Ganti testdb dan testuser dengan nama yang sesuai untuk pengaturan Anda. Ganti password dengan kata sandi yang kuat.
CREATE DATABASE testdb;
CREATE USER 'testuser' IDENTIFIED BY 'password';
GRANT ALL PRIVILEGES ON testdb.* TO 'testuser';
FLUSH PRIVILEGES;
Keluar dari shell MySQL.
exit
Langkah 5 - Konfigurasi OpenLiteSpeed
Konfigurasi Panel Admin
Setel kredensial panel Administrator.
$ sudo /usr/local/lsws/admin/misc/admpass.sh
Please specify the user name of administrator.
This is the user name required to login the administration Web interface.

User name [admin]: <username>

Please specify the administrator's password.
This is the password required to login the administration Web interface.

Password:
Retype password:
Administrator's username/password is updated successfully!
Anda juga dapat menggunakan perintah ini jika Anda lupa detail login Anda.
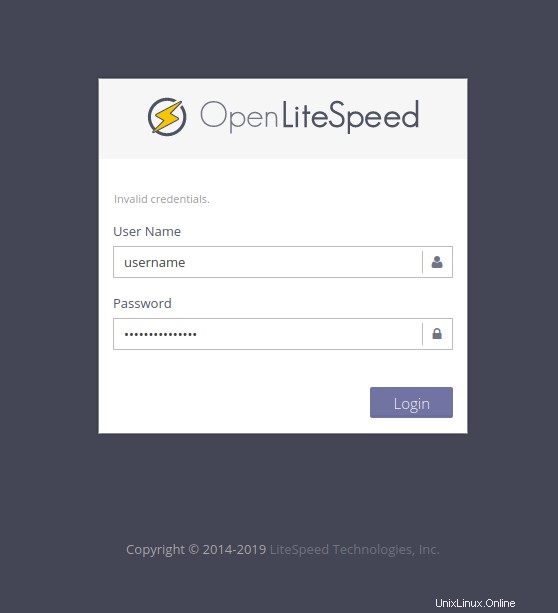
Untuk mengakses panel administrasi, buka http://<YOURSERVERIP>:7080 .
Pada login pertama Anda, browser Anda akan memberikan peringatan yang mengatakan bahwa koneksi Anda tidak pribadi. Klik Lanjutan dan klik "Terima risiko dan Lanjutkan" (untuk Firefox) atau "Lanjutkan ke <YOURSERVERIP>(unsafe) " (untuk browser berbasis Chromium). Anda tidak akan melihat peringatan itu lagi.
Anda akan disambut oleh layar berikut.
Ganti port HTTP kembali ke 80
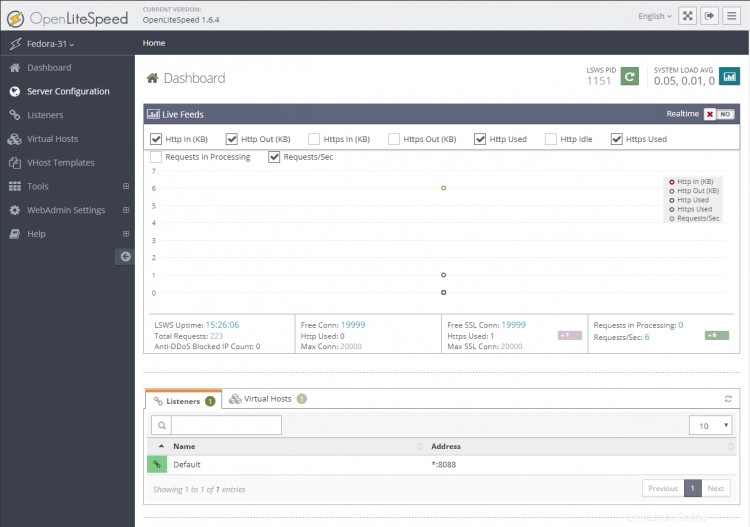
Mari kita ubah port HTTP default menjadi 80. Masuk ke panel administrasi Anda di http://<YOURSERVERIP>:7080 dengan kredensial yang baru saja Anda buat.
Anda akan disambut oleh layar berikut.
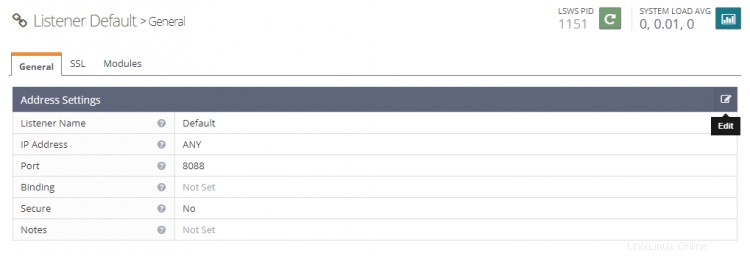
Kunjungi Pendengar bagian dari kiri. Anda akan melihat pendengar default dengan port 8080.
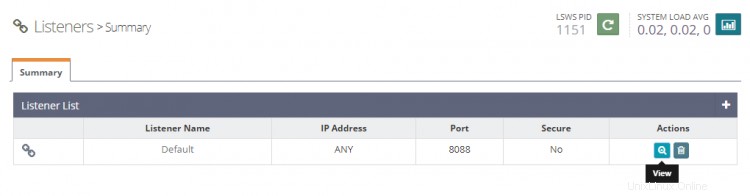
Klik tombol View untuk melihat detail konfigurasi. Di laman berikutnya di bawah Default Pendengar> Umum Page, klik ikon Edit dan ubah port dari 8080 menjadi 80.
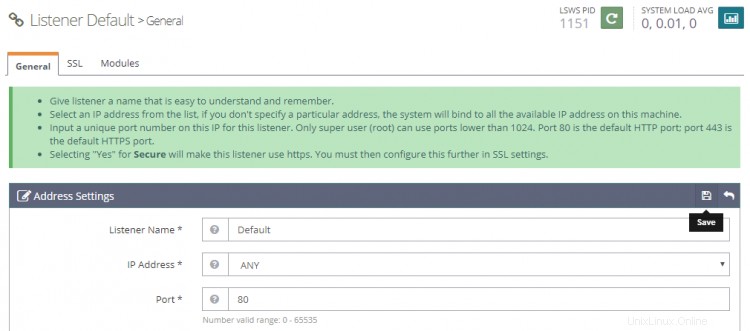
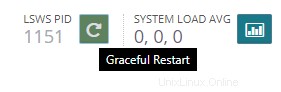
Klik Simpan lalu mulai ulang server dengan mengeklik tombol Mulai ulang yang anggun.
Langkah 6 - Konfigurasi PHP
Pada langkah ini, kita perlu mengaitkan salinan PHP 7.4 kita dengan server.
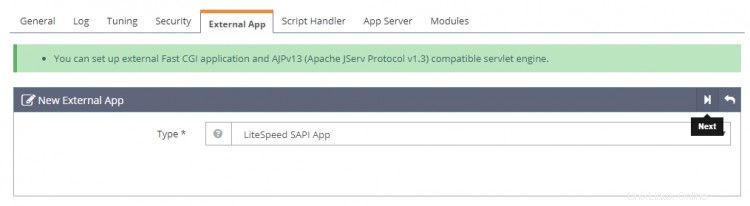
Klik Konfigurasi Server bagian di sebelah kiri lalu pada tab Aplikasi Eksternal . Anda akan melihat Aplikasi LiteSpeed untuk PHP 7.3. Kami akan membuat Aplikasi LiteSpeed kami sendiri untuk PHP 7.4. Anda dapat dengan mudah beralih di antara mereka nanti jika Anda mau.
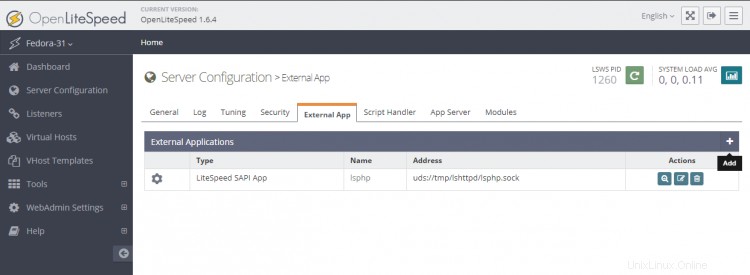
Klik tombol Tambah untuk membuat aplikasi baru. Untuk jenisnya, pilih LiteSpeed SAPI App dan klik Berikutnya.
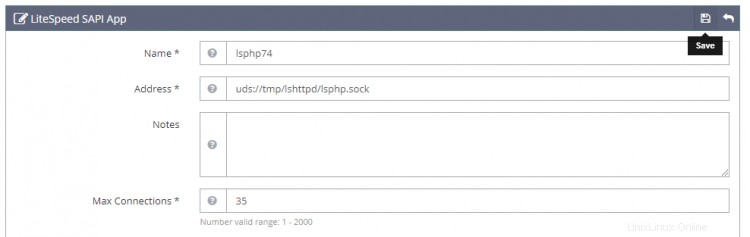
Selanjutnya, tambahkan konfigurasi di bawah ini. Kosongkan semua bidang lainnya.
Name: lsphp74
Address: uds://tmp/lshttpd/lsphp.sock
Max Connections: 35
Environment: PHP_LSAPI_MAX_REQUESTS=500
             PHP_LSAPI_CHILDREN=35
             LSAPI_AVOID_FORK=200M
Initial Request Timeout (secs): 60
Retry Timeout : 0
Persistent Connection: Yes
Response Buffering: no
Start By Server: Yes(Through CGI Daemon)
Command: lsphp74/bin/lsphp
Back Log: 100
Instances: 1
Priority: 0
Memory Soft Limit (bytes): 2047M
Memory Hard Limit (bytes): 2047M
Process Soft Limit: 1400
Process Hard Limit: 1500
Klik Simpan setelah selesai.
Sekarang kita telah membuat aplikasi berbasis PHP 7.4 kita sendiri, kita perlu memberi tahu server untuk mulai menggunakannya.
Buka Penangan Skrip tab dan edit handler lsphp. Ganti nama Handle ke lsphp74 dari menu tarik-turun.
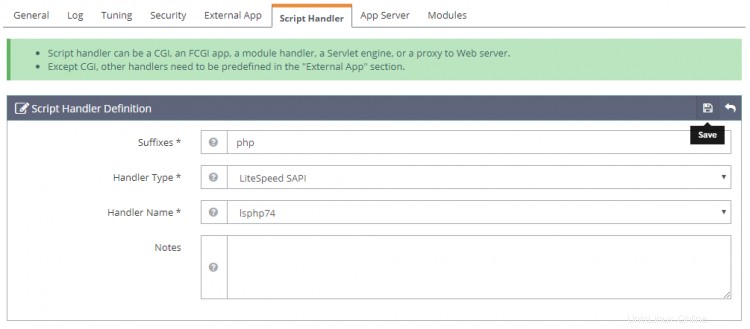
Klik Simpan, lalu mulai ulang server dengan mengeklik Mulai ulang dengan anggun tombol.
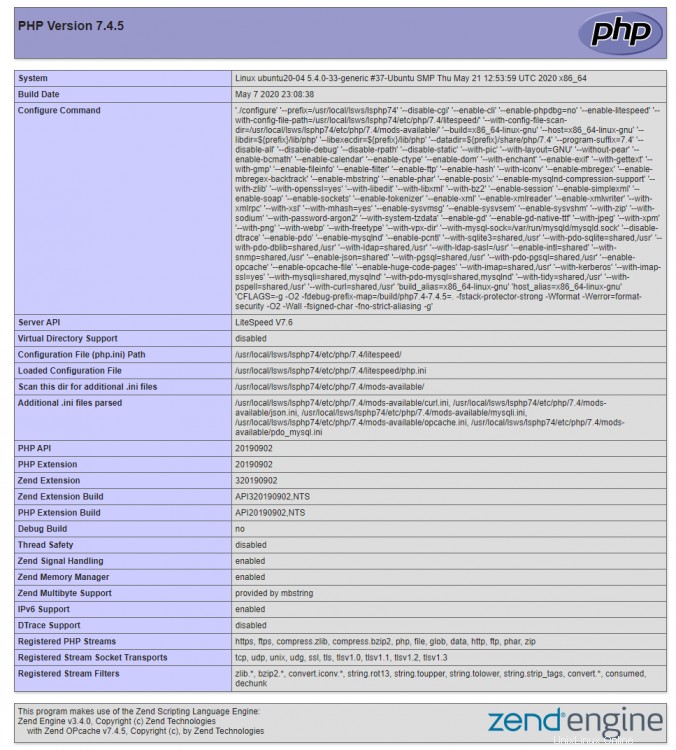
Untuk menguji apakah PHP Anda telah dialihkan dengan benar, kunjungi http://<YOURSERVERIP>/phpinfo.php di browser Anda.
Langkah 7 - Siapkan Virtual Host
Pertama, kita perlu membuat direktori untuk virtual host kita.
$ sudo mkdir /usr/local/lsws/example.com/{html,logs} -p
html direktori akan menyimpan file publik dan logs direktori akan berisi log server.
Selanjutnya, buka konsol Admin dan akses Virtual Host bagian dari kiri dan klik tombol Tambah.
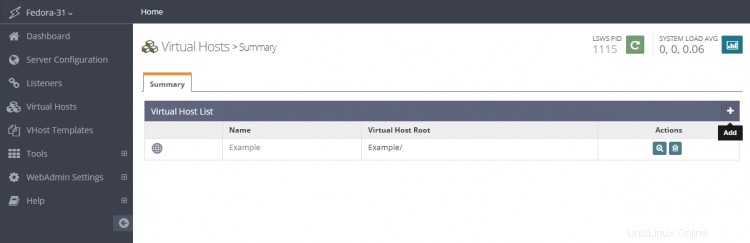
Isi nilai sesuai yang ditentukan
Virtual Host Name: example.com
Virtual Host Root: $SERVER_ROOT/example.com/
Config File: $SERVER_ROOT/conf/vhosts/$VH_NAME/vhconf.conf
Follow Symbolic Link: Yes
Enable Scripts/ExtApps: Yes
Restrained: Yes
External App Set UID Mode: Server UID

Klik tombol Simpan jika sudah selesai. Anda akan mendapatkan kesalahan berikut karena file konfigurasi tidak ada sampai sekarang. Klik tautan untuk membuat file konfigurasi.
Klik tombol Simpan lagi untuk menyelesaikan pembuatan Virtual Host.
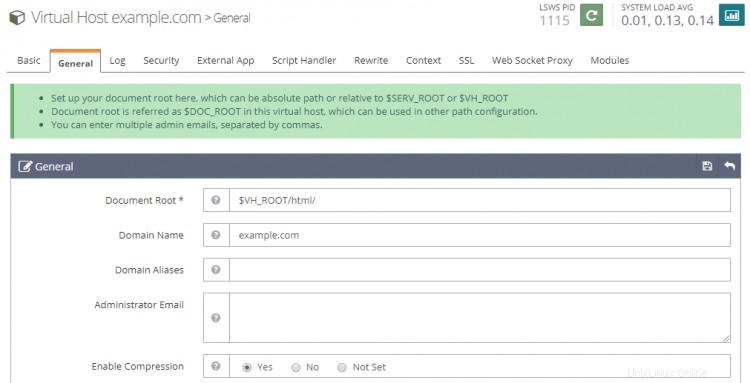
Setelah virtual host dibuat, buka Virtual Hosts -> Pilih Virtual Host(example.com) -> General dan ubah konfigurasi seperti yang diberikan.
Document Root: $VH_ROOT/html/
Domain Name: example.com
Enable Compression: Yes
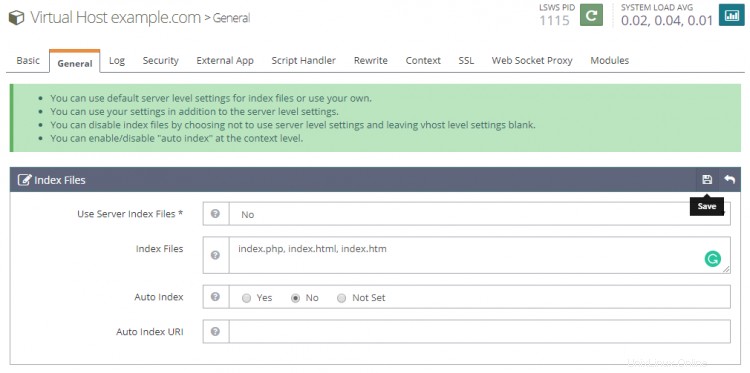
Klik tombol Simpan jika sudah selesai. Selanjutnya, kita perlu mengatur file indeks. Klik tombol edit terhadap file Indeks di bawah Umum Bagian. Setel opsi berikut.
Use Server Index Files: No
Index files: index.php, index.html, index.htm
Auto Index: No
Klik Simpan setelah selesai. Selanjutnya, kita perlu memilih file Log. Buka Log dan klik Edit terhadap Log Host Virtual dan isi nilai berikut.
Use Server’s Log: Yes
File Name: $VH_ROOT/logs/error.log
Log Level: ERROR
Rolling Size (bytes): 10M
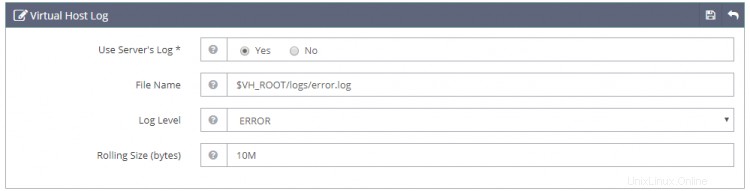
Anda dapat memilih Tingkat Log sebagai DEBUG jika Anda menggunakan mesin produksi/pengembangan.
Klik Simpan, lalu klik tanda plus di Log Akses bagian untuk menambahkan entri baru. Isi nilai berikut.
Log Control: Own Log File
File Name: $VH_ROOT/logs/access.log
Piped Logger: Not Set
Log Format: Not Set
Log Headers: Not Set
Rolling Size (bytes): 10M
Keep Days: 30
Bytes log: Not Set
Compress Archive: Yes
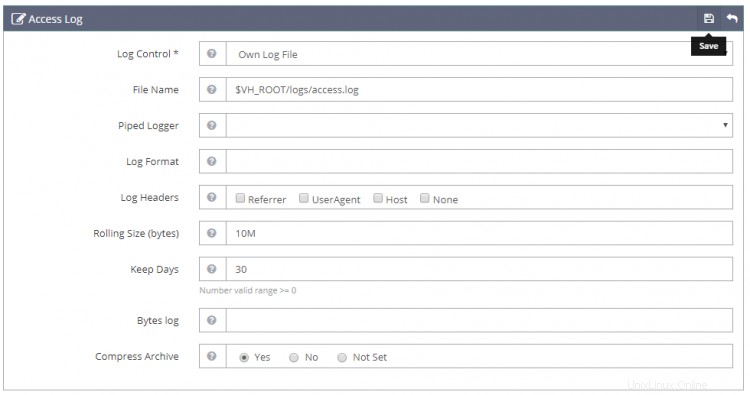
Klik Simpan setelah selesai. Selanjutnya, kita perlu mengonfigurasi Access Control di bawah Keamanan bagian. Tetapkan Nilai berikut.
Allowed List: *
Denied List: Not set
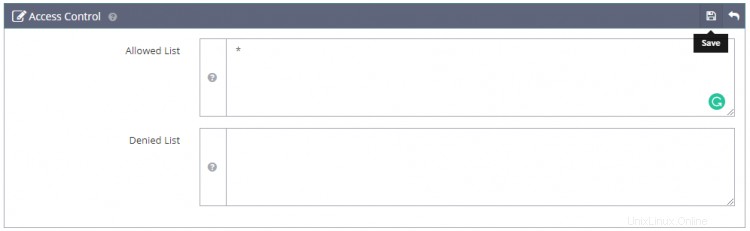
Klik Simpan setelah selesai. Selanjutnya, kita perlu mengatur Definisi Pengendali Skrip . Tetapkan nilai berikut.
Suffixes: php
Handler Type: LiteSpeed SAPI
Handler Name: [Server Level]: lsphp74
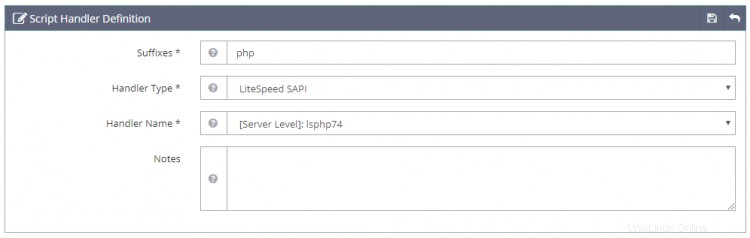
Selanjutnya, kita perlu mengatur Rewrite Control di bawah Tulis Ulang bagian. Tetapkan nilai berikut.
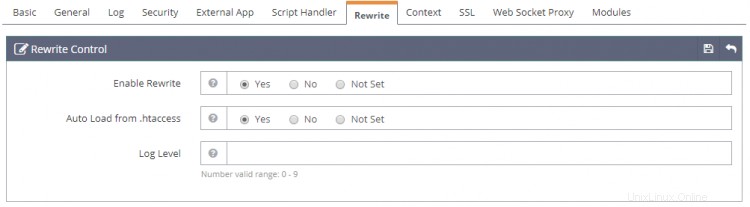
Dan terakhir, kita perlu mengatur Listeners. Buka Pendengar bagian dan klik tombol Lihat melawan Pendengar Default . Kemudian, klik tombol Tambah pada Pemetaan Host Virtual untuk menambahkan pemetaan baru dan menetapkan nilai berikut.

Klik Simpan setelah selesai. Sekarang, klik Mulai ulang dengan anggun untuk menerapkan semua perubahan di atas dan memulai ulang server.
Langkah 8 - Siapkan SSL
Menyiapkan SSL di OpenLiteSpeed mengharuskan kita untuk menyiapkan dua sertifikat. Sertifikat yang ditandatangani sendiri untuk keseluruhan server dan server khusus situs Let's Encrypt.
Mari kita buat Sertifikat yang Ditandatangani Sendiri terlebih dahulu.
$ openssl req -x509 -days 365 -newkey rsa:4096 -keyout key.pem -out cert.pem -nodes
Generating a RSA private key
..++++
......................++++
writing new private key to 'key.pem'
-----
You are about to be asked to enter information that will be incorporated
into your certificate request.
What you are about to enter is what is called a Distinguished Name or a DN.
There are quite a few fields but you can leave some blank
For some fields there will be a default value,
If you enter '.', the field will be left blank.
-----
Country Name (2 letter code) [AU]:
State or Province Name (full name) [Some-State]:
Locality Name (eg, city) []:
Organization Name (eg, company) [Internet Widgits Pty Ltd]:
Organizational Unit Name (eg, section) []:
Common Name (e.g. server FQDN or YOUR name) []:
Email Address []:
Anda dapat menekan enter melalui semua bidang dan membiarkannya kosong.
Sertifikat sekarang disimpan di /home/user direktori. Kami akan membutuhkan informasi ini nanti.
Untuk menggunakan Let's Encrypt, kita perlu menginstal alat Certbot.
$ sudo apt install certbot
Dapatkan sertifikat SSL.
$ sudo certbot certonly --webroot -w /usr/local/lsws/example.com/html/ -d example.com
Ikuti perintah Interaktif.
Saving debug log to /var/log/letsencrypt/letsencrypt.log
Plugins selected: Authenticator webroot, Installer None
Enter email address (used for urgent renewal and security notices) (Enter 'c' to
cancel): [email protected]
Starting new HTTPS connection (1): acme-v01.api.letsencrypt.org

-------------------------------------------------------------------------------
Please read the Terms of Service at
https://letsencrypt.org/documents/LE-SA-v1.2-November-15-2017.pdf. You must agree
in order to register with the ACME server at
https://acme-v02.api.letsencrypt.org/directory
-------------------------------------------------------------------------------
(A)gree/(C)ancel: A

-------------------------------------------------------------------------------
Would you be willing to share your email address with the Electronic Frontier
Foundation, a founding partner of the Let's Encrypt project and the non-profit
organization that develops Certbot? We'd like to send you email about our work
encrypting the web, EFF news, campaigns, and ways to support digital freedom.
-------------------------------------------------------------------------------
(Y)es/(N)o: N
Obtaining a new certificate
Performing the following challenges:
http-01 challenge for example.com
Using the webroot path /usr/local/lsws/example.com/html for all unmatched domains.
Waiting for verification...
Cleaning up challenges

IMPORTANT NOTES:
 - Congratulations! Your certificate and chain have been saved at:
   /etc/letsencrypt/live/example/fullchain.pem. Your key file has
   been saved at:
   /etc/letsencrypt/live/linode.nspeaks.com/privkey.pem Your cert will
   expire on 2020-09-04. To obtain a new or tweaked version of this
   certificate in the future, simply run certbot again. To
   non-interactively renew *all* of your certificates, run "certbot
   renew"
 - Your account credentials have been saved in your Certbot
   configuration directory at /etc/letsencrypt. You should make a
   secure backup of this folder now. This configuration directory will
   also contain certificates and private keys obtained by Certbot so
   making regular backups of this folder is ideal.
 - If you like Certbot, please consider supporting our work by:

   Donating to ISRG / Let's Encrypt:   https://letsencrypt.org/donate
   Donating to EFF:                    https://eff.org/donate-le
Sekarang buka konsol Admin dan buka Listeners>> Add New Listener dan tambahkan nilai berikut.
Listener Name: SSL
IP Address: ANY
Port: 443
Secure: Yes
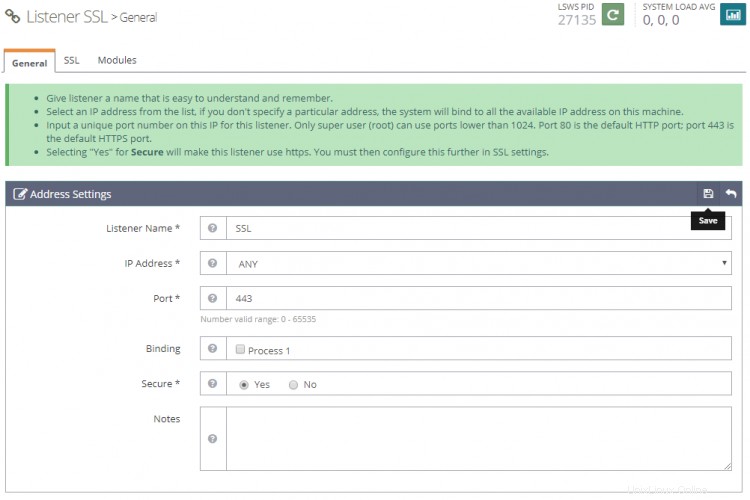
Klik Simpan setelah selesai. Selanjutnya, buka Pemetaan Host Virtual bagian di bawah Pendengar SSL dengan mengklik SSL, klik tombol Tambah dan isi nilai berikut.
Virtual Host: example.com
Domains: example.com

Klik Simpan setelah selesai.
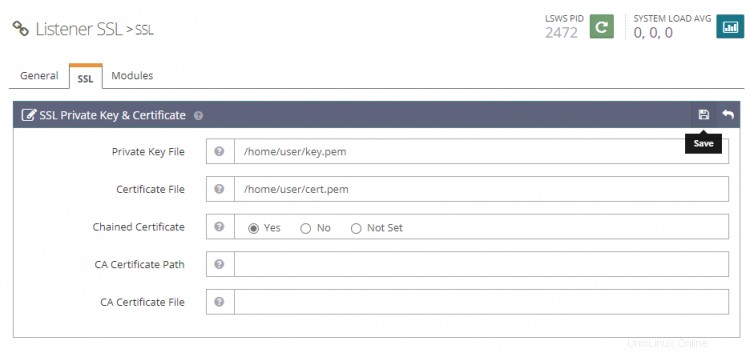
Selanjutnya, buka Pendengar>> Pendengar SSL>> Tab SSL>> Kunci &Sertifikat Pribadi SSL (tombol Edit) dan isi nilai berikut untuk sertifikat yang ditandatangani sendiri yang kita buat sebelumnya.
Private Key File: /home/user/key.pem
Certificate File: /home/user/cert.pem
Chained Certificate: Yes
Selanjutnya buka Virtual Hosts>> example.com>> Tab SSL>> Kunci &Sertifikat Pribadi SSL (tombol Edit) dan isi nilai berikut dengan Let's Encrypt Certificate.
Private Key File: /etc/letsencrypt/live/example.com/privkey.pem
Certificate File: /etc/letsencrypt/live/example.com/fullchain.pem
Chained Certificate: Yes
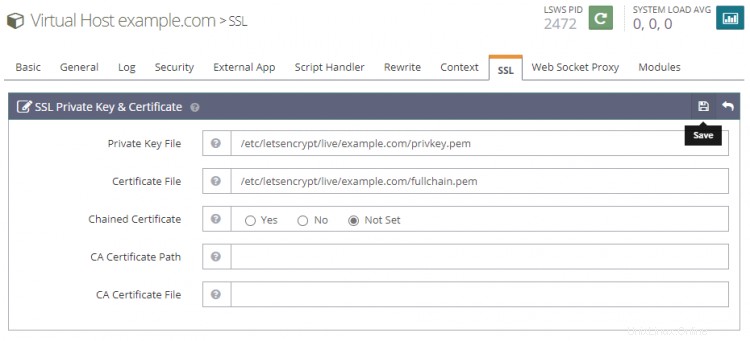
Klik Simpan setelah selesai.
Restart server dengan mengklik tombol Graceful restart.
Langkah 9 - Situs Uji
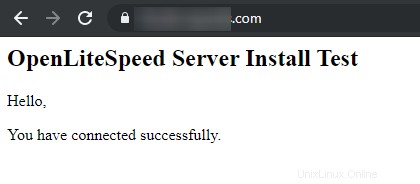
Buat file Tes di html . Anda direktori.
$ sudo nano /usr/local/lsws/example.com/html/index.php
Rekatkan kode berikut di editor Nano.
<html>
<head>
    <h2>OpenLiteSpeed Server Install Test</h2>
</head>
    <body>
    <?php echo '<p>Hello,</p>';

    // Define PHP variables for the MySQL connection.
    $servername = "localhost";
    $username = "testuser";
    $password = "password";

    // Create a MySQL connection.
    $conn = mysqli_connect($servername, $username, $password);

    // Report if the connection fails or is successful.
    if (!$conn) {
        exit('<p>Your connection has failed.<p>' .  mysqli_connect_error());
    }
    echo '<p>You have connected successfully.</p>';
    ?>
</body>
</html>
Kunjungi situs Anda di https://example.com di browser dan Anda akan melihat halaman berikut.
Itu saja untuk tutorial ini. Jika Anda memiliki pertanyaan, tulis di komentar di bawah.