WordPress adalah CMS gratis, open-source, dan paling populer di dunia yang seluruhnya dibangun dalam PHP. Ini digunakan oleh ribuan orang di seluruh dunia untuk menjalankan blog, situs web bisnis, dan toko e-niaga. Ini memiliki beberapa fitur hebat termasuk, panel admin yang sederhana dan mudah digunakan, ribuan plugin, komunitas besar, tema mendalam, penyesuaian, dan banyak lagi.
Dalam panduan ini, kami akan menunjukkan cara menginstal WordPress dengan Apache dan Let's Encrypt SSL di AlmaLinux 8.
Prasyarat
- Server yang menjalankan AlmaLinux 8.
- Nama domain valid yang ditunjukkan dengan IP server Anda.
- Kata sandi root dikonfigurasi di server.
Instal Server LAMP
WordPress membutuhkan server LAMP untuk diinstal di server Anda. Anda dapat menginstalnya menggunakan perintah berikut:
dnf install httpd mariadb-server php php-mysqlnd php-dom php-simplexml php-xml php-xmlreader php-curl php-exif php-ftp php-gd php-iconv php-json php-mbstring php-posix php-sockets php-tokenizer unzip -y
Setelah menginstal server LAMP, mulai layanan Apache dan MariaDB, dan aktifkan mereka untuk memulai saat reboot sistem:
systemctl start mariadb
systemctl start httpd
systemctl enable mariadb
systemctl enable httpd
Setelah selesai, Anda dapat melanjutkan ke langkah berikutnya.
Konfigurasi Database MariaDB
Pertama, Anda perlu mengatur kata sandi root MariaDB dan mengamankan instalasi MariaDB. Anda dapat melakukannya dengan menggunakan perintah berikut:
mysql_secure_installation
Jawab semua pertanyaan seperti yang ditunjukkan di bawah ini:
Enter current password for root (enter for none):
Set root password? [Y/n] Y
New password:
Re-enter new password:
Remove anonymous users? [Y/n] Y
Disallow root login remotely? [Y/n] Y
Remove test database and access to it? [Y/n] Y
Reload privilege tables now? [Y/n] Y
Setelah selesai, masuk ke MariaDB dengan perintah berikut:
mysql -u root -p
Setelah Anda masuk, buat database dan pengguna untuk WordPress:
MariaDB [(none)]> CREATE DATABASE wordpress;
MariaDB [(none)]> CREATE USER `wordpress`@`localhost` IDENTIFIED BY 'password';
Selanjutnya, berikan semua hak istimewa ke database WordPress menggunakan perintah di bawah ini:
MariaDB [(none)]> GRANT ALL ON wordpress.* TO `wordpress`@`localhost`;
Selanjutnya, flush hak istimewa dan keluar dari shell MariaDB dengan perintah berikut:
MariaDB [(none)]> FLUSH PRIVILEGES;
MariaDB [(none)]> EXIT;
Setelah selesai, Anda dapat melanjutkan ke langkah berikutnya.
Unduh WordPress
Selanjutnya, ubah direktori ke root web Apache dan unduh WordPress versi terbaru menggunakan perintah berikut:
cd /var/www/html
wget https://wordpress.org/latest.tar.gz
Setelah unduhan selesai, ekstrak file yang diunduh dengan perintah berikut:
tar -xvzf latest.tar.gz
Selanjutnya, ubah direktori ke wordpress dan ganti nama file konfigurasi sampel:
cd wordpress
mv wp-config-sample.php wp-config.php
Selanjutnya, edit file konfigurasi dengan perintah berikut:
nano wp-config.php
Tentukan konfigurasi database Anda seperti yang ditunjukkan di bawah ini:
/** The name of the database for WordPress */
define( 'DB_NAME', 'wordpress' );

/** MySQL database username */
define( 'DB_USER', 'wordpress' );

/** MySQL database password */
define( 'DB_PASSWORD', 'password' );

/** MySQL hostname */
define( 'DB_HOST', 'localhost' );
Simpan dan tutup file ketika Anda selesai kemudian atur izin yang tepat ke direktori WordPress:
chown -R apache:apache /var/www/html/wordpress
Setelah selesai, Anda dapat melanjutkan ke langkah berikutnya.
Konfigurasi Apache untuk WordPress
Selanjutnya, Anda perlu membuat file konfigurasi virtual host Apache untuk WordPress. Anda dapat membuatnya dengan perintah berikut:
nano /etc/httpd/conf.d/wordpress.conf
Tambahkan baris berikut:
<VirtualHost *:80>
   ServerAdmin [email protected]
   DocumentRoot "/var/www/html/wordpress"
   ServerName wordpress.example.com
   ErrorLog "/var/log/httpd/example.com-error_log"
   CustomLog "/var/log/httpd/example.com-access_log" combined

<Directory "/var/www/html/wordpress">
   DirectoryIndex index.html index.php
   Options FollowSymLinks
   AllowOverride All
   Require all granted
</Directory>
</VirtualHost>
Simpan dan tutup file kemudian restart layanan Apache untuk menerapkan perubahan:
systemctl restart httpd
Anda dapat memeriksa status Apache dengan perintah berikut:
systemctl status httpd
Anda akan mendapatkan output berikut:
? httpd.service - The Apache HTTP Server
   Loaded: loaded (/usr/lib/systemd/system/httpd.service; disabled; vendor preset: disabled)
   Active: active (running) since Fri 2021-07-09 03:30:47 EDT; 3s ago
     Docs: man:httpd.service(8)
 Main PID: 4153 (httpd)
   Status: "Started, listening on: port 80"
    Tasks: 213 (limit: 12524)
   Memory: 24.5M
   CGroup: /system.slice/httpd.service
           ??4153 /usr/sbin/httpd -DFOREGROUND
           ??4155 /usr/sbin/httpd -DFOREGROUND
           ??4156 /usr/sbin/httpd -DFOREGROUND
           ??4157 /usr/sbin/httpd -DFOREGROUND
           ??4158 /usr/sbin/httpd -DFOREGROUND

Jul 09 03:30:47 AlmaLinux systemd[1]: Stopped The Apache HTTP Server.
Jul 09 03:30:47 AlmaLinux systemd[1]: Starting The Apache HTTP Server...
Setelah selesai, Anda dapat melanjutkan ke langkah berikutnya.
Amankan WordPress dengan Let's Encrypt SSL
Selanjutnya, Anda perlu menginstal klien Certbot untuk menginstal Let's Encrypt SSL untuk WordPress. Anda dapat menginstalnya dengan perintah berikut:
dnf install epel-release -y
dnf install certbot python3-certbot-apache
Selanjutnya, dapatkan dan instal sertifikat SSL untuk domain let Anda dengan perintah berikut:
certbot --apache -d wordpress.example.com
Anda akan diminta untuk memberikan alamat email Anda dan menerima persyaratan layanan:
Saving debug log to /var/log/letsencrypt/letsencrypt.log
Plugins selected: Authenticator apache, Installer apache
Enter email address (used for urgent renewal and security notices)
 (Enter 'c' to cancel): [email protected]

- - - - - - - - - - - - - - - - - - - - - - - - - - - - - - - - - - - - - - - -
Please read the Terms of Service at
https://letsencrypt.org/documents/LE-SA-v1.2-November-15-2017.pdf. You must
agree in order to register with the ACME server. Do you agree?
- - - - - - - - - - - - - - - - - - - - - - - - - - - - - - - - - - - - - - - -
(Y)es/(N)o: Y

- - - - - - - - - - - - - - - - - - - - - - - - - - - - - - - - - - - - - - - -
Would you be willing, once your first certificate is successfully issued, to
share your email address with the Electronic Frontier Foundation, a founding
partner of the Let's Encrypt project and the non-profit organization that
develops Certbot? We'd like to send you email about our work encrypting the web,
EFF news, campaigns, and ways to support digital freedom.
- - - - - - - - - - - - - - - - - - - - - - - - - - - - - - - - - - - - - - - -
(Y)es/(N)o: Y
Account registered.
Requesting a certificate for wordpress.example.com
Performing the following challenges:
http-01 challenge for wordpress.example.com
Waiting for verification...
Cleaning up challenges
Deploying Certificate to VirtualHost /etc/httpd/conf.d/wordpress.conf
Redirecting all traffic on port 80 to ssl in /etc/httpd/conf.d/wordpress.conf

- - - - - - - - - - - - - - - - - - - - - - - - - - - - - - - - - - - - - - - -
Congratulations! You have successfully enabled https://wordpress.example.com
- - - - - - - - - - - - - - - - - - - - - - - - - - - - - - - - - - - - - - - -
Subscribe to the EFF mailing list (email: [email protected]).


IMPORTANT NOTES:
 - Congratulations! Your certificate and chain have been saved at:
   /etc/letsencrypt/live/wordpress.example.com/fullchain.pem
   Your key file has been saved at:
   /etc/letsencrypt/live/wordpress.example.com/privkey.pem
   Your certificate will expire on 2022-02-09. To obtain a new or
   tweaked version of this certificate in the future, simply run
   certbot again with the "certonly" option. To non-interactively
   renew *all* of your certificates, run "certbot renew"
 - If you like Certbot, please consider supporting our work by:

   Donating to ISRG / Let's Encrypt:   https://letsencrypt.org/donate
   Donating to EFF:                    https://eff.org/donate-le
Konfigurasi Firewall
Selanjutnya, Anda harus mengizinkan port 80 dan 443 melalui firewalld. Anda dapat mengizinkannya dengan perintah berikut:
firewall-cmd --permanent --zone=public --add-service=http
firewall-cmd --permanent --zone=public --add-service=https
Selanjutnya, muat ulang firewalld untuk menerapkan perubahan:
firewall-cmd --reload
Setelah selesai, Anda dapat melanjutkan ke langkah berikutnya.
Mengakses Dasbor WordPress
Selanjutnya, buka browser web Anda dan akses panel admin WordPress menggunakan URL https://wordpress.example.com . Anda akan diarahkan ke halaman berikut:
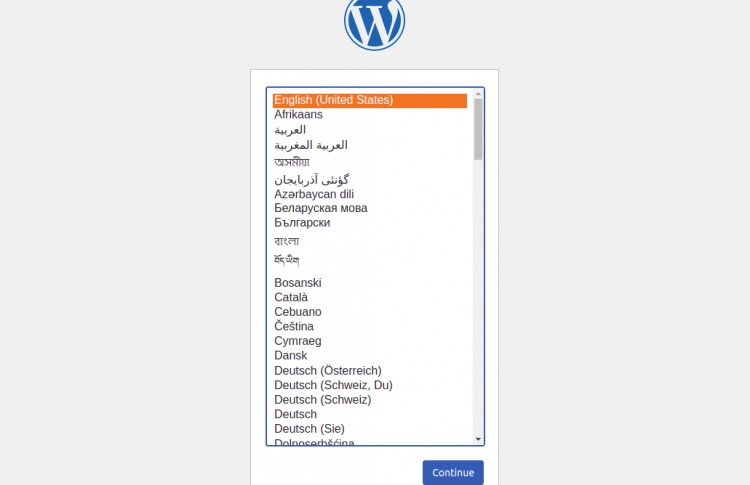
Pilih bahasa Anda dan klik Lanjutkan . Anda akan melihat halaman konfigurasi situs WordPress:
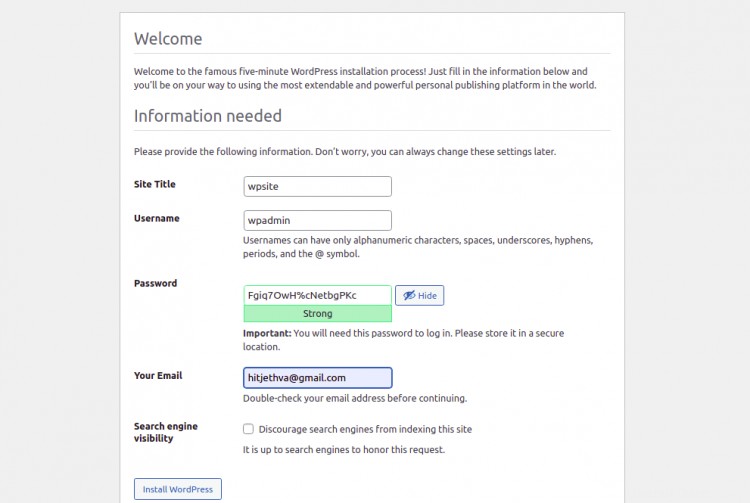
Berikan informasi situs Anda dan klik Instal WordPress tombol. Setelah instalasi selesai, Anda akan melihat halaman berikut:

Klik Masuk tombol. Anda akan diarahkan ke halaman login WordPress:

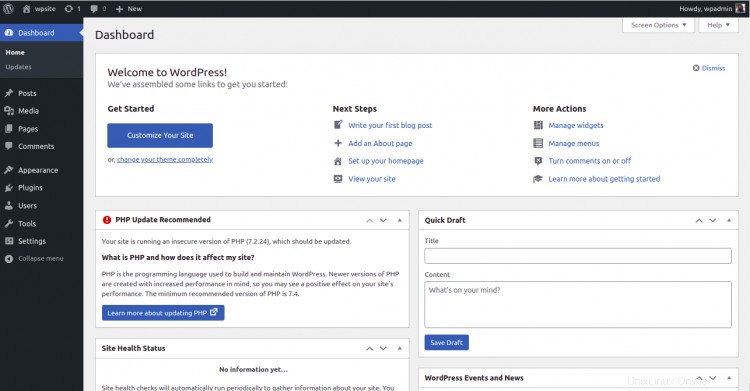
Berikan nama pengguna, kata sandi admin Anda, dan klik Masuk tombol. Anda akan melihat dasbor WordPress di halaman berikut:
Kesimpulan
Selamat! Anda telah berhasil menginstal WordPress dengan Apache dan Let's Encrypt SSL di AlmaLinux 8. Sekarang Anda dapat membuat situs web Anda sendiri dengan mudah menggunakan WordPress. Jangan ragu untuk bertanya kepada saya jika Anda memiliki pertanyaan.