Let's Encrypt adalah otoritas sertifikat terkenal yang menyediakan sertifikat SSL gratis untuk situs web, diluncurkan pada April 2016.
Dengan bantuan klien Certbot, pembuatan sertifikat, validasi, penandatanganan, implementasi, dan pembaruan sertifikat sepenuhnya otomatis.
Prasyarat
Ikuti tautan untuk menginstal LAMP stack atau hanya server web Apache di sistem Anda.
BACA :Cara Memasang LAMP Stack di CentOS 8 / RHEL 8
BACA :Cara Memasang LAMP Stack di CentOS 7 / RHEL 7
Instal Klien Certbot
Untuk membuat dan menginstal sertifikat untuk domain apa pun, Anda harus memiliki akses terminal, dan klien Certbot ACME diinstal pada sistem. Klien Certbot mengotomatiskan penerbitan dan pemasangan sertifikat tanpa waktu henti.
Klien Certbot tersedia di repositori EPEL untuk CentOS 7 / RHEL 7. Namun, kita perlu mengunduh klien Certbot secara manual untuk CentOS 8 / RHEL 8 dari situs resminya.
### CentOS 8 / RHEL 8 ###

yum install -y httpd mod_ssl

curl -O https://dl.eff.org/certbot-auto

mv certbot-auto /usr/local/bin/certbot-auto

chmod 0755 /usr/local/bin/certbot-auto

### CentOS 7 ###

rpm -ivh https://dl.fedoraproject.org/pub/epel/epel-release-latest-7.noarch.rpm

yum install -y certbot python2-certbot-apache

### RHEL 7 ###

rpm -ivh https://dl.fedoraproject.org/pub/epel/epel-release-latest-7.noarch.rpm

subscription-manager repos --enable rhel-7-server-optional-rpms

yum install -y certbot python2-certbot-apache
Buat Host Virtual
Kami akan membuat host virtual untuk domain:www.itzgeek.net.
Host virtual ini menangani versi HTTP domain Anda.vi /etc/httpd/conf.d/www.itzgeek.net.conf
Gunakan informasi di bawah ini.
<VirtualHost *:80>
  ServerName itzgeek.net
  ServerAlias www.itzgeek.net
  DocumentRoot /var/www/www.itzgeek.net

  <Directory /var/www/www.itzgeek.net>
      Options -Indexes +FollowSymLinks
      AllowOverride All
  </Directory>

  ErrorLog /var/log/httpd/www.itzgeek.net-error.log
  CustomLog /var/log/httpd/www.itzgeek.net-access.log combined
</VirtualHost>
Buat root dokumen untuk menempatkan file HTML Anda.
mkdir -p /var/www/www.itzgeek.net
Tempatkan file HTML di dalam root dokumen domain Anda.
echo "This is a test site @ www.itzgeek.net" > /var/www/www.itzgeek.net/index.html
Ubah izin direktori.
chown -R apache:apache /var/www/www.itzgeek.net
Mulai ulang layanan Apache.
systemctl restart httpd
Buat / Perbarui Data DNS
Buka pencatat domain Anda dan buat data A/CNAME untuk domain Anda. Contoh:www.itzgeek.net.

Tunggu beberapa saat hingga rekaman menyebar.
Periksa propagasi DNS menggunakan Nslookup yum install -y bind-utils utility.

Instal Let's Encrypt SSL Certificate
Gunakan perintah certbot untuk membuat dan menginstal sertifikat Let's Encrypt.
### RHEL 8 ###

/usr/local/bin/certbot-auto --apache

### CentOS 7 / RHEL 7 ###

certbot --apache
Ikuti perintah interaktif dan instal sertifikat.
Saving debug log to /var/log/letsencrypt/letsencrypt.log
Plugins selected: Authenticator apache, Installer apache
Enter email address (used for urgent renewal and security notices) (Enter 'c' to
cancel): [email protected]  << Enter Email address to receive notifications

- - - - - - - - - - - - - - - - - - - - - - - - - - - - - - - - - - - - - - - -
Please read the Terms of Service at
https://letsencrypt.org/documents/LE-SA-v1.2-November-15-2017.pdf. You must
agree in order to register with the ACME server at
https://acme-v02.api.letsencrypt.org/directory
- - - - - - - - - - - - - - - - - - - - - - - - - - - - - - - - - - - - - - - -
(A)gree/(C)ancel: A  << Agree to Terms of Sevice

- - - - - - - - - - - - - - - - - - - - - - - - - - - - - - - - - - - - - - - -
Would you be willing to share your email address with the Electronic Frontier
Foundation, a founding partner of the Let's Encrypt project and the non-profit
organization that develops Certbot? We'd like to send you email about our work
encrypting the web, EFF news, campaigns, and ways to support digital freedom.
- - - - - - - - - - - - - - - - - - - - - - - - - - - - - - - - - - - - - - - -
(Y)es/(N)o: Y  << Subscribe to Newsletter

Which names would you like to activate HTTPS for?
- - - - - - - - - - - - - - - - - - - - - - - - - - - - - - - - - - - - - - - -
1: itzgeek.net
2: www.itzgeek.net
- - - - - - - - - - - - - - - - - - - - - - - - - - - - - - - - - - - - - - - -
Select the appropriate numbers separated by commas and/or spaces, or leave input
blank to select all options shown (Enter 'c' to cancel): 2  << Choose the domain to install Let's Encrypt SSL certificate
Obtaining a new certificate
Performing the following challenges:
http-01 challenge for www.itzgeek.net
Waiting for verification...
Cleaning up challenges
Created an SSL vhost at /etc/httpd/conf.d/www.itzgeek.net-le-ssl.conf
Deploying Certificate to VirtualHost /etc/httpd/conf.d/www.itzgeek.net-le-ssl.conf

Please choose whether or not to redirect HTTP traffic to HTTPS, removing HTTP access.
- - - - - - - - - - - - - - - - - - - - - - - - - - - - - - - - - - - - - - - -
1: No redirect - Make no further changes to the webserver configuration.
2: Redirect - Make all requests redirect to secure HTTPS access. Choose this for
new sites, or if you're confident your site works on HTTPS. You can undo this
change by editing your web server's configuration.
- - - - - - - - - - - - - - - - - - - - - - - - - - - - - - - - - - - - - - - -
Select the appropriate number [1-2] then [enter] (press 'c' to cancel): 2  << Redirect from HTTP to HTTPS
Redirecting vhost in /etc/httpd/conf.d/www.itzgeek.net.conf to ssl vhost in /etc/httpd/conf.d/www.itzgeek.net-le-ssl.conf

- - - - - - - - - - - - - - - - - - - - - - - - - - - - - - - - - - - - - - - -
Congratulations! You have successfully enabled https://www.itzgeek.net

You should test your configuration at:
https://www.ssllabs.com/ssltest/analyze.html?d=www.itzgeek.net
- - - - - - - - - - - - - - - - - - - - - - - - - - - - - - - - - - - - - - - -

IMPORTANT NOTES:
 - Congratulations! Your certificate and chain have been saved at:
   /etc/letsencrypt/live/www.itzgeek.net/fullchain.pem
   Your key file has been saved at:
   /etc/letsencrypt/live/www.itzgeek.net/privkey.pem
   Your cert will expire on 2019-11-10. To obtain a new or tweaked
   version of this certificate in the future, simply run certbot-auto
   again with the "certonly" option. To non-interactively renew *all*
   of your certificates, run "certbot-auto renew"
 - Your account credentials have been saved in your Certbot
   configuration directory at /etc/letsencrypt. You should make a
   secure backup of this folder now. This configuration directory will
   also contain certificates and private keys obtained by Certbot so
   making regular backups of this folder is ideal.
 - If you like Certbot, please consider supporting our work by:

   Donating to ISRG / Let's Encrypt:   https://letsencrypt.org/donate
   Donating to EFF:                    https://eff.org/donate-le
Firewall
Konfigurasikan firewall untuk mengizinkan permintaan HTTPS.
firewall-cmd --permanent --add-port=443/tcp

firewall-cmd --reload
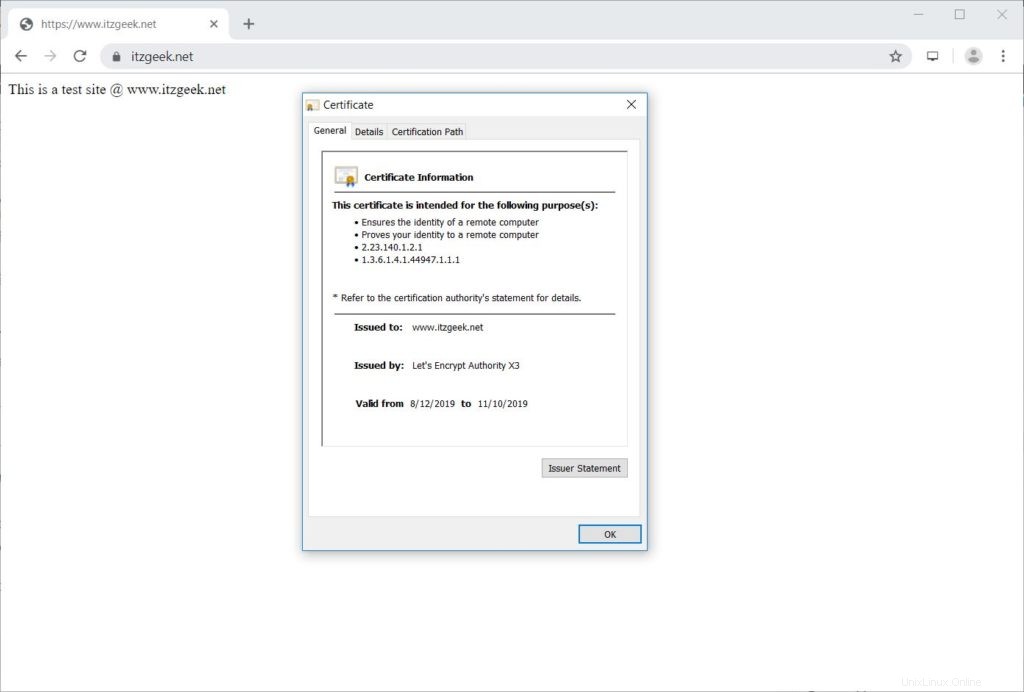
Verifikasi Let's Encrypt Certificate
Verifikasi sertifikat Let's Encrypt dengan mengunjungi versi HTTPS situs web Anda.
http://situs-http-AndaATAU
https://your-https-web-siteAnda sekarang seharusnya mendapatkan versi HTTPS dari situs Anda.
Uji Mari Mengenkripsi Sertifikat SSL
Uji sertifikat SSL Anda untuk masalah dan peringkat keamanannya dengan membuka URL di bawah ini.
https://www.ssllabs.com/ssltest/analyze.html?d=www.itzgeek.net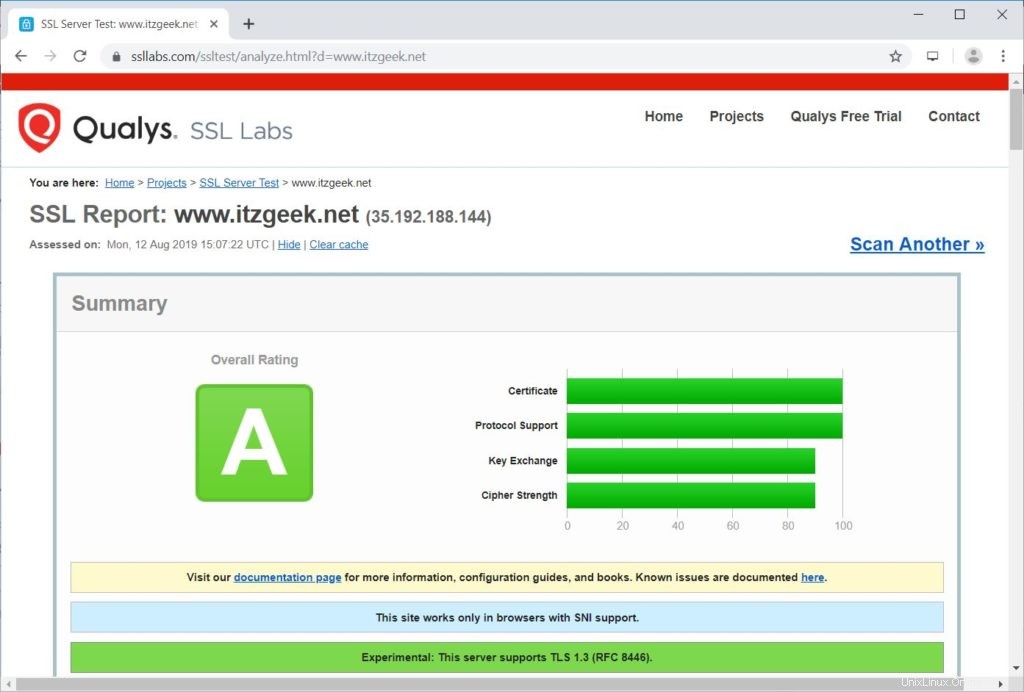
Perbarui Sertifikat Let's Encrypt
Sertifikat Let's Encrypt berlaku selama 90 hari sejak tanggal penerbitan, dan perlu diperpanjang sebelum kedaluwarsa.
Di CentOS 7 / RHEL 7, secara default, klien certbot membuat entri penjadwal cron untuk memperbarui sertifikat Let's Encrypt secara otomatis.
Sayangnya, untuk CentOS 8 / RHEL 8, kita perlu mengkonfigurasi cron scheduler secara manual.
echo "0 0,12 * * * root python -c 'import random; import time; time.sleep(random.random() * 3600)' && /usr/local/bin/certbot-auto renew" | sudo tee -a /etc/crontab > /dev/null
Anda juga dapat mensimulasikan proses pembaruan sertifikat dengan perintah di bawah ini untuk memastikan pembaruan berjalan lancar.
### CentOS 8 / RHEL 8 ###

/usr/local/bin/certbot-auto renew --dry-run

### CentOS 7 / RHEL 7 ###

certbot renew --dry-run
Untuk memperbarui sertifikat Let's Encrypt, jalankan perintah di atas tanpa
--dry-run pilihan. Keluaran:
Saving debug log to /var/log/letsencrypt/letsencrypt.log

- - - - - - - - - - - - - - - - - - - - - - - - - - - - - - - - - - - - - - - -
Processing /etc/letsencrypt/renewal/www.itzgeek.net.conf
- - - - - - - - - - - - - - - - - - - - - - - - - - - - - - - - - - - - - - - -
Cert not due for renewal, but simulating renewal for dry run
Plugins selected: Authenticator apache, Installer apache
Renewing an existing certificate
Performing the following challenges:
http-01 challenge for www.itzgeek.net
Waiting for verification...
Cleaning up challenges

- - - - - - - - - - - - - - - - - - - - - - - - - - - - - - - - - - - - - - - -
new certificate deployed with reload of apache server; fullchain is
/etc/letsencrypt/live/www.itzgeek.net/fullchain.pem
- - - - - - - - - - - - - - - - - - - - - - - - - - - - - - - - - - - - - - - -

- - - - - - - - - - - - - - - - - - - - - - - - - - - - - - - - - - - - - - - -
** DRY RUN: simulating 'certbot renew' close to cert expiry
**          (The test certificates below have not been saved.)

Congratulations, all renewals succeeded. The following certs have been renewed:
  /etc/letsencrypt/live/www.itzgeek.net/fullchain.pem (success)
** DRY RUN: simulating 'certbot renew' close to cert expiry
**          (The test certificates above have not been saved.)
- - - - - - - - - - - - - - - - - - - - - - - - - - - - - - - - - - - - - - - -

IMPORTANT NOTES:
 - Your account credentials have been saved in your Certbot
   configuration directory at /etc/letsencrypt. You should make a
   secure backup of this folder now. This configuration directory will
   also contain certificates and private keys obtained by Certbot so
   making regular backups of this folder is ideal.
Jika keluaran tidak melaporkan masalah, maka pembaruan sertifikat akan berjalan seperti yang diharapkan.
Kesimpulan
Itu saja. Saya harap Anda mempelajari cara menyiapkan Let's Encrypt SSL Certificate dengan Apache di CentOS 8 / RHEL 8 &CentOS 7 / RHEL 7. Bagikan tanggapan Anda di bagian komentar.