Server Sempurna - CentOS 6.1 x86_64 Dengan nginx [ISPConfig 3]
Tutorial ini menunjukkan cara menyiapkan server CentOS 6.1 x86_64 untuk instalasi ISPConfig 3, dan cara menginstal ISPConfig 3. ISPConfig 3 adalah panel kontrol webhosting yang memungkinkan Anda untuk mengkonfigurasi layanan berikut melalui browser web:server web nginx, Postfix server email, MySQL, server nama BIND, PureFTPd, SpamAssassin, ClamAV, Mailman, dan banyak lagi. Sejak versi 3.0.4, ISPConfig hadir dengan dukungan penuh untuk server web nginx selain Apache; tutorial ini mencakup penyiapan server yang menggunakan nginx, bukan Apache.
Harap perhatikan bahwa pengaturan ini tidak berfungsi untuk ISPConfig 2 ! Ini hanya berlaku untuk ISPConfig 3!
Saya tidak memberikan jaminan apa pun bahwa ini akan berhasil untuk Anda!
Panduan ISPConfig 3
Untuk mempelajari cara menggunakan ISPConfig 3, saya sangat menyarankan untuk mengunduh Manual ISPConfig 3.
Pada sekitar 300 halaman, ini mencakup konsep di balik ISPConfig (admin, reseller, klien), menjelaskan cara menginstal dan memperbarui ISPConfig 3, menyertakan referensi untuk semua formulir dan bidang formulir di ISPConfig bersama dengan contoh input yang valid, dan memberikan tutorial untuk tugas paling umum di ISPConfig 3. Ini juga menjelaskan cara membuat server Anda lebih aman dan dilengkapi dengan bagian pemecahan masalah di bagian akhir.
Aplikasi Monitor ISPConfig Untuk Android
Dengan Aplikasi Monitor ISPConfig, Anda dapat memeriksa status server Anda dan mengetahui apakah semua layanan berjalan seperti yang diharapkan. Anda dapat memeriksa port TCP dan UDP dan melakukan ping ke server Anda. Selain itu, Anda dapat menggunakan aplikasi ini untuk meminta detail dari server yang telah menginstal ISPConfig (harap diperhatikan bahwa versi ISPConfig 3 yang diinstal minimum dengan dukungan untuk Aplikasi ISPConfig Monitor adalah 3.0.3.3! ); detail ini mencakup semua yang Anda ketahui dari modul Monitor di ISPConfig Control Panel (misalnya layanan, log email dan sistem, antrian email, info CPU dan memori, penggunaan disk, kuota, detail OS, log RKHunter, dll.), dan tentu saja , karena ISPConfig berkemampuan multiserver, Anda dapat memeriksa semua server yang dikendalikan dari server master ISPConfig Anda.
Untuk mengunduh dan petunjuk penggunaan, silakan kunjungi http://www.ispconfig.org/ispconfig-3/ispconfig-monitor-app-for-android/.
1 Persyaratan
Untuk menginstal sistem seperti itu, Anda memerlukan yang berikut:
- Unduh dua DVD CentOS 6.1 dari mirror di sebelah Anda (daftar mirror dapat ditemukan di sini:http://isoredirect.centos.org/centos/6/isos/x86_64/).
- koneksi internet yang cepat.
2 Catatan Awal
Dalam tutorial ini saya menggunakan hostname server1.example.com dengan alamat IP 192.168.0.100 dan gateway 192.168.0.1. Setelan ini mungkin berbeda untuk Anda, jadi Anda harus menggantinya jika perlu.
3 Instal Sistem Dasar
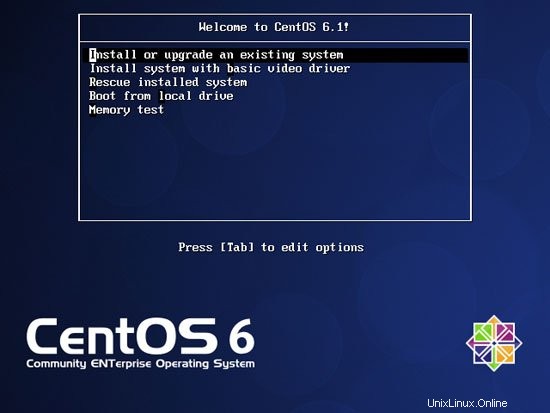
Boot dari CentOS 6.1 DVD (DVD 1) pertama Anda. Pilih Instal atau perbarui sistem yang ada:
Diperlukan waktu lama untuk menguji media penginstalan, jadi kami melewatkan tes ini di sini:
Layar pembuka penginstal CentOS muncul. Klik Berikutnya:

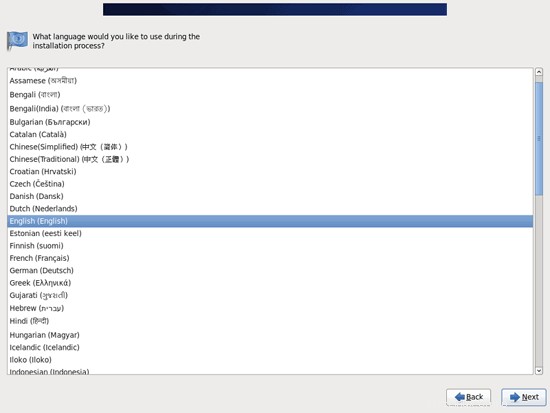
Pilih bahasa Anda selanjutnya:
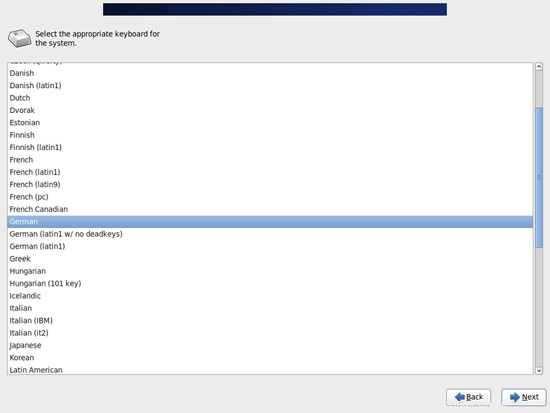
Pilih tata letak keyboard Anda:
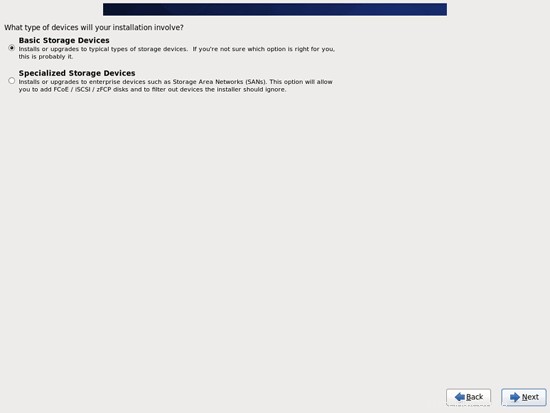
Saya berasumsi bahwa Anda menggunakan hard drive yang terpasang secara lokal, jadi Anda harus memilih Perangkat Penyimpanan Dasar di sini:
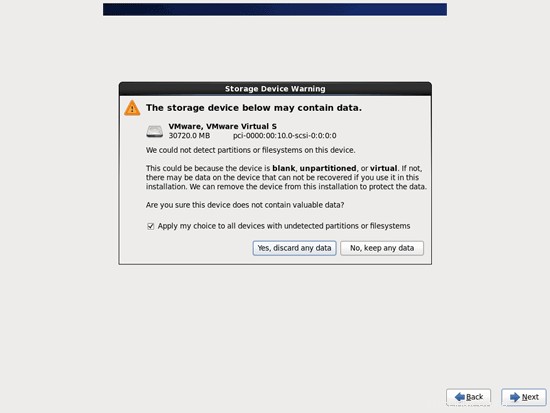
Anda mungkin melihat peringatan berikut - Drive pemrosesan kesalahan. Jika Anda melihat ini, klik tombol Re-inisialisasi semua untuk melanjutkan:
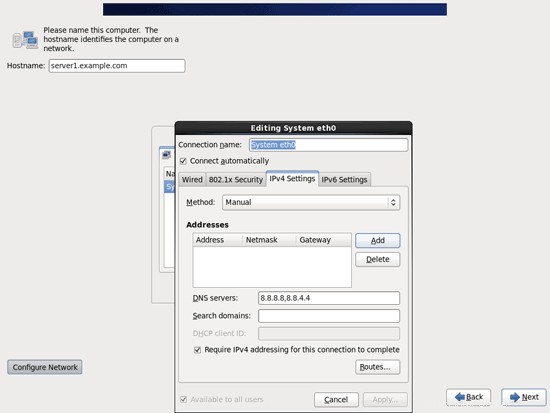
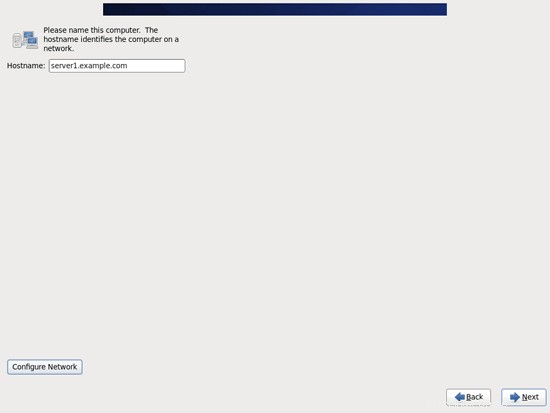
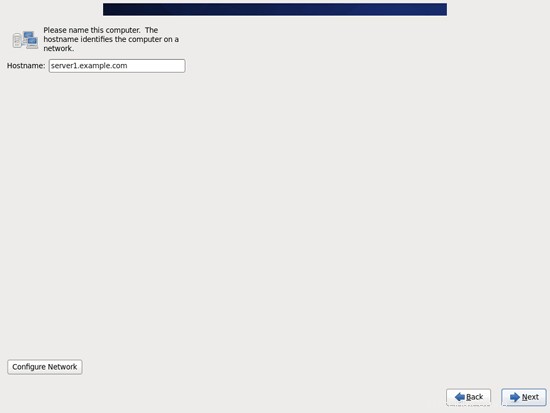
Isi hostname server (misal server1.example.com), lalu klik tombol Configure Network:
Buka tab Wired, pilih antarmuka jaringan (mungkin eth0) dan klik Edit...:
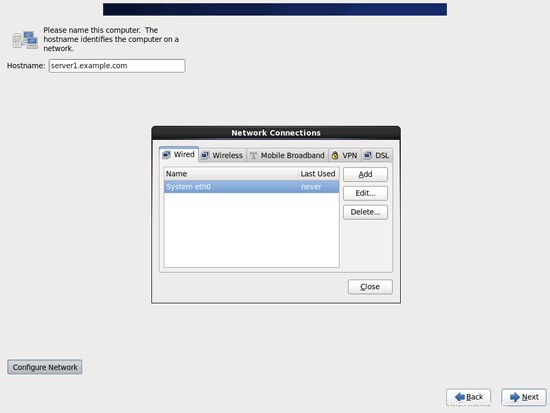
Tandai kotak centang Hubungkan secara otomatis dan buka tab Pengaturan IPv4 dan pilih Manual di menu tarik-turun Metode. Isikan satu, dua, atau tiga nameserver (dipisahkan dengan koma) pada kolom DNS server (mis. 8.8.8.8,8.8.4.4), lalu klik tombol Add di sebelah area Addresses:
Sekarang berikan kartu jaringan Anda alamat IP statis dan netmask (dalam tutorial ini saya menggunakan alamat IP 192.168.0.100 dan netmask 255.255.255.0 untuk tujuan demonstrasi; jika Anda tidak yakin tentang nilai yang benar, http://www. subnetmask.info mungkin membantu Anda). Isi juga gateway Anda (mis. 192.168.0.1) dan klik tombol Apply...:
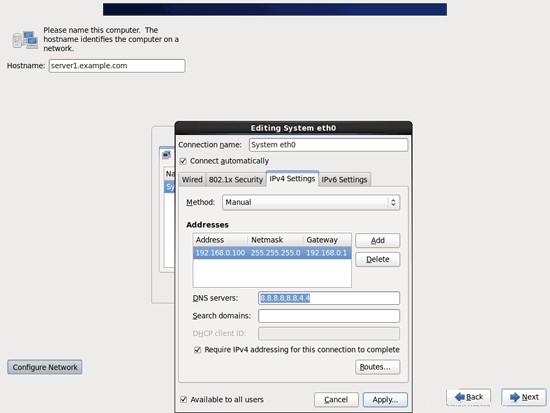
Konfigurasi jaringan sekarang selesai. Klik tombol Berikutnya:
Server Sempurna - CentOS 6.1 x86_64 Dengan nginx [ISPConfig 3] - Halaman 2
4 Sesuaikan /etc/hosts
Selanjutnya kita edit /etc/hosts. Jadikan seperti ini:
vi /etc/hosts
127.0.0.1 localhost localhost.localdomain localhost4 localhost4.localdomain4 192.168.0.100 server1.example.com server1 ::1 localhost localhost.localdomain localhost6 localhost6.localdomain6 |
5 Konfigurasi Firewall
(Anda dapat melewati bab ini jika Anda telah menonaktifkan firewall di akhir penginstalan sistem dasar.)
Saya ingin menginstal ISPConfig di akhir tutorial ini yang dilengkapi dengan firewallnya sendiri. Itu sebabnya saya menonaktifkan firewall CentOS default sekarang. Tentu saja, Anda bebas untuk membiarkannya dan mengonfigurasinya sesuai kebutuhan Anda (tetapi Anda tidak boleh menggunakan firewall lain di kemudian hari karena kemungkinan besar akan mengganggu firewall CentOS).
Jalankan
system-config-firewall
dan menonaktifkan firewall.
Untuk memeriksa apakah firewall benar-benar telah dinonaktifkan, Anda dapat menjalankan
iptables -L
setelah itu. Outputnya akan terlihat seperti ini:
[example@unixlinux.online ~]# iptables -L
Rantai INPUT (policy ACCEPT)
target prot opt source tujuan
Rantai FORWARD (
Keluaran rantai (policy ACCEPT)
target prot opt sumber tujuan
[example@unixlinux]#
6 Nonaktifkan SELinux
SELinux adalah ekstensi keamanan CentOS yang seharusnya memberikan keamanan yang diperluas. Menurut pendapat saya Anda tidak memerlukannya untuk mengkonfigurasi sistem yang aman, dan biasanya menyebabkan lebih banyak masalah daripada keuntungan (pikirkan setelah Anda melakukan pemecahan masalah selama seminggu karena beberapa layanan tidak berfungsi seperti yang diharapkan, dan kemudian Anda mengetahui bahwa semuanya baik-baik saja, hanya SELinux yang menyebabkan masalah). Oleh karena itu saya menonaktifkannya (ini adalah suatu keharusan jika Anda ingin menginstal ISPConfig nanti).
Edit /etc/selinux/config dan atur SELINUX=disabled:
vi /etc/selinux/config
# This file controls the state of SELinux on the system. # SELINUX= can take one of these three values: # enforcing - SELinux security policy is enforced. # permissive - SELinux prints warnings instead of enforcing. # disabled - No SELinux policy is loaded. SELINUX=disabled # SELINUXTYPE= can take one of these two values: # targeted - Targeted processes are protected, # mls - Multi Level Security protection. SELINUXTYPE=targeted |
Setelah itu kita harus me-reboot sistem:
reboot
7 Aktifkan Repositori Tambahan Dan Instal Beberapa Perangkat Lunak
Pertama-tama kita mengimpor kunci GPG untuk paket perangkat lunak:
rpm --import /etc/pki/rpm-gpg/RPM-GPG-KEY*
Kemudian kami mengaktifkan repositori RPMforge dan EPEL pada sistem CentOS kami karena banyak paket yang akan kami instal selama tutorial ini tidak tersedia di repositori resmi CentOS 6.1:
rpm --import http://dag.wieers.com/rpm/packages/RPM-GPG-KEY.dag.txt
cd /tmp
wget http://pkgs.repoforge.org/rpmforge-release/rpmforge-release-0.5.2-2.el6.rf.x86_64.rpm
rpm -ivh rpmforge-release- 0.5.2-2.el6.rf.x86_64.rpm
(Jika tautan di atas tidak berfungsi lagi, Anda dapat menemukan versi rpmforge-release saat ini di sini:http://packages.sw.be/rpmforge-release/)
rpm --import https://fedoraproject.org/static/0608B895.txt
wget http://dl.fedoraproject.org/pub/epel/6/x86_64/epel-release-6-5.noarch. rpm
rpm -ivh epel-release-6-5.noarch.rpm
Kita juga perlu mengaktifkan repositori Remi RPM yang berisi paket php-fpm yang akan kita instal nanti:
rpm --import http://rpms.famillecollet.com/RPM-GPG-KEY-remi
rpm -ivh http://rpms.famillecollet.com/enterprise/remi-release-6.rpm
yum install yum-priorities
Edit /etc/yum.repos.d/epel.repo...
vi /etc/yum.repos.d/epel.repo
... dan tambahkan baris priority=10 ke bagian [epel]:
[epel] name=Extra Packages for Enterprise Linux 6 - $basearch #baseurl=http://download.fedoraproject.org/pub/epel/6/$basearch mirrorlist=https://mirrors.fedoraproject.org/metalink?repo=epel-6&arch=$basearch failovermethod=priority enabled=1 priority=10 gpgcheck=1 gpgkey=file:///etc/pki/rpm-gpg/RPM-GPG-KEY-EPEL-6 [...] |
Kemudian lakukan hal yang sama untuk bagian [remi] di /etc/yum.repos.d/remi.repo, ditambah ubah menjadi 1:
vi /etc/yum.repos.d/remi.repo
[remi] name=Les RPM de remi pour Enterprise Linux $releasever - $basearch #baseurl=http://rpms.famillecollet.com/enterprise/$releasever/remi/$basearch/ mirrorlist=http://rpms.famillecollet.com/enterprise/$releasever/remi/mirror enabled=1 priority=10 gpgcheck=1 gpgkey=file:///etc/pki/rpm-gpg/RPM-GPG-KEY-remi failovermethod=priority [remi-test] name=Les RPM de remi en test pour Enterprise Linux $releasever - $basearch #baseurl=http://rpms.famillecollet.com/enterprise/$releasever/test/$basearch/ mirrorlist=http://rpms.famillecollet.com/enterprise/$releasever/test/mirror enabled=0 gpgcheck=1 gpgkey=file:///etc/pki/rpm-gpg/RPM-GPG-KEY-remi |
Kemudian kami memperbarui paket kami yang ada di sistem:
yum update
Sekarang kita install beberapa paket software yang dibutuhkan nantinya:
yum groupinstall 'Development Tools'
8 Kuota
(Jika Anda telah memilih skema partisi yang berbeda dari saya, Anda harus menyesuaikan bab ini sehingga kuota berlaku untuk partisi yang Anda butuhkan.)
Untuk memasang kuota, kita jalankan perintah ini:
yum install quota
Edit /etc/fstab dan tambahkan ,usrjquota=aquota.user,grpjquota=aquota.group,jqfmt=vfsv0 ke partisi / (/dev/mapper/vg_server1-lv_root):
vi /etc/fstab
# # /etc/fstab # Created by anaconda on Fri Dec 16 00:22:26 2011 # # Accessible filesystems, by reference, are maintained under '/dev/disk' # See man pages fstab(5), findfs(8), mount(8) and/or blkid(8) for more info # /dev/mapper/vg_server1-lv_root / ext4 defaults,usrjquota=aquota.user,grpjquota=aquota.group,jqfmt=vfsv0 1 1 UUID=d995c881-fbc7-409f-bcad-86d255331a3f /boot ext4 defaults 1 2 /dev/mapper/vg_server1-lv_swap swap swap defaults 0 0 tmpfs /dev/shm tmpfs defaults 0 0 devpts /dev/pts devpts gid=5,mode=620 0 0 sysfs /sys sysfs defaults 0 0 proc /proc proc defaults 0 0 |
Kemudian jalankan
mount -o remount /
quotacheck -avugm
quotaon -avug
untuk mengaktifkan kuota.
9 Sinkronisasi Jam Sistem
Sebaiknya sinkronkan jam sistem dengan NTP (n jaringan t waktu p rotocol) server melalui Internet. Cukup jalankan
yum install ntp
dan waktu sistem Anda akan selalu sinkron.
10 Instal MySQL
Instal MySQL sebagai berikut:
yum install mysql mysql-server
Kemudian buat tautan startup sistem untuk MySQL dan mulai:
chkconfig --levels 235 mysqld pada
/etc/init.d/mysqld start
Setel kata sandi untuk akun root MySQL:
mysql_secure_installation
[example@unixlinux.online tmp]# mysql_secure_installation
CATATAN:MENJALANKAN SEMUA BAGIAN SKRIP INI DIREKOMENDASIKAN UNTUK SEMUA MySQL
SERVER IN PRODUKSI MENGGUNAKAN! HARAP BACA SETIAP LANGKAH DENGAN SEKSAMA!
Untuk masuk ke MySQL guna mengamankannya, kami memerlukan kata sandi
saat ini untuk pengguna root. Jika Anda baru menginstal MySQL, dan
belum menyetel sandi root, sandi akan kosong,
jadi Anda cukup tekan enter di sini.
Enter sandi saat ini untuk root (masukkan untuk none):
Oke, sandi berhasil digunakan, pindah ...
Menyetel sandi root memastikan bahwa tidak ada yang dapat masuk ke akar MySQL
pengguna tanpa otorisasi yang sesuai.
Tetapkan sandi root? [Y/n] <-- ENTER
Sandi baru: <-- yourrootsqlpassword
Masukkan kembali sandi baru: <-- yourrootsqlpassword
Sandi berhasil diperbarui!
Memuat ulang tabel hak istimewa. .
... Berhasil!
Secara default, penginstalan MySQL memiliki pengguna anonim yang memungkinkan siapa saja
masuk ke MySQL tanpa harus memiliki akun pengguna dibuat untuk
mereka. Ini dimaksudkan hanya untuk pengujian, dan untuk membuat pemasangan
menjadi sedikit lebih lancar. Anda harus menghapusnya sebelum berpindah ke
lingkungan produksi.
Hapus pengguna anonim? [Y/n] <-- ENTER
... Berhasil!
Biasanya, root hanya diizinkan untuk terhubung dari 'localhost'. Ini
memastikan bahwa seseorang tidak dapat menebak kata sandi root dari jaringan.
Larang login root dari jarak jauh? [Y/n] <-- ENTER
... Berhasil!
Secara default, MySQL dilengkapi dengan database bernama 'test' yang dapat diakses oleh siapa saja
. Ini juga ditujukan hanya untuk pengujian, dan harus dihapus
sebelum dipindahkan ke lingkungan produksi.
Hapus database pengujian dan akses ke sana? [Y/n] <-- MASUKKAN
- Menghapus basis data pengujian...
... Berhasil!
- Menghapus hak istimewa pada basis data pengujian...
... Berhasil !
Memuat ulang tabel hak istimewa akan memastikan bahwa semua perubahan yang dibuat sejauh ini
akan segera berlaku.
Muat ulang tabel hak istimewa sekarang? [Y/n] <-- ENTER
... Berhasil!
Membersihkan...
Selesai! Jika Anda telah menyelesaikan semua langkah di atas, penginstalan MySQL
Anda seharusnya kini aman.
Terima kasih telah menggunakan MySQL!
[contoh @unixlinux.online tmp]#
Server Sempurna - CentOS 6.1 x86_64 Dengan nginx [ISPConfig 3] - Halaman 4
11 Instal Courier-IMAP, Courier-Authlib, Dan Maildrop
Sayangnya tidak ada paket rpm untuk Courier-IMAP, Courier-Authlib, dan Maildrop, oleh karena itu kami harus membuatnya sendiri.
Hapus dulu Dovecot (CentOS 6.1 hadir dengan Dovecot 2.x; sayangnya, ISPConfig 3 mendukung Dovecot 1.2.x, tetapi tidak 2.x):
yum remove dovecot dovecot-mysql
Kemudian install prasyarat yang kita perlukan untuk membangun paket Courier rpm:
yum install rpm-build gcc mysql-devel openssl-devel cyrus-sasl-devel pkgconfig zlib-devel pcre-devel openldap-devel postgresql-devel expect libtool-ltdl-devel openldap-servers libtool gdbm-devel pam-devel gamin-devel libidn-devel
Paket RPM tidak boleh dibangun sebagai root; kurir-imap bahkan akan menolak untuk mengkompilasi jika mendeteksi bahwa kompilasi dijalankan sebagai pengguna root. Oleh karena itu kami membuat akun pengguna normal sekarang (falko dalam contoh ini) dan memberinya kata sandi:
useradd -m -s /bin/bash falko
passwd falko
Kita akan membutuhkan perintah sudo nanti agar falko pengguna dapat mengkompilasi dan menginstal paket rpm. Tapi pertama-tama, kita harus mengizinkan falko untuk menjalankan semua perintah menggunakan sudo:
Jalankan
visudo
Di file yang terbuka ada baris root ALL=(ALL) ALL. Tambahkan baris serupa untuk falko tepat di bawah baris itu:
[...] ## Allow root to run any commands anywhere root ALL=(ALL) ALL falko ALL=(ALL) ALL [...] |
Sekarang kita siap untuk membangun paket rpm kita. Pertama menjadi pengguna falko:
su falko
Selanjutnya kita buat lingkungan build kita:
mkdir $HOME/rpm
mkdir $HOME/rpm/SOURCES
mkdir $HOME/rpm/SPECS
mkdir $HOME/rpm/BUILD
mkdir $HOME/rpm/BUILDROOT
mkdir $HOME/rpm/SRPMS
mkdir $HOME/rpm/RPMS
mkdir $HOME/rpm/RPMS/i386
mkdir $HOME/rpm/RPMS/x86_64
echo "%_topdir $HOME/rpm" >> $HOME/.rpmmacros
Sekarang kita membuat direktori unduhan dan mengunduh file sumber dari http://www.courier-mta.org/download.php:
mkdir $HOME/downloads
cd $HOME/downloads
wget https://sourceforge.net/projects/courier/files/authlib/0.63.0/courier-authlib-0.63.0.tar.bz2/download
wget https://sourceforge.net/projects/courier /files/imap/4.9.3/courier-imap-4.9.3.tar.bz2/download
wget https://sourceforge.net/projects/courier/files/maildrop/2.5.5/maildrop-2.5 .5.tar.bz2/download
(Harap dicatat bahwa saya menggunakan Courier-IMAP 4.9.3 di sini daripada 4.10.0 yang lebih baru karena 4.10.0 bergantung pada systemctl yang ada untuk Fedora, tetapi tidak untuk CentOS.)
Sekarang (masih dalam $HOME/downloads) kita dapat membangun authlib-kurir:
sudo rpmbuild -ta courier-authlib-0.63.0.tar.bz2
Setelah proses build, paket rpm dapat ditemukan di /root/rpmbuild/RPMS/x86_64 (/root/rpmbuild/RPMS/i686 jika Anda menggunakan sistem i686). Perintah
sudo ls -l /root/rpmbuild/RPMS/x86_64
menunjukkan kepada Anda paket rpm yang tersedia:
[example@unixlinux.online downloads]$ sudo ls -l /root/rpmbuild/RPMS/x86_64
total 528
-rw-r--r-- 1 root root 124008 Des 16 01:10 kurir -authlib-0.63.0-1.el6.x86_64.rpm
-rw-r--r-- 1 root root 270860 Des 16 01:10 courier-authlib-debuginfo-0.63.0-1.el6. x86_64.rpm
-rw-r--r-- 1 root root 35072 Des 16 01:10 courier-authlib-devel-0.63.0-1.el6.x86_64.rpm
-rw-r --r-- 1 root root 17368 16 Des 01:10 courier-authlib-ldap-0.63.0-1.el6.x86_64.rpm
-rw-r--r-- 1 root root 13928 16 Des 01:10 courier-authlib-mysql-0.63.0-1.el6.x86_64.rpm
-rw-r--r-- 1 root root 13076 16 Des 01:10 courier-authlib-pgsql-0.63. 0-1.el6.x86_64.rpm
-rw-r--r-- 1 root root 8312 Des 16 01:10 courier-authlib-pipe-0.63.0-1.el6.x86_64.rpm
-rw-r--r-- 1 root root 34064 16 Des 01:10 courier-authlib-userdb-0.63.0-1.el6.x86_64.rpm
[example@unixlinux.online downloads]$
Pilih yang ingin Anda instal, dan instal seperti ini:
sudo rpm -ivh /root/rpmbuild/RPMS/x86_64/courier-authlib-0.63.0-1.el6.x86_64.rpm /root/rpmbuild/RPMS/x86_64/courier-authlib-mysql-0.63.0-1.el6.x86_64.rpm /root/rpmbuild/RPMS/x86_64/courier-authlib-devel-0.63.0-1.el6.x86_64.rpm
Sekarang kita kembali ke direktori unduhan kita:
cd $HOME/downloads
Jalankan perintah berikut untuk membuat direktori yang diperlukan/mengubah izin direktori (karena jika tidak, proses pembuatan untuk Courier-Imap akan gagal):
sudo mkdir -p /var/cache/ccache/tmp
sudo chmod o+rwx /var/cache/ccache/
sudo chmod 777 /var/cache/ccache/tmp
Sekarang jalankan rpmbuild lagi, kali ini tanpa sudo, jika tidak, kompilasi akan gagal karena dijalankan sebagai root:
rpmbuild -ta courier-imap-4.9.3.tar.bz2
Setelah proses pembuatan, paket rpm dapat ditemukan di $HOME/rpm/RPMS/x86_64 ($HOME/rpm/RPMS/i686 jika Anda menggunakan sistem i686):
cd $HOME/rpm/RPMS/x86_64
Perintah
ls -l
menunjukkan kepada Anda paket rpm yang tersedia:
[contoh@unixlinux.online x86_64]$ ls -l
total 1116
-rw-rw-r-- 1 falko falko 331908 16 Des 01:33 kurir-imap-4.9.3-1.x86_64 .rpm
-rw-rw-r-- 1 falko falko 800864 16 Des 01:33 kurir-imap-debuginfo-4.9.3-1.x86_64.rpm
[example@unixlinux.online x86_64] $
Anda dapat menginstal kurir-imap seperti ini:
sudo rpm -ivh courier-imap-4.9.3-1.x86_64.rpm
Sekarang kita kembali ke direktori unduhan kita:
cd $HOME/downloads
dan jalankan rpmbuild lagi, kali ini untuk membuat paket maildrop:
sudo rpmbuild -ta maildrop-2.5.5.tar.bz2
Setelah proses build, paket rpm dapat ditemukan di /root/rpmbuild/RPMS/x86_64 (/root/rpmbuild/RPMS/i686 jika Anda menggunakan sistem i686). Perintah
sudo ls -l /root/rpmbuild/RPMS/x86_64
menunjukkan kepada Anda paket rpm yang tersedia:
[example@unixlinux.online downloads]$ sudo ls -l /root/rpmbuild/RPMS/x86_64
total 1712
-rw-r--r-- 1 root root 124008 Des 16 01:10 kurir -authlib-0.63.0-1.el6.x86_64.rpm
-rw-r--r-- 1 root root 270860 Des 16 01:10 courier-authlib-debuginfo-0.63.0-1.el6. x86_64.rpm
-rw-r--r-- 1 root root 35072 Des 16 01:10 courier-authlib-devel-0.63.0-1.el6.x86_64.rpm
-rw-r --r-- 1 root root 17368 16 Des 01:10 courier-authlib-ldap-0.63.0-1.el6.x86_64.rpm
-rw-r--r-- 1 root root 13928 16 Des 01:10 courier-authlib-mysql-0.63.0-1.el6.x86_64.rpm
-rw-r--r-- 1 root root 13076 16 Des 01:10 courier-authlib-pgsql-0.63. 0-1.el6.x86_64.rpm
-rw-r--r-- 1 root root 8312 Des 16 01:10 courier-authlib-pipe-0.63.0-1.el6.x86_64.rpm
-rw-r--r-- 1 root root 34064 16 Des 01:10 courier-authlib-userdb-0.63.0-1.el6.x86_64.rpm
-rw-r--r-- 1 root root 286480 Des 16 01:40 maildrop-2.5.5-1.x86_64.rpm
-rw-r--r-- 1 root root 751376 Des 16 01:40 maildrop-debuginfo-2.5.5- 1.x86_64.r pm
-rw-r--r-- 1 root root 102104 Des 16 01:40 maildrop-devel-2.5.5-1.x86_64.rpm
-rw-r--r-- 1 root root 65940 16 Des 01:40 maildrop-man-2.5.5-1.x86_64.rpm
[example@unixlinux.online downloads]$
Sekarang Anda dapat menginstal maildrop seperti ini:
sudo rpm -ivh /root/rpmbuild/RPMS/x86_64/maildrop-2.5.5-1.x86_64.rpm
Setelah Anda mengkompilasi dan menginstal semua paket yang dibutuhkan, Anda dapat menjadi root kembali dengan mengetik
exit
Sekarang mulai Courier-IMAP/-POP3 sebagai berikut:
/etc/init.d/courier-imap start
12 Instal Postfix
Postfix dapat diinstal sebagai berikut:
yum install postfix
Kemudian matikan Sendmail dan mulai Postfix:
chkconfig --level 235 sendmail mati
chkconfig --level 235 postfix aktif
/etc/init.d/sendmail stop
/etc/init.d/postfix restart
13 Instal Getmail
Getmail dapat diinstal sebagai berikut:
yum install getmail
14 Instal Amavisd-new, SpamAssassin Dan ClamAV
Untuk menginstal amavisd-new, spamassassin dan clamav, jalankan perintah berikut:
yum install amavisd-new spamassassin clamav clamd unzip bzip2 unrar perl-DBD-mysql
Kemudian kita mulai freshclam, amavisd, dan clamd.amavisd:
sa-update
chkconfig --levels 235 amavisd aktif
chkconfig --del clamd
chkconfig --levels 235 clamd.amavisd aktif
/usr/bin/freshclam
/etc/init.d/amavisd start
/etc/init.d/clamd.amavisd start
Server Sempurna - CentOS 6.1 x86_64 Dengan nginx [ISPConfig 3] - Halaman 5
15 Instal Nginx, PHP5 (PHP-FPM), Dan Fcgiwrap
Nginx tersedia sebagai paket untuk CentOS 6.1 (dari EPEL) yang dapat kita instal sebagai berikut:
yum install nginx
Jika Apache2 sudah terinstal di sistem, hentikan sekarang...
/etc/init.d/httpd stop
... dan hapus tautan startup sistem Apache:
chkconfig --del httpd
Kemudian kami membuat tautan startup sistem untuk nginx dan memulainya:
chkconfig --levels 235 nginx aktif
/etc/init.d/nginx mulai
(Jika Apache2 dan nginx terinstal, penginstal ISPConfig 3 akan menanyakan mana yang ingin Anda gunakan - jawab nginx dalam kasus ini. Jika hanya salah satu dari keduanya yang diinstal, ISPConfig akan melakukan konfigurasi yang diperlukan secara otomatis.)
Kita dapat membuat PHP5 bekerja di nginx melalui PHP-FPM (PHP-FPM (FastCGI Process Manager) adalah implementasi PHP FastCGI alternatif dengan beberapa fitur tambahan yang berguna untuk situs dari berbagai ukuran, terutama situs yang lebih sibuk). Kita dapat menginstal php-fpm bersama-sama dengan php-cli dan beberapa modul PHP5 seperti php-mysql yang Anda butuhkan jika Anda ingin menggunakan MySQL dari skrip PHP Anda sebagai berikut:
yum install php-fpm php-cli php-mysql php-gd php-imap php-ldap php-odbc php-pear php-xml php-xmlrpc php-eaccelerator php-magickwand php-magpierss php-mbstring php-mcrypt php-mssql php-shout php-snmp php-soap php-tidy
Selanjutnya kita buka /etc/php.ini...
vi /etc/php.ini
... dan ubah pelaporan kesalahan (agar pemberitahuan tidak ditampilkan lagi) dan batalkan komentar cgi.fix_pathinfo=1:
[...] ;error_reporting = E_ALL & ~E_DEPRECATED error_reporting = E_ALL & ~E_NOTICE [...] |
Setel juga cgi.fix_pathinfo=0:
vi /etc/php.ini
[...] ; cgi.fix_pathinfo provides *real* PATH_INFO/PATH_TRANSLATED support for CGI. PHP's ; previous behaviour was to set PATH_TRANSLATED to SCRIPT_FILENAME, and to not grok ; what PATH_INFO is. For more information on PATH_INFO, see the cgi specs. Setting ; this to 1 will cause PHP CGI to fix its paths to conform to the spec. A setting ; of zero causes PHP to behave as before. Default is 1. You should fix your scripts ; to use SCRIPT_FILENAME rather than PATH_TRANSLATED. ; http://www.php.net/manual/en/ini.core.php#ini.cgi.fix-pathinfo cgi.fix_pathinfo=0 [...] |
(Silakan baca http://wiki.nginx.org/Pitfalls untuk mengetahui mengapa Anda harus melakukan ini.)
Selain itu, untuk menghindari kesalahan seperti
[08-Aug-2011 18:07:08] PHP Warning: phpinfo(): It is not safe to rely on the system's timezone settings. You are *required* to use the date.timezone setting or the date_default_timezone_set() function. In case you used any of those methods and you are still getting this warning, you most likely misspelled the timezone identifier. We selected 'Europe/Berlin' for 'CEST/2.0/DST' instead in /usr/share/nginx/html/info.php on line 2
... di /var/log/php-fpm/www-error.log ketika Anda memanggil skrip PHP di browser Anda, Anda harus mengatur date.timezone di /etc/php.ini:
[...] [Date] ; Defines the default timezone used by the date functions ; http://www.php.net/manual/en/datetime.configuration.php#ini.date.timezone date.timezone = "Europe/Berlin" [...] |
Anda dapat mengetahui zona waktu yang tepat untuk sistem Anda dengan menjalankan:
cat /etc/sysconfig/clock
[example@unixlinux.online tmp]# cat /etc/sysconfig/clock
ZONE="Europe/Berlin"
[example@unixlinux.online tmp]#
Selanjutnya buat tautan startup sistem untuk php-fpm dan mulai:
chkconfig --levels 235 php-fpm pada
/etc/init.d/php-fpm mulai
PHP-FPM adalah proses daemon (dengan skrip init /etc/init.d/php-fpm) yang menjalankan server FastCGI pada port 9000.
Untuk mendapatkan dukungan CGI di nginx, kami menginstal Fcgiwrap.
Fcgiwrap adalah pembungkus CGI yang juga berfungsi untuk skrip CGI yang kompleks dan dapat digunakan untuk lingkungan hosting bersama karena memungkinkan setiap vhost untuk menggunakan direktori cgi-bin-nya sendiri.
Karena tidak ada paket fcgiwrap untuk CentOS 6.1, kita harus membuatnya sendiri. Pertama kita install beberapa prasyarat:
yum install fcgi-devel
Sekarang kita dapat membangun fcgiwrap sebagai berikut:
cd /usr/local/src/
git clone git://github.com/gnosek/fcgiwrap.git
cd fcgiwrap
autoreconf -i
./configure
buat
buat pasang
Ini akan menginstal fcgiwrap ke /usr/local/sbin/fcgiwrap.
Selanjutnya kita menginstal paket spawn-fcgi yang memungkinkan kita untuk menjalankan fcgiwrap sebagai daemon:
yum install spawn-fcgi
Buka /etc/sysconfig/spawn-fcgi...
vi /etc/sysconfig/spawn-fcgi
... dan ubah file sebagai berikut:
# You must set some working options before the "spawn-fcgi" service will work. # If SOCKET points to a file, then this file is cleaned up by the init script. # # See spawn-fcgi(1) for all possible options. # # Example : #SOCKET=/var/run/php-fcgi.sock #OPTIONS="-u apache -g apache -s $SOCKET -S -M 0600 -C 32 -F 1 -P /var/run/spawn-fcgi.pid -- /usr/bin/php-cgi" FCGI_SOCKET=/var/run/fcgiwrap.socket FCGI_PROGRAM=/usr/local/sbin/fcgiwrap FCGI_USER=apache FCGI_GROUP=apache FCGI_EXTRA_OPTIONS="-M 0770" OPTIONS="-u $FCGI_USER -g $FCGI_GROUP -s $FCGI_SOCKET -S $FCGI_EXTRA_OPTIONS -F 1 -P /var/run/spawn-fcgi.pid -- $FCGI_PROGRAM" |
Sekarang tambahkan pengguna nginx ke grup apache:
usermod -a -G apache nginx
Buat tautan startup sistem untuk spawn-fcgi...
chkconfig --levels 235 spawn-fcgi on
... dan mulai sebagai berikut:
/etc/init.d/spawn-fcgi start
Anda sekarang harus menemukan soket fcgiwrap di/var/run/fcgiwrap.socket, yang dimiliki oleh apache pengguna dan grup (beberapa skrip, misalnya Mailman, diharapkan dijalankan oleh pengguna/grup apache, itu sebabnya kami tidak menjalankan spawn -fcgi sebagai pengguna/grup nginx, tetapi sebagai gantinya tambahkan nginx ke grup Apache).
16 Instal phpMyAdmin
Selanjutnya kita install phpMyAdmin:
yum install phpmyadmin
Selanjutnya kita ubah otentikasi di phpMyAdmin dari cookie menjadi http:
vi /usr/share/phpmyadmin/config.inc.php
[...] /* Authentication type */ $cfg['Servers'][$i]['auth_type'] = 'http'; [...] |
Anda sekarang dapat menemukan phpMyAdmin di direktori /usr/share/phpmyadmin/.
Setelah Anda menginstal ISPConfig 3, Anda dapat mengakses phpMyAdmin sebagai berikut:
Aplikasi ISPConfig vhost pada port 8081 untuk nginx dilengkapi dengan konfigurasi phpMyAdmin, jadi Anda dapat menggunakan http://server1.example.com:8081/phpmyadmin atau http://server1.example.com:8081/phpMyAdmin untuk mengakses phpMyAdmin.
Jika Anda ingin menggunakan /phpmyadmin atau /phpMyAdmin alias yang dapat Anda gunakan dari situs web Anda, ini sedikit lebih rumit daripada untuk Apache karena nginx tidak memiliki alias global (yaitu, alias yang dapat ditentukan untuk semua vhost). Oleh karena itu Anda harus mendefinisikan alias ini untuk setiap vhost tempat Anda ingin mengakses phpMyAdmin.
Untuk melakukannya, rekatkan yang berikut ini ke bidang Arahan nginx pada tab Opsi situs web di ISPConfig:
        location /phpmyadmin {
               root /usr/share/;
               index index.php index.html index.htm;
               location ~ ^/phpmyadmin/(.+\.php)$ {
                       try_files $uri =404;
                       root /usr/share/;
                       fastcgi_pass 127.0.0.1:9000;
                       fastcgi_index index.php;
                       fastcgi_param SCRIPT_FILENAME $document_root$fastcgi_script_name;
                       include /etc/nginx/fastcgi_params;
                       fastcgi_buffer_size 128k;
                       fastcgi_buffers 256 4k;
                       fastcgi_busy_buffers_size 256k;
                       fastcgi_temp_file_write_size 256k;
                       fastcgi_intercept_errors on;
               }
               location ~* ^/phpmyadmin/(.+\.(jpg|jpeg|gif|css|png|js|ico|html|xml|txt))$ {
                       root /usr/share/;
               }
        }
        location /phpMyAdmin {
               rewrite ^/* /phpmyadmin last;
} |
Jika Anda menggunakan https alih-alih http untuk vhost Anda, Anda harus menambahkan baris fastcgi_param HTTPS di; ke konfigurasi phpMyAdmin Anda seperti ini:
        location /phpmyadmin {
               root /usr/share/;
               index index.php index.html index.htm;
               location ~ ^/phpmyadmin/(.+\.php)$ {
                       try_files $uri =404;
                       root /usr/share/;
                       fastcgi_pass 127.0.0.1:9000;
                       fastcgi_param HTTPS on; # <-- add this line
                       fastcgi_index index.php;
                       fastcgi_param SCRIPT_FILENAME $document_root$fastcgi_script_name;
                       include /etc/nginx/fastcgi_params;
                       fastcgi_buffer_size 128k;
                       fastcgi_buffers 256 4k;
                       fastcgi_busy_buffers_size 256k;
                       fastcgi_temp_file_write_size 256k;
                       fastcgi_intercept_errors on;
               }
               location ~* ^/phpmyadmin/(.+\.(jpg|jpeg|gif|css|png|js|ico|html|xml|txt))$ {
                       root /usr/share/;
               }
        }
        location /phpMyAdmin {
               rewrite ^/* /phpmyadmin last;
} |
Jika Anda menggunakan http dan https untuk vhost, Anda perlu menambahkan bagian berikut ke bagian {} http di /etc/nginx/nginx.conf (sebelum baris penyertaan apa pun) yang menentukan apakah pengunjung menggunakan http atau https dan menyetel variabel $fastcgi_https (yang akan kita gunakan dalam konfigurasi phpMyAdmin kita) sebagai berikut:
vi /etc/nginx/nginx.conf
[...]
http {
[...]
    ## Detect when HTTPS is used
    map $scheme $fastcgi_https {
      default off;
      https on;
    }
[...]
}
[...] |
Jangan lupa untuk memuat ulang nginx setelahnya:
/etc/init.d/nginx reload
Lalu pergi ke bidang nginx Directives lagi, dan alih-alih fastcgi_param HTTPS aktif; Anda menambahkan baris fastcgi_param HTTPS $fastcgi_https; sehingga Anda dapat menggunakan phpMyAdmin untuk permintaan http dan https:
        location /phpmyadmin {
               root /usr/share/;
               index index.php index.html index.htm;
               location ~ ^/phpmyadmin/(.+\.php)$ {
                       try_files $uri =404;
                       root /usr/share/;
                       fastcgi_pass 127.0.0.1:9000;
                       fastcgi_param HTTPS $fastcgi_https; # <-- add this line
                       fastcgi_index index.php;
                       fastcgi_param SCRIPT_FILENAME $document_root$fastcgi_script_name;
                       include /etc/nginx/fastcgi_params;
                       fastcgi_buffer_size 128k;
                       fastcgi_buffers 256 4k;
                       fastcgi_busy_buffers_size 256k;
                       fastcgi_temp_file_write_size 256k;
                       fastcgi_intercept_errors on;
               }
               location ~* ^/phpmyadmin/(.+\.(jpg|jpeg|gif|css|png|js|ico|html|xml|txt))$ {
                       root /usr/share/;
               }
        }
        location /phpMyAdmin {
               rewrite ^/* /phpmyadmin last;
} |
17 Instal Mailman
Sejak versi 3.0.4, ISPConfig juga memungkinkan Anda untuk mengelola (membuat/memodifikasi/menghapus) milis Mailman. Jika Anda ingin menggunakan fitur ini, instal Mailman sebagai berikut:
yum install mailman
Sebelum kita dapat memulai Mailman, milis pertama yang disebut mailman harus dibuat:
/usr/lib/mailman/bin/newlist mailman
[example@unixlinux.online tmp]# /usr/lib/mailman/bin/newlist mailman
Enter the email of the person running the list: <-- admin email address, e.g. example@unixlinux.online
Initial mailman password: <-- admin password for the mailman list
To finish creating your mailing list, you must edit your /etc/aliases (or
equivalent) file by adding the following lines, and possibly running the
`newaliases' program:
## mailman mailing list
mailman: "|/usr/lib/mailman/mail/mailman post mailman"
mailman-admin: "|/usr/lib/mailman/mail/mailman admin mailman"
mailman-bounces: "|/usr/lib/mailman/mail/mailman bounces mailman"
mailman-confirm: "|/usr/lib/mailman/mail/mailman confirm mailman"
mailman-join: "|/usr/lib/mailman/mail/mailman join mailman"
mailman-leave: "|/usr/lib/mailman/mail/mailman leave mailman"
mailman-owner: "|/usr/lib/mailman/mail/mailman owner mailman"
mailman-request: "|/usr/lib/mailman/mail/mailman request mailman"
mailman-subscribe: "|/usr/lib/mailman/mail/mailman subscribe mailman"
mailman-unsubscribe: "|/usr/lib/mailman/mail/mailman unsubscribe mailman"
Hit enter to notify mailman owner... <-- ENTER
[example@unixlinux.online tmp]#
Open /etc/aliases afterwards...
vi /etc/aliases
... and add the following lines:
[...] mailman: "|/usr/lib/mailman/mail/mailman post mailman" mailman-admin: "|/usr/lib/mailman/mail/mailman admin mailman" mailman-bounces: "|/usr/lib/mailman/mail/mailman bounces mailman" mailman-confirm: "|/usr/lib/mailman/mail/mailman confirm mailman" mailman-join: "|/usr/lib/mailman/mail/mailman join mailman" mailman-leave: "|/usr/lib/mailman/mail/mailman leave mailman" mailman-owner: "|/usr/lib/mailman/mail/mailman owner mailman" mailman-request: "|/usr/lib/mailman/mail/mailman request mailman" mailman-subscribe: "|/usr/lib/mailman/mail/mailman subscribe mailman" mailman-unsubscribe: "|/usr/lib/mailman/mail/mailman unsubscribe mailman" |
Jalankan
newaliases
afterwards and restart Postfix:
/etc/init.d/postfix restart
Create the system startup links for Mailman and start it:
chkconfig --levels 235 mailman on
/etc/init.d/mailman start
Now we need to create this symlink to make Mailman work with ISPConfig:
cd /usr/lib/mailman/cgi-bin/
ln -s ./ mailman
If you want to use Mailman from your web sites created through ISPConfig, this is a bit more complicated than for Apache because nginx does not have global aliases (i.e., aliases that can be defined for all vhosts). Therefore you have to define these aliases for each vhost from which you want to access Mailman.
To do this, paste the following into the nginx Directives field on the Options tab of the web site in ISPConfig:
        location /cgi-bin/mailman {
               alias /usr/lib/mailman/cgi-bin;
               fastcgi_split_path_info (^/cgi-bin/mailman/[^/]*)(.*)$;
               include /etc/nginx/fastcgi_params;
               fastcgi_param SCRIPT_FILENAME /usr/lib/mailman$fastcgi_script_name;
               fastcgi_param PATH_INFO $fastcgi_path_info;
               fastcgi_param PATH_TRANSLATED /usr/lib/mailman$fastcgi_path_info;
               fastcgi_intercept_errors on;
               fastcgi_pass unix:/var/run/fcgiwrap.socket;
        }
        location /images/mailman {
               alias /usr/lib/mailman/icons;
        }
        location /pipermail {
               alias /var/lib/mailman/archives/public;
               autoindex on;
} |
Ini mendefinisikan alias /cgi-bin/mailman/ untuk vhost Anda, yang berarti Anda dapat mengakses antarmuka admin Mailman untuk daftar di http://
Di bawah http://
The Perfect Server - CentOS 6.1 x86_64 With nginx [ISPConfig 3] - Page 6
18 Install PureFTPd
PureFTPd can be installed with the following command:
yum install pure-ftpd
Then create the system startup links and start PureFTPd:
chkconfig --levels 235 pure-ftpd on
/etc/init.d/pure-ftpd start
Now we configure PureFTPd to allow FTP and TLS sessions. FTP is a very insecure protocol because all passwords and all data are transferred in clear text. By using TLS, the whole communication can be encrypted, thus making FTP much more secure.
OpenSSL is needed by TLS; to install OpenSSL, we simply run:
yum install openssl
Open /etc/pure-ftpd/pure-ftpd.conf...
vi /etc/pure-ftpd/pure-ftpd.conf
If you want to allow FTP and TLS sessions, set TLS to 1:
[...] # This option can accept three values : # 0 : disable SSL/TLS encryption layer (default). # 1 : accept both traditional and encrypted sessions. # 2 : refuse connections that don't use SSL/TLS security mechanisms, # including anonymous sessions. # Do _not_ uncomment this blindly. Be sure that : # 1) Your server has been compiled with SSL/TLS support (--with-tls), # 2) A valid certificate is in place, # 3) Only compatible clients will log in. TLS 1 [...] |
In order to use TLS, we must create an SSL certificate. I create it in /etc/ssl/private/, therefore I create that directory first:
mkdir -p /etc/ssl/private/
Afterwards, we can generate the SSL certificate as follows:
openssl req -x509 -nodes -days 7300 -newkey rsa:2048 -keyout /etc/ssl/private/pure-ftpd.pem -out /etc/ssl/private/pure-ftpd.pem
Country Name (2 letter code) [XX]:<-- Enter your Country Name (e.g., "DE").
State or Province Name (full name) []:<-- Enter your State or Province Name.
Locality Name (eg, city) [Default City]:<-- Enter your City.
Organization Name (eg, company) [Default Company Ltd]:<-- Enter your Organization Name (e.g., the name of your company).
Organizational Unit Name (eg, section) []:<-- Enter your Organizational Unit Name (e.g. "IT Department").
Common Name (eg, your name or your server's hostname) []:<-- Enter the Fully Qualified Domain Name of the system (e.g. "server1.example.com").
Email Address []:<-- Enter your Email Address.
Change the permissions of the SSL certificate:
chmod 600 /etc/ssl/private/pure-ftpd.pem
Finally restart PureFTPd:
/etc/init.d/pure-ftpd restart
Itu dia. You can now try to connect using your FTP client; however, you should configure your FTP client to use TLS.
19 Install BIND
We can install BIND as follows:
yum install bind bind-utils
Next open /etc/sysconfig/named...
vi /etc/sysconfig/named
... and make sure that the ROOTDIR=/var/named/chroot line is comment out:
# BIND named process options # ~~~~~~~~~~~~~~~~~~~~~~~~~~ # Currently, you can use the following options: # # ROOTDIR="/var/named/chroot" -- will run named in a chroot environment. # you must set up the chroot environment # (install the bind-chroot package) before # doing this. # NOTE: # Those directories are automatically mounted to chroot if they are # empty in the ROOTDIR directory. It will simplify maintenance of your # chroot environment. # - /var/named # - /etc/pki/dnssec-keys # - /etc/named # - /usr/lib64/bind or /usr/lib/bind (architecture dependent) # # Those files are mounted as well if target file doesn't exist in # chroot. # - /etc/named.conf # - /etc/rndc.conf # - /etc/rndc.key # - /etc/named.rfc1912.zones # - /etc/named.dnssec.keys # - /etc/named.iscdlv.key # # Don't forget to add "$AddUnixListenSocket /var/named/chroot/dev/log" # line to your /etc/rsyslog.conf file. Otherwise your logging becomes # broken when rsyslogd daemon is restarted (due update, for example). # # OPTIONS="whatever" -- These additional options will be passed to named # at startup. Don't add -t here, use ROOTDIR instead. # # KEYTAB_FILE="/dir/file" -- Specify named service keytab file (for GSS-TSIG) # # DISABLE_ZONE_CHECKING -- By default, initscript calls named-checkzone # utility for every zone to ensure all zones are # valid before named starts. If you set this option # to 'yes' then initscript doesn't perform those # checks. |
Make a backup of the existing /etc/named.conf file and create a new one as follows:
cp /etc/named.conf /etc/named.conf_bak
cat /dev/null> /etc/named.conf
vi /etc/named.conf
//
// named.conf
//
// Provided by Red Hat bind package to configure the ISC BIND named(8) DNS
// server as a caching only nameserver (as a localhost DNS resolver only).
//
// See /usr/share/doc/bind*/sample/ for example named configuration files.
//
options {
        listen-on port 53 { any; };
        listen-on-v6 port 53 { any; };
        directory       "/var/named";
        dump-file       "/var/named/data/cache_dump.db";
        statistics-file "/var/named/data/named_stats.txt";
        memstatistics-file "/var/named/data/named_mem_stats.txt";
        allow-query     { any; };
        recursion no;
        allow-recursion { none; };
};
logging {
        channel default_debug {
                file "data/named.run";
                severity dynamic;
        };
};
zone "." IN {
        type hint;
        file "named.ca";
};
include "/etc/named.conf.local"; |
Create the file /etc/named.conf.local that is included at the end of /etc/named.conf (/etc/named.conf.local will later on get populated by ISPConfig if you create DNS zones in ISPConfig):
touch /etc/named.conf.local
Then we create the startup links and start BIND:
chkconfig --levels 235 named on
/etc/init.d/named start
20 Install Vlogger, Webalizer, And AWStats
Vlogger, webalizer, and AWStats can be installed as follows:
yum install webalizer awstats perl-DateTime-Format-HTTP perl-DateTime-Format-Builder
cd /tmp
wget http://n0rp.chemlab.org/vlogger/vlogger-1.3.tar.gz
tar xvfz vlogger-1.3.tar.gz
mv vlogger-1.3/vlogger /usr/sbin/
rm -rf vlogger*
21 Install Jailkit
Jailkit is needed only if you want to chroot SSH users. It can be installed as follows (important:Jailkit must be installed before ISPConfig - it cannot be installed afterwards!):
cd /tmp
wget http://olivier.sessink.nl/jailkit/jailkit-2.14.tar.gz
tar xvfz jailkit-2.14.tar.gz
cd jailkit-2.14
./configure
make
make install
cd ..
rm -rf jailkit-2.14*
22 Install fail2ban
This is optional but recommended, because the ISPConfig monitor tries to show the log:
yum install fail2ban
We must configure fail2ban to log to the log file /var/log/fail2ban.log because this is the log file that is monitored by the ISPConfig Monitor module. Open /etc/fail2ban/fail2ban.conf...
vi /etc/fail2ban/fail2ban.conf
... and comment out the logtarget =SYSLOG line and add logtarget =/var/log/fail2ban.log:
[...] # Option: logtarget # Notes.: Set the log target. This could be a file, SYSLOG, STDERR or STDOUT. # Only one log target can be specified. # Values: STDOUT STDERR SYSLOG file Default: /var/log/fail2ban.log # #logtarget = SYSLOG logtarget = /var/log/fail2ban.log [...] |
Then create the system startup links for fail2ban and start it:
chkconfig --levels 235 fail2ban on
/etc/init.d/fail2ban start
23 Install rkhunter
rkhunter can be installed as follows:
yum install rkhunter
The Perfect Server - CentOS 6.1 x86_64 With nginx [ISPConfig 3] - Page 7
24 Install SquirrelMail
To install the SquirrelMail webmail client, run...
yum install squirrelmail
Then configure SquirrelMail:
/usr/share/squirrelmail/config/conf.pl
We must tell SquirrelMail that we are using Courier-IMAP/-POP3:
SquirrelMail Configuration : Read: config.php (1.4.0)
---------------------------------------------------------
Main Menu --
1. Organization Preferences
2. Server Settings
3. Folder Defaults
4. General Options
5. Themes
6. Address Books
7. Message of the Day (MOTD)
8. Plugins
9. Database
10. Languages
D. Set pre-defined settings for specific IMAP servers
C Turn color off
S Save data
Q Quit
Command >> <-- D
SquirrelMail Configuration : Read: config.php
---------------------------------------------------------
While we have been building SquirrelMail, we have discovered some
preferences that work better with some servers that don't work so
well with others. If you select your IMAP server, this option will
set some pre-defined settings for that server.
Please note that you will still need to go through and make sure
everything is correct. This does not change everything. There are
only a few settings that this will change.
Please select your IMAP server:
bincimap = Binc IMAP server
courier = Courier IMAP server
cyrus = Cyrus IMAP server
dovecot = Dovecot Secure IMAP server
exchange = Microsoft Exchange IMAP server
hmailserver = hMailServer
macosx = Mac OS X Mailserver
mercury32 = Mercury/32
uw = University of Washington's IMAP server
gmail = IMAP access to Google mail (Gmail) accounts
quit = Do not change anything
Command >> <-- courier
SquirrelMail Configuration : Read: config.php
---------------------------------------------------------
While we have been building SquirrelMail, we have discovered some
preferences that work better with some servers that don't work so
well with others. If you select your IMAP server, this option will
set some pre-defined settings for that server.
Please note that you will still need to go through and make sure
everything is correct. This does not change everything. There are
only a few settings that this will change.
Please select your IMAP server:
bincimap = Binc IMAP server
courier = Courier IMAP server
cyrus = Cyrus IMAP server
dovecot = Dovecot Secure IMAP server
exchange = Microsoft Exchange IMAP server
hmailserver = hMailServer
macosx = Mac OS X Mailserver
mercury32 = Mercury/32
uw = University of Washington's IMAP server
gmail = IMAP access to Google mail (Gmail) accounts
quit = Do not change anything
Command >> courier
imap_server_type = courier
default_folder_prefix = INBOX.
trash_folder = Trash
sent_folder = Sent
draft_folder = Drafts
show_prefix_option = false
default_sub_of_inbox = false
show_contain_subfolders_option = false
optional_delimiter = .
delete_folder = true
Press enter to continue... <-- press ENTER
SquirrelMail Configuration : Read: config.php (1.4.0)
---------------------------------------------------------
Main Menu --
1. Organization Preferences
2. Server Settings
3. Folder Defaults
4. General Options
5. Themes
6. Address Books
7. Message of the Day (MOTD)
8. Plugins
9. Database
10. Languages
D. Set pre-defined settings for specific IMAP servers
C Turn color off
S Save data
Q Quit
Command >> <--S
SquirrelMail Configuration : Read: config.php (1.4.0)
---------------------------------------------------------
Main Menu --
1. Organization Preferences
2. Server Settings
3. Folder Defaults
4. General Options
5. Themes
6. Address Books
7. Message of the Day (MOTD)
8. Plugins
9. Database
10. Languages
D. Set pre-defined settings for specific IMAP servers
C Turn color off
S Save data
Q Quit
Command >> <--Q
One last thing we need to do is modify the file /etc/squirrelmail/config_local.php and comment out the $default_folder_prefix variable - if you don't do this, you will see the following error message in SquirrelMail after you've logged in:Query:CREATE "Sent" Reason Given:Invalid mailbox name.
vi /etc/squirrelmail/config_local.php
<?php /** * Local config overrides. * * You can override the config.php settings here. * Don't do it unless you know what you're doing. * Use standard PHP syntax, see config.php for examples. * * @copyright © 2002-2006 The SquirrelMail Project Team * @license http://opensource.org/licenses/gpl-license.php GNU Public License * @version $Id: config_local.php,v 1.2 2006/07/11 03:33:47 wtogami Exp $ * @package squirrelmail * @subpackage config */ //$default_folder_prefix = ''; ?> |
You can now find SquirrelMail in the /usr/share/squirrelmail/ directory.
After you have installed ISPConfig 3, you can access SquirrelMail as follows:
The ISPConfig apps vhost on port 8081 for nginx comes with a SquirrelMail configuration, so you can use http://server1.example.com:8081/squirrelmail or http://server1.example.com:8081/webmail to access SquirrelMail.
If you want to use a /webmail or /squirrelmail alias that you can use from your web sites, this is a bit more complicated than for Apache because nginx does not have global aliases (i.e., aliases that can be defined for all vhosts). Therefore you have to define these aliases for each vhost from which you want to access SquirrelMail.
To do this, paste the following into the nginx Directives field on the Options tab of the web site in ISPConfig:
        location /squirrelmail {
               root /usr/share/;
               index index.php index.html index.htm;
               location ~ ^/squirrelmail/(.+\.php)$ {
                       try_files $uri =404;
                       root /usr/share/;
                       fastcgi_pass 127.0.0.1:9000;
                       fastcgi_index index.php;
                       fastcgi_param SCRIPT_FILENAME $document_root$fastcgi_script_name;
                       include /etc/nginx/fastcgi_params;
                       fastcgi_buffer_size 128k;
                       fastcgi_buffers 256 4k;
                       fastcgi_busy_buffers_size 256k;
                       fastcgi_temp_file_write_size 256k;
                       fastcgi_intercept_errors on;
               }
               location ~* ^/squirrelmail/(.+\.(jpg|jpeg|gif|css|png|js|ico|html|xml|txt))$ {
                       root /usr/share/;
               }
        }
        location /webmail {
               rewrite ^/* /squirrelmail last;
} |
If you use https instead of http for your vhost, you should add the line fastcgi_param HTTPS on; to your SquirrelMail configuration like this:
        location /squirrelmail {
               root /usr/share/;
               index index.php index.html index.htm;
               location ~ ^/squirrelmail/(.+\.php)$ {
                       try_files $uri =404;
                       root /usr/share/;
                       fastcgi_pass 127.0.0.1:9000;
                       fastcgi_param HTTPS on; # <-- add this line
                       fastcgi_index index.php;
                       fastcgi_param SCRIPT_FILENAME $document_root$fastcgi_script_name;
                       include /etc/nginx/fastcgi_params;
                       fastcgi_buffer_size 128k;
                       fastcgi_buffers 256 4k;
                       fastcgi_busy_buffers_size 256k;
                       fastcgi_temp_file_write_size 256k;
                       fastcgi_intercept_errors on;
               }
               location ~* ^/squirrelmail/(.+\.(jpg|jpeg|gif|css|png|js|ico|html|xml|txt))$ {
                       root /usr/share/;
               }
        }
        location /webmail {
               rewrite ^/* /squirrelmail last;
} |
If you use both http and https for your vhost, you need to add the following section to the http {} section in /etc/nginx/nginx.conf (before any include lines) which determines if the visitor uses http or https and sets the $fastcgi_https variable (which we will use in our SquirrelMail configuration) accordingly (please note that you don't need to do this if you have added this section before, for example when you configured phpMyAdmin - see chapter 16):
vi /etc/nginx/nginx.conf
[...]
http {
[...]
    ## Detect when HTTPS is used
    map $scheme $fastcgi_https {
      default off;
      https on;
    }
[...]
}
[...] |
Don't forget to reload nginx afterwards:
/etc/init.d/nginx reload
Then go to the nginx Directives field again, and instead of fastcgi_param HTTPS on; you add the line fastcgi_param HTTPS $fastcgi_https; so that you can use SquirrelMail for both http and https requests:
        location /squirrelmail {
               root /usr/share/;
               index index.php index.html index.htm;
               location ~ ^/squirrelmail/(.+\.php)$ {
                       try_files $uri =404;
                       root /usr/share/;
                       fastcgi_pass 127.0.0.1:9000;
                       fastcgi_param HTTPS $fastcgi_https; # <-- add this line
                       fastcgi_index index.php;
                       fastcgi_param SCRIPT_FILENAME $document_root$fastcgi_script_name;
                       include /etc/nginx/fastcgi_params;
                       fastcgi_buffer_size 128k;
                       fastcgi_buffers 256 4k;
                       fastcgi_busy_buffers_size 256k;
                       fastcgi_temp_file_write_size 256k;
                       fastcgi_intercept_errors on;
               }
               location ~* ^/squirrelmail/(.+\.(jpg|jpeg|gif|css|png|js|ico|html|xml|txt))$ {
                       root /usr/share/;
               }
        }
        location /webmail {
               rewrite ^/* /squirrelmail last;
} |
25 Install ISPConfig 3
Before you start the ISPConfig installation, make sure that Apache is stopped (if it is installed - it is possible that some of your installed packages have installed Apache as a dependency without you knowing). If Apache2 is already installed on the system, stop it now...
/etc/init.d/httpd stop
... and remove Apache's system startup links:
chkconfig --del httpd
Make sure that nginx is running:
/etc/init.d/nginx restart
(If you have both Apache and nginx installed, the installer asks you which one you want to use:Apache and nginx detected. Select server to use for ISPConfig:(apache,nginx) [apache]:
Type nginx. If only Apache or nginx are installed, this is automatically detected by the installer, and no question is asked.)
Download the current ISPConfig 3 version and install it. The ISPConfig installer will configure all services like Postfix, Courier, etc. for you. A manual setup as required for ISPConfig 2 is not necessary anymore.
You now also have the possibility to let the installer create an SSL vhost for the ISPConfig control panel, so that ISPConfig can be accessed using https:// instead of http://. To achieve this, just press ENTER when you see this question:Do you want a secure (SSL) connection to the ISPConfig web interface (y,n) [y]:.
To install ISPConfig 3 from the latest released version, do this:
cd /tmp
wget http://www.ispconfig.org/downloads/ISPConfig-3-stable.tar.gz
tar xfz ISPConfig-3-stable.tar.gz
cd ispconfig3_install/install/
The next step is to run
php -q install.php
This will start the ISPConfig 3 installer:
[example@unixlinux.online install]# php -q install.php
--------------------------------------------------------------------------------
_____ ___________ _____ __ _ ____
|_ _/ ___| ___ \ / __ \ / _(_) /__ \
| | \ `--.| |_/ / | / \/ ___ _ __ | |_ _ __ _ _/ /
| | `--. \ __/ | | / _ \| '_ \| _| |/ _` | |_ |
_| |_/\__/ / | | \__/\ (_) | | | | | | | (_| | ___\ \
\___/\____/\_| \____/\___/|_| |_|_| |_|\__, | \____/
__/ |
|___/
--------------------------------------------------------------------------------
>> Initial configuration
Operating System: Redhat or compatible, unknown version.
Following will be a few questions for primary configuration so be careful.
Default values are in [brackets] and can be accepted with
Tap in "quit" (without the quotes) to stop the installer.
Select language (en,de) [en]: <-- ENTER
Installation mode (standard,expert) [standard]: <-- ENTER
Full qualified hostname (FQDN) of the server, eg server1.domain.tld [server1.example.com]: <-- ENTER
MySQL server hostname [localhost]: <-- ENTER
MySQL root username [root]: <-- ENTER
MySQL root password []: <- - yourrootsqlpassword
MySQL database to create [dbispconfig]: <-- ENTER
MySQL charset [utf8]: <-- ENTER
Apache and nginx detected. Select server to use for ISPConfig: (apache,nginx) [apache]: <-- nginx
Generating a 2048 bit RSA private key
....+++
.................................+++
writing new private key to 'smtpd.key'
-----
You are about to be asked to enter information that will be incorporated
into your certificate request.
What you are about to enter is what is called a Distinguished Name or a DN.
There are quite a few fields but you can leave some blank
For some fields there will be a default value,
If you enter '.', the field will be left blank.
-----
Country Name (2 letter code) [XX]: <-- ENTER
State or Province Name (full name) []: <-- ENTER
Locality Name (eg, city) [Default City]: <-- ENTER
Organization Name (eg, company) [Default Company Ltd]: <-- ENTER
Organizational Unit Name (eg, section) []: <-- ENTER
Common Name (eg, your name or your server's hostname) []: <-- ENTER
Email Address []: <-- ENTER
Configuring Jailkit
Configuring SASL
Configuring PAM
Configuring Courier
Configuring Spamassassin
Configuring Amavisd
Configuring Getmail
Configuring Pureftpd
Configuring BIND
Configuring nginx
Configuring Vlogger
Configuring Apps vhost
Configuring Bastille Firewall
Configuring Fail2ban
Installing ISPConfig
ISPConfig Port [8080]: <-- ENTER
Do you want a secure (SSL) connection to the ISPConfig web interface (y,n) [y]: <-- ENTER
Generating RSA private key, 4096 bit long modulus
...........................................................................................
...............................................................................++
...................................................................................................................++
e is 65537 (0x10001)
You are about to be asked to enter information that will be incorporated
in to your certificate request.
What you are about to enter is what is called a Distinguished Name or a DN.
There are quite a few fields but you can leave some blank
For some fields there will be a default value,
If you enter '.', the field will be left blank.
-----
Country Name (2 letter code) [XX]: <-- ENTER
State or Province Name (full name) []: <-- ENTER
Locality Name (eg, city) [Default City]: <-- ENTER
Organization Name (eg, company) [Default Company Ltd]: <-- ENTER
Organizational Unit Name (eg, section) []: <-- ENTER
Common Name (eg, your name or your server's hostname) []: <-- ENTER
Email Address []: <-- ENTER
Please enter the following 'extra' attributes
to be sent with your certificate request
A challenge password []: <-- ENTER
An optional company name []: <-- ENTER
writing RSA key
Configuring DBServer
Installing ISPConfig crontab
no crontab for root
no crontab for getm ail
Restarting services ...
Stopping mysqld: [ OK ]
Starting mysqld: [ OK ]
Shutting down postfix: [ OK ]
Starting postfix: [ OK ]
Stopping saslauthd: [FAILED]
Starting saslauthd: [ OK ]
Shutting down amavisd: Daemon [1503] terminated by SIGTERM
[ OK ]
amavisd stopped
Starting amavisd: [ OK ]
Stopping clamd.amavisd: [ OK ]
Starting clamd.amavisd: [ OK ]
Stopping Courier authentication services: authdaemond
Starting Courier authentication services: authdaemond
Stopping Courier-IMAP s erver: imap imap-ssl pop3 pop3-ssl
Starting Courier-IMAP server: imap imap-ssl pop3 pop3-ssl
Stopping Courier-IMAP server: imap imap-ssl pop3 pop3-ssl
Starting Courier-IMAP server: imap imap-ssl pop3 pop3-ssl
Stopping Courier-IMAP server: imap imap-ssl pop3 pop3-ssl
Starting Courier-IMAP server: imap imap-ssl pop3 pop3-ssl
Stopping Courier-IMAP server: imap imap-ssl pop3 pop3-ssl
Starting Courier-IMAP server: imap imap-ssl pop3 pop3-ssl
SyntaxError: ('invalid syntax', ('/usr/lib/mailman/Mailman/mm_cfg.py', 76, 27, 'DEFAULT_SERVER_LANGUAGE = \n'))
Traceback (most recent call last):
File "/usr/lib/mailman/bin/mailmanctl", line 109, in
from Mailman import mm_cfg
File "/usr/lib/mailman/Mailman/mm_cfg.py", line 76
DEFAULT_SERVER_LANGUAGE =
^
SyntaxError: invalid syntax
Shutting down mailman: [FAILED]
SyntaxError: ('i nvalid syntax', ('/usr/lib/mailman/Mailman/mm_cfg.py', 76, 27, 'DEFAULT_SERVER_LANGUAGE = \n'))
Traceback (most recent call last):
File "/usr/lib/mailman/bin/mailmanctl", line 109, in
from Mailman import mm_cfg
File "/usr/lib/mailman/Mailman/mm_cfg.py", line 76
DEFAULT_SERVER_LANGUAGE =
^
SyntaxError: invalid syntax
Starting mailman: [FAILED]
Reloading php-fpm: [ OK ]
Reloading nginx: [ OK ]
Stopping pure-ftpd: [ OK ]
Starting pure-ftpd: [ OK ]
Installation completed.
[example@unixlinux.online install]#
To fix the Mailman errors you might get during the ISPConfig installation, open /usr/lib/mailman/Mailman/mm_cfg.py...
vi /usr/lib/mailman/Mailman/mm_cfg.py
... and set DEFAULT_SERVER_LANGUAGE ='en':
[...] #------------------------------------------------------------- # The default language for this server. DEFAULT_SERVER_LANGUAGE = 'en' [...] |
Restart Mailman:
/etc/init.d/mailman restart
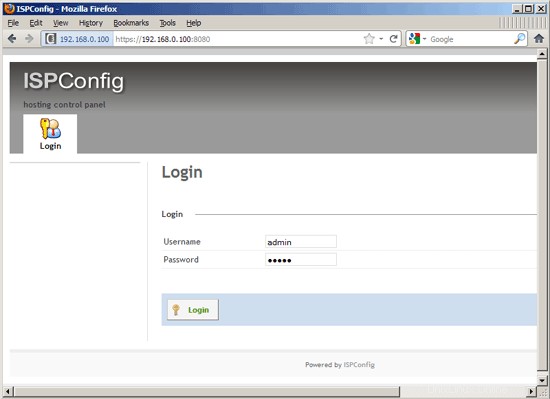
Afterwards you can access ISPConfig 3 under http(s)://server1.example.com:8080/ or http(s)://192.168.0.100:8080/ (http or https depends on what you chose during installation). Log in with the username admin and the password admin (you should change the default password after your first login):
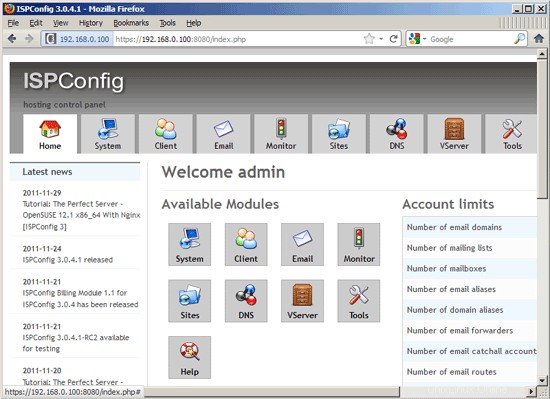
The system is now ready to be used.
25.1 ISPConfig 3 Manual
In order to learn how to use ISPConfig 3, I strongly recommend to download the ISPConfig 3 Manual.
Pada sekitar 300 halaman, ini mencakup konsep di balik ISPConfig (admin, reseller, klien), menjelaskan cara menginstal dan memperbarui ISPConfig 3, menyertakan referensi untuk semua formulir dan bidang formulir di ISPConfig bersama dengan contoh input yang valid, dan memberikan tutorial untuk tugas paling umum di ISPConfig 3. Ini juga menjelaskan cara membuat server Anda lebih aman dan dilengkapi dengan bagian pemecahan masalah di bagian akhir.
25.2 ISPConfig Monitor App For Android
Dengan Aplikasi Monitor ISPConfig, Anda dapat memeriksa status server Anda dan mengetahui apakah semua layanan berjalan seperti yang diharapkan. Anda dapat memeriksa port TCP dan UDP dan melakukan ping ke server Anda. Selain itu, Anda dapat menggunakan aplikasi ini untuk meminta detail dari server yang telah menginstal ISPConfig (harap diperhatikan bahwa versi ISPConfig 3 yang diinstal minimum dengan dukungan untuk Aplikasi ISPConfig Monitor adalah 3.0.3.3! ); these details include everything you know from the Monitor module in the ISPConfig Control Panel (e.g. services, mail and system logs, mail queue, CPU and memory info, disk usage, quota, OS details, RKHunter log, etc.), and of course, as ISPConfig is multiserver-capable, you can check all servers that are controlled from your ISPConfig master server.
Untuk mengunduh dan petunjuk penggunaan, silakan kunjungi http://www.ispconfig.org/ispconfig-3/ispconfig-monitor-app-for-android/.
26 Links
- CentOS:http://www.centos.org/
- ISPConfig:http://www.ispconfig.org/
About The Author

Falko Timme is the owner of  Timme Hosting (ultra-fast nginx web hosting). He is the lead maintainer of HowtoForge (since 2005) and one of the core developers of ISPConfig (since 2000). He has also contributed to the O'Reilly book "Linux System Administration".