Pada halaman ini protokol DNS dan server DNS BIND dijelaskan, seperti modul Webmin untuk membuat dan mengelola domain DNS.
- Lihat Pengenalan Sistem Nama Domain
Isi
Modul Server DNS BIND
BIND (Berkeley Internet Name Domain) adalah server DNS paling umum untuk sistem Unix. Beberapa versi telah dirilis selama bertahun-tahun, yang terbaru adalah versi 9. Modul Server DNS BIND (ditemukan di bawah kategori Server) mendukung konfigurasi versi 8 dan 9. Versi 4 yang lebih lama memiliki format file konfigurasi yang berbeda, dan dapat dikonfigurasi menggunakan modul BIND 4 DNS Server, didokumentasikan di bagian selanjutnya dari bab ini.
Karena BIND tersedia untuk hampir semua sistem Unix dan bekerja secara identik terlepas dari sistem operasinya, instruksi dalam bab ini tidak hanya berlaku untuk Linux tetapi juga untuk versi Unix lainnya. Sebagian besar versi Unix dan Linux menyertakan BIND 8 atau 9 sebagai paket standar, sehingga jarang diperlukan untuk menginstalnya. Jika modul tidak dapat menemukan server DNS, pesan kesalahan akan ditampilkan di halaman utama - jika ini terjadi, periksa CD sistem operasi atau situs web Anda untuk paket BIND, atau unduh dan kompilasi sumber dari http://www.isc .org/.
File konfigurasi utama BIND adalah /etc/named.conf, yang berisi semua zona yang dihosting oleh server, dan pengaturan konfigurasi global yang berlaku untuk semua zona. Catatan di setiap zona disimpan dalam file terpisah, biasanya ditemukan di direktori /var/named. Modul Webmin ini selalu memperbarui semua file ini secara langsung, bukan dengan berkomunikasi dengan proses BIND yang sedang berjalan. Ini berarti bahwa jika Anda menjalankan beberapa program lain yang secara dinamis memperbarui zona dengan berkomunikasi dengan BIND (seperti server DHCP), maka modul ini tidak boleh digunakan karena dapat mengganggu perubahan ini. Namun, sangat sedikit sistem yang mengaktifkan pembaruan dinamis semacam ini.
Versi 9 dari BIND memiliki beberapa fitur yang tidak dimiliki versi 8. Yang paling penting yang didukung oleh modul Webmin ini adalah tampilan. Tampilan adalah sekumpulan zona yang hanya terlihat oleh beberapa klien DNS. Biasanya semua klien melihat zona yang sama, tetapi dengan BIND 9 Anda dapat membatasi visibilitas beberapa domain hanya untuk klien tertentu, yang diidentifikasi oleh alamat IP mereka. Ini dapat berguna untuk membuat zona yang hanya dapat dilihat oleh sistem di jaringan internal, bahkan jika server DNS Anda terhubung ke Internet.
Jika Anda belum pernah mengatur BIND di sistem Anda, saat pertama kali memasukkan modul ke halaman utama akan muncul formulir untuk mengatur server DNS, seperti gambar di bawah ini. Formulir ini hanya ditampilkan jika Webmin mendeteksi bahwa file konfigurasi bernama.conf tidak ada, atau jika direktori file zona yang ditentukan tidak ada. Jika Anda yakin bahwa konfigurasi BIND Anda valid dan server DNS sudah berjalan, jangan klik tombol Buat tombol, karena file bernama.conf Anda akan ditimpa. Sebagai gantinya, klik Konfigurasi Modul link dan periksa apakah semua jalur sudah benar untuk sistem Anda.
-
 Mengikat Instal
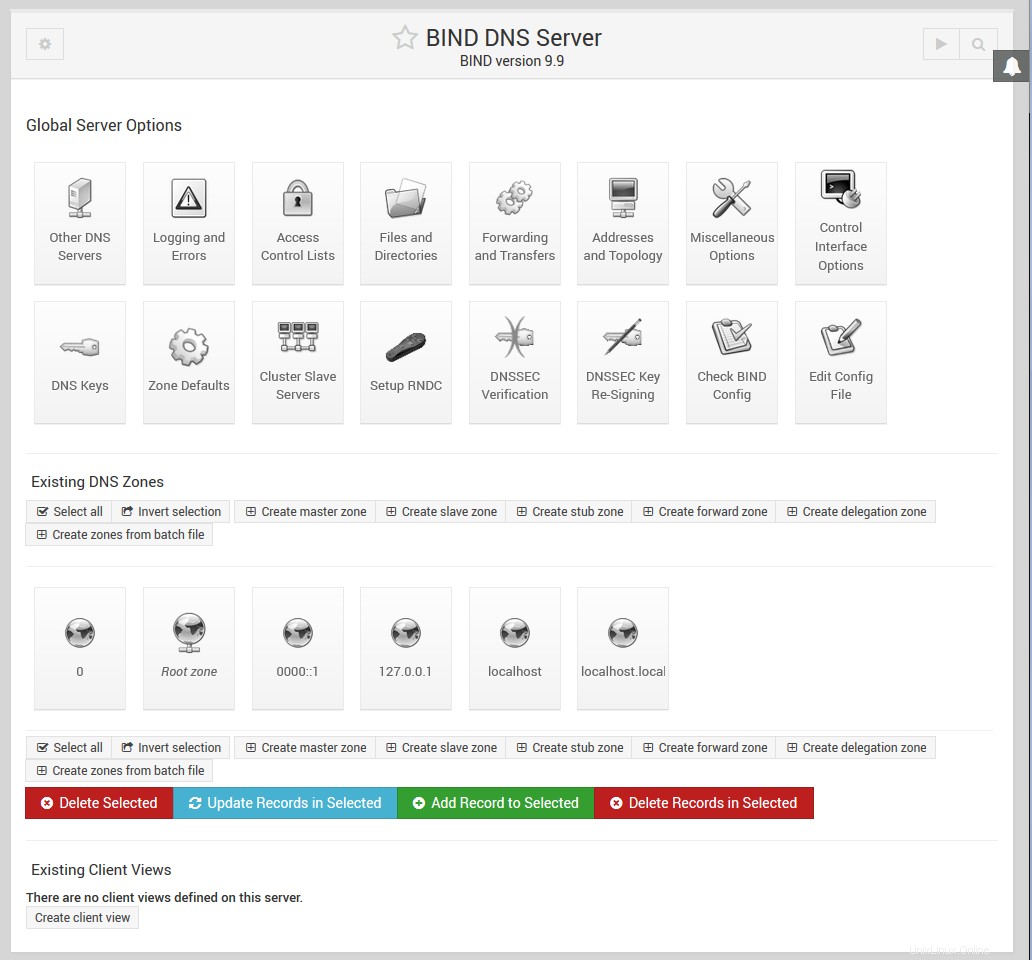
Ketika BIND telah diatur di sistem Anda, halaman utama akan muncul seperti yang ditunjukkan pada gambar di bawah. Di bagian atas adalah tabel ikon untuk mengatur opsi global yang berlaku untuk seluruh server DNS Anda. Di bawahnya terdapat ikon untuk setiap zona host server Anda, diikuti oleh ikon untuk tampilan jika Anda menjalankan BIND versi 9. Di bagian paling bawah terdapat tombol untuk menerapkan konfigurasi DNS saat ini atau memulai server BIND.
Jika Anda baru saja mengatur BIND untuk pertama kalinya, mungkin hanya akan ada satu ikon zona - zona akar. Beberapa distribusi Linux yang menyertakan paket BIND datang dengan file konfigurasi dasar yang mendefinisikan zona seperti localdomain dan 127.0.0, yang digunakan untuk menyelesaikan localhost dan 127.0.0.l loopback hostname dan alamat IP.
-
 Mengikat Halaman Utama Server DNS
Membuat zona master baru
Zona master adalah zona di mana server DNS Anda adalah sumber informasi yang otoritatif. Satu zona dapat di-host oleh beberapa server, tetapi hanya satu yang menjadi master - sisanya adalah budak. Jika Anda ingin menambahkan zona master baru ke konfigurasi server Anda, langkah-langkah yang harus diikuti adalah:
- Tentukan nama untuk zona baru, seperti example.com atau internal. Jika ini akan menjadi domain Internet yang akan terlihat oleh semua orang di dunia, nama domain tersebut harus belum didaftarkan oleh orang lain. Namun, Anda biasanya tidak dapat mendaftarkannya sendiri sampai server DNS Anda telah disiapkan untuk menampungnya.
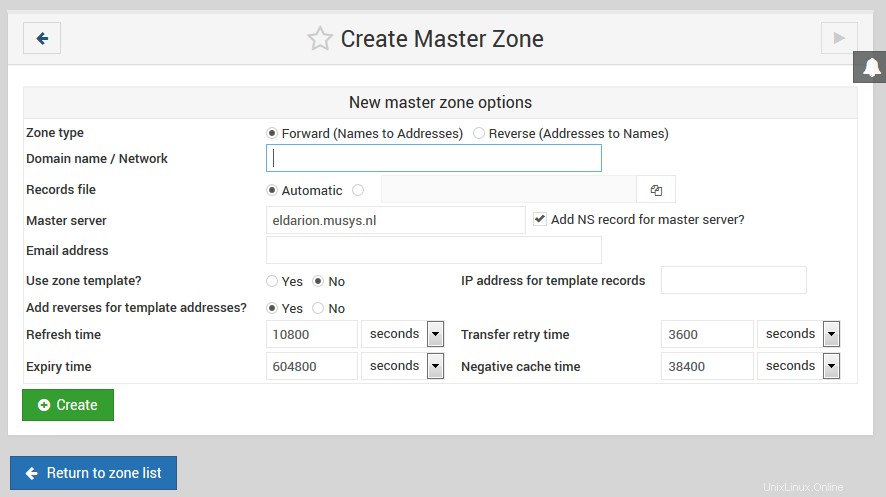
- Pada halaman utama modul, klik Buat zona master baru link di bawah tabel zona yang ada. Ini akan membawa Anda ke halaman yang ditunjukkan pada gambar di bawah ini untuk memasukkan rincian zona baru.
- Jika ini akan menjadi zona maju seperti example.com atau foo.com.au, biarkan Jenis zona bidang disetel ke Maju . Namun, jika ini adalah zona terbalik untuk mencari nama host dari alamat IP, setel bidang ke Mundur .
- Di Nama domain / Jaringan bidang, masukkan nama zona tanpa titik tambahan. Untuk zona terbalik, cukup masukkan alamat jaringan seperti 192.168.1. Webmin akan secara otomatis mengonversi ini ke format in-addr.arpa untuk Anda saat domain dibuat.
- File Rekaman kontrol bidang tempat file konfigurasi yang berisi catatan zona disimpan. Jika Anda membiarkannya disetel ke Otomatis , nama file akan ditentukan secara otomatis berdasarkan konfigurasi modul dan pengaturan direktori di file bernama.conf. Ini biasanya merupakan opsi terbaik, karena akan menghasilkan file record yang dibuat di direktori yang sama dengan zona yang ada, seperti /var/named. Namun, jika Anda membatalkan pilihan Otomatis pilihan dan masukkan nama file sebagai gantinya, semua catatan untuk zona akan ditulis ke file itu. Jika Anda memasukkan nama file yang ada, itu akan ditimpa saat domain dibuat.
- Di Server utama bidang, masukkan nama domain lengkap dari server DNS master untuk zona ini. Ini harus nama kanonik sistem Anda, seperti server.example.com, bukan nama pendek seperti server. Server ini (dan nilai dari . berikutnya
- bidang) digunakan untuk membuat catatan SOA zona baru.
- Di Alamat email bidang, masukkan alamat orang yang bertanggung jawab untuk zona ini. Anda dapat menggunakan simbol @ di alamat, yang akan secara otomatis dikonversi oleh Webmin menjadi titik untuk dimasukkan dalam catatan SOA.
- Waktu penyegaran bidang menentukan seberapa sering server sekunder harus memeriksa dengan server master ini untuk pembaruan zona. Standarnya masuk akal, tetapi Anda mungkin ingin meningkatkannya untuk zona yang jarang berubah, atau menguranginya untuk zona yang sering diperbarui.
- Waktu percobaan ulang transfer field menentukan berapa lama server sekunder harus menunggu setelah transfer zona gagal sebelum mencoba lagi.
- Waktu kedaluwarsa bidang mengontrol jumlah waktu maksimum yang server DNS sekunder untuk zona harus menyimpan catatan sebelum mentransfernya kembali dari master.
- Waktu tayang default bidang menentukan TTL catatan di zona yang tidak memiliki satu set secara eksplisit.
- Klik tombol Buat tombol di bagian bawah halaman. Selama formulir telah diisi dengan benar dan zona belum ada di server Anda, Anda akan dibawa ke halaman untuk menambahkan catatan baru ke zona tersebut.
- Kembali ke halaman utama modul yang sekarang akan menyertakan ikon untuk zona baru Anda, dan klik tombol Terapkan Perubahan tombol di bagian bawah untuk mengaktifkannya.
- Buat Zona Master.png
Zona yang baru dibuat hanya akan berisi satu record (kecuali jika Anda telah menyiapkan template). Untuk menambahkan lebih banyak, ikuti petunjuk di bagian berikutnya. Setelah Anda menyiapkan catatan dasar di domain Anda, Anda dapat mendaftarkannya ke otoritas yang mengelola domain induk, seperti .com atau .com.au. Beberapa otoritas domain tidak akan mengizinkan Anda untuk mendaftarkan zona yang tidak memiliki setidaknya dua server (satu master dan satu budak), dan catatan server nama di zona untuk server tersebut.
Menambahkan dan mengedit catatan
-
 Mengikat - Mengedit Zona Master
Fitur yang paling berguna dari modul BIND DNS Server adalah kemampuan untuk menambah, mengedit, dan menghapus catatan di zona master yang dihosting oleh server Anda. Misalnya, jika Anda ingin menyiapkan server web di domain example.com, Anda perlu menambahkan data Alamat untuk www.example.com dengan alamat IP server. Untuk menambahkan record baru seperti ini, langkah-langkah yang harus dilakukan adalah:
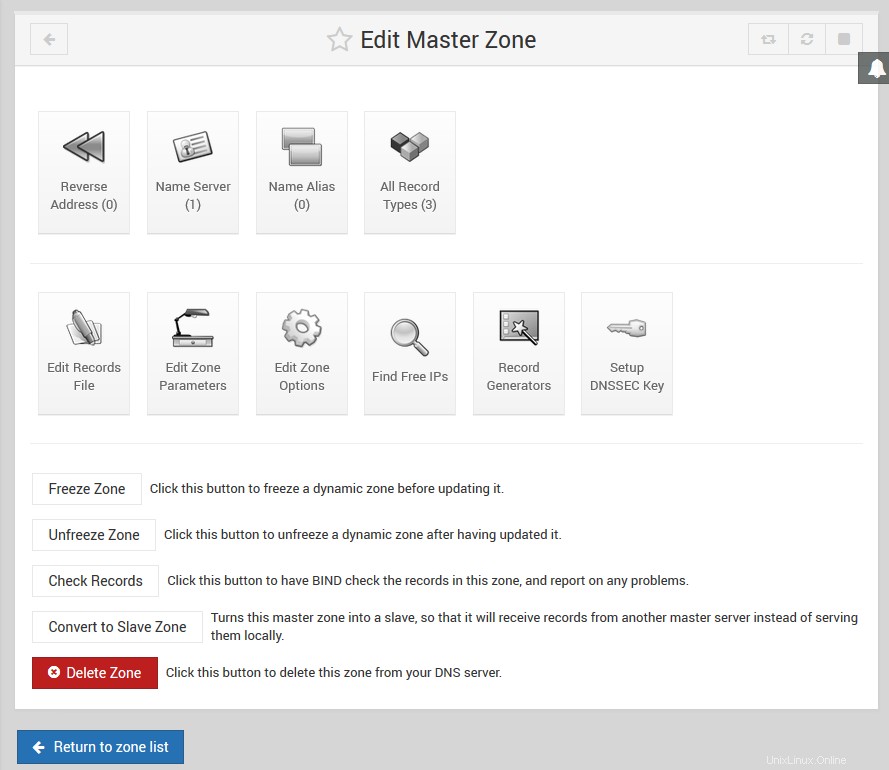
- Pada halaman utama modul, klik ikon untuk zona yang ingin Anda tambahkan. Ini akan memunculkan halaman yang ditunjukkan di bawah ini, di atasnya terdapat tabel ikon, satu untuk setiap jenis rekaman.
- Klik ikon untuk jenis rekaman yang ingin Anda tambahkan. Jenis yang paling umum adalah Alamat , yang mengaitkan alamat IP dengan nama host. Lihat #Jenis rekaman di bawah ini untuk daftar lengkap semua jenis rekaman yang didukung.
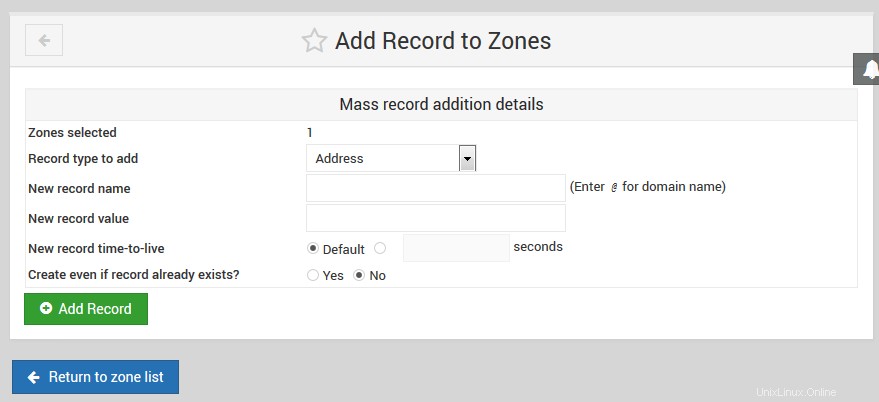
- Mengeklik ikon akan membawa Anda ke halaman yang mencantumkan semua catatan yang ada dari jenis itu. Di atas daftar adalah formulir untuk memasukkan catatan baru.
- Dalam Nama bidang, masukkan nama catatan baru relatif terhadap nama zona. Misalnya, jika Anda ingin menambahkan catatan www.example.com, Anda cukup memasukkan www . Dimungkinkan juga untuk memasukkan nama rekaman lengkap, asalkan memiliki titik di akhir untuk menunjukkan bahwa itu tidak terkait dengan zona. Jangan masukkan hanya www.example.com , karena akan dikonversi menjadi www.example.com.example.com, yang mungkin bukan yang Anda inginkan.
- Jika catatan ini akan berubah lebih sering daripada zona lainnya, ubah Waktu-Untuk-Live bidang dari Default dengan perkiraan waktu antara perubahan. Ini menentukan berapa lama klien DNS dan server lain akan menyimpan catatan untuk cache.
- Jika Anda menambahkan catatan Alamat, masukkan alamat IP lengkap dari host ke dalam Alamat bidang. Lihat tabel di bawah untuk deskripsi bidang yang muncul saat menambahkan tipe rekaman lain dan artinya.
- Kolom Perbarui terbalik? hanya muncul saat menambahkan catatan Alamat. Ini mengontrol pembuatan otomatis catatan yang sesuai di zona terbalik yang mengaitkan nama host dengan alamat IP. Secara alami, ini hanya dapat dilakukan jika IP yang Anda masukkan berada dalam jaringan di mana sistem Anda adalah server DNS terbalik utama. Ini membuat zona maju dan mundur tersinkronisasi, yang bisa sangat berguna. Jika Ya dipilih, catatan alamat terbalik akan ditambahkan selama belum ada di zona terbalik untuk alamat IP yang sama. Seringkali banyak nama host akan memiliki IP yang sama, seperti yang digunakan untuk hosting virtual berbasis nama. Dalam kasus seperti ini, Anda tidak ingin mengubah pemetaan terbalik jika sudah ada. Opsi *Ya (dan ganti yang sudah ada)* berfungsi sama seperti Ya , tetapi jika catatan terbalik untuk alamat IP sudah ada, itu akan diperbarui dengan nama host baru. Ini bisa berguna jika Anda tahu ada catatan yang ingin Anda ganti. Jika Tidak dipilih, tidak ada alamat balik yang akan dibuat meskipun memungkinkan.
- Setelah selesai mengisi formulir, klik tombol Buat tombol di bagian bawah. Selama diisi dengan benar, catatan akan ditambahkan ke daftar di bawah formulir. Saat menulis ke file rekaman zona, Webmin akan menggunakan format kanonik lengkap untuk nama rekaman, seperti www.example.com., bahkan jika Anda hanya memasukkan www.
- Untuk mengaktifkan catatan baru sehingga dapat dicari oleh klien DNS dan server lain, Anda perlu mengklik Terapkan Perubahan tombol di halaman utama modul. Jika Anda berencana untuk menambah atau mengedit beberapa catatan, biasanya lebih baik menunggu sampai semua perubahan selesai sebelum menekan tombol terapkan. Jika tersedia, Anda dapat menggunakan Terapkan Perubahan tombol di bagian bawah halaman zona master yang ditunjukkan di bawah ini. Ini menggunakan perintah ndc untuk memberi tahu BIND agar membaca ulang hanya file untuk zona ini, yang bisa jauh lebih cepat pada sistem yang menghosting sejumlah besar domain.
-
 Ikat - Tambahkan Rekaman ke Zona
Meskipun instruksi di atas difokuskan pada penambahan record Alamat, proses penambahan tipe record lain ke zona penerusan hampir sama. Pembaruan terbalik? kolom tidak ada, dan Alamat field diganti dengan satu atau lebih field yang berbeda. Jenis rekaman bagian di bawah ini menjelaskan secara rinci bidang apa yang tersedia untuk setiap jenis catatan yang dikenal oleh Webmin.
Saat menambahkan catatan Alamat Balik ke zona terbalik, bentuknya sangat berbeda. Alamat kolom muncul sebelum Nama Inang , dan nama host harus selalu dimasukkan dalam bentuk kanonik dengan titik di akhir, seperti www.example.com. . Pembaruan terbalik? kolom diganti dengan Update forward? , yang mengontrol pembuatan otomatis catatan di zona maju yang sesuai. Namun, tidak ada opsi untuk menimpa catatan penerusan yang ada - jika catatan dengan nama yang sama sudah ada, catatan tersebut tidak akan disentuh meskipun Ya dipilih.
Setiap kali catatan ditambahkan atau diperbarui di zona menggunakan Webmin, nomor serinya akan bertambah secara otomatis. Ini juga berlaku untuk zona terbalik yang diperbarui secara otomatis saat menambahkan catatan Alamat, dan sebaliknya. Ini berarti bahwa ketika Anda menerapkan perubahan, server DNS lain akan dapat mendeteksi bahwa zona telah berubah dengan membandingkan nomor seri baru dengan yang lama yang telah di-cache.
Untuk mengedit record yang ada dalam suatu zone, langkah-langkah yang harus dilakukan adalah:
- Pada halaman utama modul, klik ikon zona yang ingin Anda edit, yang akan membawa Anda ke tampilan halaman di atas.
- Klik ikon untuk jenis rekaman yang ingin Anda ubah, yang akan menampilkan halaman yang mencantumkan semua rekaman jenis itu di zona tersebut. Sebagai alternatif, Anda dapat mengklik Semua Jenis Rekaman ikon yang akan menampilkan daftar setiap catatan di zona apa pun jenisnya.
- Klik pada nama rekaman yang ingin Anda edit. Browser Anda akan menampilkan formulir yang mirip dengan yang digunakan untuk menambahkan catatan, tetapi dengan bidang yang sudah diisi dengan rincian alamat yang ada.
- Untuk menamai ulang rekaman, edit konten Nama bidang. Ini akan ditampilkan dalam bentuk kanonik dengan titik di akhir awalnya, tetapi Anda dapat mengubahnya menjadi nama yang relatif terhadap domain jika Anda mau.
- Sesuaikan Waktu-Untuk-Live bidang di mana Anda ingin catatan ini memiliki TTL yang berbeda, atau setel ke Default untuk membuatnya sama dengan zona lainnya.
- Jika ini adalah catatan Alamat, ubah IP di Alamat bidang. Untuk tipe rekaman lainnya, bidangnya sama dengan yang ada di formulir pembuatan rekaman, dan memiliki arti yang sama.
- Untuk catatan Alamat, bidang Perbarui terbalik? ditampilkan. Memilih Ya akan menyebabkan catatan yang sesuai di zona terbalik diubah nama dan alamatnya agar sesuai dengan catatan penerusan ini. Jika Anda mengubah IP sehingga alamat balik tidak lagi berada di jaringan yang sama, itu akan dihapus dari zona balik yang lama dan ditambahkan ke zona balik yang baru (jika di-host oleh server Anda).
- Untuk catatan Alamat Terbalik, bidang Perbarui teruskan? ditampilkan sebagai gantinya. Jika Ya dipilih, catatan Alamat yang sesuai di zona penerusannya akan diubah agar sesuai dengan perubahan apa pun yang Anda buat pada formulir ini.
- Klik tombol Simpan tombol untuk memperbarui catatan dalam file zona, dan kembali ke daftar jenis catatan.
- Untuk mengaktifkan perubahan, klik Terapkan Perubahan tombol kembali di halaman utama modul.
Untuk menghapus catatan dari suatu zona, klik tombol Hapus tombol pada formulir pengeditan alih-alih Simpan . Untuk catatan Alamat, jika Pembaruan terbalik? bidang disetel ke Ya , catatan Alamat Balik yang sesuai akan dihapus juga. Selain itu, proses menghapus catatan adalah identik, apa pun jenisnya. Hal yang sama terjadi saat menghapus catatan Alamat Terbalik - catatan Alamat yang cocok juga akan dihapus, selama Maju pembaruan? bidang disetel ke Ya .
Daftar record di zona awalnya diurutkan menurut konfigurasi modul, yang biasanya berarti record akan ditampilkan sesuai urutan penambahannya. Untuk mengubahnya, Anda dapat mengklik judul kolom seperti Nama , Alamat atau Nama Asli untuk mengurutkannya berdasarkan kolom itu. Penyortiran hanya bersifat sementara, dan akan hilang jika Anda kembali ke halaman utama dan membuka kembali zona tersebut. Untuk mengubahnya secara permanen, lihat Urutan untuk menampilkan catatan di bidang di bagian Mengonfigurasi modul Server DNS BIND .
Jenis rekaman
Webmin tidak mendukung semua jenis catatan yang diketahui BIND, hanya yang paling umum digunakan. Daftar di bawah ini mencakup semua jenis yang didukung, dan menjelaskan kegunaannya dan bidang apa yang tersedia saat menambahkan atau mengedit catatan jenis itu di Webmin. Di sebelah setiap nama jenis adalah kode pendek yang digunakan oleh BIND itu sendiri untuk mengidentifikasi jenis dalam file catatan.
- Alamat (A)
- Catatan alamat mengaitkan alamat IPv4 dengan nama host. Sistem apa pun yang ingin Anda sambungkan melalui HTTP, telnet, atau protokol lain yang menggunakan nama hostnya harus memiliki catatan alamat sehingga klien dapat mencari IP-nya. Sebuah nama host tunggal dapat memiliki lebih dari satu catatan Alamat, yang sering dilakukan untuk menyebarkan beban situs web ke beberapa server. Hal ini juga berlaku untuk membuat beberapa catatan jenis ini dengan nama yang berbeda tetapi IP yang sama, seperti saat menyiapkan server virtual Apache berbasis nama. Saat membuat atau mengedit catatan Alamat, bidang Alamat ditampilkan untuk memasukkan IP yang terkait dengan nama host. Bidang berlabel Perbarui terbalik? juga muncul, yang mengontrol pembuatan dan modifikasi otomatis catatan Alamat Balik di zona balik yang sesuai. Lihat Menambahkan dan mengedit catatan bagian di atas untuk lebih jelasnya.
- Alamat IPv6 (AAAA)
- Catatan alamat IPv6 mengaitkan alamat IPv6 dengan nama host yang mirip dengan catatan A.
- Server Nama (NS)
- Catatan jenis ini mendefinisikan server nama yang bertanggung jawab atas suatu zona. Setiap zona harus memiliki setidaknya satu catatan Server Nama untuk dirinya sendiri, dan mungkin memiliki catatan tambahan yang menentukan server DNS yang bertanggung jawab untuk subdomain. Jika Anda menyiapkan server DNS sekunder untuk zona, pastikan untuk menambahkan catatan Server Nama untuk zona di server master. Dalam hal ini, nama rekaman akan menjadi nama kanonik zona, seperti example.com. . Saat membuat atau mengedit catatan jenis ini, bidang berlabel Server Nama akan ditampilkan. Ini harus diisi dengan alamat IP atau nama host dari server DNS yang bertanggung jawab untuk zona tersebut. Jika Anda memasukkan nama host, itu harus memiliki alamat IP yang ditetapkan oleh catatan Alamat di beberapa zona di server Anda.
- Nama Alias (CNAME)
- Jenis catatan ini membuat nama tambahan untuk catatan Alamat atau Alamat Balik yang sudah ada. Saat klien DNS meminta alamat IP catatan jenis ini, ia akan mendapatkan IP catatan yang ditunjuk oleh Nama Alias sebagai gantinya. Catatan semacam ini dapat berguna jika Anda memiliki satu host yang perlu diakses dengan beberapa nama berbeda, seperti server web yang melakukan hosting virtual berbasis nama. Meskipun ini juga dapat dilakukan dengan membuat beberapa catatan Alamat, membuat hanya satu Alamat dan beberapa Nama Alias lebih fleksibel karena memungkinkan pembaruan yang lebih mudah jika alamat IP host berubah. Formulir untuk mengedit dan membuat catatan Nama Alias berisi bidang berlabel Nama Asli . Ini harus diisi dengan nama kanonik catatan yang ditunjuk oleh alias (seperti server web.example.com. ), atau dengan nama pendek yang sesuai dengan zona tempat record Nama Alias berada.
- Server Email (MX)
- Catatan Server Email memberi tahu program pengiriman email seperti Sendmail dan Qmail sistem mana yang harus dihubungi saat mengirimkan email ke domain atau host. Tanpa catatan jenis ini, email untuk domain akan dikirimkan ke sistem yang IP-nya ditentukan dalam catatan Alamat untuk zona itu sendiri. Ini tidak selalu diinginkan, karena Anda mungkin ingin IP tersebut menjadi alamat server web, sehingga browser web dapat terhubung ke http://example.com/ serta http://www.example.com/. Catatan Server Surat dapat mengatasi masalah ini dengan hanya mengirim email misalnya.com ke host lain, dan semua lalu lintas lainnya ke server web. Setiap record Server Mail memiliki prioritas, yang memberi tahu program pengiriman email server email mana yang harus dicoba terlebih dahulu. Catatan dengan prioritas terendah harus menunjuk ke sistem yang benar-benar menerima dan menyimpan email untuk domain tersebut, sedangkan catatan dengan prioritas yang lebih tinggi umumnya menunjuk ke sistem yang hanya akan menyampaikan email. Program pengiriman akan mencoba masing-masing secara bergiliran dimulai dari yang terendah, sehingga jika server email utama mati, email akan tetap dikirim ke relai yang dapat menahannya hingga server utama muncul kembali.
- Saat menambahkan atau mengedit catatan Server Surat, dua bidang tambahan akan ditampilkan. Yang pertama diberi label Server Surat , dan harus diisi dengan nama host kanonik atau relatif dari sistem yang dapat menerima email untuk domain atau nama host yang dimasukkan di Nama bidang. Yang kedua diberi label Prioritas , dan harus digunakan untuk menentukan prioritas numerik untuk server email khusus ini. Biasanya prioritas 5 digunakan untuk server email utama, dan 10 untuk relai cadangan. Jika Anda hanya memiliki satu server email untuk domain Anda, tidak masalah nomor apa yang dimasukkan ke dalam bidang ini. Ada kemungkinan dua server memiliki prioritas yang sama, dalam hal ini salah satu akan dipilih secara acak untuk dikirim. Catatan Server Surat dapat menggunakan * wildcard dalam namanya, yang menunjukkan kepada program surat bahwa server surat tertentu bertanggung jawab atas semua host di domain. Misalnya, catatan bernama seperti *.example.com akan cocok dengan nama host pc1.example.com dan semua host lain di zona tersebut. Ini dapat berguna jika Anda ingin memaksa email yang seharusnya dikirim langsung ke stasiun kerja di domain Anda untuk melalui server email pusat. Webmin tidak akan mengizinkan Anda menggunakan karakter pengganti kecuali Izinkan karakter pengganti opsi konfigurasi modul disetel ke Ya meskipun, seperti yang dijelaskan di bagian *Mengonfigurasi modul Server DNS BIND*.
- Informasi Tuan Rumah (HINFO)
- Rekaman jenis ini digunakan untuk merekam informasi tentang perangkat keras dan sistem operasi dari suatu host tertentu. Misalnya, Anda dapat membuat yang mengatakan bahwa server1.example.com adalah PC x86 yang menjalankan Linux. Namun, mereka sangat jarang digunakan dan pada kenyataannya dianggap sebagai risiko keamanan, karena mereka memberikan informasi kepada penyerang potensial yang dapat digunakan untuk mengambil alih server. Saat membuat atau mengedit catatan Informasi Host, bidang Perangkat Keras dan Sistem Operasi ditampilkan untuk memasuki arsitektur dan jenis sistem operasi dari sebuah host. Nilai yang Anda masukkan tidak boleh berisi spasi - biasanya, nilai tersebut diganti dengan jenis perangkat keras dan string sistem operasi dengan karakter _.
- Teks (TXT)
- Catatan teks mengaitkan pesan arbitrer dari beberapa jenis dengan nama. TXT-records dapat digunakan untuk memberikan informasi kepemilikan fasilitas mail seperti SPF dan DKIM. Namun perlu diketahui bahwa komentar semacam itu akan tersedia bagi siapa saja di Internet yang dapat mencari catatan di domain Anda, dan karenanya tidak boleh berisi informasi sensitif. Bidang Pesan ditampilkan saat memasukkan atau mengedit catatan teks. Anda dapat memasukkan teks apa pun yang Anda suka, termasuk spasi.
- Layanan Terkenal (WKS)
- Catatan jenis ini mengaitkan nama host, port, dan protokol dengan sebuah nama. Ini dapat dianggap sebagai varian umum dari catatan Server Surat, yang memberi tahu klien host mana yang menyediakan layanan tertentu untuk beberapa domain atau nama host. Namun, hampir tidak ada program yang benar-benar mencari catatan WKS, sehingga dalam praktiknya hampir tidak berguna. Saat menambahkan atau mengedit salah satu catatan ini, bidang Alamat , Protokol dan Layanan tersedia. Yang pertama adalah memasukkan alamat IP dari sebuah host yang menyediakan layanan untuk host atau domain yang dimasukkan ke dalam Nama bidang. Yang kedua adalah untuk memilih protokol jaringan yang digunakan layanan, baik TCP atau UDP. Yang terakhir adalah untuk memasukkan daftar nomor port atau nama (dari file /etc/services) untuk layanan yang disediakan oleh host.
- Penanggung Jawab (PR)
- Jenis record ini digunakan untuk menentukan orang atau grup yang bertanggung jawab untuk host tertentu. Masing-masing catatan ini memiliki dua nilai yang terkait dengannya - alamat email, dan nama Catatan teks yang berisi nama orang tersebut. Catatan Orang yang Bertanggung Jawab jarang terlihat, dan tidak digunakan oleh program pengiriman surat atau klien Internet mana pun. Alamat Email bidang yang ditampilkan saat mengedit atau menambahkan salah satu catatan ini adalah untuk memasukkan alamat lengkap (seperti jcameron@example.com ) dari orang yang bertanggung jawab atas tuan rumah yang namanya dimasukkan ke dalam Nama bidang. Nama Rekaman Teks bidang adalah untuk memasukkan nama relatif atau kanonik dari catatan Teks yang berisi nama asli orang tersebut.
- Lokasi (LOC)
- Rekaman lokasi digunakan untuk menentukan lokasi fisik dalam garis lintang dan garis bujur suatu host. Mereka hampir tidak pernah terlihat, dan dengan demikian tidak digunakan oleh banyak program. Namun, mereka dapat berguna dalam organisasi besar yang memiliki host di banyak negara. Saat menambahkan atau mengedit rekaman Lokasi, bidang *Lintang dan Bujur* ditampilkan untuk memasukkan lokasi host di Nama bidang. Itu harus diformat seperti _42 21 43.528 N 71 05 06.284 W 12.00m 30.00m 10000.00m 10.00m_.
- Alamat Layanan (SRV)
- Catatan jenis ini digunakan untuk mengaitkan nama domain, nama layanan, dan protokol dengan host tertentu. Mereka memungkinkan Anda untuk menentukan server mana yang harus dihubungi klien untuk layanan dan nama host tertentu, alih-alih hanya menghubungkan ke host. Di satu sisi, mereka seperti catatan Mail Server tetapi jauh lebih fleksibel. Misalnya, Anda dapat menentukan bahwa server POP3 untuk example.com adalah mail.example.com , tetapi server webnya adalah www.example.com . Pada saat penulisan, catatan SRV sebagian besar digunakan oleh sistem klien Windows. Saat menambahkan atau mengedit catatan Alamat Layanan, bidang Protokol dan Nama layanan ditampilkan di dekat Nama kolom tulisan. Untuk protokol, Anda harus memilih TCP atau UDP dari menu. Untuk nama layanan, Anda harus memasukkan nama yang terkenal dari file /etc/services, seperti pop3 atau telnet . Untuk mencari catatan SRV, klien menggabungkan nama layanan, protokol, dan nama untuk mendapatkan nama catatan seperti ___telnet.___tcp.example.com . Webmin melakukan ini untuk Anda secara otomatis saat mengedit atau menambahkan catatan Alamat Layanan, tetapi Anda dapat melihat nama gabungan pada catatan daftar halaman jenis ini. Webmin juga secara otomatis menambahkan _s sebelum layanan dan protokol, tetapi menyembunyikannya saat catatan SRV sedang ditampilkan atau diedit. Ini berarti bahwa tidak perlu memasukkan secara manual saat membuat atau mengedit catatan jenis ini. Prioritas bidang harus digunakan untuk memasukkan prioritas numerik untuk server ini, yang memiliki arti yang sama dengan prioritas dalam catatan Server Surat. Berat bidang harus berisi penimbangan untuk server khusus ini, atau nol jika hanya ada satu catatan dengan nama, protokol, dan nama layanan yang sama. Bobot yang lebih tinggi memberi tahu klien untuk mencoba server ini lebih sering daripada server dengan bobot lebih rendah. Pelabuhan bidang harus berisi nomor port agar klien dapat terhubung ke server, yang tidak harus berupa port standar untuk layanan. Di Server bidang, Anda harus memasukkan nama host atau alamat IP dari sistem yang benar-benar menyediakan layanan, dan klien yang benar-benar terhubung.
Jenis catatan yang didukung oleh Webmin di zona terbalik adalah:
- Alamat Balik (PTR)
- Catatan alamat terbalik mengaitkan nama host dengan alamat IP di zona terbalik. Agar klien DNS dapat mencari nama host dari alamat IP di jaringan Anda, Anda harus membuat satu catatan jenis ini untuk setiap host. Namun, sebagian besar waktu ini dilakukan secara otomatis oleh Webmin saat menambahkan dan mengedit catatan Alamat. Jika Anda membuat catatan Alamat Balik Anda sendiri, pastikan catatan tersebut disinkronkan dengan catatan Alamat yang cocok. Saat menambahkan atau mengedit catatan jenis ini, bidang Alamat dan Nama Inang ditampilkan. Yang pertama adalah memasukkan alamat IP lengkap, seperti 192.168.1.10 . Ini akan secara otomatis dikonversi oleh Webmin ke format in-addr.arpa yang digunakan secara internal oleh sistem DNS untuk alamat balik. Kolom kedua adalah untuk memasukkan nama host dalam bentuk kanonik, seperti pc1.example.com. , pastikan untuk selalu meletakkan titik di akhir, atau nama host akan relatif terhadap zona terbalik, yang jelas bukan yang Anda inginkan.
- Server Nama (NS)
- Catatan Server Nama di zona terbalik memiliki tujuan yang sama dengan yang ada di domain maju - mereka memberi tahu server DNS lain alamat IP atau nama host dari server yang bertanggung jawab untuk zona atau subdomain. Ini berarti bahwa satu harus ditambahkan untuk setiap server DNS primer atau sekunder untuk zona tersebut. Bidang *Zone Name* yang muncul saat menambahkan atau mengedit rekaman jenis ini adalah untuk memasukkan nama zona yang menjadi tanggung jawab server, yang biasanya akan menjadi zona yang berisi rekaman. Namun, tidak seperti catatan Alamat Balik, bidang ini tidak secara otomatis dikonversi ke format in-addr.arpa. Sebagai gantinya, Anda harus memasukkannya dalam formulir yang memenuhi syarat seperti 1.168.192.in-addr.arpa. jika mendefinisikan server nama untuk 192.168.1 jaringan. Di bidang *Name Server*, Anda harus memasukkan alamat IP atau nama host bentuk kanonik untuk server DNS, seperti ns1.example.com. .
- Nama Alias (CNAME)
- Catatan jenis ini berperilaku persis sama di zona terbalik seperti yang mereka lakukan di domain maju. Namun, Anda harus mengisi Nama dan Nama Asli fields with reverse names in in-addr.arpa format, as Webmin will not convert them for you. Name Alias fields are most useful in reverse zones for doing partial subnet delegation, as covered in the *Partial reverse delegation* section below.
Editing a master zone
You can use Webmin to edit many of the settings that apply to an entire master zone, such as the expiry and retry times, and the clients that are allowed to query it. These settings effectively apply to all records in the zone, although some (such as the TTL) can be overridden on a per-record basis.
Webmin uses the term zone parameters to refer to all information stored in the domain's SOA record, including the primary nameserver, administrator email address and retry and expiry times. All of these are set when the zone is created, but you can edit them at any time by following these steps:
- On the module's main page, click on the icon for the zone that you want to edit.
- Click on the Zone Parameters icon, which will bring up a form for editing the parameters.
- The Master server field only needs to be edited if the Internet hostname of the DNS server has changed. Enter a fully-qualified hostname, with a dot at the end.
- To change the address of the person responsible for the zone, edit the Email address bidang. Any @ symbols that it contains will be automatically converted to dots for use in the SOA record, as BIND requires.
- The Refresh time , Transfer retry time , Expiry time and Default time-to-live fields all have the same meanings as explained in the section on Creating a new master zone . If records in your zone are going to be changing frequently in future, you may want to reduce some of these times. However, any changes, may not be detected by secondary servers and DNS clients until the old refresh or expiry time has elapsed, even if the new times are much lower. This is because they will wait for the old times to elapse before checking with the master server again to discovered the new ones.
- Click the Save button at the bottom of the page when you are done, and then the Apply Changes button back on the module's main page. The serial number in the SOA record will be automatically incremented when the form is saved, so that secondaries now that the zone has changed.
There is another set of options that you can edit for a master zone, stored in the named.conf file in the zone's section. These control which servers and clients are allowed to query records in the zone, do zone transfers and update records over the network. The most useful of these options specifies a list of slave DNS servers for the zone that should be notified when a change occurs, so that they can perform immediate zone transfers and thus remain synchronized.
To edit these master zone options, the process to follow is:
- On the module's main page, click on the icon for the zone that you want to edit. This will take you to the form shown in Figure 30-4.
- Click on the Edit Zone Options icon, which will bring up a form showing the existing settings.
- The Check names? field determines the level of checking that BIND performs on records in this zone when it reads the records file. The available options are :
- Warn
- If an invalid record is found, an error will be written to the system log file but processing of other records continues normally.
- Fail
- Invalid records cause the entire zone to be rejected, but other zones will still be processed normally.
- Ignore
- No checking is done at all.
- Default
- The global default from the Zone Defaults page is used. If it is not set, then the default complied into BIND will be used instead, which is to fail when invalid records are encounterd.
- To have secondary servers notified when records in the zone change, set the Notify slaves of changes? field to Yes . BIND works out which slaves will be notified by looking at the Name Server records for the zone, and the list of IP addresses in the Also notify slaves bidang. If your zone has an secondary servers, then you should definitely turn this option on.
- To allow some systems to update records in the zone dynamically, fill in the Allow updates from field with a list of IP addresses, IP networks (like 192.168.1.0/24) and BIND ACL names. Only those hosts that match will be able to modify records using commands like nsupdate, and if the list is left empty updates will not be allowed at all. You should be careful allowing the dynamic update of zones in which Webmin is also being used to edit records, as it is very likely that updates made dynamically will be overwritten by changes made in this module, or vice-versa.
- By default, all DNS clients and servers will be able to lookup records in the zone. This may not be what you want for a zone that is used only on an internal network, as it may give away sensitive information to potential attackers. To restrict queries, fill in the Allow queries from field with a list of IP addresses, IP networks and BIND ACL names. If the field is left empty, the field with the same name on the global Zone Defaults page determines which clients are allowed.
- To restrict the clients and servers that are allowed to perform zone transfers of all the records in this domain, fill in the Allow transfers from bidang. Often you will only want to allow secondary servers to perform transfers, especially if your zone is very large or contains records that you want to hide from attackers. Enter a list of IP addresses, IP networks and ACL names into the field to limit transfers to only matching clients. If it is left empty, the Allow transfers from field on the Zone Defaults page applies instead.
- To specify additional slave servers to be notified when the zone changes, fill in the Also notify slaves field with a list of IP addresses. BIND normally works out with addresses of all secondary servers for the zone from its Name Server records, but this may not always be complete.
- When you are done, click the Save button at the bottom of the page to update the BIND configuration file with your changes. You will need to use the Apply Changes button on the module's main page to make them active.
If a master zone is no longer needed, you can use this Webmin module to totally delete it along with all the records that it contains. To do this, the steps to follow are:
- On the module's main page, click on the icon for the zone that you want to edit.
- Click on the Delete Zone button at the bottom of the page.
- When deleting a forward zone, the field *Delete reverse records in other zones?* controls whether matching Reverse Address records in hosted reverse zones for all of the Address records in this one should be removed as well. This is generally safe to set to Yes , as only records with the exact same IP address and hostname will be deleted.
- Similarly, when deleting a reverse zone the field *Delete forward records in other zones?* determines whether matching forward records should be deleted too.
- Once you have made your selection and are sure you want to go ahead with the deletion, click the Delete tombol. The zone's entry in the named.conf file will be removed, and its records file deleted.
You can convert a master zone to a slave zone of the same name without needing to delete and re-create it. This can be useful if the new server is taking over as the master for some domain, or if the master and secondary servers are switching roles. The section on Editing a slave zone explains how to carry out the reverse action of converting a slave zone to a master, which may be useful in this situation.
To convert a zone, the steps to follow are:
- On the module's main page, click on the icon for the zone that you want to edit, then on the Edit Zone Options icon.
- When you click on the Convert to slave zone button , zone's entry in named.conf will be immediately updated to convert it to a slave zone. The browser will then return to the module's main page.
- Normally, every slave zone has a list of master server IP addresses that it can use to perform zone transfers from. In the case of converted zones, this list will be initially empty unless the Default master server(s) for slave zones module configuration option is set. Follow the instructions in the *Edit a slave zone* section to set the master servers addresses correctly.
- To activate the change, click on the Apply Changes button the module's main page.
Creating a new slave zone
A slave or secondary zone is one for which your DNS server gets the list of records from a master server for the zone. Generally, slave servers are used to reduce the load on the primary server, or act as a backup in case it goes down. For important zones (such as a company's Internet domain), you should always have at least one slave server so that your website is still accessible and email can still be delivered even if the primary goes down.
The secondary DNS server for a domain should not usually be located on the same network as the master, so that the failure of that network cannot take them both down. Many ISPs and hosting companies will host secondary zones for their customer's domains for free, on their own DNS servers. If your ISP provides this service and you want to set up a secondary server for an Internet domain, you should take advantage of it. If so, most of this section can be skipped. However, if you want to add a slave server for an internal domain or have a large company network with many connections to the Internet, then the instructions below explain how to set it up:
- On the main page of the BIND DNS Server module, click on the Create a new slave zone link above or below the list of existing zones. This will bring up the form shown below, for entering the details of the new domain.
- For a forward zone like example.com , set the Zone type field to Forward and enter the zone name into the *Domain name / Network* field. For a reverse zone that maps IP addresses to hostnames for a network, choose the Reverse option and enter the network address (like 192.168.1 ) into the *Domain name / Network* text field.
- The Records file field determines if BIND keeps a cache of the records in this zone in a file, and if so where that file is located. If the option None is chosen, records that the DNS server transfers from the master will be kept in memory only, and lost when the server is re-started. This should only be chosen if there is a good network connect between the master and slave servers, as it will increase the number of zone transfers that your server must perform. If you choose Automatic , Webmin will generate a filename in the zone files directory specified in the named.conf file (usually /var/named). Whenever your server does a zone transfer, all records will be written to this file in the standard format. If the final option is selected, you can enter the full path to a file in which records should be stored into the field next to. This can be useful if you want to separate the records files for master and slave zones.
- In the Master servers field, enter the IP addresses of the master DNS server and any other secondary servers for the zone. BIND will try these servers in order when doing a zone transfer, so the master should be first on the list. You must enter at least one address, so that your server knows where to get records from.
- Click the Create button to have the new slave zone added to your server's configuration. Your browser will be re-directed to a page for editing options for the zone.
- Return to the module's main page, and click the Apply Changes button on the main page to make the addition active.
- On the master server, add a new Name Server (NS) record for the zone with the IP address of the secondary server. This can be easily done in Webmin by following the instructions in the Adding and editing records bagian.
- Configure the master DNS server to notify this slave of any changes to records in the zone. The steps in the section on Editing a master zone explain how.
- If this is an Internet domain, notify the registrar for the parent zone of the new secondary server. Most provide online forms for editing the list of nameservers for a domain, to which you can add the secondary's IP. This is necessary so that other hosts on the Internet know to use the slave server is the master is down.

The slave zone creation form
Another type of zone that is closely related to the slave zone is the stub. They are like slave zones, but only contain Name Server records that have been transferred from a master server, instead of all the records. Stub zones are rarely used, but can be useful for ensuring that the Name Server records in a zone for its sub-domains are the same as those use in the sub-domain itself. The steps for creating one are almost identical to those above, but in step 1 you must use the Create a new stub zone link on the main page instead.
Editing a slave zone
After a slave zone has been created, it is still possible to edit several options that apply to it. Naturally there is no way to add or edit the actual records within the zone, but you can still change the list of master servers, the records file and the clients that allowed to query it. To change these setting, the steps to follow are:
- On the module's main page, click on the icon for the slave zone that you want to edit. Your browser will display the form shown in the screenshot below.
- Scroll down to the Zone Options form at the bottom of the page.
- To edit the list of other master and slave servers for this zone, change the IP addresses in the *Master servers *field. If a new secondary server has been added, it should be added to this list on all other secondaries so that they can do zone transfers from it. If the IP address of the master has changed, the list must be updated with the new address.
- To change the amount of time that the server will wait before giving up on a zone transfer, de-select Default for the Maximum transfer time field and enter a number of minutes into the text box next to it.
- If the Records file field is set to None , records transferred from the master server for this zone will be kept in memory only. However if a filename is entered, records will be written to that file instead in the standard format. This is the best option, as it minimizes zone transfers and allows you to view the records on the secondary server, as explained below.
- To have this DNS server notify others when the zone changes, change the Notify slaves of changes? field to Yes . This is only really useful if there are other secondary servers that perform zone transfers from this one, and may not be able to receive update notifications from the master server. The DNS servers to notify are determined from the Name Server records for the zone, and the contents of the *Also notify slaves* field.
- By default, all DNS clients and servers will be able to lookup records in the zone. To change this, fill in the *Allow queries from* field with a list of IP addresses, IP networks and BIND ACL names. If the field is left empty, the field with the same name on the global Zone Defaults page determines which clients are allowed.
- To restrict the clients and servers that are allowed to perform zone transfers of all the records in this domain, fill in the Allow transfers from field with a list of IP addresses, IP networks and ACL names. If it is left empty, the *Allow transfers from* field on the Zone Defaults page applies instead.
- The other fields on the form such as Check names? and *Allow updates from?* are not really used for slave zones, and so can be left unchanged.
- When you are done making changes, click the Save button. As long as there were no syntax errors in your input, you will be returned to the module's main page. Click the Apply Changes button there to make the modifications active. Note that this will not always force a re-transfer of the zone, even if the master servers have changed. For slave zones that use records files, BIND will only do a transfer when it the zone expires or the server receives notification of a change.

The slave zone editing form
When editing a slave zones that uses a records file, it is possible to browse the records in Webmin. At the top of the page that appears when you click on the slave zone's icon is a table of record types, just like the one that appears on the master zone form. Each can be clicked on to list the names and values of records of that type in the zone, as known to the secondary server. Editing or adding to them is impossible of course, as any changes must be made on the master server which is the authoritative source of records for the domain.
To stop your system acting as a slave server for a zone, you will need to delete it from the BIND configuration. This is generally a safe procedure, as the all the records in the zone have been copied from a master server and can be easily replaced. However, you should update the Name Server records in the zone and notify the parent domain's registrar that you system is no longer a secondary for the zone, so that other DNS servers do not waste time querying it.
To delete a slave zone, the steps to follow are:
- On the module's main page, click on the icon for the slave zone that you want to edit. This will take you to the form shown in the screenshot above.
- Click on the Delete button in the bottom right-hand corner of the page, which will display a confirmation form.
- Hit the Delete button if you are sure you want to delete the zone.
- After your browser returns to the module's main page, click on Apply Changes to make the deletion active.
- On the master server, remove the Name Server (NS) record for this secondary server from the zone.
- If this is an Internet domain, notify the parent zone registrar of the removal of this secondary server. Failure to do so could cause problems if other DNS servers attempt to query this one for records in the domain when it cannot provide answers.
The final thing that you can do to a slave zone is convert it to a master. This is only possible for zones that use a records file, so that Webmin can view and edit that file in future. If you do such a conversion, make sure that the original master server is changed to become a slave or stops hosting the zone altogether - the same domain cannot be served by two masters.
The steps to convert a zone are:
- Click on its icon on the module's main page.
- Scroll down to the bottom of the slave zone page, and hit the Convert to master zone tombol. This will immediately update the named.conf file to change the zone's type, but will not make any other changes.
- To make the conversion active, click on the Apply Changes button on the module's main page.
- You can now edit records in the domain just as you would with any normal master zone, by following the instructions in the section on Adding and editing records .
Creating and editing a forward zone
A forward zone is one for which your DNS server simply forwards queries to another server on behalf of whoever is making the request. They can be useful if the zone is actually hosted by another server that cannot be reached by clients of this server. It is possible to set up BIND to forward all requests for any non-hosted zones to another server, as explained in the *Configuring forwarding and transfers* section below. A forward zone entry does the same thing, but for just a single domain.
To set one up, the steps to follow are:
- On the module's main page, click on the *Create a new forward zone* link above or below the list of existing domain icons. This will take you to the zone creation form.
- Set the Zone type field to either Forward or Reverse , as when creating master and slave zones.
- For a forward zone, enter its full name (without a dot at the end) into the Domain name / Network bidang. For a reverse zone, enter its network (like 192.168.1 ) into the field instead - Webmin will automatically convert it to in-addr.arpa format when the zone is added.
- In the Master servers field, enter a list of IP addresses for the DNS servers that can be queried to lookup records in the zone. These must all be master, slave or forward hosts for the domain. If no addresses are entered at all, BIND will always perform normal lookups of records in the zone instead of forwarding requests to another server. This can be used to override the global forwarding settings on the Forwarding and Transfers page for a single zone.
- Click the Create button to have the zone added to BIND's configuration file. Your browser will be taken to a page for editing options in the new domain.
- Return to the module's main page, and hit the Apply Changes button to make it active.
After a forward zone has been created, you can delete it or edit the few settings that it has by following these steps :
- Click on the icon for the zone on the module's main page, which will bring your browser to a small form for editing its options.
- To change the list of DNS servers that requests are forwarded to, edit the IP addresses in the Master servers bidang. If none are entered, requests for records in this domain will be looked up directly.
- If the Try other servers? field is set to Yes , BIND will try a normal direct lookup for requests in this zone if it cannot contact any of the listed servers.
- Click the Save button to store your changes, and then Apply Changes back on the main page to activate them. Or to delete the forward zone, click on Delete and then Delete again on the confirmation page.
Creating a root zone
As the introduction explains, a root zone is one that contains the information that your DNS server needs to contain the Internet root servers. Without one, it is impossible to resolve records in domains other than those hosted by your server. Fortunately, one will almost always exist already in your BIND configuration, created either by Webmin or included as part of the default setup.
You may need to create a root zone if one does not exist yet because you selected the internal non-internet use only option when setting up the module for the first time, but have now connected your system to the Internet. Adding a second root zone can also be useful when views have been configured, as explained in the Using BIND views bagian.
Webmin will only allow you to create a root zone if none exists yet, or if a view exists that does not contain one, because there is no point having two such zones. To add one, the steps to follow are:
- On the module's main page, click on the Create a new root zone icon.
- Fill in the Store root servers in file field with a filename to use for the root zone file. If one already exists, then this field will already contain its path - otherwise, you should enter something like /var/named/db.cache.
- The Get root servers from field controls where Webmin copies the root file from. The choices are :*Download from root FTP server *This is the best option, as it tells the module to make an FTP connection to rs.internic.net and download the latest version of the file. However, this may not work if your system cannot make perform FTP downloads due to a firewall. *Use Webmin's older root server information *This option should be used if the first will not work. If selected, the module will use a copy of the root zone file that comes with Webmin, which will work but may not be up to date. *Existing root servers in file *If the file entered in step 2 already exists, then this option should be chosen. If you are adding a root zone to a view and one already exists in another view, it will be selected by default so that the file can be shared between both zones.
- Click the Create button to add the zone and return to the module's main page. Then hit Apply Changes to make it active.
Once a root zone has been added, an icon representing it will appear on the main page. You can delete it by clicking on the icon and hitting the Delete button - however, this may prevent the lookup of records in non-hosted Internet domains from working as explained above.
Editing zone defaults
Defaults for new master zones
If you add lots of zones that contain similar records, then it can be a lot of work to add them manually after creating each one. For example, in a web hosting company all of your domains might contain a www Address record for the IP address of your webserver, and an Mail Server record that directs mail to a central server. Fortunately, Webmin allows you to create a list of records that get added to all new domains, called a zone template.
A template consists of one or more records, each of which has a name, type and value. For Address records, the value can be option which indicates that it can be entered by the user at zone creation time. This is useful if one of the records (such as www) in the new domains does not have a fixed address, and you want to be able to easily set it when the zone is added. Templates can only be used when creating forward zones, as they do not make much sense for reverse zones.
It is also possible to edit the default expiry, refresh, TTL and retry times for new zones. Webmin's initial defaults are reasonable, but may not be appropriate for your network. To change these defaults and set up template records, the steps to follow are:
- On the module's main page, click on the Zone Defaults icon. The form at the top of the page labeled Defaults for new master zones contains all the fields that need to be edited.
- Edit the Refresh time , Transfer retry time , Expiry time and Default time-to-live fields if you want to change the defaults times for new zones. Existing master zones will not be effected by any changes you make here though.
- If all your new domains are managed by the same person, enter his address into the Default email address bidang. This will save you from having to type it in on the master zone creation page every time.
- In the Template records table, two blanks rows appear for entering new records. To add more than two, you will need to save this page and re-edit it. The records in existing rows can be edited by just changing their fields, or deleted by clearing out the record name. Under the Record name column you must enter the name of the record relative to the zone, such as www or ftp. To create a record for the zone itself (such as a Mail Server record for the domain), just enter a single dot. Under the Type column, select a type for the record from the list. See the #Record types section for more information on what each is used for. As its name suggests, the field under the Value column is for entering a value for the new record. For the Address type, you can select From form in which case you will be able to enter an address when creating a new domain, which will be used by all template records that have this option selected. For Mail Server records, both the priority and server name must be entered separated by a space, such as _5 mail.example.com._. Values for records of all other types should be entered in the same format as is used when adding a record to a zone.
- If you are familiar with the records file format used by BIND, you can create your own file of records to be included in new zones. If a filename is entered into the Additional template file field, its contents will be added to the zone file created by Webmin for new master domains.
- When you are done adding template records, click the Save button at the bottom of the page. The changes will apply to any new master zones created from now on.
Now that you have created a template, you can choose whether or not to use it for each new master zone that you create. On the creation form (explained in the Creating a new master zone section) is a field labeled Use zone template? , which is set to Yes by default if there are any template records. Next to it is a field named IP address for template records , which used for entering the IP for records for which the From form option is selected. If you chose to use a template and if there are any records that do not have an IP address specified, then this field must be filled in.
Default zone settings
At the bottom of the Zone Defaults page you will find several options that apply to all existing domains, but can all be set or overridden on a per-zone basis as explained in the Editing a master zone bagian. You can control which clients are allowed to query the server, and what kind of checking is done for the records of various domain types. Being able to limit the allowed client hosts is particularly useful, so that you can stop non-internal clients using your DNS server. However, you should make sure that master Internet zones hosted by your server are accessible to everyone, so that other DNS servers on the Internet can look them up.
To change these global options, the steps to follow are:
- On the module's main page, click on the Zone Defaults icon and scroll down to the Default zone settings bagian.
- To control which hosts are allowed to query your DNS server, change the Allow queries from field to Listed and enter a list of IP addresses, IP networks (like 192.168.1.0/24) and ACL names into the text box below. Clients that do not match any entry on the list will be denied, unless they are requesting a record in a zone which has its own separate settings allowing them.
- To control which hosts are allowed to perform zone transfers from your server, change the Allow transfers from field to Listed and fill in the text box below with a list of IP addresses, IP networks and ACL names. Only servers that are acting as secondaries for zones that this server hosts really need to be able to do transfers, so it is usually a good idea to enter just their IP addresses. If you are restricting queries, this field must be filled in so that hosts that cannot lookup records are not allowed to perform transfers either.
- The fields Check names in master zones? and Check names in slave zones? control the checking of records in all zone files for master and slave zones respectively. The available options for each are:
- Warn
- If an invalid record is found, an error will be written to the system log file but processing of other records continues normally.
- Fail
- Invalid records cause the entire zone to be rejected, but other zones will still be processed normally.
- Ignore
- No checking is done at all.
- Default
- The default checking level is used, which is Fail .
- To have BIND check responses that it receives from other DNS servers, set the Check names in responses? field to Warn or Fail . The default is simply to pass potentially erroneous responses on to clients.
- The Notify slaves of changes? field determines whether BIND sends a notification to all slaves of master zones hosted by this server when they change. To turn this on, select Yes - otherwise, select No or Default . Enabling notification is a good idea, as it ensures that secondary servers are kept in sync with the master.
- When done, click the Save button at the bottom of the page to update the BIND configuration file, and then the Apply Changes button on the module's main page to make the changes active. The new settings will apply to all zones that do not explicitly override them on their own options pages.
Configuring forwarding and transfers
BIND can be configured to forward all requests for zones that it is not the master or slave for to another DNS server. When doing this, it acts like a DNS client itself, accepting requests from real clients and then sending them off to another server or servers for resolution instead of carrying out the normal process of contacting the root zone servers and finding the correct server for the domain. This can be useful if your DNS server is unable to contact the rest of the Internet, but can still communicate with a DNS server that does have full network access. For example, it may be on an internal network behind a firewall that only allows connections to a limited set of destinations.
To set up forwarding, the steps to follow are:
- On the module's main page, click on the Forwarding and Transfers icon.
- In the form that appears, fill in the Servers to forward queries to field the IP addresses of DNS servers that requests should be sent to. BIND will try them in order until one returns a positive or negative a response. If the list is empty, the server will revert to the normal method of looking up records by contacting the root servers and so on.
- If you want your server to attempt to resolve a client's query directly when it cannot contact any of the forwarding servers, set the Lookup directly if no response from forwarder field to Yes . This is only useful if your server is actually capable of doing lookups.
- Click the Save button at the bottom of the page, and then hit Apply Changes back on the main page to make the new setting active. Assuming the forwarding list was filled in, your server will now send all client queries to the listed servers.
The same form also contains fields for configuring BIND's behavior when doing zone transfers. You can control how long it will wait for a transfer to complete, the protocol used for transfers and the number that can be active at the same time. To edit these settings, follow these steps:
- On the module's main page, click on the Forwarding and Transfers icon.
- By default, BIND will wait 120 minutes (2 hours) for a zone transfer from a master to complete. To change this, enter a different number of minutes into the *Maximum zone transfer time* field. This can also be set or overridden on a per-slave zone basis.
- BIND versions before 8.1 only support the transfer of a single zone at a time. Because this can be slow when transferring many zones from the same master server, the *Zone transfer format* field can be set to Many to use a new format that combines multiple domains into the same transfer. If One at a time or Default is chosen, then each zone will be transferred separately. This is the best choice unless you are sure that all slave servers are running BIND 8.1 or above.
- By default, your nameserver will not carry out more than 2 concurrent zone transfers from the same master server. To increase this limit, change the *Maximum concurrent zone transfers* field to something higher. This can speed up the process of transferring a large number of domains, but at the expense of putting a higher load on the master server.
- Click the Save button when you are done making changes, and then Apply Changes on the main page to activate them. The new settings will apply to all subsequent zone transfers.
Editing access control lists
An access control list (or ACL) is list of IP addresses, IP networks or other ACLs that are grouped together under a single name. The ACL name can then be used when specifying the list of clients allowed to query, update or perform zone transfers from a zone. This can make be used to reduce the amount of duplication in your BIND configuration, and to make it clearer. For example, the ACL corpnet might match the IP networks 192.168.1.0/24 , 192.168.2.0/24 and 1.2.3.0/24 , which are all part of your company's network. When configuring who can query a zone, you could just enter corpnet instead of that list of network addresses. To view and edit ACLs in Webmin, the steps to follow are :
- On the module's main page, click on the Access Control Lists icon. This will take you to a page listing existing ACLs and allowing the addition of one more. If you want to add more than one ACL, you will need to save the form and re-edit it to force the display of a new blank row.
- To add a new ACL, find the blank row at the bottom of the table and enter a short name consisting of only letters and numbers in the ACL Name kolom. Then in the field under *Matching addresses, networks and ACLs*, enter a list of IP addresses, IP networks and other ACL names that this new ACL will contain. IP addresses must be entered in their standard format like 192.168.1.1 , but hostnames are not allowed. IP networks must be entered in network/prefix format like 192.168.1.0/24 or 192.168.1/24 . You can also precede any address, network or ACL name with a ! to negate it, so for example the entry !192.168.1.0/24 would match all hosts outside the_ 192.168.1 _network.
- Existing entries in the list can be edited by changing their fields in the table, and ACLs can be deleted by clearing out the field containing their names.
- When you are done adding and editing ACLs, click the Save tombol. To activate the changes, hit Apply Changes back on the main page. As soon as an ACL is created, it can be used in other query, transfer and update restrictions of other zones.
BIND has four built-in ACLs that can be used in all the same places that user-defined ACLs can. They are:
- any
- Matches any client address.
- none
- Matches nothing.
- localhost
- Matches the IP addresses of all network interfaces on your system. Even though it is called localhost, it doesn't just match 127.0.0.1.
- localnets
- Matches all clients on all networks that your system is directly connected to. BIND works this out by looking at the IP addresses and netmasks of all network interfaces.
Setting up partial reverse delegation
Partial reverse zone delegation is method for transferring the management of a small set of reverse IP addresses to another DNS server. Normally, reverse zones cover an entire class C network containing 256 addresses. However, many organizations have networks much smaller than this, containing maybe 16 or 32 addresses. Normally, this would make it impossible for the organization to manage its own reverse address mappings, as the addresses come from a network that is owned by an ISP or hosting company.
Fortunately, there is a solution - the ISP can set up Name Alias (CNAME) records in the reverse zone for the parent network that point to Reverse Address records in a special zone on the organization's DNS server. The parent zone must also contain a Name Server (NS) record for the special sub-zone that points to the customer's server, so that other DNS clients know where to look when resolving the Name Alias records.
An example may make this clearer - imagine for example than an ISP had granted addresses in the range 192.168.1.100 to 192.168.1.110 to Example Corporation, which owns the example.com domain. The company already runs its own DNS server to host the example.com zone, but wants to control reverse address resolution for its IP range as well. The ISP would create Name Alias records in the 192.168.1 zone pointing to the special sub-zone 192.168.1.100-110, which will contain the actual Reverse Address records named like 192.168.1.100-100.101. The ISP also needs to create a Name Server record for 192.168.1.100-110 which tells other servers that Example Corporation's DNS server should be used to find records under that zone.
Webmin handles reverse address delegation well, and automatically converts special network zones like 192.168.1.100-110 to and from the real zone names used by BIND such as 100-110.1.168.192.in-addr.arpa. The exact steps to follow on both the server that hosts the actual class C network zone and the server that a subset of it is being delegated to are :
- Decide on the range of addresses that are being delegated, such as 192.168.1.100 to 192.168.1.110 . Typically, the sub-zone name is based on the range of addresses being delegated, but this does not have to be the case as long as it is under the parent network domain.
- On the server that hosts the class C network zone, add a Name Server record for 192.168.1.100-110 with the server set to the IP address or name of the sub-zone's DNS server.
- For each address in the range, add a Name Alias record to the reverse zone named like 101.1.168.192.in-addr.arpa. with the Real Name set like 101.100-110.1.168.192.in-addr.arpa . As you can see, the alias points to a record inside the zone for the sub-network.
- When all of the Name Alias records have been created, everything that needs to be done on this server is finished and you can hit Apply Changes .
- On the DNS server for the sub-network, create a new master zone for the reverse network 192.168.1.100-110 . Webmin will automatically convert this to the correct in-addr.arpa format for you.
- Add Reverse Address records to the new zone as normal for IP addresses like 192.168.1.100-110.101 . Adding a record for the IP 192.168.1.101 will not work.
- When you are done creating reverse records, click the *Apply Changes* button to make them active. You should now be able to look them up using a command like nslookup on the server for the parent network zone.
The instructions above can be used to delegate multiple ranges from a single class C network to several different DNS servers. There is no limit on the size of ranges, nor any requirement that they follow normal network block boundaries - however, for routing reasons most IP allocation is done in power-of-two sized blocks (like 4, 8, 16 and so on), which means that any sub-zone ranges will be the same size.
The only problem with reverse address delegation when using Webmin is that Reverse Address are not automatically created and updated when Address records are. This means that you will have to create all such records manually on the sub-zone server, as in the steps above.
One inconvenience in setting up partial reverse delegation is the number of similar Name Alias records that must be created on the parent network zone server. Fortunately, there is a simpler alternative - record generators. A generator is a special BIND configuration entry that creates multiple similar records using an incrementing counter. This module allows you to created and edit generators, by following these steps :
- On the module's main page, click on the icon for the reverse zone that you want to create records in. This will typically be a class C network domain that is going to have a range of addresses delegated to some other Server.
- Click on the Record Generators icon. This takes you to a page containing a table of existing generators, with a blank row for adding a new one.
- In the empty row, select CNAME from the menu under the Type kolom.
- Under the Range column, enter numbers for the start and end of the address range into the first two fields, such as 100 and 110 . The third field is for entering the gap between each step, and should be left blank. If you were to enter 2, then the range would go 100 , 102 , 104 dan seterusnya.
- In the Address pattern field, enter _$_ (a single dollar sign). When the records are created, the $ will be replaced with the number of each record, which will in turn resolve to an IP address in the range. You could also enter $.1.168.192.in-addr.arpa. , which makes things more obvious but is longer to type.
- In the Hostname pattern field, enter $.100-110 . Similarly, the $ will be replace with the number of each record, which will resolve to something like 101.100-110. 1.168.192.in-addr.arpa. .
- If you like, enter a comment that describes what this generator is for into the Comment bidang.
- Click the Save button, return to the module's main page and click on Apply Changes .
A generator can replace the Name Alias records that the first set of instructions in this section tell you to create, so there is no need for them anymore. Note that the automatically generated replacements will not be visible or editable in the normal way, only through the Record Generators page.
Using BIND views
BIND version 9 introduced the concept of views, which are groups of zones that are visible only to certain DNS clients. Views can be used to hide internal zones from the Internet, to present the same zone in two different ways, or to stop non-local clients resolving non-hosted domains through your server. Every view has a unique name, and a list of matching IPs addresses and IP networks that determines which clients and servers it is visible to.
When it detects that you are running BIND 9, several additional features are available in the module. You can create views, move zones from one view to another, and choose which view zones are created in. On the main page, each current view is represented by an icon under Existing Client Views heading, and each zone icon has a label that indicates which view it is in.
If any views exist, then every zone must be in a view. Only if none are defined will Webmin allow the creation of zones outside views, as this is not supported by BIND. This includes the root zone, which must be available to a client for DNS requests for records in domains not hosted by this server to succeed. For this reason, it often makes sense to put the root zone in a view that is available to all clients.
To add a new view to your BIND configuration, the steps to follow are:
- On the module's main page, click on the Create a new view link in the Existing Client Views bagian. This will take you to a form for entering its details.
- Enter a short alphanumeric name for the view (such as internal or everyone ) into the View name bidang. Each view must have a unique name.
- Leave the DNS records class field set to Default .
- If this zones in this view are to be visible to everyone, set the Apply this view to clients field to All clients . Otherwise, choose Selected addresses, networks and ACLs and enter a list of IP addresses, IP networks and BIND ACL names into the text box below. Only clients that match one of the entries in this list will have access to the view.
- Click the Create button at the bottom of the form. You will be returned to the main page, which will include an icon for your new view.
- Move any existing zones that you want to be in this view into it. A zone can be moved by clicking on its icon, then on *Edit Zone Options*, and then selecting the new view from the menu next to the Move to view button before clicking it. If this is your first view, all existing zones must be moved into it (or another view) before the new configuration will be accepted by BIND.
- When you are done moving zones, click the Apply Changes button on the main page.
Once a view has been created, you can change the list of addresses and networks that it matches by clicking on its icon on the main page and updating the Apply this view to clients bidang. Then hit the Save button followed by Apply Changes to make the new client list active.
A view can be deleted by clicking the Delete button on the same form. This will bring up a confirmation page that allows you to choose what should happen to the zones that it contains, if any. The available options are:
- Delete totally
- All zones in the view are deleted, along with their records files.
- Move out of views
- Zones in the view are moved out to the top level. This option should only be used when deleting the last view, for the reasons explained above.
- Move to view
- Zones are moved to a different existing view.
When one or more views have been defined on your system, you can choose which one to use when adding new zones. This is done using the Create in view field on the master, slave, forward and root zone creation forms, which allows you to select a view from its menu. Naturally, there is no option for creating a zone outside of any views as this is not allowed by BIND.
One common use of views is hiding internal zones from clients outside your internal network. This is a good way of hiding the structure of your network and the hosts on it from potential attackers. To set it up, the steps to follow are:
- Create a new view called internal that matches clients on your internal LAN.
- Create a second view called everyone that matches all clients.
- Move any zones that are for internal use only into the internal view. Zones for Internet domains such as example.com must not be put in this view, as that would make them inaccessible to the rest of the world.
- Move all other zones (including the root zone) to the everyone view.
Views can also be used to prevent clients outside your network looking up non-hosted domains on your server, as follows:
- Create a new view called internal that matches clients on your internal LAN.
- Create a second view called everyone that matches all clients.
- Move the root zone to the internal view, which will prevent the server from looking up records for non-local clients that require contact with the root servers.
- Move all other zones to the everyone view.
Module access control
Like others, the BIND DNS Server module allows you to control which of its features are available to a particular Webmin user or group. This can be useful for giving people the rights to manage only records in their own zones and nobody else's. Even though this would normally require root access to the records files, with Webmin it can be granted to people without giving them level of power that a root login would allow.
Once you have created a user with access to the module as explained on WebminUsers, the steps to limit his access to only certain zones are:
- Click on the BIND DNS Server next to the name of the user in the Webmin Users module. This will being up a page of access control options.
- Change the Can edit module configuration? field to No , so that the user is not allowed to change the paths that the module uses to named.conf and other files.
- For the *Domains this user can edit *field, choose *Selected zones* and select the ones that you want him to have access to from the list to its right. If you want him to be able to edit almost all zones, it may be better to choose All except selected and select only those that he should not be allowed to manage records in. If your DNS server uses views, you can use the *Zones in view* options to allow or deny access to all zones in a view as well.
- Change the fields Can create master zones? , *Can create slave/stub zones?*, Can create forward zones? and *Can edit global options?* to No .
- If you want Reverse Address records in zones that the user does not have access to to be updated by changes to Address records in zones that he does, set the *Can update reverse addresses in any domain?* field to Yes . This may not be a good idea from a security point of view though, as he would be able to change almost any existing Reverse Address record on your system. For that reason, I suggest that this field be set to No .
- To stop the user creating more than one Address record with the same IP, set the *Can multiple addresses have the same IP? field to *No . Even though creating multiple records is harmless, you may want to set this to No to prevent the user allocating the same IP twice.
- Leave the Read-only access mode? field set to No . If it is changed to Yes , the user will only be able to view zones and records using the module, and not change anything. This might be useful for creating a different kind of restricted user though - one who can see all settings, but not edit them.
- Leave the Can apply changes? field set to Yes , so that he can use the Apply Changes button to make his additions and modifications active.
- Unless you want the user to be able to edit his records file manually, change the Can edit records file? field to No . Most un-trusted users are not smart enough to perform manual editing.
- The Can edit zone parameters? field determines if the user can see and use the Edit Zone Parameters icon for his domains. Setting this to Yes is quite safe, as the user can only harm his own zones by setting the parameters to silly values.
- Similarly, the Can edit zone options? field determines if the Edit Zone Options icon is visible or not. You should set this to No , as it is possible for a user to create a syntax error in named.conf by improper use of the zone options form.
- Unless you want the user to be able to delete his own domains, change the Can delete zones? field to No . Users should contact the master administrator instead if they can to delete zones.
- The Can edit record generators? field can be left set to Yes , as it simply allows the creation of multiple records at once. However, some users may get confused by this feature so it might be a good idea to change the field to No .
- The Can lookup WHOIS information? And *Can search for free IP numbers?* fields can also be left on Yes , as those features mere display information to the user.
- Change the Can create and edit views? field to No , so that the user cannot manage BIND 9 views. If the user is allowed to create zones, you can use the *Views this user can edit and add zones to* field to limit those that he can create zones in.
- Can create slave zones on remote servers? should be set to No , but this doesn't really matter as the user is not going to be allowed to create master or slave zones anyway.
- Finally, click the Save button to make the new restrictions for the user active.
See also:
- Resolution for Virtual Hosts