Pengantar
Virtual Private Network (VPN) memungkinkan Anda untuk melintasi jaringan yang tidak tepercaya seolah-olah Anda berada di jaringan pribadi. Ini memberi Anda kebebasan untuk mengakses internet dengan aman dan aman dari ponsel cerdas atau laptop Anda saat terhubung ke jaringan yang tidak tepercaya, seperti WiFi di hotel atau kedai kopi.
Ketika digabungkan dengan koneksi HTTPS, pengaturan ini memungkinkan Anda untuk mengamankan login dan transaksi nirkabel Anda. Anda dapat menghindari pembatasan geografis dan sensor, serta melindungi lokasi Anda dan lalu lintas HTTP yang tidak terenkripsi dari jaringan yang tidak tepercaya.
OpenVPN adalah solusi VPN Transport Layer Security (TLS) open-source berfitur lengkap yang mengakomodasi berbagai konfigurasi. Dalam tutorial ini, Anda akan mengatur OpenVPN di server Ubuntu 22.04, dan kemudian mengonfigurasinya agar dapat diakses dari mesin klien.
Catatan: Jika Anda berencana untuk menyiapkan Server OpenVPN pada DigitalOcean Droplet, ketahuilah bahwa kami, seperti banyak penyedia hosting, mengenakan biaya untuk kelebihan bandwidth. Untuk alasan ini, harap perhatikan berapa banyak lalu lintas yang ditangani server Anda.
Lihat halaman ini untuk info lebih lanjut.
Prasyarat
Untuk mengikuti tutorial ini, Anda memerlukan:
- Satu server Ubuntu 22.04 dengan pengguna non-root Sudo dan firewall yang diaktifkan. Untuk mengatur ini, Anda dapat mengikuti tutorial Pengaturan Server Awal kami dengan Ubuntu 22.04. Kami akan menyebutnya sebagai Server OpenVPN di seluruh panduan ini.
- Server Ubuntu 22.04 terpisah yang disiapkan sebagai Otoritas Sertifikat (CA) pribadi, yang akan kami rujuk sebagai Server CA sepanjang panduan ini. Setelah menjalankan langkah-langkah dari Panduan Pengaturan Server Awal di server ini, Anda dapat mengikuti langkah 1 hingga 3 dari panduan kami tentang Cara Mengatur dan Mengonfigurasi Otoritas Sertifikat (CA) di Ubuntu 22.04 untuk mencapainya.
Catatan: Meskipun secara teknis dimungkinkan untuk menggunakan Server OpenVPN atau mesin lokal Anda sebagai CA Anda, ini tidak disarankan karena membuka VPN Anda ke beberapa kerentanan keamanan. Sesuai dengan dokumentasi OpenVPN resmi, Anda harus menempatkan CA Anda di mesin mandiri yang didedikasikan untuk mengimpor dan menandatangani permintaan sertifikat. Untuk alasan ini, panduan ini mengasumsikan bahwa CA Anda berada di server Ubuntu 22.04 terpisah yang juga memiliki pengguna non-root dengan hak sudo dan firewall dasar yang diaktifkan.
Selain itu, Anda memerlukan mesin klien yang akan Anda gunakan untuk terhubung ke Server OpenVPN Anda. Dalam panduan ini, kami akan menyebutnya Klien OpenVPN . Untuk tujuan tutorial ini, Anda disarankan untuk menggunakan mesin lokal Anda sebagai klien OpenVPN.
Dengan prasyarat ini, Anda siap untuk mulai menyiapkan dan mengonfigurasi Server OpenVPN di Ubuntu 22.04.
Catatan: Harap dicatat bahwa jika Anda menonaktifkan otentikasi kata sandi saat mengonfigurasi server ini, Anda mungkin mengalami kesulitan saat mentransfer file di antara mereka nanti dalam panduan ini. Untuk mengatasi masalah ini, Anda dapat mengaktifkan kembali otentikasi sandi di setiap server. Atau, Anda dapat membuat pasangan kunci SSH untuk setiap server, lalu menambahkan kunci SSH publik Server OpenVPN ke authorized_keys mesin CA. berkas dan sebaliknya. Lihat Cara Mengatur Kunci SSH di Ubuntu 22.04 untuk petunjuk tentang cara melakukan salah satu dari solusi ini.
Langkah 1 — Memasang OpenVPN dan Easy-RSA
Langkah pertama dalam tutorial ini adalah menginstal OpenVPN dan Easy-RSA. Easy-RSA adalah alat manajemen infrastruktur kunci publik (PKI) yang akan Anda gunakan di Server OpenVPN untuk menghasilkan permintaan sertifikat yang kemudian akan Anda verifikasi dan tandatangani di Server CA.
Untuk memulai, perbarui indeks paket Server OpenVPN Anda dan instal OpenVPN dan Easy-RSA. Kedua paket tersedia di repositori default Ubuntu, jadi Anda dapat menggunakan apt untuk instalasi:
- sudo apt update
- sudo apt install openvpn easy-rsa
Selanjutnya Anda perlu membuat direktori baru di Server OpenVPN sebagai pengguna non-root Anda yang disebut ~/easy-rsa :
- mkdir ~/easy-rsa
Sekarang Anda perlu membuat symlink dari easyrsa skrip yang diinstal paket ke dalam ~/easy-rsa direktori yang baru saja Anda buat:
- ln -s /usr/share/easy-rsa/* ~/easy-rsa/
Catatan: Sementara panduan lain mungkin menginstruksikan Anda untuk menyalin easy-rsa paket file ke direktori PKI Anda, tutorial ini mengadopsi pendekatan symlink. Akibatnya, setiap pembaruan pada easy-rsa paket akan secara otomatis tercermin dalam skrip PKI Anda.
Terakhir, pastikan pemilik direktori adalah pengguna sudo non-root Anda dan batasi akses ke pengguna tersebut menggunakan chmod :
- sudo chown sammy ~/easy-rsa
- chmod 700 ~/easy-rsa
Setelah program ini diinstal dan telah dipindahkan ke lokasi yang tepat di sistem Anda, langkah selanjutnya adalah membuat Infrastruktur Kunci Publik (PKI) di server OpenVPN sehingga Anda dapat meminta dan mengelola sertifikat TLS untuk klien dan server lain yang akan sambungkan ke VPN Anda.
Langkah 2 — Membuat PKI untuk OpenVPN
Sebelum Anda dapat membuat kunci dan sertifikat pribadi server OpenVPN Anda, Anda perlu membuat direktori Infrastruktur Kunci Publik lokal di server OpenVPN Anda. Anda akan menggunakan direktori ini untuk mengelola permintaan sertifikat server dan klien alih-alih membuatnya langsung di server CA Anda.
Untuk membangun direktori PKI di server OpenVPN Anda, Anda harus mengisi file bernama vars dengan beberapa nilai default. Pertama Anda akan cd ke dalam easy-rsa direktori, maka Anda akan membuat dan mengedit vars file menggunakan nano atau editor teks pilihan Anda.
- cd ~/easy-rsa
- nano vars
Setelah file dibuka, rekatkan di dua baris berikut:
~/easy-rsa/varsset_var EASYRSA_ALGO "ec"
set_var EASYRSA_DIGEST "sha512"
Ini adalah dua baris yang Anda butuhkan di vars file di server OpenVPN Anda karena tidak akan digunakan sebagai Otoritas Sertifikat. Mereka akan memastikan bahwa kunci pribadi dan permintaan sertifikat Anda dikonfigurasi untuk menggunakan Kriptografi Kurva Elliptik (ECC) modern untuk menghasilkan kunci dan mengamankan tanda tangan untuk klien Anda dan server OpenVPN.
Mengonfigurasi server OpenVPN &CA Anda untuk menggunakan ECC berarti ketika klien dan server mencoba membuat kunci simetris bersama, mereka dapat menggunakan algoritma Kurva Elliptik untuk melakukan pertukaran mereka. Menggunakan ECC untuk pertukaran kunci secara signifikan lebih cepat daripada menggunakan Diffie-Hellman biasa dengan algoritme RSA klasik karena jumlahnya jauh lebih kecil dan komputasinya lebih cepat.
Latar Belakang: Saat klien terhubung ke OpenVPN, mereka menggunakan enkripsi asimetris (juga dikenal sebagai kunci publik/pribadi) untuk melakukan jabat tangan TLS. Namun, saat mentransmisikan lalu lintas VPN terenkripsi, server dan klien menggunakan enkripsi simetris, yang juga dikenal sebagai enkripsi kunci bersama.
Ada lebih sedikit overhead komputasi dengan enkripsi simetris dibandingkan dengan asimetris:jumlah yang digunakan jauh lebih kecil, dan CPU modern mengintegrasikan instruksi untuk melakukan operasi enkripsi simetris yang dioptimalkan. Untuk beralih dari enkripsi asimetris ke simetris, server dan klien OpenVPN akan menggunakan algoritma Elliptic Curve Diffie-Hellman (ECDH) untuk menyetujui kunci rahasia bersama secepat mungkin.
Setelah Anda mengisi vars file Anda dapat melanjutkan dengan membuat direktori PKI. Untuk melakukannya, jalankan easyrsa skrip dengan init-pki pilihan. Meskipun Anda telah menjalankan perintah ini di server CA sebagai bagian dari prasyarat, Anda perlu menjalankannya di sini karena server OpenVPN dan server CA Anda memiliki direktori PKI yang terpisah:
- ./easyrsa init-pki
Perhatikan bahwa di server OpenVPN Anda tidak perlu membuat Otoritas Sertifikat. Server CA Anda bertanggung jawab penuh untuk memvalidasi dan menandatangani sertifikat. PKI di server VPN Anda hanya digunakan sebagai tempat yang nyaman dan terpusat untuk menyimpan permintaan sertifikat dan sertifikat publik.
Setelah Anda menginisialisasi PKI di server OpenVPN, Anda siap untuk melanjutkan ke langkah berikutnya, yaitu membuat permintaan sertifikat server OpenVPN dan kunci pribadi.
Langkah 3 — Membuat Permintaan Sertifikat Server OpenVPN dan Kunci Pribadi
Sekarang server OpenVPN Anda telah menginstal semua prasyarat, langkah selanjutnya adalah membuat kunci pribadi dan Permintaan Penandatanganan Sertifikat (CSR) di server OpenVPN Anda. Setelah itu Anda akan mentransfer permintaan ke CA Anda untuk ditandatangani, membuat sertifikat yang diperlukan. Setelah memiliki sertifikat yang ditandatangani, Anda akan mentransfernya kembali ke server OpenVPN dan menginstalnya agar server dapat digunakan.
Untuk memulai, navigasikan ke ~/easy-rsa direktori pada Server OpenVPN Anda sebagai pengguna non-root Anda:
- cd ~/easy-rsa
Sekarang Anda akan memanggil easyrsa dengan gen-req pilihan diikuti dengan Nama Umum (CN) untuk mesin. CN dapat berupa apa saja yang Anda suka, tetapi akan sangat membantu untuk membuatnya menjadi sesuatu yang deskriptif. Sepanjang tutorial ini, CN Server OpenVPN akan menjadi server . Pastikan untuk menyertakan nopass pilihan juga. Gagal melakukannya akan melindungi file permintaan dengan kata sandi yang dapat menyebabkan masalah izin di kemudian hari.
Catatan: Jika Anda memilih nama selain server di sini, Anda harus menyesuaikan beberapa petunjuk di bawah ini. Misalnya, saat menyalin file yang dihasilkan ke /etc/openvpn direktori, Anda harus mengganti nama yang benar. Anda juga harus mengubah /etc/openvpn/server.conf file nanti untuk menunjuk ke .crt yang benar dan .key file.
- ./easyrsa gen-req server nopass
OutputCommon Name (eg: your user, host, or server name) [server]:

Keypair and certificate request completed. Your files are:
req: /home/sammy/easy-rsa/pki/reqs/server.req
key: /home/sammy/easy-rsa/pki/private/server.key
Ini akan membuat kunci pribadi untuk server dan file permintaan sertifikat bernama server.req . Salin kunci server ke /etc/openvpn/server direktori:
- sudo cp /home/sammy/easy-rsa/pki/private/server.key /etc/openvpn/server/
Setelah menyelesaikan langkah-langkah ini, Anda telah berhasil membuat kunci pribadi untuk server OpenVPN Anda. Anda juga telah membuat Permintaan Penandatanganan Sertifikat untuk server OpenVPN. CSR sekarang siap untuk ditandatangani oleh CA Anda. Di bagian selanjutnya dari tutorial ini, Anda akan mempelajari cara menandatangani CSR dengan kunci pribadi server CA Anda.
Langkah 4 — Menandatangani Permintaan Sertifikat Server OpenVPN
Pada langkah sebelumnya Anda membuat Permintaan Penandatanganan Sertifikat (CSR) dan kunci pribadi untuk server OpenVPN. Sekarang server CA perlu mengetahui tentang server sertifikat dan memvalidasinya. Setelah CA memvalidasi dan menyampaikan kembali sertifikat ke server OpenVPN, klien yang memercayai CA Anda akan dapat memercayai server OpenVPN juga.
Di server OpenVPN, sebagai pengguna non-root Anda, gunakan SCP atau metode transfer lain untuk menyalin server.req permintaan sertifikat ke server CA untuk ditandatangani:
- scp /home/sammy/easy-rsa/pki/reqs/server.req sammy@your_ca_server_ip:/tmp
Jika Anda mengikuti tutorial Cara Mengatur dan Mengonfigurasi Otoritas Sertifikat (CA) di Ubuntu 22.04 prasyarat, langkah selanjutnya adalah masuk ke server CA sebagai pengguna non-root yang Anda buat untuk mengelola CA Anda. Anda akan cd ke ~/easy-rsa direktori tempat Anda membuat PK dan kemudian mengimpor permintaan sertifikat menggunakan easyrsa naskah:
- cd ~/easy-rsa
- ./easyrsa import-req /tmp/server.req server
Output. . .
The request has been successfully imported with a short name of: server
You may now use this name to perform signing operations on this request.
Selanjutnya, tanda tangani permintaan dengan menjalankan easyrsa skrip dengan sign-req pilihan, diikuti oleh jenis permintaan dan Nama Umum. Jenis permintaan dapat berupa client atau server . Karena Anda bekerja dengan permintaan sertifikat server OpenVPN, pastikan untuk menggunakan server jenis permintaan:
- ./easyrsa sign-req server server
Di output, Anda akan diminta untuk memverifikasi bahwa permintaan tersebut berasal dari sumber tepercaya. Ketik yes lalu tekan ENTER untuk mengonfirmasi:
OutputYou are about to sign the following certificate.
Please check over the details shown below for accuracy. Note that this request
has not been cryptographically verified. Please be sure it came from a trusted
source or that you have verified the request checksum with the sender.

Request subject, to be signed as a server certificate for 3650 days:

subject=
commonName = server


Type the word 'yes' to continue, or any other input to abort.
Confirm request details: yes
. . .
Certificate created at: /home/sammy/easy-rsa/pki/issued/server.crt
Perhatikan bahwa jika Anda mengenkripsi kunci pribadi CA, Anda akan dimintai sandi pada saat ini.
Setelah langkah-langkah tersebut selesai, Anda telah menandatangani permintaan sertifikat server OpenVPN menggunakan kunci pribadi server CA. Hasil server.crt file berisi kunci enkripsi publik server OpenVPN, serta tanda tangan dari server CA. Maksud dari tanda tangan ini adalah untuk memberi tahu siapa pun yang memercayai server CA bahwa mereka juga dapat mempercayai server OpenVPN saat mereka terhubung.
Untuk menyelesaikan konfigurasi sertifikat, salin server.crt dan ca.crt file dari server CA ke server OpenVPN:
- scp pki/issued/server.crt sammy@your_vpn_server_ip:/tmp
- scp pki/ca.crt sammy@your_vpn_server_ip:/tmp
Sekarang kembali ke server OpenVPN Anda, salin file dari /tmp ke /etc/openvpn/server :
- sudo cp /tmp/{server.crt,ca.crt} /etc/openvpn/server
Sekarang server OpenVPN Anda hampir siap untuk menerima koneksi. Pada langkah berikutnya Anda akan melakukan beberapa langkah tambahan untuk meningkatkan keamanan server.
Langkah 5 — Mengonfigurasi Materi Kriptografi OpenVPN
Untuk lapisan keamanan tambahan, tambahkan kunci rahasia bersama ekstra yang akan digunakan server dan semua klien dengan tls-crypt OpenVPN pengarahan. Opsi ini digunakan untuk mengaburkan sertifikat TLS yang digunakan saat server dan klien terhubung satu sama lain pada awalnya. Ini juga digunakan oleh server OpenVPN untuk melakukan pemeriksaan cepat pada paket yang masuk:jika sebuah paket ditandatangani menggunakan kunci yang dibagikan sebelumnya, maka server akan memprosesnya; jika tidak ditandatangani, maka server mengetahui bahwa itu berasal dari sumber yang tidak tepercaya dan dapat membuangnya tanpa harus melakukan pekerjaan dekripsi tambahan.
Opsi ini akan membantu memastikan bahwa server OpenVPN Anda mampu mengatasi lalu lintas yang tidak diautentikasi, pemindaian port, dan serangan Denial of Service, yang dapat mengikat sumber daya server. Ini juga mempersulit untuk mengidentifikasi lalu lintas jaringan OpenVPN.
Untuk menghasilkan tls-crypt kunci yang dibagikan sebelumnya, jalankan yang berikut ini di server OpenVPN di ~/easy-rsa direktori:
- cd ~/easy-rsa
- openvpn --genkey secret ta.key
Hasilnya akan menjadi file bernama ta.key . Salin ke /etc/openvpn/server/ direktori:
- sudo cp ta.key /etc/openvpn/server
Dengan file-file ini di server OpenVPN Anda siap untuk membuat sertifikat klien dan file kunci untuk pengguna Anda, yang akan Anda gunakan untuk terhubung ke VPN.
Langkah 6 — Membuat Sertifikat Klien dan Pasangan Kunci
Meskipun Anda dapat membuat kunci pribadi dan permintaan sertifikat pada mesin klien Anda dan kemudian mengirimkannya ke CA untuk ditandatangani, panduan ini menguraikan proses untuk menghasilkan permintaan sertifikat di server OpenVPN. Manfaat dari pendekatan ini adalah Anda dapat membuat skrip yang secara otomatis akan menghasilkan file konfigurasi klien yang berisi semua kunci dan sertifikat yang diperlukan. Ini memungkinkan Anda menghindari keharusan mentransfer kunci, sertifikat, dan file konfigurasi ke klien dan menyederhanakan proses bergabung dengan VPN.
Anda akan membuat satu kunci klien dan pasangan sertifikat untuk panduan ini. Jika Anda memiliki lebih dari satu klien, Anda dapat mengulangi proses ini untuk masing-masing klien. Namun, harap perhatikan bahwa Anda harus memberikan nilai nama unik ke skrip untuk setiap klien. Sepanjang tutorial ini, pasangan sertifikat/kunci pertama disebut sebagai client1 .
Mulailah dengan membuat struktur direktori di dalam direktori home Anda untuk menyimpan sertifikat klien dan file kunci:
- mkdir -p ~/client-configs/keys
Karena Anda akan menyimpan sertifikat/pasangan kunci dan file konfigurasi klien Anda di direktori ini, Anda harus mengunci izinnya sekarang sebagai tindakan keamanan:
- chmod -R 700 ~/client-configs
Selanjutnya, navigasikan kembali ke direktori EasyRSA dan jalankan easyrsa skrip dengan gen-req dan nopass pilihan, bersama dengan nama umum untuk klien:
- cd ~/easy-rsa
- ./easyrsa gen-req client1 nopass
Tekan ENTER untuk mengkonfirmasi nama umum. Kemudian, salin client1.key file ke ~/client-configs/keys/ direktori yang Anda buat sebelumnya:
- cp pki/private/client1.key ~/client-configs/keys/
Selanjutnya, transfer client1.req file ke Server CA Anda menggunakan metode aman:
- scp pki/reqs/client1.req sammy@your_ca_server_ip:/tmp
Sekarang masuk ke Server CA Anda. Kemudian, navigasikan ke direktori EasyRSA, dan impor permintaan sertifikat:
- cd ~/easy-rsa
- ./easyrsa import-req /tmp/client1.req client1
Selanjutnya, tandatangani permintaan dengan cara yang sama seperti yang Anda lakukan untuk server pada langkah sebelumnya. Namun kali ini, pastikan untuk menentukan client jenis permintaan:
- ./easyrsa sign-req client client1
Saat diminta, masukkan yes untuk mengonfirmasi bahwa Anda bermaksud menandatangani permintaan sertifikat dan bahwa itu berasal dari sumber tepercaya:
OutputType the word 'yes' to continue, or any other input to abort.
Confirm request details: yes
Sekali lagi, jika Anda mengenkripsi kunci CA, Anda akan dimintai sandi di sini.
Ini akan membuat file sertifikat klien bernama client1.crt . Transfer file ini kembali ke server:
- scp pki/issued/client1.crt sammy@your_server_ip:/tmp
Kembali ke server OpenVPN Anda, salin sertifikat klien ke ~/client-configs/keys/ direktori:
- cp /tmp/client1.crt ~/client-configs/keys/
Selanjutnya, salin ca.crt dan ta.key file ke ~/client-configs/keys/ direktori juga, dan atur izin yang sesuai untuk pengguna sudo Anda:
- cp ~/easy-rsa/ta.key ~/client-configs/keys/
- sudo cp /etc/openvpn/server/ca.crt ~/client-configs/keys/
- sudo chown sammy.sammy ~/client-configs/keys/*
Dengan itu, sertifikat dan kunci server dan klien Anda semuanya telah dibuat dan disimpan di direktori yang sesuai di server OpenVPN Anda. Masih ada beberapa tindakan yang perlu dilakukan dengan file-file ini, tetapi itu akan datang di langkah selanjutnya. Untuk saat ini, Anda dapat melanjutkan ke konfigurasi OpenVPN.
Langkah 7 — Mengonfigurasi OpenVPN
Seperti banyak alat sumber terbuka lain yang banyak digunakan, OpenVPN memiliki banyak opsi konfigurasi yang tersedia untuk menyesuaikan server Anda untuk kebutuhan spesifik Anda. Di bagian ini, kami akan memberikan petunjuk tentang cara menyiapkan konfigurasi server OpenVPN berdasarkan salah satu contoh file konfigurasi yang disertakan dalam dokumentasi perangkat lunak ini.
Pertama, salin contoh server.conf file sebagai titik awal untuk file konfigurasi Anda sendiri:
- sudo cp /usr/share/doc/openvpn/examples/sample-config-files/server.conf /etc/openvpn/server/
Buka file baru untuk diedit dengan nano atau editor teks pilihan Anda:
- sudo nano /etc/openvpn/server/server.conf
Anda harus mengubah beberapa baris dalam file ini. Pertama, temukan HMAC bagian konfigurasi dengan mencari tls-auth pengarahan. Baris ini akan diaktifkan secara default. Beri komentar dengan menambahkan ; ke awal baris. Kemudian tambahkan baris baru setelahnya berisi nilai tls-crypt ta.key hanya:
;tls-auth ta.key 0 # This file is secret
tls-crypt ta.key
Selanjutnya, temukan bagian tentang cipher kriptografi dengan mencari cipher garis. Nilai default diatur ke AES-256-CBC , namun, AES-256-GCM cipher menawarkan tingkat enkripsi, kinerja, dan didukung dengan baik di klien OpenVPN terbaru. Komentari nilai default dengan menambahkan ; tanda tangani awal baris ini, lalu tambahkan baris lain setelahnya berisi nilai terbaru AES-256-GCM :
;cipher AES-256-CBC
cipher AES-256-GCM
Tepat setelah baris ini, tambahkan auth direktif untuk memilih algoritma intisari pesan HMAC. Untuk ini, SHA256 adalah pilihan yang baik:
auth SHA256
Selanjutnya, cari baris yang berisi dh direktif, yang mendefinisikan parameter Diffie-Hellman. Karena Anda mengonfigurasi semua sertifikat untuk menggunakan Kriptografi Kurva Elliptik, file benih Diffie-Hellman tidak diperlukan. Komentari baris yang ada yang terlihat seperti dh dh2048.pem atau dh dh.pem . Nama file untuk kunci Diffie-Hellman mungkin berbeda dari yang tercantum dalam file konfigurasi server contoh. Kemudian tambahkan baris setelahnya dengan isi dh none :
;dh dh2048.pem
dh none
Selanjutnya, OpenVPN harus berjalan tanpa hak istimewa setelah dimulai, jadi Anda harus memberi tahunya agar berjalan dengan pengguna tidak ada dan grup nogroup . Untuk mengaktifkannya, temukan dan batalkan komentar pada user nobody dan group nogroup baris dengan menghapus ; tanda tangani dari awal setiap baris:
user nobody
group nogroup
(Opsional) Dorong Perubahan DNS untuk Mengarahkan Ulang Semua Lalu Lintas Melalui VPN
Pengaturan di atas akan membuat koneksi VPN antara klien dan server Anda, tetapi tidak akan memaksa koneksi apa pun untuk menggunakan terowongan. Jika Anda ingin menggunakan VPN untuk merutekan semua lalu lintas klien Anda melalui VPN, Anda mungkin ingin menerapkan beberapa pengaturan tambahan ke komputer klien.
Untuk memulai, temukan dan batalkan komentar pada baris yang berisi push "redirect-gateway def1 bypass-dhcp" . Melakukan ini akan memberi tahu klien Anda untuk mengalihkan semua lalu lintasnya melalui Server OpenVPN Anda. Ketahuilah bahwa mengaktifkan fungsi ini dapat menyebabkan masalah konektivitas dengan layanan jaringan lain, seperti SSH:
push "redirect-gateway def1 bypass-dhcp"
Tepat di bawah baris ini, temukan dhcp-option bagian. Sekali lagi, hapus ; dari awal kedua baris untuk menghapus komentar:
push "dhcp-option DNS 208.67.222.222"
push "dhcp-option DNS 208.67.220.220"
Baris ini akan memberitahu klien Anda untuk menggunakan resolver OpenDNS gratis di alamat IP yang terdaftar. Jika Anda lebih suka resolver DNS lain, Anda dapat menggantinya dengan IP yang disorot.
Ini akan membantu klien dalam mengonfigurasi ulang pengaturan DNS mereka untuk menggunakan terowongan VPN sebagai gateway default.
(Opsional) Sesuaikan Port dan Protokol
Secara default, server OpenVPN menggunakan port 1194 dan protokol UDP untuk menerima koneksi klien. Jika Anda perlu menggunakan port yang berbeda karena lingkungan jaringan yang membatasi tempat klien Anda berada, Anda dapat mengubah port pilihan. Jika Anda tidak menghosting konten web di server OpenVPN Anda, port 443 adalah pilihan populer karena biasanya diizinkan melalui aturan firewall.
Untuk mengubah OpenVPN agar mendengarkan pada port 443, buka server.conf file dan temukan baris yang terlihat seperti ini:
port 1194
Edit sehingga portnya menjadi 443:
/etc/openvpn/server/server.conf# Optional!
port 443
Seringkali, protokol juga dibatasi pada port tersebut. Jika demikian, temukan proto baris di bawah port baris dan ubah protokol dari udp ke tcp :
# Optional!
proto tcp
Jika Anda melakukannya alihkan protokol ke TCP, Anda perlu mengubah explicit-exit-notify nilai direktif dari 1 ke 0 , karena direktif ini hanya digunakan oleh UDP. Gagal melakukannya saat menggunakan TCP akan menyebabkan kesalahan saat Anda memulai layanan OpenVPN.
Temukan explicit-exit-notify baris di akhir file dan ubah nilainya menjadi 0 :
# Optional!
explicit-exit-notify 0
Jika Anda tidak perlu menggunakan port dan protokol yang berbeda, yang terbaik adalah membiarkan pengaturan ini tidak berubah.
(Opsional) Arahkan ke Kredensial Non-Default
Jika Anda memilih nama yang berbeda selama ./easyrsa gen-req server perintah tadi, ubah cert dan key baris di server.conf file konfigurasi sehingga mereka menunjuk ke .crt yang sesuai dan .key file. Jika Anda menggunakan nama default, server , ini sudah disetel dengan benar:
cert server.crt
key server.key
Setelah selesai, simpan dan tutup file.
Anda sekarang telah selesai mengonfigurasi pengaturan umum OpenVPN Anda. Pada langkah berikutnya, Anda akan menyesuaikan opsi jaringan server.
Langkah 8 — Menyesuaikan Konfigurasi Jaringan Server OpenVPN
Ada beberapa aspek dari konfigurasi jaringan server yang perlu diubah agar OpenVPN dapat merutekan lalu lintas melalui VPN dengan benar. Yang pertama adalah penerusan IP , metode untuk menentukan ke mana lalu lintas IP harus diarahkan. Ini penting untuk fungsionalitas VPN yang akan disediakan server Anda.
Untuk menyesuaikan pengaturan penerusan IP default server OpenVPN Anda, buka /etc/sysctl.conf file menggunakan nano atau editor pilihan Anda:
- sudo nano /etc/sysctl.conf
Kemudian tambahkan baris berikut di bagian bawah file:
/etc/sysctl.confnet.ipv4.ip_forward = 1
Simpan dan tutup file setelah Anda selesai.
Untuk membaca file dan memuat nilai baru untuk sesi saat ini, ketik:
- sudo sysctl -p
Outputnet.ipv4.ip_forward = 1
Sekarang server OpenVPN Anda akan dapat meneruskan lalu lintas masuk dari satu perangkat ethernet ke perangkat lainnya. Pengaturan ini memastikan server dapat mengarahkan lalu lintas dari klien yang terhubung pada antarmuka VPN virtual melalui perangkat ethernet fisik lainnya. Konfigurasi ini akan mengarahkan semua lalu lintas web dari klien Anda melalui alamat IP server Anda, dan alamat IP publik klien Anda akan disembunyikan secara efektif.
Pada langkah berikutnya Anda perlu mengonfigurasi beberapa aturan firewall untuk memastikan bahwa lalu lintas ke dan dari server OpenVPN Anda mengalir dengan benar.
Langkah 9 — Konfigurasi Firewall
Sejauh ini, Anda telah menginstal OpenVPN di server Anda, mengonfigurasinya, dan membuat kunci dan sertifikat yang diperlukan klien Anda untuk mengakses VPN. Namun, Anda belum memberikan OpenVPN instruksi apa pun tentang ke mana harus mengirim lalu lintas web masuk dari klien. Anda dapat menetapkan bagaimana server harus menangani lalu lintas klien dengan menetapkan beberapa aturan firewall dan konfigurasi perutean.
Dengan asumsi Anda mengikuti prasyarat di awal tutorial ini, Anda seharusnya sudah memiliki ufw diinstal dan dijalankan di server Anda. Untuk mengizinkan OpenVPN melalui firewall, Anda harus mengaktifkan penyamaran, sebuah konsep iptables yang menyediakan terjemahan alamat jaringan dinamis (NAT) on-the-fly untuk merutekan koneksi klien dengan benar.
Sebelum membuka file konfigurasi firewall untuk menambahkan aturan penyamaran, Anda harus terlebih dahulu menemukan antarmuka jaringan publik mesin Anda. Untuk melakukannya, ketik:
- ip route list default
Antarmuka publik Anda adalah string yang ditemukan dalam output perintah ini yang mengikuti kata "dev". Misalnya, hasil ini menunjukkan antarmuka bernama eth0 , yang disorot di bawah ini:
Outputdefault via 159.65.160.1 dev eth0 proto static
Saat Anda memiliki antarmuka yang terkait dengan rute default Anda, buka /etc/ufw/before.rules file untuk menambahkan konfigurasi yang relevan:
- sudo nano /etc/ufw/before.rules
Aturan UFW biasanya ditambahkan menggunakan ufw memerintah. Aturan tercantum di before.rules file, though, are read and put into place before the conventional UFW rules are loaded. Towards the top of the file, add the highlighted lines below. This will set the default policy for the POSTROUTING chain in the nat table and masquerade any traffic coming from the VPN. Remember to replace eth0 in the -A POSTROUTING line below with the interface you found in the above command:
#
# rules.before
#
# Rules that should be run before the ufw command line added rules. Custom
# rules should be added to one of these chains:
#   ufw-before-input
#   ufw-before-output
#   ufw-before-forward
#

# START OPENVPN RULES
# NAT table rules
*nat
:POSTROUTING ACCEPT [0:0]
# Allow traffic from OpenVPN client to eth0 (change to the interface you discovered!)
-A POSTROUTING -s 10.8.0.0/8 -o eth0 -j MASQUERADE
COMMIT
# END OPENVPN RULES

# Don't delete these required lines, otherwise there will be errors
*filter
. . .
Save and close the file when you are finished.
Next, you need to tell UFW to allow forwarded packets by default as well. To do this, open the /etc/default/ufw berkas:
- sudo nano /etc/default/ufw
Inside, find the DEFAULT_FORWARD_POLICY directive and change the value from DROP to ACCEPT :
DEFAULT_FORWARD_POLICY="ACCEPT"
Save and close the file when you are finished.
Next, adjust the firewall itself to allow traffic to OpenVPN. If you did not change the port and protocol in the /etc/openvpn/server.conf file, you will need to open up UDP traffic to port 1194 . If you modified the port and/or protocol, substitute the values you selected here.
In case you forgot to add the SSH port when following the prerequisite tutorial, add it here as well:
- sudo ufw allow 1194/udp
- sudo ufw allow OpenSSH
Catatan :If you are using a different firewall or have customized your UFW configuration, you may need to add additional firewall rules. For example, if you decide to tunnel all of your network traffic over the VPN connection, you will need to ensure that port 53 traffic is allowed for DNS requests, and ports like 80 and 443 for HTTP and HTTPS traffic respectively. If there are other protocols that you are using over the VPN then you will need to add rules for them as well.
After adding those rules, disable and re-enable UFW to restart it and load the changes from all of the files you’ve modified:
- sudo ufw disable
- sudo ufw enable
Your server is now configured to correctly handle OpenVPN traffic. With the firewall rules in place, you can start the OpenVPN service on the server.
Step 10 — Starting OpenVPN
OpenVPN runs as a systemd service, so you can use systemctl to manage it. You will configure OpenVPN to start up at boot so you can connect to your VPN at any time as long as your server is running. To do this, enable the OpenVPN service by adding it to systemctl :
- sudo systemctl -f enable openvpn-server@server.service
Then start the OpenVPN service:
- sudo systemctl start openvpn-server@server.service
Double check that the OpenVPN service is active with the following command. You should see active (running) in the output:
- sudo systemctl status openvpn-server@server.service
Output● openvpn-server@server.service - OpenVPN service for server
     Loaded: loaded (/lib/systemd/system/openvpn-server@.service; enabled; vendor preset: enabled)
     Active: active (running) since Thu 2022-04-21 17:58:24 UTC; 6s ago
       Docs: man:openvpn(8)
             https://community.openvpn.net/openvpn/wiki/Openvpn24ManPage
             https://community.openvpn.net/openvpn/wiki/HOWTO
   Main PID: 144351 (openvpn)
     Status: "Initialization Sequence Completed"
      Tasks: 1 (limit: 4665)
     Memory: 1.8M
        CPU: 27ms
     CGroup: /system.slice/system-openvpn\x2dserver.slice/openvpn-server@server.service
             └─144351 /usr/sbin/openvpn --status /run/openvpn-server/status-server.log --status-version 2 --suppress-timestamps --config server.conf

. . .
You have now completed the server-side configuration for OpenVPN. Next, you will configure your client machine and connect to the OpenVPN Server.
Step 11 — Creating the Client Configuration Infrastructure
Creating configuration files for OpenVPN clients can be somewhat involved, as every client must have its own config and each must align with the settings outlined in the server’s configuration file. Rather than writing a single configuration file that can only be used on one client, this step outlines a process for building a client configuration infrastructure which you can use to generate config files on-the-fly. You will first create a “base” configuration file then build a script which will allow you to generate unique client config files, certificates, and keys as needed.
Get started by creating a new directory where you will store client configuration files within the client-configs directory you created earlier:
- mkdir -p ~/client-configs/files
Next, copy an example client configuration file into the client-configs directory to use as your base configuration:
- cp /usr/share/doc/openvpn/examples/sample-config-files/client.conf ~/client-configs/base.conf
Open this new file using nano or your preferred text editor:
- nano ~/client-configs/base.conf
Inside, locate the remote directive. This points the client to your OpenVPN server address — the public IP address of your OpenVPN server. If you decided to change the port that the OpenVPN server is listening on, you will also need to change 1194 to the port you selected:
. . .
# The hostname/IP and port of the server.
# You can have multiple remote entries
# to load balance between the servers.
remote your_server_ip 1194
. . .
Be sure that the protocol matches the value you are using in the server configuration:
~/client-configs/base.confproto udp
Next, uncomment the user dan group directives by removing the ; sign at the beginning of each line:
# Downgrade privileges after initialization (non-Windows only)
user nobody
group nogroup
Find the directives that set the ca , cert , and key . Comment out these directives since you will add the certs and keys within the file itself shortly:
# SSL/TLS parms.
# See the server config file for more
# description. It's best to use
# a separate .crt/.key file pair
# for each client. A single ca
# file can be used for all clients.
;ca ca.crt
;cert client.crt
;key client.key
Similarly, comment out the tls-auth directive, as you will add ta.key directly into the client configuration file (and the server is set up to use tls-crypt ):
# If a tls-auth key is used on the server
# then every client must also have the key.
;tls-auth ta.key 1
Mirror the cipher and auth settings that you set in the /etc/openvpn/server/server.conf berkas:
cipher AES-256-GCM
auth SHA256
Next, add the key-direction directive somewhere in the file. You must set this to “1” for the VPN to function correctly on the client machine:
key-direction 1
Finally, add a few commented out lines to handle various methods that Linux based VPN clients will use for DNS resolution. You’ll add two similar, but separate sets of commented out lines. The first set is for clients that do not use systemd-resolved to manage DNS. These clients rely on the resolvconf utility to update DNS information for Linux clients.
; script-security 2
; up /etc/openvpn/update-resolv-conf
; down /etc/openvpn/update-resolv-conf
Now add another set of lines for clients that use systemd-resolved for DNS resolution:
; script-security 2
; up /etc/openvpn/update-systemd-resolved
; down /etc/openvpn/update-systemd-resolved
; down-pre
; dhcp-option DOMAIN-ROUTE .
Save and close the file when you are finished.
Later in Step 13 - Installing the Client Configuration step of this tutorial you will learn how to determine how DNS resolution works on Linux clients and which section to uncomment.
Next, you’ll create a script that will compile your base configuration with the relevant certificate, key, and encryption files and then place the generated configuration in the ~/client-configs/files direktori. Open a new file called make_config.sh within the ~/client-configs direktori:
- nano ~/client-configs/make_config.sh
Inside, add the following content:
~/client-configs/make_config.sh#!/bin/bash
# First argument: Client identifier
KEY_DIR=~/client-configs/keys
OUTPUT_DIR=~/client-configs/files
BASE_CONFIG=~/client-configs/base.conf
cat ${BASE_CONFIG} \
<(echo -e '<ca>') \
${KEY_DIR}/ca.crt \
<(echo -e '</ca>\n<cert>') \
${KEY_DIR}/${1}.crt \
<(echo -e '</cert>\n<key>') \
${KEY_DIR}/${1}.key \
<(echo -e '</key>\n<tls-crypt>') \
${KEY_DIR}/ta.key \
<(echo -e '</tls-crypt>') \
> ${OUTPUT_DIR}/${1}.ovpn
Save and close the file when you are finished.
Before moving on, be sure to mark this file as executable by typing:
- chmod 700 ~/client-configs/make_config.sh
This script will make a copy of the base.conf file you made, collect all the certificate and key files you’ve created for your client, extract their contents, append them to the copy of the base configuration file, and export all of this content into a new client configuration file. This means that, rather than having to manage the client’s configuration, certificate, and key files separately, all the required information is stored in one place. The benefit of using this method is that if you ever need to add a client in the future, you can run this script to quickly create a new config file and ensure that all the important information is stored in a single, easy-to-access location.
Please note that any time you add a new client, you will need to generate new keys and certificates for it before you can run this script and generate its configuration file. You will get some practice using this script in the next step.
Step 12 — Generating Client Configurations
If you followed along with the guide, you created a client certificate and key named client1.crt and client1.key , respectively, in Step 6. You can generate a config file for these credentials by moving into your ~/client-configs directory and running the script you made at the end of the previous step:
- cd ~/client-configs
- ./make_config.sh client1
This will create a file named client1.ovpn in your ~/client-configs/files direktori:
- ls ~/client-configs/files
Outputclient1.ovpn
You need to transfer this file to the device you plan to use as the client. For instance, this could be your local computer or a mobile device.
While the exact applications used to accomplish this transfer will depend on your device’s operating system and your personal preferences, a dependable and secure method is to use SFTP (SSH file transfer protocol) or SCP (Secure Copy) on the backend. This will transport your client’s VPN authentication files over an encrypted connection.
Here is an example SFTP command which you can run from your local computer (macOS or Linux). This will copy the client1.ovpn file you created in the last step to your home directory:
- sftp sammy@openvpn_server_ip:client-configs/files/client1.ovpn ~/
Here are several tools and tutorials for securely transferring files from the OpenVPN server to a local computer:
- WinSCP
- How To Use SFTP to Securely Transfer Files with a Remote Server
- How To Use Filezilla to Transfer and Manage Files Securely on your VPS
Step 13 — Installing the Client Configuration
This section covers how to install a client VPN profile on Windows, macOS, Linux, iOS, and Android. None of these client instructions are dependent on one another, so feel free to skip to whichever is applicable to your device.
The OpenVPN connection will have the same name as whatever you called the .ovpn mengajukan. In regards to this tutorial, this means that the connection is named client1.ovpn , aligning with the first client file you generated.
Windows
Installing
Download the OpenVPN client application for Windows from OpenVPN’s Downloads page. Choose the appropriate installer version for your version of Windows.
Catatan :OpenVPN needs administrative privileges to install.
After installing OpenVPN, copy the .ovpn file to:
C:\Program Files\OpenVPN\config
When you launch OpenVPN, it will automatically locate the profile and make it available.
You must run OpenVPN as an administrator each time it’s used, even by administrative accounts. To do this without having to right-click and select Run as administrator every time you use the VPN, you must preset this from an administrative account. This also means that standard users will need to enter the administrator’s password to use OpenVPN. On the other hand, standard users can’t properly connect to the server unless the OpenVPN application on the client has admin rights, so the elevated privileges are necessary.
To set the OpenVPN application to always run as an administrator, right-click on its shortcut icon and go to Properties . At the bottom of the Compatibility tab, click the button to Change settings for all users . In the new window, check Run this program as an administrator .
Connecting
Each time you launch the OpenVPN GUI, Windows will ask if you want to allow the program to make changes to your computer. Click Yes . Launching the OpenVPN client application only puts the applet in the system tray so that you can connect and disconnect the VPN as needed; it does not actually make the VPN connection.
Once OpenVPN is started, initiate a connection by going into the system tray applet and right-clicking on the OpenVPN applet icon. This opens the context menu. Select client1 at the top of the menu (that’s your client1.ovpn profile) and choose Connect .
A status window will open showing the log output while the connection is established, and a message will show once the client is connected.
Disconnect from the VPN the same way:Go into the system tray applet, right-click the OpenVPN applet icon, select the client profile and click Disconnect .
macOS
Installing
Tunnelblick is a free, open source OpenVPN client for macOS. You can download the latest disk image from the Tunnelblick Downloads page. Double-click the downloaded .dmg file and follow the prompts to install.
Towards the end of the installation process, Tunnelblick will ask if you have any configuration files. Answer I have configuration files and let Tunnelblick finish. Open a Finder window and double-click client1.ovpn . Tunnelblick will install the client profile. Administrative privileges are required.
Connecting
Launch Tunnelblick by double-clicking the Tunnelblick icon in the Applications map. Once Tunnelblick has been launched, there will be a Tunnelblick icon in the menu bar at the top right of the screen for controlling connections. Click on the icon, and then the Connect client1 menu item to initiate the VPN connection. If you are using custom DNS settings with Tunnelblick, you may need check “Allow changes to manually-set network settings” in the advanced configuration dialog.
Linux
Installing
If you are using Linux, there are a variety of tools that you can use depending on your distribution. Your desktop environment or window manager might also include connection utilities.
The most universal way of connecting, however, is to just use the OpenVPN software.
On Ubuntu or Debian, you can install it just as you did on the server by typing:
- sudo apt update
- sudo apt install openvpn
On CentOS you can enable the EPEL repositories and then install it by typing:
- sudo dnf install epel-release
- sudo dnf install openvpn
Configuring Clients that use systemd-resolved
First determine if your system is using systemd-resolved to handle DNS resolution by checking the /etc/resolv.conf berkas:
- cat /etc/resolv.conf
Output# This file is managed by man:systemd-resolved(8). Do not edit.
. . .

nameserver 127.0.0.53
options edns0
If your system is configured to use systemd-resolved for DNS resolution, the IP address after the nameserver option will be 127.0.0.53 . There should also be comments in the file like the output that is shown that explain how systemd-resolved is managing the file. If you have a different IP address than 127.0.0.53 then chances are your system is not using systemd-resolved and you can go to the next section on configuring Linux clients that have an update-resolv-conf script instead.
To support these clients, first install the openvpn-systemd-resolved package. It provides scripts that will force systemd-resolved to use the VPN server for DNS resolution.
- sudo apt install openvpn-systemd-resolved
One that package is installed, configure the client to use it, and to send all DNS queries over the VPN interface. Open the client’s VPN file:
- nano client1.ovpn
Now uncomment the following lines that you added earlier:
client1.ovpnscript-security 2
up /etc/openvpn/update-systemd-resolved
down /etc/openvpn/update-systemd-resolved
down-pre
dhcp-option DOMAIN-ROUTE .
Configuring Clients that use update-resolv-conf
If your system is not using systemd-resolved to manage DNS, check to see if your distribution includes an /etc/openvpn/update-resolv-conf script instead:
- ls /etc/openvpn
Outputupdate-resolv-conf
If your client includes the update-resolv-conf file, then edit the OpenVPN client configuration file that you transferred earlier:
- nano client1.ovpn
Uncomment the three lines you added to adjust the DNS settings:
client1.ovpnscript-security 2
up /etc/openvpn/update-resolv-conf
down /etc/openvpn/update-resolv-conf
If you are using CentOS, change the group directive from nogroup to nobody to match the distribution’s available groups:
group nobody
Save and close the file.
Connecting
Now, you can connect to the VPN by just pointing the openvpn command to the client configuration file:
- sudo openvpn --config client1.ovpn
This should connect you to your VPN.
Catatan: If your client uses systemd-resolved to manage DNS, check the settings are applied correctly by running the systemd-resolve --status command like this:
- systemd-resolve --status tun0
You should see output like the following:
OutputLink 22 (tun0)
. . .
         DNS Servers: 208.67.222.222
                      208.67.220.220
          DNS Domain: ~.
If you see the IP addresses of the DNS servers that you configured on the OpenVPN server, along with the ~. setting for DNS Domain in the output, then you have correctly configured your client to use the VPN server’s DNS resolver. You can also check that you are sending DNS queries over the VPN by using a site like DNS leak test.com.
iOS
Installing
From the iTunes App Store, search for and install OpenVPN Connect, the official iOS OpenVPN client application. To transfer your iOS client configuration onto the device, connect it directly to a computer.
The process of completing the transfer with iTunes is outlined here. Open iTunes on the computer and click on iPhone> apps . Scroll down to the bottom to the File Sharing section and click the OpenVPN app. The blank window to the right, OpenVPN Documents , is for sharing files. Drag the .ovpn file to the OpenVPN Documents window. 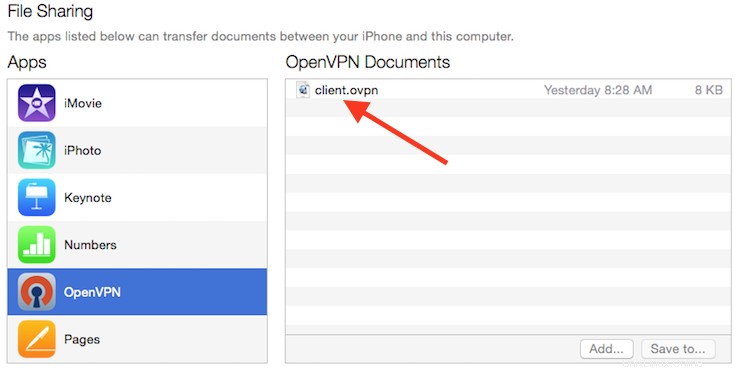
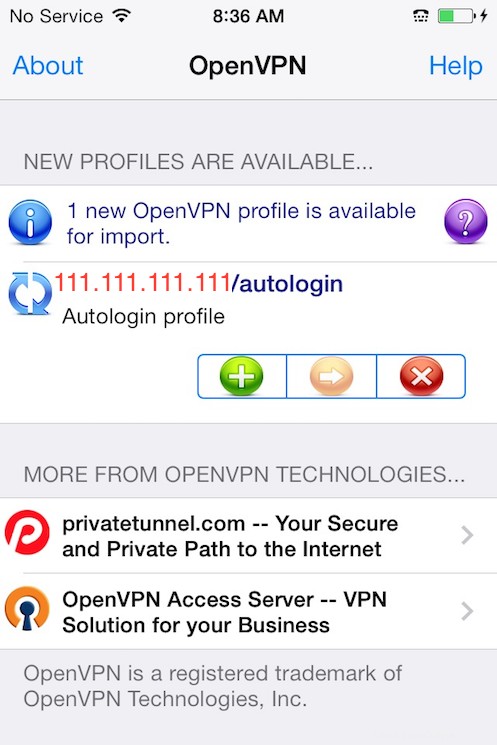
Now launch the OpenVPN app on the iPhone. You will receive a notification that a new profile is ready to import. Tap the green plus sign to import it.
 Connecting
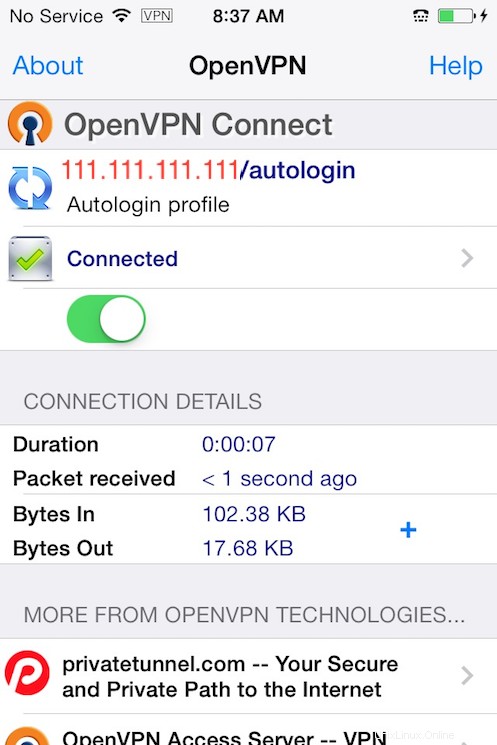
OpenVPN is now ready to use with the new profile. Start the connection by sliding the Connect button to the On posisi. Disconnect by sliding the same button to Off .
Catatan :The VPN switch under Settings cannot be used to connect to the VPN. If you try, you will receive a notice to only connect using the OpenVPN app.
Android
Installing
Open the Google Play Store. Search for and install Android OpenVPN Connect, the official Android OpenVPN client application.
You can transfer the .ovpn profile by connecting the Android device to your computer by USB and copying the file over. Alternatively, if you have an SD card reader, you can remove the device’s SD card, copy the profile onto it and then insert the card back into the Android device.
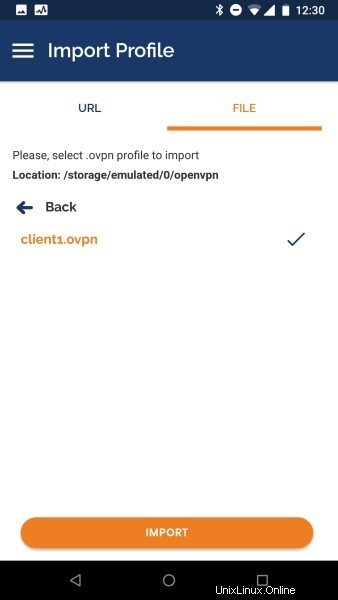
Start the OpenVPN app and tap the FILE menu to import the profile.
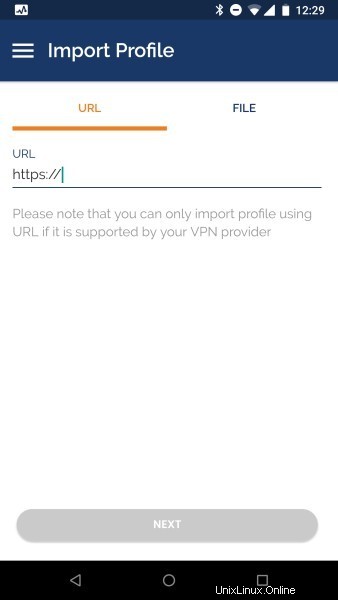
Then navigate to the location of the saved profile (the screenshot uses /storage/emulated/0/openvpn ) and select your .ovpn mengajukan. Tap the IMPORT button to finish importing this profile.
Connecting Once the profile is added, you will see a screen like this:
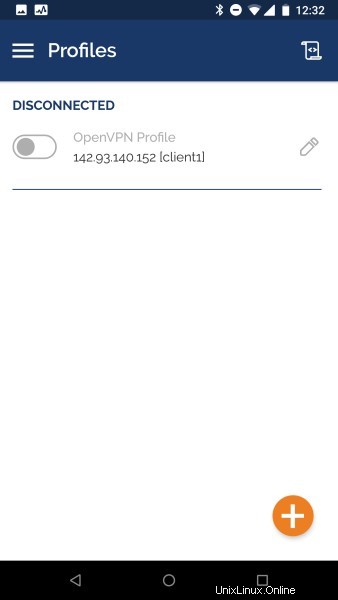
To connect, tap the toggle button close to the profile you want to use. You’ll see real time stats of your connection and traffic being routed through your OpenVPN server: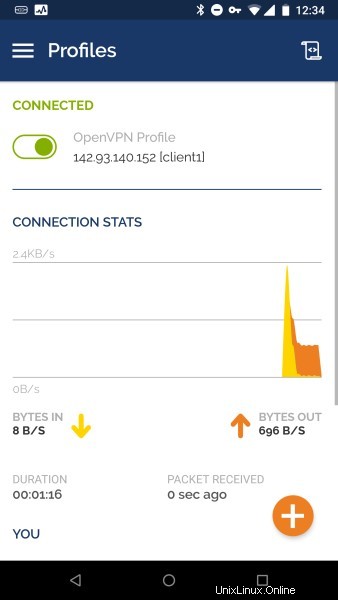
To disconnect, just tap the toggle button on the top left once again. You will be prompted to confirm that you want to disconnect from your VPN.
Step 14 — Testing Your VPN Connection (Optional)
Catatan: This method for testing your VPN connection will only work if you opted to route all your traffic through the VPN in Step 7 when you edited the server.conf file for OpenVPN.
Once everything is installed, a simple check confirms everything is working properly. Without having a VPN connection enabled, open a browser and go to DNSLeakTest.
The site will return the IP address assigned by your internet service provider and as you appear to the rest of the world. To check your DNS settings through the same website, click on Extended Test and it will tell you which DNS servers you are using.
Now connect the OpenVPN client to your Droplet’s VPN and refresh the browser. A completely different IP address (that of your VPN server) should now appear, and this is how you appear to the world. Again, DNSLeakTest’s Extended Test will check your DNS settings and confirm you are now using the DNS resolvers pushed by your VPN.
Step 15 — Revoking Client Certificates
Occasionally, you may need to revoke a client certificate to prevent further access to the OpenVPN server.
To do so, follow the example in the prerequisite tutorial on How to Set Up and Configure a Certificate Authority on Ubuntu 22.04 under the Revoking a Certificate section.
Once you have revoked a certificate for a client using those instructions, you’ll need to copy the generated crl.pem file to your OpenVPN server in the /etc/openvpn/server direktori:
- sudo cp /tmp/crl.pem /etc/openvpn/server/
Next, open the OpenVPN server configuration file:
- sudo nano /etc/openvpn/server/server.conf
At the bottom of the file, add the crl-verify option, which will instruct the OpenVPN server to check the certificate revocation list that you created each time a connection attempt is made:
crl-verify crl.pem
Save and close the file.
Finally, restart OpenVPN to implement the certificate revocation:
- sudo systemctl restart openvpn-server@server.service
The client should no longer be able to successfully connect to the server using the old credential.
To revoke additional clients, follow this process:
- Revoke the certificate with the
./easyrsa revoke client_nameperintah - Generate a new CRL
- Transfer the new
crl.pemfile to your OpenVPN server and copy it to the/etc/openvpn/server/directory to overwrite the old list. - Restart the OpenVPN service.
You can use this process to revoke any certificates that you’ve previously issued for your server.
Conclusion
You should now have a fully operational virtual private network running on your OpenVPN Server. You can browse the web and download content without worrying about malicious actors tracking your activity.
There are several steps you could take to customize your OpenVPN installation even further, such as configuring your client to connect to the VPN automatically or configuring client-specific rules and access policies. For these and other OpenVPN customizations, you should consult the official OpenVPN documentation.
To configure more clients, you only need to follow steps 6 and 11-13 for each additional device. To revoke access to clients, follow step 15 .