Ikhtisar panel kontrol cPanel
cPanel panel kontrol dirancang untuk mengelola akun hosting terpisah di server. Pengguna akhir/klien dapat:- mengunggah dan mengelola file untuk situs web mereka
- mengedit data DNS untuk domainnya
- menambah/menghapus domain dan subdomain addon
- instal CMS menggunakan penginstal skrip Softaculous
- buat akun email
- mengelola setelan email dan perlindungan SPAM
- periksa statistik situs web
- mengelola database dan backup, dll.
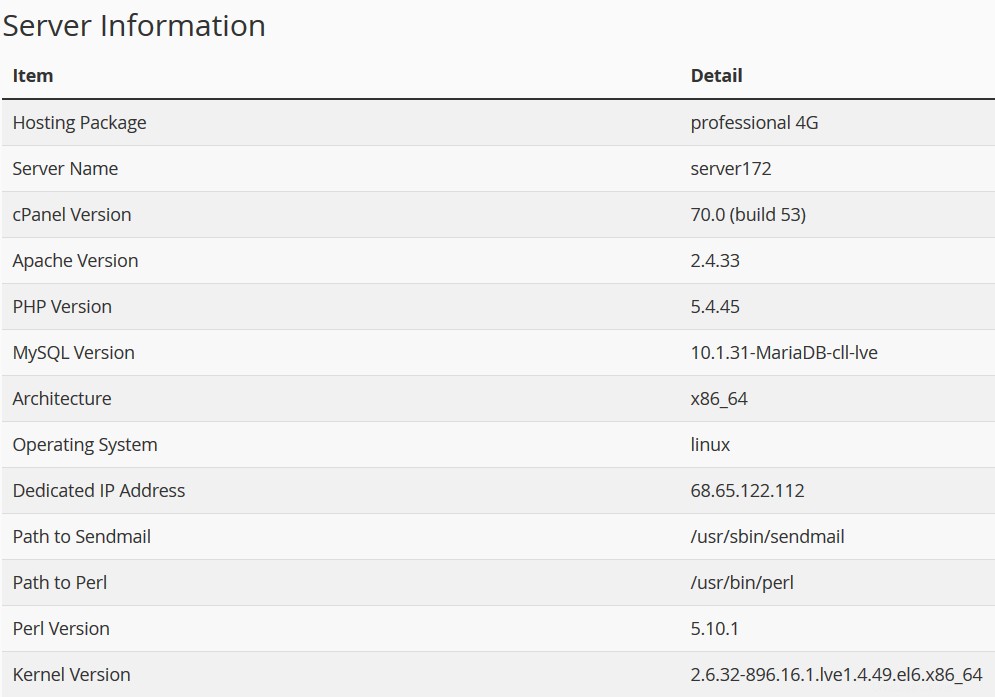
Kami telah menginstal cPanel 11.86 di server hosting kami. Anda dapat menemukan dokumentasi terbaru yang mencakup semua fungsinya di sini.
Anda dapat menemukan ikhtisar struktur cPanel untuk Tema Dasar cPanel dan untuk Tema Retro cPanel di bawah ini dalam panduan ini.
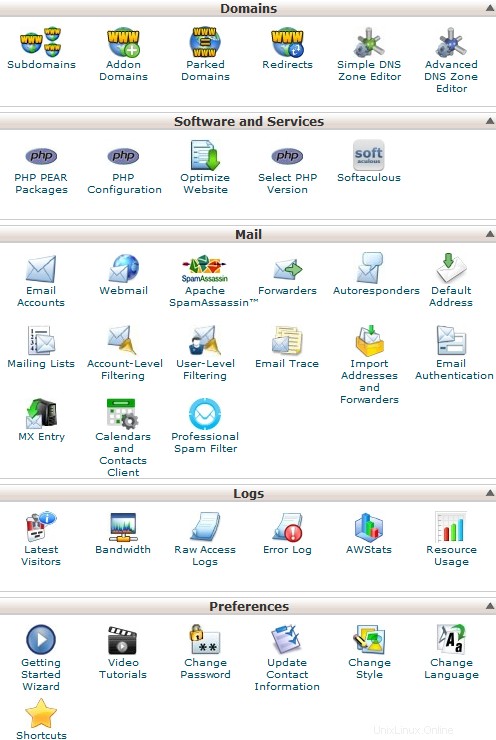
Untuk Tema Dasar cPanel:
Pada dasarnya cPanel memiliki dua bagian vertikal dengan fitur yang berbeda:
Kolom kiri yang menyediakan sejumlah fitur berbeda yang terstruktur dengan mudah untuk grup tertentu berdasarkan aspek konkret dari layanan hosting web dan Kolom kanan yang mencakup Statistik yang berbeda informasi tentang akun. Selain itu, Anda dapat melihat header di atas kedua bagian:
Tajuk dan Kolom Kanan:
- Telusuri
- Pengguna
- Statistik
Kolom Kiri:
- Eksklusif untuk pelanggan Namecheap
- File
- Database
- Domain
- Metrik
- Keamanan
- Perangkat Lunak
- Lanjutan
- Preferensi
Header dan Kolom Kanan:
Telusuri User Stats
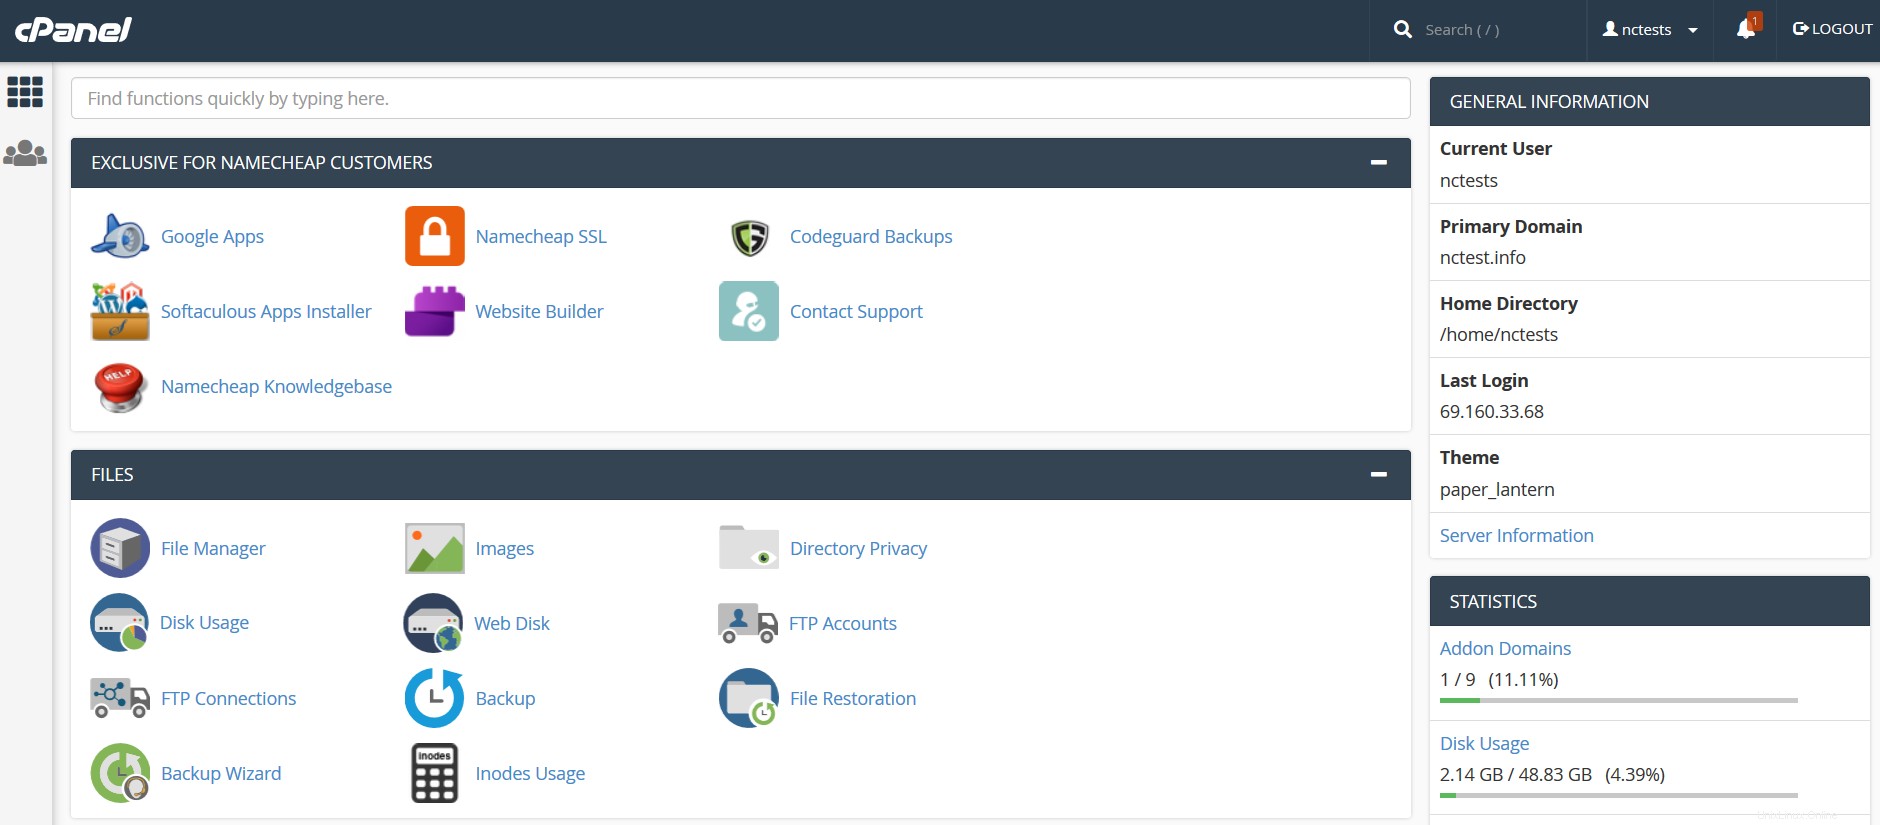
Penelusuran: bilah pencarian yang memungkinkan Anda menemukan fitur cPanel dengan cara tercepat. Cukup masukkan nama alat yang dibutuhkan untuk mengalokasikan menu yang sesuai:
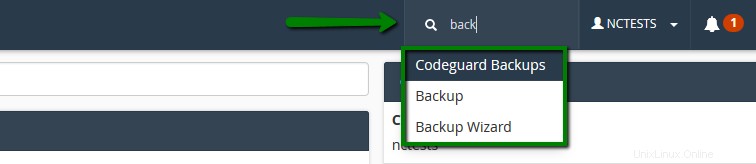
Pengguna: menu ini menyediakan sejumlah opsi yang terkait dengan pengguna cPanel Anda dan akun itu sendiri – mengubah kata sandi cPanel Anda, informasi kontak, gaya dan bahasa serta mengatur ulang semua konfigurasi akun saat ini ke keadaan default:
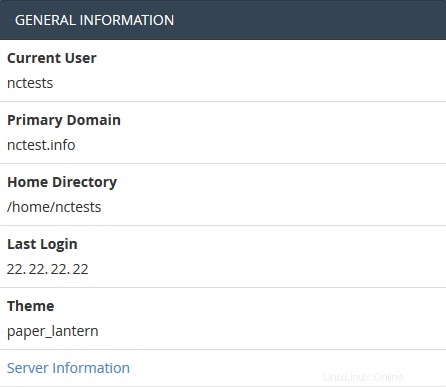
Statistik: di sini Anda akan menemukan informasi umum yang terkait dengan akun cPanel Anda:
Informasi Server daftar menu paket akun hosting dan detail sisi server tambahan, seperti alamat IP yang ditetapkan untuk akun cPanel Anda, perangkat lunak yang diinstal di server, dan status layanan inti:
Statistik kolom mengumpulkan layanan dan kuota cPanel serta penggunaan sumber daya akun saat ini:
Kolom Kiri:
Eksklusif untuk pelanggan Namecheap
Files Databases Email Domains Metrics Keamanan Software Preferensi Lanjutan
Eksklusif untuk Pelanggan Namecheap
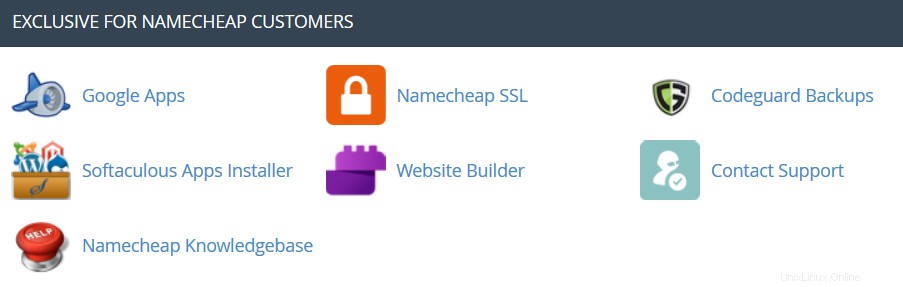
AutoBackup: ini adalah plugin cPanel yang memungkinkan pelanggan dengan Hosting Premium dan Bisnis untuk segera mengambil cadangan cPanel lengkap.
 Google Apps: dengan alat ini Anda akan dapat mengonfigurasi layanan Google Apps untuk domain Anda hanya dengan beberapa klik. Silakan periksa kategori ini untuk informasi lebih lanjut.
  Namecheap SSL: menu ini memungkinkan Anda untuk menggunakan plugin Namecheap SSL cPanel, periksa panduan ini untuk lebih jelasnya.
  Cadangan CodeGuard: alat ini dirancang untuk membuat proses pencadangan semudah mungkin. Sistem CodeGuard akan terus memantau situs web dan memberi tahu Anda tentang perubahan apa pun, melakukan pencadangan otomatis penuh atas file Anda untuk menghindari kemungkinan downtime. Informasi lebih lanjut tersedia di artikel berikut:
- Cara membuat cadangan menggunakan CodeGuard
- Cara mencadangkan situs WordPress menggunakan CodeGuard
 Pemasang Aplikasi Softaculous: fitur ini memungkinkan Anda untuk menggunakan Softaculous Script Installer, yang mencakup CMS paling populer, seperti Wordpress/Joomla/Magento dll. Ini jauh lebih cepat daripada installer skrip lain dan menginstal CMS dalam beberapa klik. Aplikasi Softaculous disediakan dengan akun cPanel apa pun di semua paket hosting bersama kami. Anda dapat melihat skrip yang tersedia dan demonya di sini. Anda mungkin menemukan panduan ini berguna saat bekerja dengan penginstal Softaculous:
- Cara bekerja dengan skrip di Softaculous
- Cara menginstal WordPress menggunakan Softaculous
- Cara menginstal Joomla dengan Softaculous
Menyiapkan Aplikasi Node.js: memungkinkan untuk memilih versi Node.js tertentu untuk menjalankan aplikasi menggunakan Node.js.
 Pilih Versi PHP: menggunakan menu ini dimungkinkan untuk memilih versi PHP yang diperlukan serta mengaktifkan/menonaktifkan modul dan fungsi PHP tertentu.
Setup Python App: fitur ini memungkinkan Anda untuk menyebarkan aplikasi Python di cPanel Anda saat menjalankan server web Apache.
Menyiapkan Aplikasi Ruby: fitur ini memungkinkan Anda untuk menerapkan aplikasi Ruby di cPanel Anda saat menjalankan server web Apache.
 Pembuat Situs Web :alat ini memungkinkan Anda membuat seluruh situs web dengan mudah menggunakan editor drag-and-drop dan tanpa mengetahui kode apa pun atau menginstal perangkat lunak khusus.
  Hubungi Dukungan :membuka Obrolan Langsung dengan tim Dukungan Pelanggan kami.
  Basis Pengetahuan Namecheap: tombol ini akan membawa Anda ke bagian situs Basis Pengetahuan kami.
 Kelola Shell: plugin ini memungkinkan Anda untuk mengaktifkan atau menonaktifkan akses SSH untuk akun hosting Anda masing-masing hanya dengan beberapa klik.
Perubahan PHP: memungkinkan pengelolaan pengaturan PHP di server Bisnis kami (Bisnis Stellar dan paket SSD Bisnis lama).
File
 Pengelola Berkas: di sini Anda dapat mengelola file yang disimpan di akun Anda. Panduan ini dapat berguna saat bekerja dengan menu ini:
- Cara menggunakan Pengelola File di cPanel
- Bagaimana cara mengunggah situs saya?
 Gambar: alat ini memungkinkan Anda untuk melihat dan memodifikasi gambar di akun Anda.
  Privasi Direktori: memungkinkan Anda menetapkan persyaratan untuk nama pengguna dan sandi saat pengguna mencoba mengakses situs Anda dari web. Ini dapat digunakan ketika Anda perlu membatasi akses ke bagian tertentu dari situs Anda. Anda bisa mendapatkan detail lebih lanjut dalam panduan ini.
  Penggunaan Disk: dalam menu ini Anda akan dapat memeriksa informasi rinci tentang penggunaan ruang disk akun Anda. Ini menunjukkan total penggunaan disk untuk direktori akun Anda dan semua basis datanya, bukan untuk file atau basis data individual. Detail lebih lanjut tentang pengoptimalan penggunaan Disk Space tersedia di artikel ini.
 Disk Web: fitur ini adalah implementasi cPanel dari protokol WebDav, yang memungkinkan Anda untuk mengelola, mengunggah, dan mengunduh file situs web Anda seolah-olah file tersebut lokal ke komputer pribadi Anda. Petunjuk lebih rinci tentang pengaturan WebDisk dapat ditemukan di artikel ini:
- Cara menyiapkan Disk Web di Windows 7
- Cara menyiapkan Disk Web di Windows 8
 Akun FTP: opsi ini memungkinkan Anda untuk membuat dan mengelola akun FTP Anda. Untuk membuat akun FTP, silakan baca artikel ini. Untuk instruksi koneksi FTP, lihat kumpulan panduan ini:
- Cara mengakses akun melalui FTP
- Cara menyiapkan FileZilla
- Cara menyiapkan Cyberduck
- Cara menyiapkan iWeb
- Cara menyiapkan Adobe Muse
- Cara menyiapkan Dreamweaver
- Cara menyiapkan Klien CoreFTP
- Cara menyiapkan CuteFTP
 Koneksi FTP: menggunakan alat ini Anda dapat memantau pengguna yang saat ini masuk ke situs Anda melalui FTP. Juga, dimungkinkan untuk mengakhiri koneksi FTP dari sini.
 Cadangan: fitur ini memungkinkan Anda untuk mengunduh salinan zip dari seluruh akun Anda atau bagian tertentu darinya, seperti direktori home, database, konfigurasi penerusan email, atau konfigurasi filter email Anda. Panduan lebih detail tentang cara membuat backup di cPanel dapat ditemukan di sini.
 Wizard Pencadangan: antarmuka yang mudah digunakan untuk membuat cadangan seluruh situs Anda, cadangan sebagian, atau memungkinkan pemulihan situs dari cadangan terakhir yang disimpan. Perhatikan, bahwa Pulihkan opsi yang disediakan dalam menu ini dinonaktifkan secara default di semua server Bersama kami.
Git Version Control: fitur ini memungkinkan Anda untuk dengan mudah meng-host repositori Git di akun cPanel Anda.
 Penggunaan Inode: memberikan statistik penggunaan inode (file) akun Anda. Anda akan menemukan detail lebih lanjut tentang alat ini di sini.
 Database
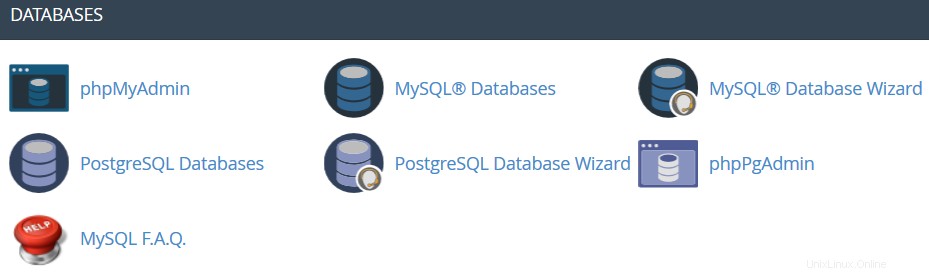
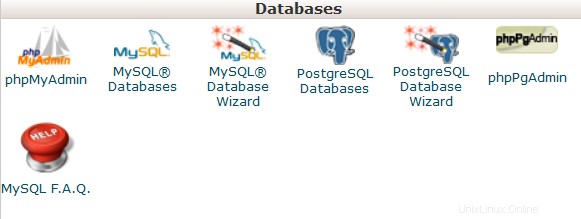
 phpMyAdmin: ini adalah alat manajemen basis data, yang memungkinkan Anda membuat berbagai perubahan pada basis data MySQL di akun Anda. Anda dapat menemukan informasi lebih lanjut tentang cara bekerja dengan database melalui phpMyAdmin panduan ini.
 Basis Data MySQL: di menu ini Anda dapat membuat dan mengelola database MySQL di akun cPanel. Anda dapat merujuk ke panduan ini untuk lebih jelasnya.
 Wizard Basis Data MySQL: menyediakan fungsionalitas yang sama dengan Database MySQL menu, dengan cara yang disederhanakan.
 Basis Data PostgreSQL: opsi ini memungkinkan Anda untuk membuat dan mengelola database PostgreSQL di cPanel.
 Wizard Basis Data PostgreSQL: memiliki fungsi yang sama dengan Basis Data PostgreSQL menu, tetapi memungkinkan untuk membuat semua perubahan dengan cara yang lebih sederhana.
 phpPgAdmin: ini adalah alat manajemen basis data, yang memungkinkan Anda membuat berbagai perubahan pada basis data PostgreSQL di akun Anda.FAQ MySQL: tombol ini akan membawa Anda ke bagian Basis Pengetahuan terkait yang didedikasikan untuk pertanyaan MySQL.
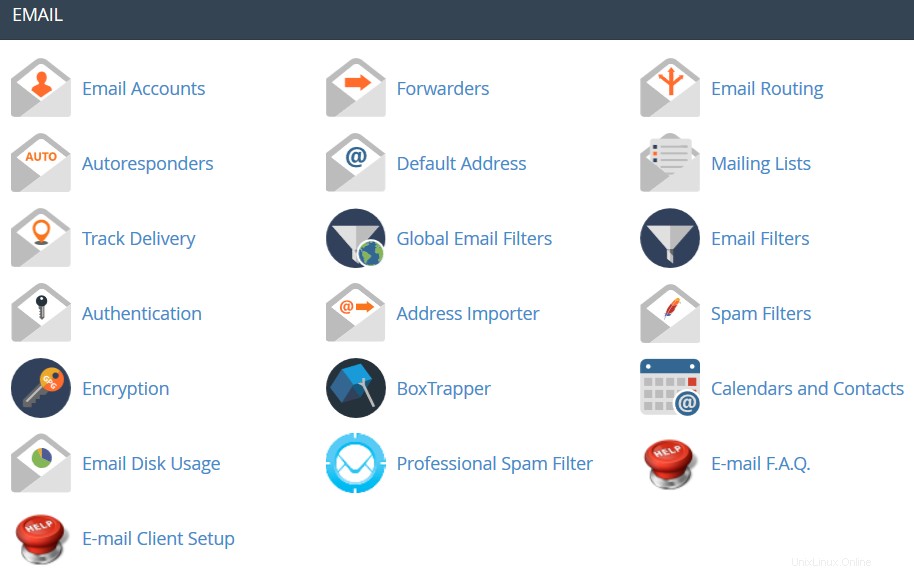
 Akun Email: dalam menu ini Anda dapat membuat dan mengelola kotak surat yang terkait dengan nama domain yang dihosting di akun Anda. Untuk membuat akun email, silakan periksa panduan ini. Detail lebih lanjut tentang pengaturan akun email yang baru dibuat dengan klien email dapat ditemukan di kumpulan artikel Email cPanel:Pengaturan Klien.
  Penerus: menyiapkan fitur Forwarders memberi Anda kesempatan untuk mengirim salinan semua email dari satu alamat email ke alamat email lainnya. Misalnya, Anda memiliki dua akun email yang berbeda dan Anda tidak ingin memeriksa keduanya setiap saat, sehingga Anda dapat meneruskan email dari test@domainanda.com ke test2@domainanda2.com. Perhatikan, bahwa alamat asli akan tetap menerima email yang diteruskan.
 Perutean Email: di sini Anda dapat mengatur perutean email untuk domain yang dihosting di akun cPanel Anda, detail lebih lanjut dapat ditemukan di panduan ini.
 Penjawab otomatis: fitur ini memungkinkan Anda untuk mengirim pesan secara otomatis sebagai balasan atas email masuk yang diterima di akun email tertentu. Ini sangat berguna ketika Anda sedang berlibur atau tidak ada, atau jika Anda memiliki pesan umum untuk dikirim. Anda akan menemukan informasi lebih lanjut dalam panduan ini.
 Alamat Default: di menu ini Anda dapat mengelola alamat email, yang digunakan oleh cPanel untuk mengambil pesan apa pun yang dikirim ke akun email yang tidak ada di domain Anda (juga dikenal sebagai 'alamat tangkap semua'). Detail lebih lanjut dapat ditemukan di sini.
 Milis: dengan opsi ini Anda dapat membuat satu alamat untuk mengirim email, buletin, dan pembaruan lainnya ke beberapa alamat email secara bersamaan. Silakan merujuk ke artikel ini untuk mendapatkan informasi lebih lanjut.
 Lacak Pengiriman: menu ini memungkinkan Anda untuk memantau pengiriman email untuk akun Anda.
 Filter Email Global: fitur ini memungkinkan Anda untuk mengonfigurasi filter semua email yang masuk ke domain yang dihosting.
 Filter Email: dengan opsi ini Anda dapat membuat filter untuk setiap akun email untuk domain Anda. Anda dapat menemukan detail lebih lanjut tentang alat pemfilteran di artikel ini.
 Keterkiriman Email: alat ini akan membantu Anda untuk mencegah spam. Menyiapkan data DKIM dan SPF untuk akun Anda melengkapi pesan email dengan informasi yang dapat diverifikasi sehingga server Anda dapat secara otomatis mendeteksi sifat pesan masuk dan keluar. Panduan terperinci tentang penggunaan fitur ini dapat ditemukan di sini.
 Importir Alamat: menu ini memungkinkan Anda menggunakan dua jenis file (.xls dan .csv ) untuk mengimpor data guna membuat beberapa alamat email atau penerus email secara bersamaan untuk akun Anda.
 Filter Spam: itu adalah utilitas email yang mudah digunakan yang memeriksa email masuk untuk karakteristik spam yang berbeda. Ini menggunakan berbagai tes jaringan dan penyaringan spam untuk mendapatkan skor keseluruhan untuk memutuskan apakah surat tersebut harus dianggap sebagai spam atau tidak. Alat SpamAssassin disediakan secara default dengan semua paket hosting bersama dan pengecer kami. Artikel ini berguna untuk mengatur fitur SpamAssasin:
- FAQ Pembunuh Spam
- Cara mengkonfigurasi SpamAssassin di cPanel
 Enkripsi: opsi ini memungkinkan Anda untuk mengatur GnuPG, yang merupakan skema enkripsi yang tersedia untuk umum yang menggunakan pendekatan kunci publik. Sistem ini menggunakan kunci publik untuk mengenkripsi pesan dan Anda dapat mendekripsinya dengan kunci pribadi, yang disimpan oleh penerima pesan yang dimaksud.
  BoxTrapper: alat ini dapat melindungi Kotak Masuk Anda dari spam dengan mewajibkan semua pengirim email yang tidak ada dalam Daftar Putih Anda untuk membalas email verifikasi sebelum Anda dapat menerima email mereka.
  Kalender dan Kontak: menu ini membantu mengonfigurasi klien Anda untuk terhubung ke CalDAV untuk kalender dan CardDAV untuk kontak agar dapat mengaksesnya di perangkat pribadi Anda. Petunjuk terperinci dapat ditemukan dalam panduan ini.
 Penggunaan Disk Email: utilitas ini memungkinkan Anda untuk memulihkan ruang disk dengan menghapus pesan lama dari kotak surat Anda.
  Filter Spam Profesional: menu ini memungkinkan Anda untuk mengonfigurasi SpamExperts, solusi penyaringan email yang mudah digunakan yang memungkinkan untuk melindungi akun Anda dari spam masuk dan keluar. Informasi lebih lanjut tentang fitur ini disediakan dalam artikel ini. FAQ Email: tombol ini akan membawa Anda ke bagian Basis Pengetahuan terkait yang didedikasikan untuk pertanyaan email. Pengaturan Klien Email: tombol ini akan membawa Anda ke bagian Basis Pengetahuan terkait yang didedikasikan untuk penyiapan akun email dengan klien dan perangkat email yang berbeda.
Domain

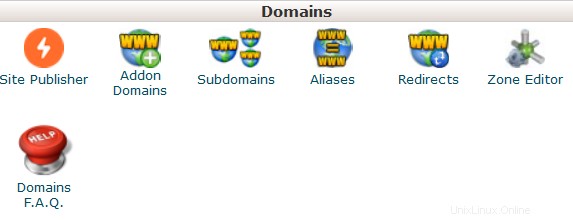
 Penerbit Situs :Anda dapat menggunakan antarmuka ini untuk membuat situs web dengan cepat dari sekumpulan template yang tersedia. Hal ini memungkinkan pengunjung untuk melihat beberapa informasi dasar saat Anda terus mengembangkan situs web Anda.
 Domain: antarmuka ini memungkinkan pembuatan dan pengelolaan beberapa domain dari satu antarmuka cPanel.
 Domain Tambahan: dengan bantuan menu ini Anda dapat menambahkan lebih banyak domain ke akun hosting. Domain addon memiliki fungsi yang sama dengan domain utama yang ditetapkan ke akun hosting Anda. Detail lebih lanjut tentang menambahkan domain ke cPanel disediakan di sini.
  Subdomain: di menu ini Anda dapat membuat subdomain dan mengarahkannya ke berbagai bagian situs web Anda atau IP lainnya. Petunjuk rinci tentang menu ini dapat ditemukan di artikel ini.
 Alias: fitur ini memungkinkan Anda untuk 'memarkir' nama domain tambahan ke akun hosting yang ada. Mereka menampilkan situs web yang sama dengan domain utama Anda dan juga berbagi statistik web. Anda dapat merujuk ke panduan ini saat menyiapkan domain terparkir baru.
 Pengalihan: di sini Anda dapat membuat pengalihan untuk domain/halaman tertentu ke domain/halaman lain dan menampilkan konten yang terakhir. Detail lebih lanjut dapat ditemukan di sini.
 Editor Zona: memungkinkan Anda untuk mengedit zona DNS domain di akun cPanel Anda. Catatan berikut dapat ditambahkan:A, AAAA, CNAME, SRV, TXT, MX. Jangan ragu untuk memeriksa artikel ini untuk mendapatkan informasi lebih lanjut tentang pengaturan catatan DNS di cPanel. FAQ Domain: tombol ini akan membawa Anda ke bagian Basis Pengetahuan terkait yang didedikasikan untuk pertanyaan pengelolaan domain.
Metrik
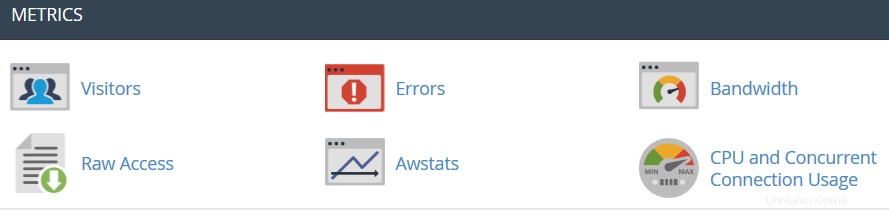
 Pengunjung: log akses akun Anda disediakan dalam tampilan tabel.
 Kesalahan: di sini Anda dapat memeriksa log kesalahan untuk akun Anda, menampilkan 300 baris konten terbaru yang terkait dengan kesalahan yang dihasilkan oleh situs web mana pun yang dihosting di akun Anda.
 Bandwidth: memberi Anda informasi terperinci tentang bandwidth yang digunakan oleh akun Anda.
 Akses Mentah: log akses RAW untuk akun Anda.
 Statistik: alat ini memberi Anda kesempatan untuk memantau indeks akses di akun Anda – pengguna, robot, halaman yang diakses, dan banyak lagi. Penjelasan lebih detail akan Anda temukan di artikel ini.
 Penggunaan CPU dan Koneksi Bersamaan: menunjukkan informasi tentang sumber daya yang digunakan oleh akun Anda. Anda dapat menemukan beberapa informasi tambahan tentang penggunaan sumber daya dalam panduan ini.
Keamanan
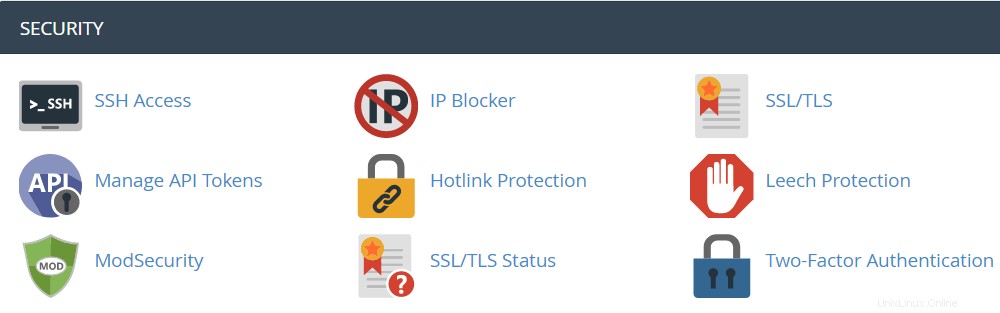
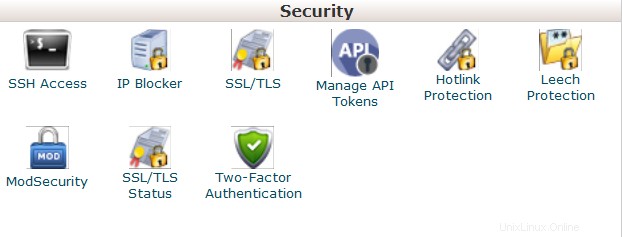
 Akses SSH: di sini Anda dapat membuat kunci akses untuk akun Anda agar dapat terhubung menggunakan kunci SSH. Detail lebih lanjut tentang menyiapkan kunci SSH dapat ditemukan di artikel ini.
  Pemblokir IP: dengan bantuan alat ini Anda dapat memblokir berbagai alamat IP untuk mencegah mereka mengakses situs Anda. Silakan merujuk ke panduan ini tentang masalah ini.
 SSL/TLS: alat ini akan membantu Anda menginstal dan mengelola Sertifikat SSL Anda. Anda akan menemukan panduan yang lebih rinci di sini.
 Perlindungan Hotlink: di menu ini Anda dapat mengaktifkan perlindungan hotlink untuk situs web Anda (yaitu untuk mencegah seseorang menautkan langsung gambar Anda ke situs web lain dan, akibatnya, menghabiskan bandwidth akun hosting Anda). Jangan ragu untuk memeriksa panduan ini untuk informasi tambahan.
 Perlindungan Lintah: memungkinkan Anda untuk mengontrol apakah pengguna dapat memberikan atau mengeposkan kata sandi mereka secara publik untuk area terlarang di situs Anda. Ini dapat digunakan untuk mengalihkan akun yang disusupi ke URL pilihan Anda, atau menangguhkannya.
 Keamanan Mod: di menu ini Anda dapat menonaktifkan atau mengaktifkan ModSecurity untuk domain dan subdomain Anda.
  Status SSL/TLS: gunakan antarmuka ini untuk melihat status SSL domain Anda.
 Otentikasi Dua Faktor: alat ini memungkinkan Anda mengaktifkan 2FA, peningkatan keamanan yang memerlukan dua bentuk identifikasi:kata sandi Anda dan kode keamanan yang dihasilkan. Saat 2FA diaktifkan, aplikasi pada ponsel cerdas Anda menyediakan kode yang harus Anda masukkan dengan kata sandi Anda untuk masuk. Anda dapat mempelajari lebih lanjut tentang mengaktifkan 2FA di sini.
Perangkat lunak
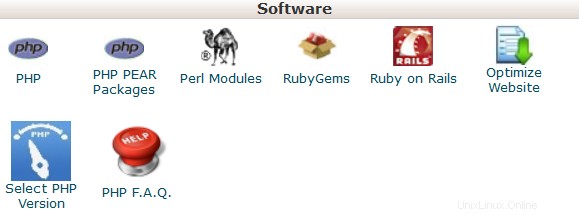
 Paket PHP PEAR: opsi ini memungkinkan Anda untuk menginstal dan memelihara paket PHP PEAR untuk akun hosting Anda.
 Modul Perl: di sini Anda dapat mengelola modul Perl yang tersedia untuk akun Anda. Modul Perl adalah komponen perangkat lunak terpisah untuk bahasa pemrograman Perl. Perl didukung di semua server bersama/pengecer kami. Artikel ini akan memberi Anda detail lebih lanjut tentang fitur ini.
 RubyGems: di menu ini Anda akan menemukan kumpulan fungsi yang memungkinkan Anda melakukan tugas di Ruby. Diperlukan untuk menginstal Permata sebelum Anda dapat menggunakannya di dalam program Ruby.
 Ruby on Rails: dengan menu ini anda bisa menggunakan fitur Ruby on Rails. Ruby on Rails adalah kerangka kerja aplikasi web gratis untuk bahasa pemrograman Ruby. Hal ini sering disebut sebagai 'Rel' atau 'RoR'. Kami mendukung RoR dengan Stellar Plus, Stellar Business kami dan Pengecer paket (dan Profesional lama , Utama , SSD Bisnis, Pengecer paket). Informasi lebih lanjut dapat ditemukan dalam panduan ini.
 Optimalkan Situs Web: fitur ini memungkinkan Anda untuk mengaktifkan/menonaktifkan dan mengonfigurasi kompresi situs web Anda dengan mengubah cara Apache menangani permintaan, yang dapat meningkatkan kinerja situs web Anda.
 Menyiapkan Aplikasi Node.js: memungkinkan untuk memilih versi Node.js tertentu untuk menjalankan aplikasi menggunakan Node.js.
Pilih Versi PHP: di sini Anda dapat mengubah versi PHP yang diterapkan ke akun cPanel Anda. Anda dapat menemukan informasi lebih lanjut di artikel ini. Menyiapkan Aplikasi Python: fitur ini memungkinkan Anda untuk menyebarkan aplikasi Python di cPanel Anda saat menjalankan server web Apache.
Menyiapkan Aplikasi Ruby: fitur ini memungkinkan Anda untuk menerapkan aplikasi Ruby di cPanel Anda saat menjalankan server web Apache.
FAQ PHP: tombol ini akan membawa Anda ke bagian situs Basis Pengetahuan kami yang didedikasikan untuk pertanyaan terkait PHP.Lanjutan
Terminal: antarmuka ini memungkinkan Anda mengakses aplikasi terminal dalam browser untuk akses baris perintah langsung dalam sesi cPanel.
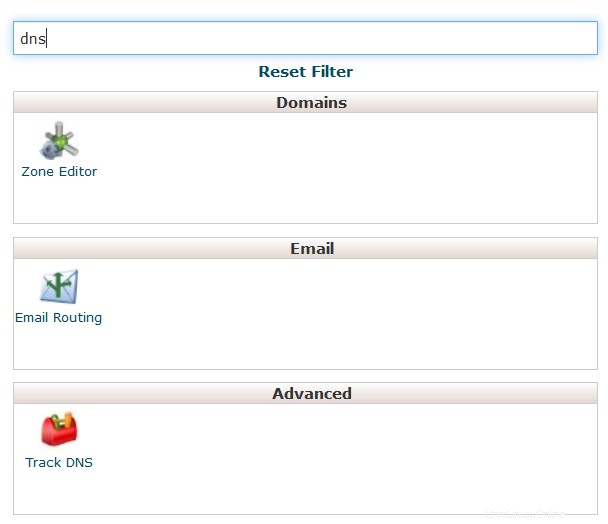
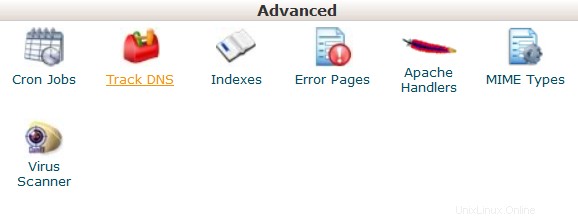
 Pekerjaan Cron: di sini Anda dapat mengatur skrip yang berjalan secara terjadwal. Untuk detail selengkapnya tentang menyiapkan CronJobs, lihat panduan ini. Lacak DNS: menggunakan alat ini, Anda dapat memeriksa informasi DNS tentang domain apa pun, atau untuk melacak rute dari server tempat situs Anda berada ke komputer tempat Anda mengakses cPanel.
 Indeks: dalam menu ini Anda dapat menyesuaikan cara pengunjung dapat melihat direktori di web.
 Laman Kesalahan: fitur ini memungkinkan Anda mengedit kode untuk halaman kesalahan default yang dapat ditampilkan situs web Anda.
 Penangan Apache: di sini Anda dapat mengonfigurasi penangan Apache yang berbeda untuk menangani format file tertentu.
 Jenis MIME: memberi Anda informasi tentang tipe MIME standar sistem dan opsi untuk menambahkan Tipe MIME Anda sendiri.
 Pemindai Virus: alat ini akan memungkinkan Anda untuk memindai akun Anda dari virus dengan pemindai virus ClamAV. ClamAV adalah mesin anti-virus open source (GPL) yang digunakan dalam berbagai situasi termasuk pemindaian email, pemindaian web, dan keamanan titik akhir. Ini menyediakan sejumlah utilitas termasuk daemon multi-utas yang fleksibel dan dapat diskalakan, pemindai baris perintah, dan alat canggih untuk pembaruan basis data otomatis.
 Preferensi
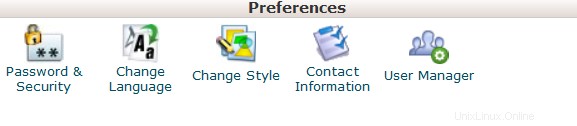
 Sandi dan Keamanan: menu ini memungkinkan Anda untuk mengubah kata sandi utama cPanel Anda jika tahu yang asli. Jika tidak, Anda dapat menyetel ulang sandi dengan mengikuti langkah-langkah dalam panduan ini.
 Change Language: this feature provides you with an opportunity to change your cPanel interface language.
 Change style: here you can change the overall look and feel of the interface by selecting one of the several preinstalled styles.
 Contact Information: in this menu you can specify an email address that will receive system email notifications.
  User Manager: allows you to manage your Subaccounts. Subaccounts use the same login and password information for email, FTP, and Web Disk.
For cPanel Retro Theme:
Basically cPanel has two vertical sections with different features:
Left column which includes different Stats information about the account, the possibility to switch cPanel theme, the search bar and frequently accessed menus and Right column which provides a number of various features that are conveniently structured to specific groups based on the concrete aspect of the web hosting service.
Below you can find a list of each menu for your convenience:
Left Column:
- Find
- Stats
- Preferences
- Domains
- Files
- Metrics
- Security
- Databases
- Software
- Advanced
- Exclusive for Namecheap Customers
Left Column
In this column you will find following options:
Find: it is a search bar that allows to find cPanel features in the quickest way. Just start entering the name of the needed tool to allocate the corresponding menu:
Stats: here you will find all the information related to the statistics of your hosting account. At the bottom of this section you will find Expand Stats button, which allows you to review the full statistics:
If you see the expanded stats menu, you will find Collapse Stats button at the bottom of this section in order to switch to the short menu version:
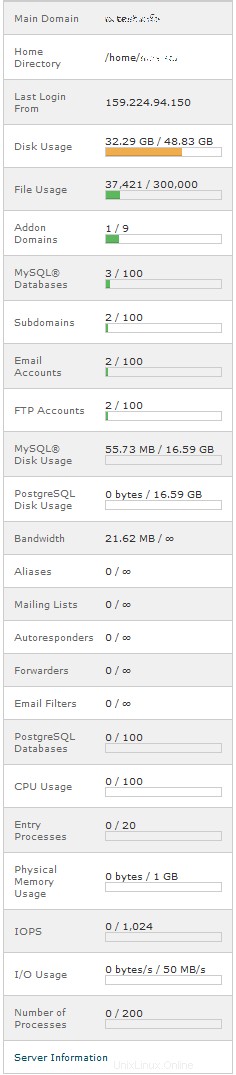
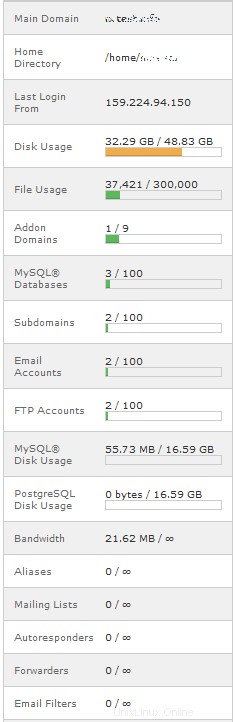
Here is an overview of all indexes:
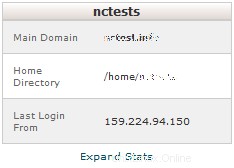
- Main Domain: the primary domain name associated with your hosting account.
- Home Directory: the path the home directory of your account on the server where your websites' folders and files reside.
- Last Login: the last IP address your cPanel has been accessed from.
- Disk Usage: the amount of server disk space provided with your cPanel account. This index displays disk space used by your websites' content, databases, emails, etc.
- File Usage: the current number of files (inodes) and your cPanel account's inode limit.
- Addon Domains: the current number of already added addon domains and the total number allowed for your cPanel account.
- MySQL Databases: the current number of MySQL or MariaDB databases created your cPanel account.
- Subdomains: the current number of already created subdomains and the total number allowed for your cPanel account.
- Email Accounts: the current number of already created email accounts and the total number of email accounts allowed for your cPanel account.
- FTP Accounts: the current number of already created FTP accounts and the total number allowed for your cPanel account.
- MySQL Disk Usage: the amount of disk space used by your MySQL or MariaDB databases.
- PostgreSQL Disk Usage: the amount of disk space used by your PostgreSQL databases.
- Bandwidth: the current amount of data transferred to and from your cPanel account for the month and the total amount of your cPanel account's monthly bandwidth limit.
- Aliases: the current number of already created alias domains and the total number allowed for your cPanel account.
- Mailing Lists: the current number of already created mailing lists and the total number allowed for your cPanel account.
- Autoresponders: the current number of created email autoresponders and the maximum number allowed.
- Forwarders: the amount of email forwarders created and the maximum number allowed.
- Email filters: the number of email filters created vs. the maximum number allowed.
- PostgreSQL Databases: the current number of PostgreSQL databases created in your cPanel account.
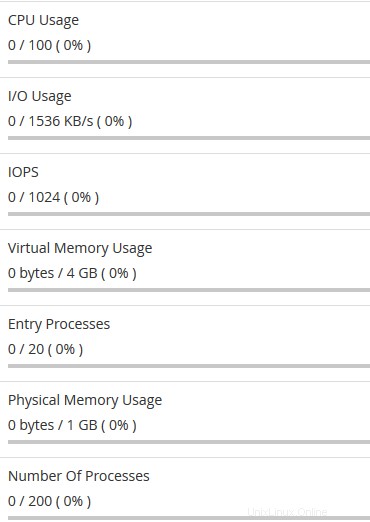
- CPU Usage: this value specifies how much of the allocated CPU resources you are currently using. The amount of CPU resources we provide to each account is the percentage of the server’s resources.
- Entry Processes: this is the number of processes that enter your account. For example, every PHP page that is accessed by a user will usually generate a single entry process.
- Physical Memory Usage: the actual memory allocated for your account. Virtual memory is usually a file on a disk drive that the operating system uses to store information (swap-to-from) when the real memory becomes full, for instance the page (swap) file on a Linux system. Therefore, if you try to publish a big post, it might take all physical memory to do so, but after some time it will be normalized.
- I/O Usage: this index represents how much I/O (or disk activity) your account is using. Any task which makes use of the servers disk drive (such as reading or writing to the server) will consume I/O. More details about resource limits can be found here.
- Number of Processes: this limit is similar to the above but includes all the processes generated by the account rather than the specific PHP, SSH or cron jobs.
Right Column
Preferences
This group of features provides you with the general information on cPanel management and allows you to make basic changes to your cPanel account.
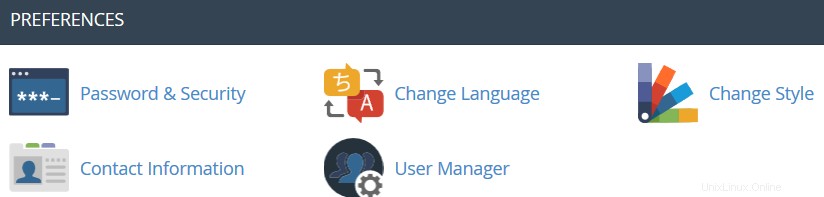
 Password &Security: this menu allows you to change your cPanel main password if know the original one. Otherwise, you can reset the password following the steps in this guide.
  Change Language: this feature provides you with an opportunity to change your cPanel interface language.
  Change style: here you can change the overall look and feel of the interface by selecting one of the several preinstalled styles.
 Contact Information: in this menu you can specify an email address that will receive system email notifications.
  User Manager: allows you to manage your Subaccounts. Subaccounts use the same login and password information for email, FTP, and Web Disk.
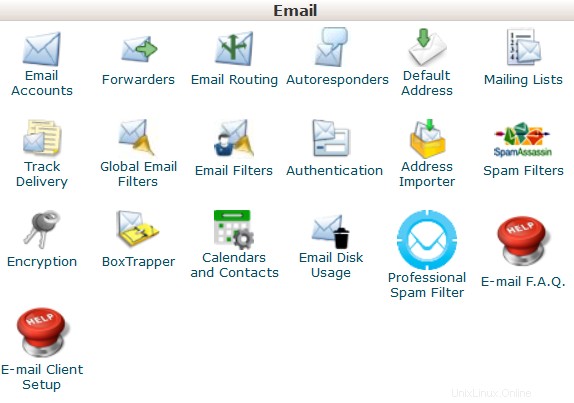
This group of features allows you to create email accounts for your domain names and manage email settings.
 Email Accounts: in this menu you can create and manage mailboxes associated with the domain names hosted in your account.In order to create an email account, feel free to check this guidance.More details about setting up a newly created email account with email clients can be found in the set of articles cPanel Email:Client Setup.
  Forwarders: setting up Forwarders feature provides you with an opportunity to send a copy of all emails from one email address to another. For example, you have two different email accounts and you don’t want to check both of them every time, so you could forward emails from test@yourdomain.com to test2@yourdomain2.com. Note, that the original address will still receive the forwarded emails.
  Email Routing: here you can set email routing for the domains hosted in your cPanel account, more details can be found in this guide.
  Autoresponders: this feature allows you to automatically send messages in reply to incoming emails received on a specific email account. This is pretty useful when you are on holidays or unavailable, or if you have any generic messages to send. You will find more information in this guide.
 Default Address: in this menu you can manage an email address, which is used by cPanel to fetch any message sent to email accounts which do not exist at your domain (also known as 'catch-all address'). More details can be found here.
  Mailing Lists: with this option you can create a single address to send emails, newsletters and other updates to multiple email addresses simultaneously. Feel free to refer to this article to get more information.
  Track Delivery: this menu allows you to monitor emails delivery for your account.
 Global Email Filters: this feature allows you to configure filters of all the emails arriving to your hosted domains.
  Email Filters: with this option you can create filters for each email account for your domain. You can find more details about filtering tools in this article.
  Email Deliverability : this tool will help you to prevent spam. Setting up DKIM and SPF records for your account equip email messages with verifiable information so that your server can automatically detect the nature of incoming and outgoing messages.The detailed guidance about using this feature can be found here.
 Address Importer: this menu allows you to use two types of files (.xls and .csv ) for importing data in order to simultaneously create multiple email address or email forwarders for your account.
  Spam Filters: it is a user-friendly email utility which examines incoming mail for different spam characteristics. It uses various network tests and spam filtering to get an overall score in order to decide whether the mail should be considered as spam or not.SpamAssassin tool is provided by default with all our shared and reseller hosting plans.These articles can be found useful for setting up SpamAssasin feature:
- SpamAssassin FAQs
- How to configure SpamAssassin in cPanel
 Encryption :this option allows you to set up GnuPG, which is a publicly-available encryption scheme that uses the public key approach. This system uses a public key to encrypt messages and you can decrypt them with the private key, which the intended recipient of the message retains.
 BoxTrapper :this tool can protect your Inbox from spam by requiring all email senders not on your Whitelist reply to a verification email before you can receive their mail.
 Calendars and Contacts: this menu helps to configure your client to connect to CalDAV for calendars and CardDAV for contacts in order to access them on your personal devices. The detailed instructions can be found in this guidance.
  Email Disk Usage :this utility allows you to recover disk space by deleting old messages from your mailbox.
 Professional Spam Filter: this menu allows you to configure SpamExperts, a user-friendly email filtering solution that allows to protect your account from both incoming and outgoing spam. More information about this feature is provided in this article. E-mail F.A.Q. :this button will take you to the corresponding Knowledgebase section dedicated to email questions. E-mail Client Setup :this button will take you to the corresponding Knowledgebase section dedicated to email account setup with different email clients and devices.
Domains
 Site Publisher :you can use this interface to quickly create a website from a set of available templates. This allows visitors to see some basic information while you continue to develop your website.
 Domains: this interface allows creating and managing multiple domains from a single cPanel interface.
 Addon Domains: with the help of this menu you can add more domains to the hosting account. Addon domains have the same functionality as the main domain assigned to your hosting account. More details about adding domains to cPanel are provided here.
 Subdomains: in this menu you can create subdomains and point them to different sections of your website or other IPs. Detailed instructions about this menu can be found in this article. Aliases: this feature allows you to 'park' additional domain names to your existing hosting account. They display the same website as your primary domain and share web statistics as well. You can refer to this guide when setting up a new parked domain.
  Redirects: here you can create a redirect for a specific domain/page to another domain/page and display the contents of the latter. More details can be found here.
 Zone Editor: allows you to edit the DNS zone of the domain(s) in your cPanel account. The following records can be added:A record, AAAA record, CNAME record, SRV record, TXT record. Feel free to check this article to get more information about setting up DNS records in cPanel. Domains F.A.Q .:this button will take you to the corresponding Knowledgebase section dedicated to domains' management questions.
Files
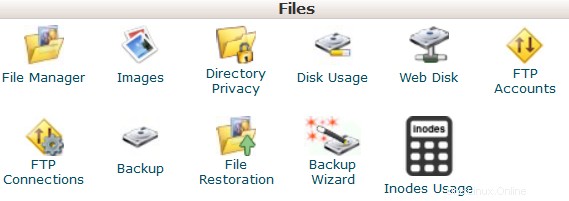
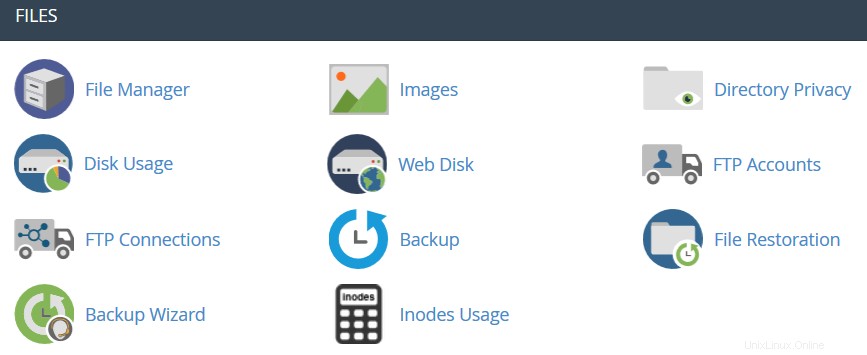
 File Manager: here you can manage the files stored in your account. These guides can be found helpful while working with this menu:
- How to use File Manager in cPanel
- How do I upload my site?
 Images :this tool allows you to view and modify images in your account.
 Directory Privacy :allows you to set a requirement for a username and password when users attempt to access your site from the web. It can be used when you need to limit access to a certain part of your site. You can get more details in this guide.
 Disk Usage: in this menu you will be able to check a detailed information about the disk space usage of your account. It shows disk usage totals for your account’s directories and all of its databases, not for individual files or databases. More details about Disk Space usage optimization are provided in this article.
  Web Disk: this feature is a cPanel implementation of the WebDav protocol, which allows you to manage, upload, and download your website’s files as though they were local to your personal computer. More detailed instructions about setting up WebDisk can be found in these articles:
- How to set up Web Disk on Windows 7
- How to set up Web Disk on Windows 8
 FTP Accounts: this option allows you to create and manage your FTP accounts. In order to create an FTP account, feel free to check this article. For FTP connection instructions, refer to this set of guides:
- How to access an account via FTP
- How to set up FileZilla
- How to set up Cyberduck
- How to set up iWeb
- How to set up Adobe Muse
- How to set up Dreamweaver
- How to set up CoreFTP Client
- How to set up CuteFTP
 FTP Connections: using this tool you can monitor the users who are currently logged into your site via FTP. Also, it’s possible to terminate an FTP connection from here.
 Backup: this feature allows you to download a zipped copy of your entire account or specific parts of it, such as your home directory, databases, email forwarder configuration, or your email filters configuration. More details guidance about how to make backups in cPanel can be found here.
  Backup Wizard: a user-friendly interface for creating a backup of your entire site, a partial backup, or allowing a site restoration from the last backup saved. Note, that Restore option provided in this menu is disabled by default on all our shared servers.
 Git Version Control: this feature allows you to easily host Git repositories on your cPanel account.
 Inodes Usage: provides the statistics of your account inodes (files) usage.You will find more details about this tool here.
Metrics

 Visitors: the access log of your account provided in a table view.
  Errors: here you can check the error log for your account, showing the latest 300 lines of content related to the errors generated by any website hosted in your account.
 Bandwidth: provides you with the detailed information the bandwidth used by your account.
  Raw Access: the RAW access log for your account Awstats: this tool provides you with an opportunity to monitor the access indexes on your account – users, robots, accessed pages and many, many more. You will find a more detailed explanation in this article.
  CPU and Concurrent Connection Usage: shows information on the resources consumed by your account.
Security
 SSH Access: here you can generate an access key for your account in order to connect using SSH keys. More details about setting up SSH keys can be found in this article.
  IP Blocker :with the help of this tool you can block a range of IP addresses to prevent them from accessing your site. Feel free to refer to this guide on the matter.
 SSL/TLS: this tool will help you to install and manage your SSL Certificates. You will find a more detailed guide here.
  Hotlink Protection: in this menu you can enable hotlink protection for your website (that is to prevent someone from direct linking of your images to another website and, as a result, consuming your hosting account bandwidth). Feel free to check this guidance for additional information.
  Leech Protection: allows you to control whether users can give out or publicly post their passwords for restricted areas of your site. It can be used to redirect compromised accounts to the URL of your choice, or suspend them.
  ModSecurity: in this menu you can disable or enable ModSecurity for your domains and subdomains.
 SSL/TLS Status :use this interface to view the SSL status of your domains.
 Two-Factor Authentication: this tool lets you enable 2FA, an improved security measure that requires two forms of identification:your password and a generated security code. When 2FA is enabled, an app on your smartphone supplies a code you must enter with your password to log in. You can learn more about enabling 2FA here.
Databases
 phpMyAdmin: the database management tool, which allows you to make different changes to MySQL databases in your account. You can find more information about how to work with databases via phpMyAdmin this guide.
  MySQL Databases: in this menu you can create and manage MySQL databases in cPanel account.
  MySQL Databases Wizard: provides the same functionality as MySQL Databases menu, in a simplified way though. More details about how to use both menus can be found here.
 PostgreSQL Databases: this option allows you to create and manage PostgreSQL databases in cPanel.
  PostgreSQL Databases Wizard: has the same functionality as PostgreSQL Databases menu, but allows to make all the changes in a simpler way.
  phpPgAdmin: the database management tool, which allows you to make different changes to PostgreSQL databases in your account. MySQL F.A.Q.: this button will take you to the corresponding Knowledgebase section dedicated to MySQL questions.
 Software and Services
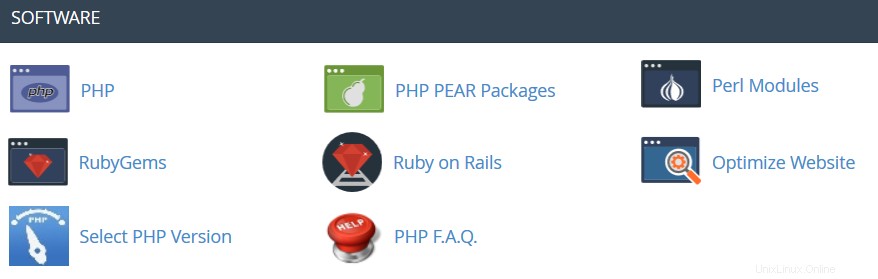
 PHP PEAR Packages: this options allows you to install and maintain PHP PEAR packages for your hosting account.
  Perl Modules: here you can manage Perl modules available for your account. A Perl module is a discrete component of software for the Perl programming language. Perl is supported on all of our shared/reseller servers.This article will provide you with more details about this feature.
 RubyGems: in this menu you will find the set of functions that allow you to perform tasks in Ruby. It’s needed to install a Gem before you can use it inside a Ruby program.
 Ruby on Rails: with this menu you can use Ruby on Rails features. Ruby on Rails is a free web application framework for the Ruby programming language. It is often referred to as 'Rails' or 'RoR'. We support RoR with our Stellar Plus, Stellar Business and Reseller packages (and old Professional , Ultimate , Business SSD, Reseller packages). The following versions are working on our servers:Ruby – 1.8.7, Rails – 2.3.18. More information can be found in this guide.
  Optimize Website: this feature allows you to enable/disable and configure the compression of your website by tweaking the way Apache handles requests, which can increase the performance of your website.
 Setup Node.js App: allows for the choosing a specific version of Node.js in order to run the apps using Node.js.
Select PHP Version: here you can change PHP version applied to your cPanel account. You can find more information in this article. Setup Python App: this feature allows you to deploy Python applications on your cPanel while running the Apache web server.
Setup Ruby App: this feature allows you to deploy Ruby applications on your cPanel while running Apache web server.
PHP F.A.Q.: this button will take you to our Knowledgebase site section dedicated to PHP-related questions.Advanced
Terminal: this interface allows you to access an in-browser terminal application for direct command-line access within a cPanel session.
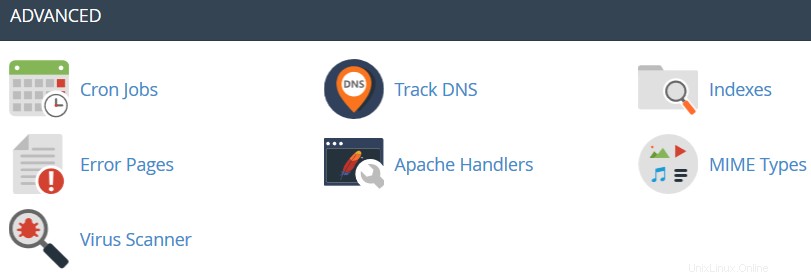
 Cron Jobs: here you can set up scripts running on a scheduled basis. For more details about setting up CronJobs refer to this guidance.
  Track DNS :using this tool you can check DNS information about any domain, or to trace the route from the server your site is on to the computer you are accessing cPanel from.
 Indexes: in this menu you can customize the way in which visitors can view a directory on the web.
  Error Pages: this feature allows you to edit the code for the default errors pages your website can display.
 Apache Handlers: here you can configure different Apache handlers for dealing with certain file formats.
 MIME Types: provides you with the information about the system predefined MIME types and the option to add a MIME Type on your own.
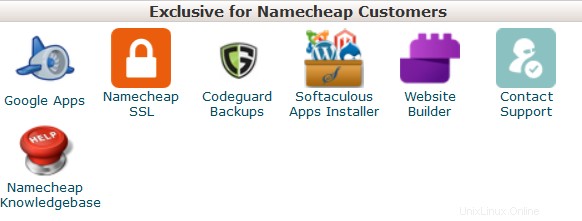 Virus Scanner: this tool will allow you to scan your account for viruses with ClamAV virus scanner. ClamAV is an open source (GPL) anti-virus engine used in a variety of situations including email scanning, web scanning, and endpoint security. It provides a number of utilities including a flexible and scalable multi-threaded daemon, a command line scanner and an advanced tool for automatic database updates.
 Exclusive for Namecheap Customers
AutoBackup: it is a cPanel plugin that allows customers with Premium and Business Hosting to retrieve a full cPanel backup right away.
Google Apps: with this tool you will be able to configure Google Apps service for your domain in just a few clicks.Feel free to check this category for more information. Namecheap SSL: this menu allows you to use Namecheap SSL cPanel plugin, check this guide for more details. CodeGuard Backup: this tool was designed to make the backup process as easy as possible. CodeGuard system will constantly monitor the website and keep you informed of any changes, performing full automatic backups of your files to avoid any possible downtime.More information is provided in the following articles:- How to make backups using CodeGuard
- How to back up a WordPress site using CodeGuard
Softaculous Apps Installer: this feature allows you to use Softaculous Script Installer, which includes most popular CMS, such as Wordpress/Joomla/Magento etc. It is much faster than other script installers and it installs CMSes in a few clicks. Softaculous application is provided with any cPanel account on all of our shared hosting plans. You can view available scripts and their demo here.You may find these guides useful when working with Softaculous installer:- How to work with scripts in Softaculous
- How to install WordPress using Softaculous
- How to install Joomla with Softaculous
Setup Node.js App: allows for the choosing a specific version of Node.js in order to run the apps using Node.js.
Select PHP Version: using this menu it is possible to select the necessary PHP version as well as enable/disable certain PHP modules and functions.
Setup Python App: this feature allows you to deploy Python applications on your cPanel while running the Apache web server.
Setup Ruby App: this feature allows you to deploy Ruby applications on your cPanel while running Apache web server.
Website Builder :this tool allows you to easily create an entire website using a drag-and-drop editor and without knowing any code or installing special software. Contact Support :opens a Live Chat with our customer support team. Namecheap Knowledgebase: this button will take you to our Knowledgebase site section.Manage Shell: this plugin allows you to enable or disable SSH access for your respective hosting accounts with just a few clicks.
PHP Tweaks: allows managing PHP settings on our Business servers (Stellar Business and old Business SSD plans).