Pengantar
PostgreSQL adalah RDBMS paling canggih dan pgAdmin adalah UI web untuk Postgres. Di sini, Anda akan melihat cara menginstal PostgreSQL dengan pgAdmin di CentOS / RHEL 8.
Apa itu PostgreSQL?
PostgreSQL (juga dikenal sebagai Postgres ) adalah sistem manajemen basis data relasional (RDBMS) sumber terbuka dan gratis yang menekankan pada ekstensibilitas dan kepatuhan SQL. PostgreSQL awalnya bernama POSTGRES, mengacu pada asalnya sebagai penerus Ingres basis data. Pada tahun 1996, proyek ini diubah namanya menjadi PostgreSQL untuk mencerminkan dukungannya terhadap SQL.
PostgreSQL menampilkan transaksi dengan properti Atomicity, Consistency, Isolation, Durability (ACID), tampilan yang dapat diperbarui secara otomatis, tampilan terwujud, pemicu, kunci asing, dan prosedur tersimpan. Ini dirancang untuk menangani berbagai beban kerja, dari mesin tunggal hingga gudang data atau layanan Web dengan banyak pengguna secara bersamaan. Ini adalah database default untuk macOS Server, dan juga tersedia untuk Linux, FreeBSD, OpenBSD, dan Windows.
Apa itu pgAdmin?
pgAdmin adalah alat administrasi antarmuka pengguna grafis (GUI) sumber terbuka dan gratis untuk server database Postgres.
Selain itu, pgAdmin tersedia di antarmuka desktop dan web. pgAdmin adalah fitur yang kaya dan paling populer di antara alat administrasi lain untuk PostgreSQL.
Perbarui Paket Server Linux
Jadi Perbarui paket server Linux dengan menggunakan dnf perintah.
# dnf update -yMenginstal Postgres Resmi
Untuk menginstal versi terbaru, kita harus menambahkan repositori yum resmi PostgreSQL di server Linux kita.
[root@unixcop ~]# dnf install https://download.postgresql.org/pub/repos/yum/reporpms/EL-8-x86_64/pgdg-redhat-repo-latest.noarch.rpm
Failed to set locale, defaulting to C.UTF-8
Last metadata expiration check: 21:31:22 ago on Sun Aug  8 10:39:31 2021.
pgdg-redhat-repo-latest.noarch.rpm               18 kB/s |  12 kB     00:00
Dependencies resolved.
================================================================================
 Package                 Architecture  Version        Repository           Size
================================================================================
Installing:
 pgdg-redhat-repo        noarch        42.0-19        @commandline         12 k

Transaction Summary
================================================================================
Install  1 Package

Total size: 12 k
Installed size: 12 k
Is this ok [y/N]: y
Downloading Packages:
Running transaction check
Transaction check succeeded.
Running transaction test
Transaction test succeeded.
Running transaction
  Preparing        :                                                        1/1
  Installing       : pgdg-redhat-repo-42.0-19.noarch                        1/1
  Verifying        : pgdg-redhat-repo-42.0-19.noarch                        1/1

Installed:
  pgdg-redhat-repo-42.0-19.noarch

Complete!
[root@unixcop ~]#
Nonaktifkan modul PostgreSQL di repositori yum standar dengan menjalankan perintah berikut.
# dnf -qy module disable postgresqlMenginstal Server Database Postgres di CentOS 8
Jadi Instal server database Postgres 13 (terbaru pada saat penulisan ini) di server Linux Anda dengan menggunakan dnf perintah.
[root@unixcop ~]# dnf install -y postgresql13-server
Last metadata expiration check: 0:01:38 ago on Mon Aug  9 10:31:26 2021.
Dependencies resolved.
======================================================================================================================================================
 Package                                    Architecture                  Version                                 Repository                     Size
======================================================================================================================================================
Installing:
 postgresql13-server                        x86_64                        13.3-2PGDG.rhel8                        pgdg13                        5.5 M
Installing dependencies:
 libicu                                     x86_64                        60.3-2.el8_1                            baseos                        8.8 M
 postgresql13                               x86_64                        13.3-2PGDG.rhel8                        pgdg13                        1.5 M
 postgresql13-libs                          x86_64                        13.3-2PGDG.rhel8                        pgdg13                        413 k

Transaction Summary
======================================================================================================================================================
Install  4 Packages

Total download size: 16 M
Installed size: 63 M
Downloading Packages:
(1/4): postgresql13-libs-13.3-2PGDG.rhel8.x86_64.rpm                                                                   69 kB/s | 413 kB     00:06
(2/4): postgresql13-13.3-2PGDG.rhel8.x86_64.rpm                                                                        92 kB/s | 1.5 MB     00:16
(3/4): postgresql13-server-13.3-2PGDG.rhel8.x86_64.rpm                                                                158 kB/s | 5.5 MB     00:35
(4/4): libicu-60.3-2.el8_1.x86_64.rpm                                                                                 190 kB/s | 8.8 MB     00:47
------------------------------------------------------------------------------------------------------------------------------------------------------
Total                                                                                                                 345 kB/s |  16 MB     00:48
warning: /var/cache/dnf/pgdg13-e81daebfc8b779ec/packages/postgresql13-13.3-2PGDG.rhel8.x86_64.rpm: Header V4 DSA/SHA1 Signature, key ID 442df0f8: NOKEY
PostgreSQL 13 for RHEL/CentOS 8 - x86_64                                                                              1.6 MB/s | 1.7 kB     00:00
Importing GPG key 0x442DF0F8:
 Userid     : "PostgreSQL RPM Building Project <[email protected]>"
 Fingerprint: 68C9 E2B9 1A37 D136 FE74 D176 1F16 D2E1 442D F0F8
 From       : /etc/pki/rpm-gpg/RPM-GPG-KEY-PGDG
Key imported successfully
Running transaction check
Transaction check succeeded.
Running transaction test
Transaction test succeeded.
Running transaction
  Preparing        :                                                                                                                              1/1
  Installing       : postgresql13-libs-13.3-2PGDG.rhel8.x86_64                                                                                    1/4
  Running scriptlet: postgresql13-libs-13.3-2PGDG.rhel8.x86_64                                                                                    1/4
  Installing       : libicu-60.3-2.el8_1.x86_64                                                                                                   2/4
  Running scriptlet: libicu-60.3-2.el8_1.x86_64                                                                                                   2/4
  Installing       : postgresql13-13.3-2PGDG.rhel8.x86_64                                                                                         3/4
  Running scriptlet: postgresql13-13.3-2PGDG.rhel8.x86_64                                                                                         3/4
  Running scriptlet: postgresql13-server-13.3-2PGDG.rhel8.x86_64                                                                                  4/4
  Installing       : postgresql13-server-13.3-2PGDG.rhel8.x86_64                                                                                  4/4
  Running scriptlet: postgresql13-server-13.3-2PGDG.rhel8.x86_64                                                                                  4/4
  Verifying        : libicu-60.3-2.el8_1.x86_64                                                                                                   1/4
  Verifying        : postgresql13-13.3-2PGDG.rhel8.x86_64                                                                                         2/4
  Verifying        : postgresql13-libs-13.3-2PGDG.rhel8.x86_64                                                                                    3/4
  Verifying        : postgresql13-server-13.3-2PGDG.rhel8.x86_64                                                                                  4/4

Installed:
  libicu-60.3-2.el8_1.x86_64                          postgresql13-13.3-2PGDG.rhel8.x86_64         postgresql13-libs-13.3-2PGDG.rhel8.x86_64
  postgresql13-server-13.3-2PGDG.rhel8.x86_64

Complete!
[root@unixcop ~]#
Anda perlu menjalankan perintah berikut sekali untuk menginisialisasi database Postgres.
[root@unixcop ~]# /usr/pgsql-13/bin/postgresql-13-setup initdb
Initializing database ... OK

[root@unixcop ~]#
Aktifkan juga, mulai dan periksa status database Postgres dengan perintah ini.
[root@unixcop ~]# systemctl start postgresql-13
[root@unixcop ~]# systemctl enable postgresql-13
Created symlink /etc/systemd/system/multi-user.target.wants/postgresql-13.service → /usr/lib/systemd/system/postgresql-13.service.
[root@unixcop ~]# systemctl status postgresql-13
● postgresql-13.service - PostgreSQL 13 database server
   Loaded: loaded (/usr/lib/systemd/system/postgresql-13.service; enabled; vendor preset: disabled)
   Active: active (running) since Mon 2021-08-09 08:21:20 EDT; 21s ago
     Docs: https://www.postgresql.org/docs/13/static/
 Main PID: 2178 (postmaster)
    Tasks: 8 (limit: 11426)
   Memory: 16.8M
   CGroup: /system.slice/postgresql-13.service
           ├─2178 /usr/pgsql-13/bin/postmaster -D /var/lib/pgsql/13/data/
           ├─2179 postgres: logger
           ├─2181 postgres: checkpointer
           ├─2182 postgres: background writer
           ├─2183 postgres: walwriter
           ├─2184 postgres: autovacuum launcher
           ├─2185 postgres: stats collector
           └─2186 postgres: logical replication launcher

Aug 09 08:21:20 unixcop systemd[1]: Starting PostgreSQL 13 database server...
Aug 09 08:21:20 unixcop postmaster[2178]: 2021-08-09 08:21:20.237 EDT [2178] LOG:  redirecting log output to logging collector process
Aug 09 08:21:20 unixcop postmaster[2178]: 2021-08-09 08:21:20.237 EDT [2178] HINT:  Future log output will appear in directory "log".
Aug 09 08:21:20 unixcop systemd[1]: Started PostgreSQL 13 database server.
[root@unixcop ~]# systemctl is-enabled postgresql-13
enabled
[root@unixcop ~]#
Periksa juga versi PostgreSQL yang diinstal .
[root@unixcop ~]# psql -V
psql (PostgreSQL) 13.3
[root@unixcop ~]#
Beralih ke postgres pengguna dan sambungkan ke psql shell untuk mengatur kata sandi pengguna admin.
[root@unixcop ~]# su - postgres
[postgres@unixcop ~]$ psql
psql (13.3)
Type "help" for help.

postgres=# ALTER USER postgres WITH PASSWORD 'unixcop';
ALTER ROLE
postgres=# \q
[postgres@unixcop ~]$ exit
logout
[root@unixcop ~]#
Konfigurasikan Akses Jaringan untuk Layanan Database Postgres
Anda mungkin memperhatikan bahwa layanan PostgreSQL pada awalnya hanya berjalan pada antarmuka localhost.
Jadi Anda harus mengedit file konfigurasi PostgreSQL di vim editor teks.
# vi /var/lib/pgsql/13/data/postgresql.confCari arahan berikut di dalamnya.
# listen_addresses = 'localhost'Dan ganti dengan arahan berikut.
listen_addresses = '*'Layanan database Postgres Anda sekarang dikonfigurasi untuk mendengarkan di semua antarmuka jaringan.
Izinkan klien jaringan mengakses layanan PostgreSQL di pg_hba.conf berkas.
# echo "host all all 192.168.13.0/24 md5" >> /var/lib/pgsql/13/data/pg_hba.confMulai ulang layanan database Postgres untuk menerapkan perubahan.
# systemctl restart postgresql-13.serviceLayanan Postgres sekarang berjalan di semua antarmuka jaringan.
Konfigurasi Firewall Linux untuk Database Postgres
Kami akan mengizinkan layanan Postgre dengan menggunakan perintah firewall-cmd.
[root@unixcop ~]# firewall-cmd --permanent --add-service=postgresql
success
[root@unixcop ~]# firewall-cmd --reload
success
[root@unixcop ~]#
Jadi, server database Postgres telah terinstal di server Linux.
Menginstal pgAdmin Yum Repository di CentOS 8
pgAdmin adalah antarmuka web populer untuk administrasi database database PostgreSQL.
Meskipun pgAdmin juga disediakan dalam repositori yum resmi PostgreSQL. Tapi itu tidak bekerja di server CentOS 8 kami.
Oleh karena itu, kami akan menginstal versi stabil terbaru pgAdmin dari repositori yum resmi pgAdmin.
Karena kami akan menambahkan repo yum ini, pertama-tama Anda harus menghapus repositori yum PostgreSQL dari server Linux Anda.
# dnf remove -y pgdg-redhat-repoTambahkan repositori yum resmi pgAdmin di sistem operasi Linux Anda dengan perintah:
[root@unixcop ~]#  dnf install -y https://ftp.postgresql.org/pub/pgadmin/pgadmin4/yum/pgadmin4-redhat-repo-1-1.noarch.rpm
Last metadata expiration check: 1 day, 0:04:44 ago on Sun Aug  8 10:39:31 2021.
pgadmin4-redhat-repo-1-1.noarch.rpm                                                                                   5.6 kB/s | 6.6 kB     00:01
Dependencies resolved.
======================================================================================================================================================
 Package                                      Architecture                   Version                       Repository                            Size
======================================================================================================================================================
Installing:
 pgadmin4-redhat-repo                         noarch                         1-1                           @commandline                         6.6 k

Transaction Summary
======================================================================================================================================================
Install  1 Package

Total size: 6.6 k
Installed size: 4.0 k
Downloading Packages:
Running transaction check
Transaction check succeeded.
Running transaction test
Transaction test succeeded.
Running transaction
  Preparing        :                                                                                                                              1/1
  Installing       : pgadmin4-redhat-repo-1-1.noarch                                                                                              1/1
  Verifying        : pgadmin4-redhat-repo-1-1.noarch                                                                                              1/1

Installed:
  pgadmin4-redhat-repo-1-1.noarch

Complete!
[root@unixcop ~]#
Juga pgAdmin memerlukan beberapa paket perangkat lunak yang tidak tersedia di repositori standar yum.
Gunakan perintah dnf dan instal repositori EPEL yum.
# dnf install -y epel-releaseBuat cache untuk repositori yum yang baru diinstal dengan perintah:
[root@unixcop ~]# dnf makecache
CentOS Linux 8 - AppStream                                                                                            2.6 kB/s | 4.3 kB     00:01
CentOS Linux 8 - BaseOS                                                                                               5.4 kB/s | 3.9 kB     00:00
CentOS Linux 8 - Extras                                                                                               2.8 kB/s | 1.5 kB     00:00
Extra Packages for Enterprise Linux Modular 8 - x86_64                                                                 21 kB/s |  36 kB     00:01
Extra Packages for Enterprise Linux 8 - x86_64                                                                         22 kB/s |  33 kB     00:01
pgadmin4                                                                                                              704  B/s | 833  B     00:01
pgadmin4                                                                                                              3.8 MB/s | 3.8 kB     00:00
Importing GPG key 0x210976F2:
 Userid     : "Package Manager (Package Signing Key) <[email protected]>"
 Fingerprint: E869 7E2E EF76 C02D 3A63 3277 8881 B2A8 2109 76F2
 From       : /etc/pki/rpm-gpg/PGADMIN_PKG_KEY
Is this ok [y/N]: y
pgadmin4                                                                                                              117 kB/s | 441 kB     00:03
Metadata cache created.
Menginstal UI Web pgAdmin
Anda sekarang dapat menginstal pgAdmin dengan menggunakan :
# dnf install -y pgadmin4CATATAN PENTING:
Untuk mengonfigurasi kebijakan SELinux, skrip penyiapan pgAdmin memerlukan semanage perintah, yang disediakan dalam paket policycoreutils-python-utils. Oleh karena itu, Anda harus menginstalnya sebelum menjalankan skrip pengaturan pgAdmin.
Anda juga dapat mengunjungi tautan ini untuk memperbaiki masalah ini dengan benar Cara Memperbaiki 'semanage command' Not Found Error di CentOS
# dnf install -y policycoreutils-python-utilsPerangkat lunak pgAdmin dilengkapi dengan skrip konfigurasi yang ditulis dengan baik untuk mengonfigurasi layanan web pgAdmin. Jalankan untuk membuat pengguna admin dan server web Apache untuk menerapkan layanan web pgAdmin.
[root@unixcop ~]# /usr/pgadmin4/bin/setup-web.sh
Setting up pgAdmin 4 in web mode on a Redhat based platform...
Creating configuration database...
NOTE: Configuring authentication for SERVER mode.

Enter the email address and password to use for the initial pgAdmin user account:

Email address: [email protected]
Password:
Retype password:
pgAdmin 4 - Application Initialisation
======================================

Creating storage and log directories...
Configuring SELinux...

The Apache web server is not running. We can enable and start the web server for you to finish pgAdmin 4 installation. Continue (y/n)? y
Created symlink /etc/systemd/system/multi-user.target.wants/httpd.service → /usr/lib/systemd/system/httpd.service.
Apache successfully enabled.
Apache successfully started.
You can now start using pgAdmin 4 in web mode at http://127.0.0.1/pgadmin4
[root@unixcop ~]#
Mulai, aktifkan, dan periksa status layanan httpd.
[root@unixcop ~]# systemctl start httpd
[root@unixcop ~]# systemctl enable httpd
Created symlink /etc/systemd/system/multi-user.target.wants/httpd.service → /usr/lib/systemd/system/httpd.service.
[root@unixcop ~]# systemctl status httpd
● httpd.service - The Apache HTTP Server
   Loaded: loaded (/usr/lib/systemd/system/httpd.service; enabled; vendor preset: disabled)
   Active: active (running) since Mon 2021-08-09 08:48:49 EDT; 16s ago
     Docs: man:httpd.service(8)
 Main PID: 3881 (httpd)
   Status: "Running, listening on: port 80"
    Tasks: 241 (limit: 11426)
   Memory: 44.2M
   CGroup: /system.slice/httpd.service
           ├─3881 /usr/sbin/httpd -DFOREGROUND
           ├─3882 /usr/sbin/httpd -DFOREGROUND
           ├─3883 /usr/sbin/httpd -DFOREGROUND
           ├─3884 /usr/sbin/httpd -DFOREGROUND
           ├─3885 /usr/sbin/httpd -DFOREGROUND
           └─3886 /usr/sbin/httpd -DFOREGROUND

Aug 09 08:48:47 unixcop systemd[1]: Starting The Apache HTTP Server...
Aug 09 08:48:47 unixcop httpd[3881]: [Mon Aug 09 08:48:47.749981 2021] [so:warn] [pid 3881:tid 140142522952000] AH01574: module wsgi_module is alread>
Aug 09 08:48:49 unixcop httpd[3881]: AH00558: httpd: Could not reliably determine the server's fully qualified domain name, using fe80::20c:29ff:feca>
Aug 09 08:48:49 unixcop systemd[1]: Started The Apache HTTP Server.
Aug 09 08:48:52 unixcop httpd[3881]: Server configured, listening on: port 80
lines 1-21/21 (END)
Konfigurasikan firewall Linux untuk mengizinkan lalu lintas masuk ke server web Apache
[root@unixcop ~]# firewall-cmd --permanent --add-service=http
success
[root@unixcop ~]# firewall-cmd --reload
success
[root@unixcop ~]#
Buka URL http://your_ip_address/pgadmin4/ di browser web.
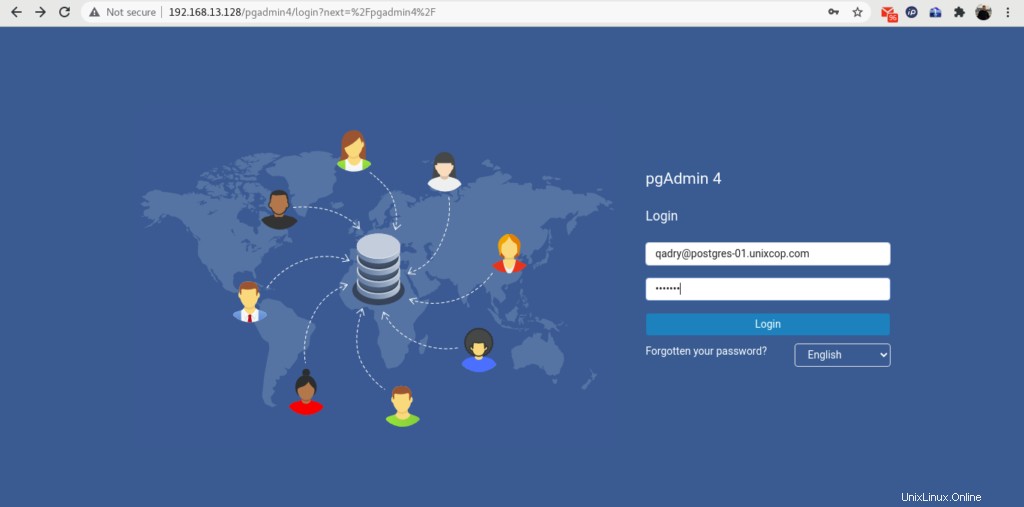
Login ke pgAdmin sebagai user admin yang telah kita buat oleh setup-web.sh naskah.
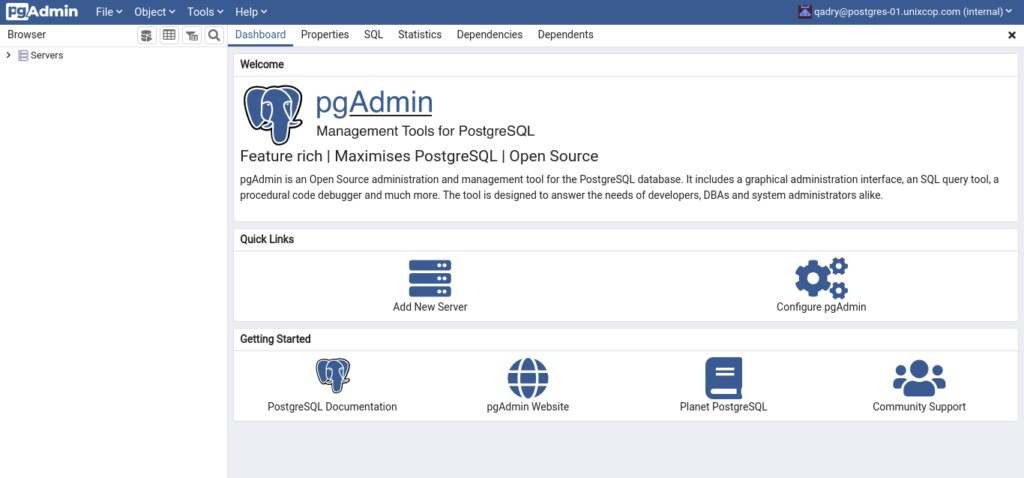
Untuk menambahkan server database PostgreSQL Anda di inventaris pgAdmin, klik “Tambah Server Baru”.
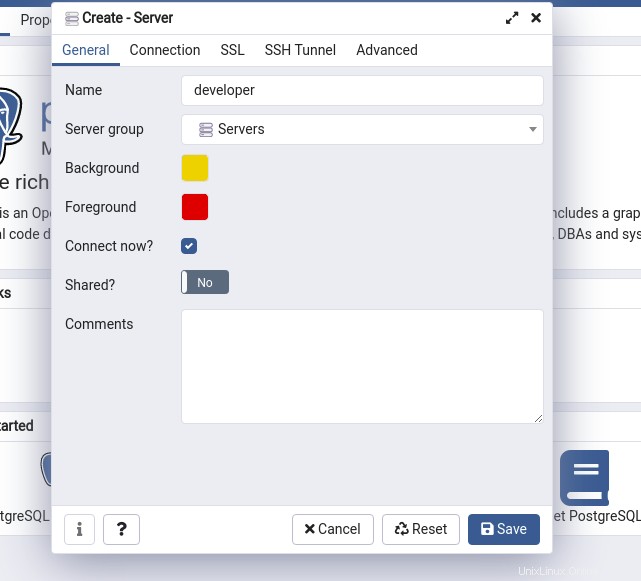
Berikan nama Server dan klik “Koneksi” tab.
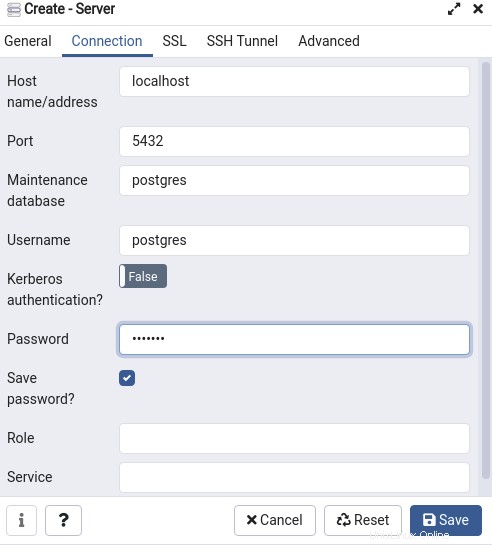
Berikan informasi koneksi database di kotak dialog yang Anda buat ini.
Kemudian Klik “Simpan”.
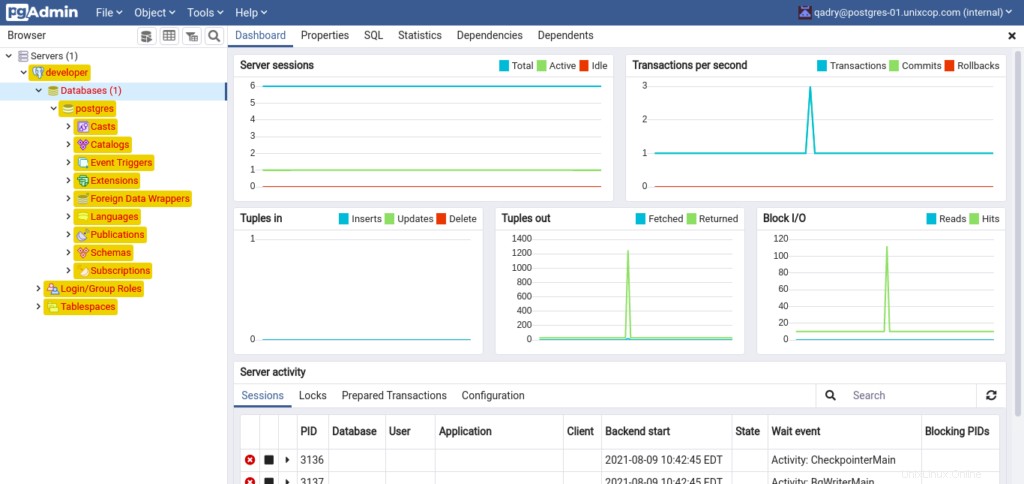
Server database Postgres kami telah ditambahkan di pgAdmin. Anda dapat melihat struktur server database Anda di panel sebelah kiri.
Kesimpulan
Dalam tutorial ini, Anda telah mempelajari cara menginstal PostgreSQL dengan pgAdmin di server CentOS 8.