Tutorial ini adalah Hak Cipta (c) 2012 oleh Falko Timme. Ini berasal dari tutorial dari Christoph Haas yang dapat Anda temukan di http://workaround.org. Anda bebas menggunakan tutorial ini di bawah lisensi Creative Commons 2.5 atau versi yang lebih baru.
Dokumen ini menjelaskan cara menginstal server email Postfix yang didasarkan pada pengguna dan domain virtual, yaitu pengguna dan domain yang ada di database MySQL. Saya juga akan mendemonstrasikan instalasi dan konfigurasi Courier (Courier-POP3, Courier-IMAP), sehingga Courier dapat mengautentikasi terhadap database MySQL yang sama yang digunakan Postfix.
Server Postfix yang dihasilkan mampu SMTP-AUTH dan TLS dan kuota (kuota tidak ada di dalam Postfix secara default, saya akan menunjukkan cara menambal Postfix Anda dengan tepat). Kata sandi disimpan dalam terenkripsi formulir di database (sebagian besar dokumen yang saya temukan berurusan dengan kata sandi teks biasa yang merupakan risiko keamanan). Selain itu, tutorial ini mencakup pemasangan Amavisd , Pembunuh Spam dan ClamAV sehingga email akan dipindai dari spam dan virus. Saya juga akan menunjukkan cara menginstal SquirrelMail sebagai antarmuka webmail sehingga pengguna dapat membaca dan mengirim email serta mengubah kata sandi mereka.
Keuntungan dari pengaturan "virtual" seperti itu (pengguna dan domain virtual dalam database MySQL) adalah kinerjanya jauh lebih baik daripada pengaturan yang didasarkan pada pengguna sistem "nyata". Dengan penyiapan virtual ini, server email Anda dapat menangani ribuan domain dan pengguna. Selain itu, lebih mudah untuk diadministrasikan karena Anda hanya perlu berurusan dengan database MySQL ketika Anda menambahkan pengguna/domain baru atau mengedit yang sudah ada. Tidak ada lagi perintah postmap untuk membuat file db, tidak ada lagi reload Postfix, dll. Untuk administrasi database MySQL Anda dapat menggunakan alat berbasis web seperti phpMyAdmin yang juga akan diinstal di howto ini. Keuntungan ketiga adalah pengguna memiliki alamat email sebagai nama pengguna (bukan nama pengguna + alamat email) yang lebih mudah dipahami dan diingat.
Howto ini dimaksudkan sebagai panduan praktis; itu tidak mencakup latar belakang teoretis. Mereka diperlakukan di banyak dokumen lain di web.
Dokumen ini datang tanpa jaminan apapun! Saya ingin mengatakan bahwa ini bukan satu-satunya cara untuk mengatur sistem seperti itu. Ada banyak cara untuk mencapai tujuan ini tetapi ini adalah cara yang saya ambil. Saya tidak memberikan jaminan apa pun bahwa ini akan berhasil untuk Anda!
1 Catatan Awal
Tutorial ini didasarkan pada Server Ubuntu 12.04 LTS (Precise Pangolin), jadi Anda harus menyiapkan instalasi server dasar Ubuntu 12.04 sebelum melanjutkan dengan tutorial ini (misalnya seperti yang ditunjukkan pada halaman 1 - 3 dalam tutorial ini:Server Sempurna - Ubuntu 12,04 LTS (Apache2, BIND, Dovecot, ISPConfig 3)). Sistem harus memiliki alamat IP statis. Saya menggunakan 192.168.0.100 sebagai alamat IP saya dalam tutorial ini dan server1.example.com sebagai nama host.
Pastikan Anda login sebagai root (ketik
sudo su
untuk menjadi root), karena kita harus menjalankan semua langkah dari tutorial ini sebagai pengguna root.
Sangat penting bagi Anda untuk membuat /bin/sh sebagai symlink ke /bin/bash...
dpkg-reconfigure dash
Gunakan tanda hubung sebagai shell sistem default (/bin/sh)? <-- Tidak
... dan bahwa Anda menonaktifkan AppArmor:
/etc/init.d/apparmor stop
update-rc.d -f apparmor hapus
apt-get hapus apparmor apparmor-utils
2 Instal Postfix, Courier, Saslauthd, MySQL, phpMyAdmin
Untuk menginstal Postfix, Courier, Saslauthd, MySQL, dan phpMyAdmin, kita cukup menjalankan
apt-get install postfix postfix-mysql postfix-doc mysql-client mysql-server courier-authdaemon courier-authlib-mysql courier-pop courier-pop-ssl courier-imap courier-imap-ssl libsasl2-2 libsasl2-modules libsasl2-modules-sql sasl2-bin libpam-mysql openssl phpmyadmin apache2 libapache2-mod-php5 php5 php5-mysql libpam-smbpass
Anda akan ditanya beberapa pertanyaan:
Kata sandi baru untuk pengguna "root" MySQL:<-- yourrootsqlpassword
Ulangi kata sandi untuk pengguna "root" MySQL:<-- yourrootsqlpassword
Buat direktori untuk administrasi berbasis web? <-- Tidak
Jenis umum konfigurasi email:<-- Situs Internet
Nama email sistem:<-- server1.example.com
Diperlukan sertifikat SSL <-- Oke
Server web untuk mengkonfigurasi ulang secara otomatis:<-- apache2
Konfigurasi database untuk phpmyadmin dengan dbconfig-common? <-- Tidak
3 Terapkan Patch Kuota Ke Postfix
Kita harus mendapatkan sumber Postfix, menambalnya dengan tambalan kuota, membangun paket .deb Postfix baru dan menginstal paket .deb tersebut:
apt-get build-dep postfix
cd /usr/src
apt-get source postfix
(Pastikan Anda menggunakan versi Postfix yang benar pada perintah berikut. Saya telah menginstal Postfix 2.9.1. Anda dapat mengetahui versi Postfix Anda dengan menjalankan
postconf -d | grep mail_version
Outputnya akan terlihat seperti ini:
[dilindungi email]:/usr/src# postconf -d | grep mail_version
mail_version =2.9.1
milter_macro_v =$mail_name $mail_version
[email protected]:/usr/src#
)
wget http://vda.sourceforge.net/VDA/postfix-vda-v11-2.9.1.patch
cd postfix-2.9.1
patch -p1 <../postfix-vda-v11 -2.9.1.patch
Selanjutnya buka debian/rules dan ubah DEB_BUILD_HARDENING dari 1 menjadi 0:
vi debian/rules
[...] export DEB_BUILD_HARDENING=0 [...] |
Jika Anda tidak melakukannya, build Anda akan gagal dengan pesan kesalahan berikut:
maildir.c:Dalam fungsi âdeliver_maildirâ:
maildir.c:974:17:error:format not string literal dan tidak ada argumen format [-Werror=format-security]
maildir.c:977:17 :error:format bukan literal string dan tidak ada argumen format [-Werror=format-security]
maildir.c:983:17:error:format bukan string literal dan tidak ada argumen format [-Werror=format-security ]
maildir.c:986:17:error:format not string literal dan tidak ada argumen format [-Werror=format-security]
maildir.c:Dalam fungsi âsql2fileâ:
maildir. c:404:25:warning:mengabaikan nilai balik 'read', dideklarasikan dengan atribut warn_unused_result [-Wunused-result]
maildir.c:417:26:warning:mengabaikan nilai kembalian 'write', dideklarasikan dengan atribut warn_unused_result [- Wunused-result]
cc1:beberapa peringatan diperlakukan sebagai kesalahan
make:*** [maildir.o] Kesalahan 1
make:Meninggalkan direktori `/usr/src/postfix-2.9. 1/src/virtual'
make[1]:*** [update] Error 1
make[1]:Meninggalkan direktori `/usr/src/postfix -2.9.1'
make:*** [build] Error 2
dpkg-buildpackage:error:debian/rules build memberi error exit status 2
[email protected]:/usr/ src/postfix-2.9.1#
Sekarang kita dapat membangun paket .deb Postfix baru:
dpkg-buildpackage
Sekarang kita naik satu direktori, di situlah paket .deb baru telah dibuat:
cd ..
Perintah
ls -l
menunjukkan kepada Anda paket yang tersedia:
[email protected]:/usr/src# ls -l
total 6932
drwxr-xr-x 24 root root 4096 Apr 27 11:20 linux-headers-3.2.0-23
drwxr-xr-x 7 root root 4096 Apr 27 11:20 linux-headers-3.2.0-23-generic
drwxr-xr-x 18 root root 4096 Mei 7 15:57 postfix-2.9.1
-rw-r--r-- 1 root root 3814 Mei 7 15:58 postfix_2.9.1-4_amd64.changes
-rw-r--r-- 1 root root 1497792 Mei 7 15:58 postfix_2 .9.1-4_amd64.deb
-rw-r--r-- 1 root root 246141 Mei 7 15:51 postfix_2.9.1-4.diff.gz
-rw-r--r-- 1 root root 1492 Mei 7 15:51 postfix_2.9.1-4.dsc
-rw-r--r-- 1 root root 3768329 22 Maret 05:05 postfix_2.9.1.orig.tar.gz
-rw-r--r-- 1 root root 46620 Mei 7 15:58 postfix-cdb_2.9.1-4_amd64.deb
-rw-r--r-- 1 root root 160196 Mei 7 15:58 postfix-dev_2.9.1-4_all.deb
-rw-r--r-- 1 root root 1080772 Mei 7 15:58 postfix-doc_2.9.1-4_all.deb
-rw-r-- r-- 1 root root 55478 Mei 7 15:58 postfix-ldap_2.9.1-4_amd64.deb
-rw-r--r-- 1 root root 48550 Ma y 7 15:58 postfix-mysql_2.9.1-4_amd64.deb
-rw-r--r-- 1 root root 48718 Mei 7 15:58 postfix-pcre_2.9.1-4_amd64.deb
- rw-r--r-- 1 root root 48686 Mei 7 15:58 postfix-pgsql_2.9.1-4_amd64.deb
-rw-r--r-- 1 root root 55009 Apr 11 14:54 postfix- vda-v11-2.9.1.patch
[email protected]:/usr/src#
Pilih paket postfix dan postfix-mysql dan instal seperti ini:
dpkg -i postfix_2.9.1-4_amd64.deb postfix-mysql_2.9.1-4_amd64.deb
4 Membuat Database MySQL Untuk Postfix/Courier
Sekarang kita membuat database bernama mail:
mysqladmin -u root -p create mail
Selanjutnya, kita pergi ke shell MySQL:
mysql -u root -p
Di shell MySQL, kami membuat pengguna mail_admin dengan passwort mail_admin_password (ganti dengan kata sandi Anda sendiri) yang memiliki hak istimewa SELECT,INSERT,UPDATE,DELETE pada database email. Pengguna ini akan digunakan oleh Postfix dan Courier untuk terhubung ke database email:
GRANT SELECT, INSERT, UPDATE, DELETE PADA email.* UNTUK 'mail_admin'@'localhost' DIIDENTIFIKASI DENGAN 'mail_admin_password';
GRANT SELECT, INSERT, UPDATE, DELETE ON mail.* UNTUK 'mail_admin'@'localhost. domain lokal' DIIDENTIFIKASI DENGAN 'mail_admin_password';
HAK ISTIMEWA FLUSH;
Masih di shell MySQL, kami membuat tabel yang dibutuhkan oleh Postfix dan Courier:
USE mail;
CREATE TABLE domain (
domain varchar(50) NOT NULL,
PRIMARY KEY (domain) )
ENGINE=MyISAM;
CREATE TABLE forwardings (
source varchar(80) NOT NULL,
destination TEXT NOT NULL,
PRIMARY KEY (source) )
ENGINE=MyISAM;
CREATE TABLE users (
email varchar(80) NOT NULL,
password varchar(20) NOT NULL,
kuota INT(10) DEFAULT '10485760',
PRIMARY KEY (email )
) ENGINE=MyISAM;
CREATE TABLE transport (
domain varchar(128) NOT NULL default '',
transport varchar(128) NOT NULL default '',
UNIQUE KEY domain (domain)
) ENGINE =MyISAM;
quit;
Seperti yang mungkin Anda perhatikan, dengan berhenti; perintah kami telah meninggalkan shell MySQL dan kembali ke shell Linux.
domain tabel akan menyimpan setiap domain virtual tempat Postfix harus menerima email (mis. example.com ).
| domain |
| contoh.com |
penerusan tabel adalah untuk aliasing satu alamat email ke yang lain, mis. teruskan email untuk [email protected] ke .
| sumber | tujuan |
| [dilindungi email] | [dilindungi email] |
pengguna tabel menyimpan semua pengguna virtual (yaitu alamat email, karena alamat email dan nama pengguna sama) dan kata sandi (dalam terenkripsi form!) dan nilai kuota untuk setiap kotak surat (dalam contoh ini nilai defaultnya adalah 10485760 byte yang berarti 10MB).
| sandi | kuota | |
| [dilindungi email] | No9.E4skNvGa. ("rahasia" dalam bentuk terenkripsi) | 10485760 |
transportasi tabel adalah opsional, ini untuk pengguna tingkat lanjut. Ini memungkinkan untuk meneruskan email untuk pengguna tunggal, seluruh domain atau semua email ke server lain. Misalnya,
| domain | transportasi |
| contoh.com | smtp:[1.2.3.4] |
akan meneruskan semua email untuk example.com melalui protokol smtp ke server dengan alamat IP 1.2.3.4 (tanda kurung siku [] berarti "jangan mencari data MX DNS" (yang masuk akal untuk alamat IP...). Jika Anda menggunakan nama domain yang sepenuhnya memenuhi syarat (FQDN), Anda tidak akan menggunakan tanda kurung siku.).
BTW, (Saya berasumsi bahwa alamat IP dari sistem server email Anda adalah 192.168.0.100) Anda dapat mengakses phpMyAdmin melalui http://192.168.0.100/phpmyadmin/ di browser dan masuk sebagai mail_admin. Kemudian Anda dapat melihat database. Nanti Anda dapat menggunakan phpMyAdmin untuk mengatur server email Anda.
5 Konfigurasi Postfix
Sekarang kita harus memberitahu Postfix di mana ia dapat menemukan semua informasi dalam database. Oleh karena itu kita harus membuat enam file teks. Anda akan melihat bahwa saya memberi tahu Postfix untuk terhubung ke MySQL pada alamat IP 127.0.0.1 alih-alih localhost. Ini karena Postfix berjalan di chroot jail dan tidak memiliki akses ke soket MySQL yang akan coba disambungkan jika saya memberi tahu Postfix untuk menggunakan localhost. Jika saya menggunakan 127.0.0.1 Postfix menggunakan jaringan TCP untuk terhubung ke MySQL yang tidak ada masalah bahkan di chroot jail (alternatifnya adalah memindahkan soket MySQL ke chroot jail yang menyebabkan beberapa masalah lain).
Harap pastikan bahwa /etc/mysql/my.cnf berisi baris berikut:
vi /etc/mysql/my.cnf
[...] # Instead of skip-networking the default is now to listen only on # localhost which is more compatible and is not less secure. bind-address = 127.0.0.1 [...] |
Jika Anda harus mengubah /etc/mysql/my.cnf, silakan restart MySQL sekarang:
/etc/init.d/mysql restart
Jalankan
netstat -tap | grep mysql
untuk memastikan bahwa MySQL mendengarkan pada 127.0.0.1 (localhost.localdomain):
[dilindungi email]:/usr/src# netstat -tap | grep mysql
tcp 0 0 localhost.localdo:mysql *:* DENGARKAN 3895/mysqld
[email protected]:/usr/src#
Sekarang mari kita buat enam file teks kita.
vi /etc/postfix/mysql-virtual_domains.cf
user = mail_admin password = mail_admin_password dbname = mail query = SELECT domain AS virtual FROM domains WHERE domain='%s' hosts = 127.0.0.1 |
vi /etc/postfix/mysql-virtual_forwardings.cf
user = mail_admin password = mail_admin_password dbname = mail query = SELECT destination FROM forwardings WHERE source='%s' hosts = 127.0.0.1 |
vi /etc/postfix/mysql-virtual_mailboxes.cf
user = mail_admin password = mail_admin_password dbname = mail query = SELECT CONCAT(SUBSTRING_INDEX(email,'@',-1),'/',SUBSTRING_INDEX(email,'@',1),'/') FROM users WHERE email='%s' hosts = 127.0.0.1 |
vi /etc/postfix/mysql-virtual_email2email.cf
user = mail_admin password = mail_admin_password dbname = mail query = SELECT email FROM users WHERE email='%s' hosts = 127.0.0.1 |
vi /etc/postfix/mysql-virtual_transports.cf
user = mail_admin password = mail_admin_password dbname = mail query = SELECT transport FROM transport WHERE domain='%s' hosts = 127.0.0.1 |
vi /etc/postfix/mysql-virtual_mailbox_limit_maps.cf
user = mail_admin password = mail_admin_password dbname = mail query = SELECT quota FROM users WHERE email='%s' hosts = 127.0.0.1 |
Kemudian ubah izin dan grup file-file ini:
chmod o=/etc/postfix/mysql-virtual_*.cf
chgrp postfix /etc/postfix/mysql-virtual_*.cf
Sekarang kita membuat pengguna dan grup bernama vmail dengan direktori home /home/vmail. Di sinilah semua kotak surat akan disimpan.
groupadd -g 5000 vmail
penggunaadd -g vmail -u 5000 vmail -d /home/vmail -m
Selanjutnya kita melakukan beberapa konfigurasi Postfix. Pastikan Anda mengganti server1.example.com dengan FQDN yang valid, jika tidak, Postfix Anda mungkin tidak berfungsi dengan baik!
postconf -e 'myhostname =server1.example.com'
postconf -e 'mydestination =server1.example.com, localhost, localhost.localdomain'
postconf -e 'mynetworks =127.0.0.0/8'
postconf -e 'virtual_alias_domains ='
postconf -e 'virtual_alias_maps =proxy:mysql:/etc/postfix/mysql-virtual_forwardings.cf, mysql:/etc/postfix/mysql-virtual_email2email.cf'
postconf -e 'virtual_mailbox_domains =proxy:mysql:/etc/postfix/mysql-virtual_domains.cf'
postconf -e 'virtual_mailbox_maps =proxy:mysql:/etc/postfix/mysql-virtual_mailboxes.cf'
postconf -e 'virtual_mailbox_base =/home/vmail'
postconf -e 'virtual_uid_maps =static:5000'
postconf -e 'virtual_gid_maps =static:5000'
postconf -e ' smtpd_sasl_auth_enable =yes'
postconf -e 'broken_sasl_auth_clients =yes'
postconf -e 'smtpd_sasl_authenticated_header =yes'
postconf -e 'smtpd_recipient__resto_resto_recipient__resto -e 'smtpd_use_tls =yes'
postconf -e 'smtpd_tls_cert_file =/etc/postfix/smtpd.cert'
postconf -e 'smtpd_tls_key_file =/etc/postfix/smtpd.key'
-e 'transport_maps =proxy:mysql:/etc/postfix/mysql-virtual_transports.cf'
postconf -e 'virtual_maildir_extended =yes'
postconf -e 'virtual_mailbox_limit_maps =proxy:mysql:/etc/postfix /mysql-virtual_mailbox_limit_maps.cf'
postconf -e 'virtual_mailbox_limit_override =yes'
postconf -e 'virtual_maildir_limit_message ="Pengguna yang Anda coba jangkau melebihi kuota."'
postconf -e 'virtual_overquota_bounce =yes'
postconf -e 'proxy_read_maps =$ local_recipient_maps $ mydestination $ virtual_alias_maps $ virtual_alias_domains $ virtual_mailbox_maps $ virtual_mailbox_domains $ relay_recipient_maps $ relay_domains $ canonical_maps $ sender_canonical_maps $ recipient_canonical_maps $ relocated_maps $ transport_maps $ mynetworks $ virtual_mailbox_limit_maps'
Setelah itu kita buat sertifikat SSL yang dibutuhkan untuk TLS:
cd /etc/postfix
openssl req -new -outform PEM -out smtpd.cert -newkey rsa:2048 -nodes -keyout smtpd.key -keyform PEM -days 365 -x509
Nama Negara (kode 2 huruf) [AU]:<-- Masukkan Nama Negara Anda (mis., "DE").
Nama Negara Bagian atau Provinsi (nama lengkap) [Some-State]:<-- Masukkan Negara Bagian Anda atau Nama Provinsi.
Nama Lokalitas (mis., kota) []:<-- Masukkan Kota Anda.
Nama Organisasi (mis., perusahaan) [Internet Widgits Pty Ltd]:<-- Masukkan Nama Organisasi Anda (mis., nama perusahaan Anda).
Nama Unit Organisasi (mis., seksi) []:<-- Masukkan Nama Unit Organisasi Anda (mis. "Departemen TI").
Nama Umum (mis. nama ANDA) []:<-- Masukkan Nama Domain yang Memenuhi Syarat dari sistem (misalnya "server1.example.com").
Alamat Email []:<-- Masukkan Alamat Email Anda.
Kemudian ubah izin smtpd.key:
chmod o= /etc/postfix/smtpd.key
6 Konfigurasi Saslauthd
Jalankan pertama
mkdir -p /var/spool/postfix/var/run/saslauthd
Kemudian edit /etc/default/saslauthd.conf Setel MULAI ke ya dan ubah baris OPTIONS="-c -m /var/run/saslauthd" menjadi OPTIONS="-c -m /var/spool/postfix/var/run/saslauthd -r":
vi /etc/default/saslauthd
# # Settings for saslauthd daemon # Please read /usr/share/doc/sasl2-bin/README.Debian for details. # # Should saslauthd run automatically on startup? (default: no) START=yes # Description of this saslauthd instance. Recommended. # (suggestion: SASL Authentication Daemon) DESC="SASL Authentication Daemon" # Short name of this saslauthd instance. Strongly recommended. # (suggestion: saslauthd) NAME="saslauthd" # Which authentication mechanisms should saslauthd use? (default: pam) # # Available options in this Debian package: # getpwent -- use the getpwent() library function # kerberos5 -- use Kerberos 5 # pam -- use PAM # rimap -- use a remote IMAP server # shadow -- use the local shadow password file # sasldb -- use the local sasldb database file # ldap -- use LDAP (configuration is in /etc/saslauthd.conf) # # Only one option may be used at a time. See the saslauthd man page # for more information. # # Example: MECHANISMS="pam" MECHANISMS="pam" # Additional options for this mechanism. (default: none) # See the saslauthd man page for information about mech-specific options. MECH_OPTIONS="" # How many saslauthd processes should we run? (default: 5) # A value of 0 will fork a new process for each connection. THREADS=5 # Other options (default: -c -m /var/run/saslauthd) # Note: You MUST specify the -m option or saslauthd won't run! # # WARNING: DO NOT SPECIFY THE -d OPTION. # The -d option will cause saslauthd to run in the foreground instead of as # a daemon. This will PREVENT YOUR SYSTEM FROM BOOTING PROPERLY. If you wish # to run saslauthd in debug mode, please run it by hand to be safe. # # See /usr/share/doc/sasl2-bin/README.Debian for Debian-specific information. # See the saslauthd man page and the output of 'saslauthd -h' for general # information about these options. # # Example for chroot Postfix users: "-c -m /var/spool/postfix/var/run/saslauthd" # Example for non-chroot Postfix users: "-c -m /var/run/saslauthd" # # To know if your Postfix is running chroot, check /etc/postfix/master.cf. # If it has the line "smtp inet n - y - - smtpd" or "smtp inet n - - - - smtpd" # then your Postfix is running in a chroot. # If it has the line "smtp inet n - n - - smtpd" then your Postfix is NOT # running in a chroot. #OPTIONS="-c -m /var/run/saslauthd" OPTIONS="-c -m /var/spool/postfix/var/run/saslauthd -r" |
Kemudian buat file /etc/pam.d/smtp. Seharusnya hanya berisi dua baris berikut (pastikan untuk mengisi detail database Anda yang benar):
vi /etc/pam.d/smtp
auth required pam_mysql.so user=mail_admin passwd=mail_admin_password host=127.0.0.1 db=mail table=users usercolumn=email passwdcolumn=password crypt=1 account sufficient pam_mysql.so user=mail_admin passwd=mail_admin_password host=127.0.0.1 db=mail table=users usercolumn=email passwdcolumn=password crypt=1 |
Selanjutnya buat file /etc/postfix/sasl/smtpd.conf. Seharusnya terlihat seperti ini:
vi /etc/postfix/sasl/smtpd.conf
pwcheck_method: saslauthd mech_list: plain login allow_plaintext: true auxprop_plugin: sql sql_engine: mysql sql_hostnames: 127.0.0.1 sql_user: mail_admin sql_passwd: mail_admin_password sql_database: mail sql_select: select password from users where email = '%[email protected]%r' |
Selanjutnya tambahkan pengguna postfix ke grup sasl (ini memastikan bahwa Postfix memiliki izin untuk mengakses saslauthd):
adduser postfix sasl
Kemudian restart Postfix dan Saslauthd:
/etc/init.d/postfix restart
/etc/init.d/saslauthd restart
7 Konfigurasikan Kurir
Sekarang kita harus memberi tahu Courier bahwa itu harus mengautentikasi terhadap database MySQL kita. Pertama, edit /etc/courier/authdaemonrc dan ubah nilai authmodulelist sehingga berbunyi:
vi /etc/courier/authdaemonrc
[...] authmodulelist="authmysql" [...] |
Kemudian buat cadangan /etc/courier/authmysqlrc dan kosongkan file lama:
cp /etc/courier/authmysqlrc /etc/courier/authmysqlrc_orig
cat /dev/null> /etc/courier/authmysqlrc
Kemudian buka /etc/courier/authmysqlrc dan masukkan baris berikut ke dalamnya:
vi /etc/courier/authmysqlrc
MYSQL_SERVER localhost MYSQL_USERNAME mail_admin MYSQL_PASSWORD mail_admin_password MYSQL_PORT 0 MYSQL_DATABASE mail MYSQL_USER_TABLE users MYSQL_CRYPT_PWFIELD password #MYSQL_CLEAR_PWFIELD password MYSQL_UID_FIELD 5000 MYSQL_GID_FIELD 5000 MYSQL_LOGIN_FIELD email MYSQL_HOME_FIELD "/home/vmail" MYSQL_MAILDIR_FIELD CONCAT(SUBSTRING_INDEX(email,'@',-1),'/',SUBSTRING_INDEX(email,'@',1),'/') #MYSQL_NAME_FIELD MYSQL_QUOTA_FIELD quota |
Selama penginstalan, sertifikat SSL untuk IMAP-SSL dan POP3-SSL dibuat dengan hostname localhost. Untuk mengubah ini ke nama host yang benar (server1.example.com dalam tutorial ini), hapus sertifikat...
cd /etc/courier
rm -f /etc/courier/imapd.pem
rm -f /etc/courier/pop3d.pem
... dan ubah dua file berikut; ganti CN=localhost dengan CN=server1.example.com (Anda juga dapat mengubah nilai lainnya, jika perlu):
vi /etc/courier/imapd.cnf
[...] CN=server1.example.com [...] |
vi /etc/courier/pop3d.cnf
[...] CN=server1.example.com [...] |
Kemudian buat ulang sertifikatnya...
mkimapdcert
mkpop3dcert
... dan mulai ulang Kurir:
/etc/init.d/courier-authdaemon restart
/etc/init.d/courier-imap restart
/etc/init.d/courier-imap-ssl restart
/etc/ init.d/courier-pop restart
/etc/init.d/courier-pop-ssl restart
Dengan menjalankan
telnet localhost pop3
Anda dapat melihat apakah server POP3 Anda berfungsi dengan benar. Seharusnya mengembalikan +OK Halo. (Ketik quit untuk kembali ke shell Linux.)
[email protected]:/etc/courier# telnet localhost pop3
Mencoba 127.0.0.1...
Terhubung ke localhost.localdomain.
Karakter Escape adalah '^]'.
+OK Halo.
<-- berhenti
+OK Semoga lain kali lebih beruntung.
Koneksi ditutup oleh host asing.
[email protected]:/etc/courier#
8 Ubah /etc/aliases
Sekarang kita harus membuka /etc/aliases. Pastikan postmaster menunjuk ke root dan root ke nama pengguna atau alamat email Anda sendiri, mis. seperti ini:
vi /etc/aliases
[...] postmaster: root root: [email protected] [...] |
atau seperti ini (jika administrator adalah nama pengguna Anda sendiri):
[...] postmaster: root root: administrator [...] |
Setiap kali Anda memodifikasi /etc/aliases, Anda harus menjalankan
newaliases
setelah itu dan mulai ulang Postfix:
/etc/init.d/postfix restart
9 Instal amavisd-new, SpamAssassin, Dan ClamAV
Untuk menginstal amavisd-new, spamassassin dan clamav, jalankan perintah berikut:
apt-get install amavisd-new spamassassin clamav clamav-daemon zoo unzip bzip2 libnet-ph-perl libnet-snpp-perl libnet-telnet-perl nomarch lzop pax
Setelah itu kita harus mengkonfigurasi amavisd-new. Konfigurasi dibagi dalam berbagai file yang berada di direktori /etc/amavis/conf.d. Lihatlah masing-masing untuk menjadi akrab dengan konfigurasi. Sebagian besar pengaturan baik-baik saja, namun kita harus memodifikasi tiga file:
Pertama kita harus mengaktifkan ClamAV dan SpamAssassin di /etc/amavis/conf.d/15-content_filter_mode dengan menghapus komentar pada baris @bypass_virus_checks_maps dan @bypass_spam_checks_maps:
vi /etc/amavis/conf.d/15-content_filter_mode
Filenya akan terlihat seperti ini:
use strict; # You can modify this file to re-enable SPAM checking through spamassassin # and to re-enable antivirus checking. # # Default antivirus checking mode # Please note, that anti-virus checking is DISABLED by # default. # If You wish to enable it, please uncomment the following lines: @bypass_virus_checks_maps = ( \%bypass_virus_checks, \@bypass_virus_checks_acl, \$bypass_virus_checks_re); # # Default SPAM checking mode # Please note, that anti-spam checking is DISABLED by # default. # If You wish to enable it, please uncomment the following lines: @bypass_spam_checks_maps = ( \%bypass_spam_checks, \@bypass_spam_checks_acl, \$bypass_spam_checks_re); 1; # ensure a defined return |
Dan kemudian Anda harus melihat pengaturan spam dan tindakan untuk spam-/virus-mails di /etc/amavis/conf.d/20-debian_defaults. Tidak perlu mengubah apa pun jika pengaturan default sudah sesuai untuk Anda. File berisi banyak penjelasan sehingga tidak perlu menjelaskan pengaturan di sini:
vi /etc/amavis/conf.d/20-debian_defaults
[...] $QUARANTINEDIR = "$MYHOME/virusmails"; $quarantine_subdir_levels = 1; # enable quarantine dir hashing $log_recip_templ = undef; # disable by-recipient level-0 log entries $DO_SYSLOG = 1; # log via syslogd (preferred) $syslog_ident = 'amavis'; # syslog ident tag, prepended to all messages $syslog_facility = 'mail'; $syslog_priority = 'debug'; # switch to info to drop debug output, etc $enable_db = 1; # enable use of BerkeleyDB/libdb (SNMP and nanny) $enable_global_cache = 1; # enable use of libdb-based cache if $enable_db=1 $inet_socket_port = 10024; # default listening socket $sa_spam_subject_tag = '***SPAM*** '; $sa_tag_level_deflt = 2.0; # add spam info headers if at, or above that level $sa_tag2_level_deflt = 6.31; # add 'spam detected' headers at that level $sa_kill_level_deflt = 6.31; # triggers spam evasive actions $sa_dsn_cutoff_level = 10; # spam level beyond which a DSN is not sent [...] $final_virus_destiny = D_DISCARD; # (data not lost, see virus quarantine) $final_banned_destiny = D_BOUNCE; # D_REJECT when front-end MTA $final_spam_destiny = D_BOUNCE; $final_bad_header_destiny = D_PASS; # False-positive prone (for spam) [...] |
Terakhir, edit /etc/amavis/conf.d/50-user dan tambahkan baris $pax='pax'; di tengah:
vi /etc/amavis/conf.d/50-user
use strict; # # Place your configuration directives here. They will override those in # earlier files. # # See /usr/share/doc/amavisd-new/ for documentation and examples of # the directives you can use in this file # $pax='pax'; #------------ Do not modify anything below this line ------------- 1; # ensure a defined return |
Setelah itu, jalankan perintah ini untuk menambahkan pengguna clamav ke grup amavis dan untuk memulai ulang amavisd-new dan ClamAV:
adduser clamav amavis
/etc/init.d/amavis restart
/etc/init.d/clamav-freshclam restart
/etc/init.d/clamav-daemon restart
Sekarang kita harus mengkonfigurasi Postfix untuk menyalurkan email masuk melalui amavisd-new:
postconf -e 'content_filter =amavis:[127.0.0.1]:10024'
postconf -e 'receive_override_options =no_address_mappings'
Setelah itu tambahkan baris berikut ke /etc/postfix/master.cf:
vi /etc/postfix/master.cf
[...]
amavis unix - - - - 2 smtp
        -o smtp_data_done_timeout=1200
        -o smtp_send_xforward_command=yes

127.0.0.1:10025 inet n - - - - smtpd
        -o content_filter=
        -o local_recipient_maps=
        -o relay_recipient_maps=
        -o smtpd_restriction_classes=
        -o smtpd_client_restrictions=
        -o smtpd_helo_restrictions=
        -o smtpd_sender_restrictions=
        -o smtpd_recipient_restrictions=permit_mynetworks,reject
        -o mynetworks=127.0.0.0/8
        -o strict_rfc821_envelopes=yes
-o receive_override_options=no_unknown_recipient_checks,no_header_body_checks |
Kemudian restart Postfix:
/etc/init.d/postfix restart
Sekarang jalankan
netstat -tap
dan Anda akan melihat Postfix (master) mendengarkan pada port 25 (smtp) dan 10025, dan amavisd-new pada port 10024:
[email protected]:/etc/courier# netstat -tap
Koneksi Internet aktif (server dan terbentuk)
Proto Recv-Q Send-Q Local Address Foreign Address / State P 0 0 localhost.localdo:10025*:*Dengarkan 25911/master
tcp 0 0 localhost.localdo:mysql*:*dengarkan 3895/mysqld
tcp 0 0*:http*:*dengarkan 4845/Apache2
tcp 0 0 *:ssh *:* LISTEN 649/sshd
tcp 0 0 *:smtp *:* LISTEN 25911/master
tcp 0 0 localhost.localdo:10024 *:* LISTEN 24534/amavisd (mast
tcp 0 52 server1.example.com:ssh 192.168.0.199:4745 ESTABLISHED 847/0
tcp6 0 0 [::]:pop3 [::]:* LISTEN 20989/ couriertcpd
tcp6 0 0 [::]:imap2 [::]:* LISTEN 20921/couriertcpd
tcp6 0 0 [::]:ssh [::]:* LISTEN 649/sshd
tcp6 0 0 [::]:smtp [::]:* LISTEN 25911/master
tcp6 0 0 [::]:imaps [::]:* LISTEN 20958/couriertcpd
tcp6 0 0 [::]:pop3s [::]:* LISTEN 21026/couriertcpd
[email protected]:/etc/courier#
10 Install Razor, Pyzor And DCC And Configure SpamAssassin
Razor, Pyzor and DCC are spamfilters that use a collaborative filtering network. To install Razor and Pyzor, run
apt-get install razor pyzor
DCC isn't available in the Ubuntu 12.04 repositories, so we install it as follows:
cd /tmp
wget http://www.dcc-servers.net/dcc/source/dcc-dccproc.tar.Z
tar xzvf dcc-dccproc.tar.Z
cd dcc-dccproc-1.3.142
./configure --with-uid=amavis
make
make install
chown -R amavis:amavis /var/dcc
ln -s /var/dcc/libexec/dccifd /usr/local/bin/dccifd
Now we have to tell SpamAssassin to use these three programs. Edit /etc/spamassassin/local.cf and add the following lines to it:
vi /etc/spamassassin/local.cf
[...] #dcc use_dcc 1 dcc_path /usr/local/bin/dccproc #pyzor use_pyzor 1 pyzor_path /usr/bin/pyzor #razor use_razor2 1 razor_config /etc/razor/razor-agent.conf #bayes use_bayes 1 use_bayes_rules 1 bayes_auto_learn 1 |
Then we must enable the DCC plugin in SpamAssassin. Open /etc/spamassassin/v310.pre and uncomment the loadplugin Mail::SpamAssassin::Plugin::DCC line:
vi /etc/spamassassin/v310.pre
[...] # DCC - perform DCC message checks. # # DCC is disabled here because it is not open source. See the DCC # license for more details. # loadplugin Mail::SpamAssassin::Plugin::DCC [...] |
You can check your SpamAssassin configuration by executing:
spamassassin --lint
It shouldn't show any errors.
Now there's a little bug in the amavisd-new init script. Open /etc/init.d/amavis...
vi /etc/init.d/amavis
... and comment out the STOP="--stop --quiet --pidfile $PIDFILE --name ${DAEMONNAME}" line and add STOP="--stop --quiet --pidfile $PIDFILE" instead:
[...]
set -e

START="--start --quiet --pidfile $PIDFILE --name ${DAEMONNAME} --startas ${DAEMON}"
#STOP="--stop --quiet --pidfile $PIDFILE --name ${DAEMONNAME}"
STOP="--stop --quiet --pidfile $PIDFILE"
PARAMS=

check_noncompatible_upgrade()
[...] |
Restart amavisd-new afterwards:
/etc/init.d/amavis restart
Now we update our SpamAssassin rulesets as follows:
sa-update --no-gpg
We create a cron job so that the rulesets will be updated regularly. Jalankan
crontab -e
to open the cron job editor. Create the following cron job:
23 4 */2 * * /usr/bin/sa-update --no-gpg &> /dev/null |
This will update the rulesets every second day at 4.23h.
11 Quota Exceedance Notifications
If you want to get notifications about all the email accounts that are over quota, then create the file /usr/local/sbin/quota_notify:
cd /usr/local/sbin/
vi quota_notify
#!/usr/bin/perl -w

# Author <[email protected]>
#
# This script assumes that virtual_mailbox_base in defined
# in postfix's main.cf file. This directory is assumed to contain
# directories which themselves contain your virtual user's maildirs.
# For example:
#
# -----------/
#            |
#            |
#    home/vmail/domains/
#        |          |
#        |          |
#  example.com/  foo.com/
#                   |
#                   |
#           -----------------
#           |       |       |
#           |       |       |
#         user1/   user2/  user3/
#                           |
#                           |
#                        maildirsize
#

use strict;

my $POSTFIX_CF = "/etc/postfix/main.cf";
my $MAILPROG = "/usr/sbin/sendmail -t";
my $WARNPERCENT = 80;
my @POSTMASTERS = ('[email protected]');
my $CONAME = 'My Company';
my $COADDR = '[email protected]';
my $SUADDR = '[email protected]';
my $MAIL_REPORT = 1;
my $MAIL_WARNING = 1;

#get virtual mailbox base from postfix config
open(PCF, "< $POSTFIX_CF") or die $!;
my $mboxBase;
while (<PCF>) {
   next unless /virtual_mailbox_base\s*=\s*(.*)\s*/;
   $mboxBase = $1;
}
close(PCF);

#assume one level of subdirectories for domain names
my @domains;
opendir(DIR, $mboxBase) or die $!;
while (defined(my $name = readdir(DIR))) {
   next if $name =~ /^\.\.?$/;        #skip '.' and '..'
   next unless (-d "$mboxBase/$name");
   push(@domains, $name);
}
closedir(DIR);
#iterate through domains for username/maildirsize files
my @users;
chdir($mboxBase);
foreach my $domain (@domains) {
        opendir(DIR, $domain) or die $!;
        while (defined(my $name = readdir(DIR))) {
           next if $name =~ /^\.\.?$/;        #skip '.' and '..'
           next unless (-d "$domain/$name");
      push(@users, {"$name\@$domain" => "$mboxBase/$domain/$name"});
        }
}
closedir(DIR);

#get user quotas and percent used
my (%lusers, $report);
foreach my $href (@users) {
   foreach my $user (keys %$href) {
      my $quotafile = "$href->{$user}/maildirsize";
      next unless (-f $quotafile);
      open(QF, "< $quotafile") or die $!;
      my ($firstln, $quota, $used);
      while (<QF>) {
         my $line = $_;
              if (! $firstln) {
                 $firstln = 1;
                 die "Error: corrupt quotafile $quotafile"
                    unless ($line =~ /^(\d+)S/);
                 $quota = $1;
            last if (! $quota);
            next;
         }
         die "Error: corrupt quotafile $quotafile"
            unless ($line =~ /\s*(-?\d+)/);
         $used += $1;
      }
      close(QF);
      next if (! $used);
      my $percent = int($used / $quota * 100);
      $lusers{$user} = $percent unless not $percent;
   }
}

#send a report to the postmasters
if ($MAIL_REPORT) {
   open(MAIL, "| $MAILPROG");
   select(MAIL);
   map {print "To: $_\n"} @POSTMASTERS;
   print "From: $COADDR\n";
   print "Subject: Daily Quota Report.\n";
   print "DAILY QUOTA REPORT:\n\n";
   print "----------------------------------------------\n";
   print "| % USAGE |            ACCOUNT NAME          |\n";
   print "----------------------------------------------\n";
   foreach my $luser ( sort { $lusers{$b} <=> $lusers{$a} } keys %lusers ) {
      printf("|   %3d   | %32s |\n", $lusers{$luser}, $luser);
      print "---------------------------------------------\n";
   }
        print "\n--\n";
        print "$CONAME\n";
        close(MAIL);
}

#email a warning to people over quota
if ($MAIL_WARNING) {
        foreach my $luser (keys (%lusers)) {
           next unless $lusers{$luser} >= $WARNPERCENT;       # skip those under quota
           open(MAIL, "| $MAILPROG");
           select(MAIL);
           print "To: $luser\n";
      map {print "BCC: $_\n"} @POSTMASTERS;
           print "From: $SUADDR\n";
           print "Subject: WARNING: Your mailbox is $lusers{$luser}% full.\n";
           print "Reply-to: $SUADDR\n";
           print "Your mailbox: $luser is $lusers{$luser}% full.\n\n";
           print "Once your e-mail box has exceeded your monthly storage quota\n";
      print "your monthly billing will be automatically adjusted.\n";
      print "Please consider deleting e-mail and emptying your trash folder to clear some space.\n\n";
           print "Contact <$SUADDR> for further assistance.\n\n";
           print "Thank You.\n\n";
           print "--\n";
           print "$CONAME\n";
           close(MAIL);
        }
} |
Make sure that you adjust the variables at the top (especially the [email protected] email address).
We must make the file executable:
chmod 755 quota_notify
Jalankan
crontab -e
to create a cron job for that script:
0 0 * * * /usr/local/sbin/quota_notify &> /dev/null |
12 Test Postfix
To see if Postfix is ready for SMTP-AUTH and TLS, run
telnet localhost 25
After you have established the connection to your Postfix mail server type
ehlo localhost
If you see the lines
250-STARTTLS
dan
250-AUTH PLAIN LOGIN
everything is fine:
[email protected]:/usr/local/sbin# telnet localhost 25
Trying 127.0.0.1...
Connected to localhost.localdomain.
Escape character is '^]'.
220 server1.example.com ESMTP Postfix (Ubuntu)
<-- ehlo localhost
250-server1.example.com
250-PIPELINING
250-SIZE 10240000
250-VRFY
250-ETRN
250-STARTTLS
250-AUTH PLAIN LOGIN
250-AUTH=PLAIN LOGIN
250-ENHANCEDSTATUSCODES
250-8BITMIME
250 DSN
<-- quit
221 2.0.0 Bye
Connection closed by foreign host.
[email protected]:/usr/local/sbin#
Type
quit
to return to the system shell.
13 Populate The Database And Test
To populate the database you can use the MySQL shell:
mysql -u root -p
USE mail;
At least you have to create entries in the tables domains and users :
INSERT INTO `domains` (`domain`) VALUES ('example.com');
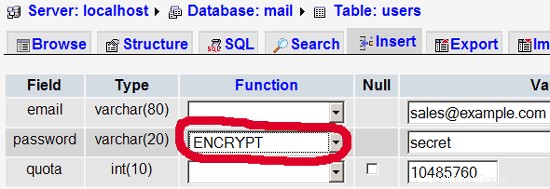
INSERT INTO `users` (`email`, `password`, `quota`) VALUES ('[email protected]', ENCRYPT('secret'), 10485760);
(Please take care that you use the ENCRYPT syntax in the second INSERT statement in order to encrypt the password!)
If you want to make entries in the other two tables, that would look like this:
INSERT INTO `forwardings` (`source`, `destination`) VALUES ('[email protected]', '[email protected]');
INSERT INTO `transport` (`domain`, `transport`) VALUES ('example.com', 'smtp:mail.example.com');
To leave the MySQL shell, type
quit;
Bagi kebanyakan orang akan lebih mudah jika mereka memiliki front-end grafis ke MySQL; therefore you can also use phpMyAdmin (in this example under http://192.168.0.100/phpmyadmin/ or http://server1.example.com/phpmyadmin/) to administrate the mail database. Again, when you create a user, go sure that you use the ENCRYPT function to encrypt the password:
I do not think I have to explain the domains and users table further.
The forwardings table can have entries like the following:
| source | destination | |
| [email protected] | [email protected] | Redirects emails for [email protected] to [email protected] |
| @example.com | [email protected] | Creates a Catch-All account for [email protected] All emails to example.com will arrive at [email protected], except those that exist in the users table (i.e., if [email protected] exists in the users table, mails to [email protected] will still arrive at [email protected]). |
| @example.com | @anotherdomain.tld | This redirects all emails to example.com to the same user at anotherdomain.tld. E.g., emails to [email protected] will be forwarded to [email protected] |
| [email protected] | [email protected], [email protected] | Forward emails for [email protected] to two or more email addresses. All listed email addresses under destination receive a copy of the email. |
The transport table can have entries like these:
| domain | transport | |
| example.com | : | Delivers emails for example.com locally. This is as if this record would not exist in this table at all. |
| example.com | smtp:mail.anotherdomain.tld | Delivers all emails for example.com via smtp to the server mail.anotherdomain.com. |
| example.com | smtp:mail.anotherdomain.tld:2025 | Delivers all emails for example.com via smtp to the server mail.anotherdomain.com, but on port 2025, not 25 which is the default port for smtp. |
| example.com |
smtp:[1.2.3.4] | The square brackets prevent Postfix from doing lookups of the MX DNS record for the address in square brackets. Makes sense for IP addresses. |
| .example.com | smtp:mail.anotherdomain.tld | Mail for any subdomain of example.com is delivered to mail.anotherdomain.tld. |
| * | smtp:mail.anotherdomain.tld | All emails are delivered to mail.anotherdomain.tld. |
| [email protected] | smtp:mail.anotherdomain.tld | Emails for [email protected] are delivered to mail.anotherdomain.tld. |
See
man transport
untuk lebih jelasnya.
Please keep in mind that the order of entries in the transport table is important! The entries will be followed from the top to the bottom.
Important: Postfix uses a caching mechanism for the transports, therefore it might take a while until you changes in the transport table take effect. If you want them to take effect immediately, run
postfix reload
after you have made your changes in the transport table.
14 Send A Welcome Email For Creating Maildir
When you create a new email account and try to fetch emails from it (with POP3/IMAP) you will probably get error messages saying that the Maildir doesn't exist. The Maildir is created automatically when the first email arrives for the new account. Therefore it's a good idea to send a welcome email to a new account.
First, we install the mailx package:
apt-get install mailutils
To send a welcome email to [email protected], we do this:
mailx [email protected]
You will be prompted for the subject. Type in the subject (e.g. Welcome), then press ENTER, and in the next line type your message. When the message is finished, press ENTER again so that you are in a new line, then press CTRL+D; if you don't want to cc the mail, press ENTER again:
[email protected]:/usr/local/sbin# mailx [email protected]
Cc:<-- ENTER
Subject:Welcome <-- ENTER
Welcome! Have fun with your new mail account. <-- ENTER
<-- CTRL+D
[email protected]:/usr/local/sbin#
15 Installing SquirrelMail
SquirrelMail is a webmail interface that will let your users send and receive emails in a browser. This chapter shows how to install it and adjust it to our setup so that users can even change their email account password from the SquirrelMail interface.
To install SquirrelMail, we run:
apt-get install squirrelmail squirrelmail-compatibility php-pear php-db
Next we symlink the Apache configuration that comes with the SquirrelMail package to the /etc/apache2/conf.d directory and restart Apache:
ln -s /etc/squirrelmail/apache.conf /etc/apache2/conf.d/squirrelmail.conf
/etc/init.d/apache2 restart
SquirrelMail comes with some pre-installed plugins, unfortunately none of them is capable of letting us change our email password in our MySQL database. But there's the Change SQL Password plugin which we can install manually:
cd /usr/share/squirrelmail/plugins
wget http://www.squirrelmail.org/plugins/change_sqlpass-3.3-1.2.tar.gz
tar xvfz change_sqlpass-3.3-1.2.tar.gz
cd change_sqlpass
cp config.php.sample config.php
Now we must edit config.php and adjust it to our setup. Please adjust the $csp_dsn, $lookup_password_query, $password_update_queries, $password_encryption, $csp_salt_static, and $csp_delimiter variables as follows and comment out $csp_salt_query:
vi config.php
[...]
$csp_dsn = 'mysql://mail_admin:[email protected]/mail';
[...]
$lookup_password_query = 'SELECT count(*) FROM users WHERE email = "%1" AND password = %4';
[...]
$password_update_queries = array('UPDATE users SET password = %4 WHERE email = "%1"');
[...]
$password_encryption = 'MYSQLENCRYPT';
[...]
$csp_salt_static = 'LEFT(password, 2)';
[...]
//$csp_salt_query = 'SELECT salt FROM users WHERE username = "%1"';
[...]
$csp_delimiter = '@';
[...] |
The complete file looks as follows:
<?php

/**
  * SquirrelMail Change SQL Password Plugin
  * Copyright (C) 2001-2002 Tyler Akins
  *               2002 Thijs Kinkhorst <[email protected]>
  *               2002-2005 Paul Lesneiwski <[email protected]>
  * This program is licensed under GPL. See COPYING for details
  *
  * @package plugins
  * @subpackage Change SQL Password
  *
  */


   // Global Variables, don't touch these unless you want to break the plugin
   //
   global $csp_dsn, $password_update_queries, $lookup_password_query,
          $force_change_password_check_query, $password_encryption,
          $csp_salt_query, $csp_salt_static, $csp_secure_port,
          $csp_non_standard_http_port, $csp_delimiter, $csp_debug,
          $min_password_length, $max_password_length, $include_digit_in_password,
          $include_uppercase_letter_in_password, $include_lowercase_letter_in_password,
          $include_nonalphanumeric_in_password;


   // csp_dsn
   //
   // Theoretically, any SQL database supported by Pear should be supported
   // here.  The DSN (data source name) must contain the information needed
   // to connect to your database backend. A MySQL example is included below.
   // For more details about DSN syntax and list of supported database types,
   // please see:
   //   http://pear.php.net/manual/en/package.database.db.intro-dsn.php
   //
   //$csp_dsn = 'mysql://user:[email protected]/email_users';
   $csp_dsn = 'mysql://mail_admin:[email protected]/mail';


   // lookup_password_query
   //
   // This plugin will always verify the user's old password
   // against their login password, but an extra check can also
   // be done against the database for more security if you
   // desire.  If you do not need the extra password check,
   // make sure this setting is empty.
   //
   // This is a query that returns a positive value if a user
   // and password pair are found in the database.
   //
   // This query should return one value (one row, one column), the
   // value being ideally a one or a zero, simply indicating that
   // the user/password pair does in fact exist in the database.
   //
   //   %1 in this query will be replaced with the full username
   //      (including domain), such as "[email protected]"
   //   %2 in this query will be replaced with the username (without
   //      any domain portion), such as "jose"
   //   %3 in this query will be replaced with the domain name,
   //      such as "example.com"
   //   %4 in this query will be replaced with the current (old)
   //      password in whatever encryption format is needed per other
   //      plugin configuration settings (Note that the syntax of
   //      the password will be provided depending on your encryption
   //      choices, so you NEVER need to provide quotes around this
   //      value in the query here.)
   //   %5 in this query will be replaced with the current (old)
   //      password in unencrypted plain text.  If you do not use any
   //      password encryption, %4 and %5 will be the same values,
   //      except %4 will have double quotes around it and %5 will not.
   //
   //$lookup_password_query = '';
   // TERRIBLE SECURITY: $lookup_password_query = 'SELECT count(*) FROM users WHERE username = "%1" AND plain_password = "%5"';
   //$lookup_password_query = 'SELECT count(*) FROM users WHERE username = "%1" AND crypt_password = %4';
   $lookup_password_query = 'SELECT count(*) FROM users WHERE email = "%1" AND password = %4';


   // password_update_queries
   //
   // An array of SQL queries that will all be executed
   // whenever a password change attempt is made.
   //
   // Any number of queries may be included here.
   // The queries will be executed in the order given here.
   //
   //   %1 in all queries will be replaced with the full username
   //      (including domain), such as "[email protected]"
   //   %2 in all queries will be replaced with the username (without
   //      any domain portion), such as "jose"
   //   %3 in all queries will be replaced with the domain name,
   //      such as "example.com"
   //   %4 in all queries will be replaced with the new password
   //      in whatever encryption format is needed per other
   //      plugin configuration settings (Note that the syntax of
   //      the password will be provided depending on your
   //      encryption choices, so you NEVER need to provide quotes
   //      around this value in the queries here.)
   //   %5 in all queries will be replaced with the new password
   //      in unencrypted plain text - BEWARE!  If you do not use
   //      any password encryption, %4 and %5 will be the same
   //      values, except %4 will have double quotes around it
   //      and %5 will not.
   //
//   $password_update_queries = array(
//            'UPDATE users SET crypt_password = %4 WHERE username = "%1"',
//            'UPDATE user_flags SET force_change_pwd = 0 WHERE username = "%1"',
//            'UPDATE users SET crypt_password = %4, force_change_pwd = 0 WHERE username = "%1"',
//                                   );
   $password_update_queries = array('UPDATE users SET password = %4 WHERE email = "%1"');


   // force_change_password_check_query
   //
   // A query that checks for a flag that indicates if a user
   // should be forced to change their password.  This query
   // should return one value (one row, one column) which is
   // zero if the user does NOT need to change their password,
   // or one if the user should be forced to change it now.
   //
   // This setting should be an empty string if you do not wish
   // to enable this functionality.
   //
   //   %1 in this query will be replaced with the full username
   //      (including domain), such as "[email protected]"
   //   %2 in this query will be replaced with the username (without
   //      any domain portion), such as "jose"
   //   %3 in this query will be replaced with the domain name,
   //      such as "example.com"
   //
   //$force_change_password_check_query = 'SELECT IF(force_change_pwd = "yes", 1, 0) FROM users WHERE username = "%1"';
   //$force_change_password_check_query = 'SELECT force_change_pwd FROM users WHERE username = "%1"';
   $force_change_password_check_query = '';


   // password_encryption
   //
   // What encryption method do you use to store passwords
   // in your database?  Please use one of the following,
   // exactly as you see it:
   //
   //   NONE          Passwords are stored as plain text only
   //   MYSQLPWD      Passwords are stored using the MySQL password() function
   //   MYSQLENCRYPT  Passwords are stored using the MySQL encrypt() function
   //   PHPCRYPT      Passwords are stored using the PHP crypt() function
   //   MD5CRYPT      Passwords are stored using encrypted MD5 algorithm
   //   MD5           Passwords are stored as MD5 hash
   //
   //$password_encryption = 'MYSQLPWD';
   $password_encryption = 'MYSQLENCRYPT';


   // csp_salt_query
   // csp_salt_static
   //
   // Encryption types that need a salt need to know where to get
   // that salt.  If you have a constant, known salt value, you
   // should define it in $csp_salt_static.  Otherwise, leave that
   // value empty and define a value for the $csp_salt_query.
   //
   // Leave both values empty if you do not need (or use) salts
   // to encrypt your passwords.
   //
   // The query should return one value (one row, one column) which
   // is the salt value for the current user's password.  This
   // query is ignored if $csp_salt_static is anything but empty.
   //
   //   %1 in this query will be replaced with the full username
   //      (including domain), such as "[email protected]"
   //   %2 in this query will be replaced with the username (without
   //      any domain portion), such as "jose"
   //   %3 in this query will be replaced with the domain name,
   //      such as "example.com"
   //
   //$csp_salt_static = 'LEFT(crypt_password, 2)';
   //$csp_salt_static = '"a4"';  // use this format with MYSQLENCRYPT
   //$csp_salt_static = '$2$blowsomefish$';  // use this format with PHPCRYPT
   //$csp_salt_static = '';
   $csp_salt_static = 'LEFT(password, 2)';

   //$csp_salt_query = 'SELECT SUBSTRING_INDEX(crypt_password, '$', 1) FROM users WHERE username = "%1"';
   //$csp_salt_query = 'SELECT SUBSTRING(crypt_password, (LENGTH(SUBSTRING_INDEX(crypt_password, '$', 2)) + 2)) FROM users WHERE username = "%1"';
   //$csp_salt_query = 'SELECT salt FROM users WHERE username = "%1"';
   //$csp_salt_query = '';


   // csp_secure_port
   //
   // You may ensure that SSL encryption is used during password
   // change by setting this to the port that your HTTPS is served
   // on (443 is typical).  Set to zero if you do not wish to force
   // an HTTPS connection when users are changing their passwords.
   //
   // You may override this value for certain domains, users, or
   // service levels through the Virtual Host Login (vlogin) plugin
   // by setting a value(s) for $vlogin_csp_secure_port in the vlogin
   // configuration.
   //
   $csp_secure_port = 0;
   //$csp_secure_port = 443;


   // csp_non_standard_http_port
   //
   // If you serve standard HTTP web requests on a non-standard
   // port (anything other than port 80), you should specify that
   // port number here.  Set to zero otherwise.
   //
   // You may override this value for certain domains, users, or
   // service levels through the Virtual Host Login (vlogin) plugin
   // by setting a value(s) for $vlogin_csp_non_standard_http_port
   // in the vlogin configuration.
   //
   //$csp_non_standard_http_port = 8080;
   $csp_non_standard_http_port = 0;


   // min_password_length
   // max_password_length
   // include_digit_in_password
   // include_uppercase_letter_in_password
   // include_lowercase_letter_in_password
   // include_nonalphanumeric_in_password
   //
   // You can set the minimum and maximum password lengths that
   // you accept or leave those settings as zero to indicate that
   // no limit should be applied.
   //
   // Turn on any of the other settings here to check that the
   // new password contains at least one digit, upper case letter,
   // lower case letter and/or one non-alphanumeric character.
   //
   $min_password_length = 6;
   $max_password_length = 0;
   $include_digit_in_password = 0;
   $include_uppercase_letter_in_password = 0;
   $include_lowercase_letter_in_password = 0;
   $include_nonalphanumeric_in_password = 0;


   // csp_delimiter
   //
   // if your system has usernames with something other than
   // an "@" sign separating the user and domain portion,
   // specify that character here
   //
   //$csp_delimiter = '|';
   $csp_delimiter = '@';


   // debug mode
   //
   $csp_debug = 0;


?> |
Now we must go into the SquirrelMail configuration and tell SquirrelMail that we use Courier as our POP3 and IMAP server and enable the Change SQL Password and the Compatibility plugins:
/usr/sbin/squirrelmail-configure
You'll see the following menu. Navigate through it as indicated:
SquirrelMail Configuration : Read: config.php (1.4.0)
---------------------------------------------------------
Main Menu --
1. Organization Preferences
2. Server Settings
3. Folder Defaults
4. General Options
5. Themes
6. Address Books
7. Message of the Day (MOTD)
8. Plugins
9. Database
10. Languages
D. Set pre-defined settings for specific IMAP servers
C Turn color on
S Save data
Q Quit
Command >> <-- D
SquirrelMail Configuration : Read: config.php
---------------------------------------------------------
While we have been building SquirrelMail, we have discovered some
preferences that work better with some servers that don't work so
well with others. If you select your IMAP server, this option will
set some pre-defined settings for that server.
Please note that you will still need to go through and make sure
everything is correct. This does not change everything. There are
only a few settings that this will change.
Please select your IMAP server:
bincimap = Binc IMAP server
courier = Courier IMAP server
cyrus = Cyrus IMAP server
dovecot = Dovecot Secure IMAP server
exchange = Microsoft Exchange IMAP server
hmailserver = hMailServer
macosx = Mac OS X Mailserver
mercury32 = Mercury/32
uw = University of Washington's IMAP server
gmail = IMAP access to Google mail (Gmail) accounts
quit = Do not change anything
Command >> <-- courier
imap_server_type = courier
default_folder_prefix = INBOX.
trash_folder = Trash
sent_folder = Sent
draft_folder = Drafts
show_prefix_option = false
default_sub_of_inbox = false
show_contain_subfolders_option = false
optional_delimiter = .
delete_folder = true
Press enter to continue... <-- press ENTER
SquirrelMail Configuration : Read: config.php (1.4.0)
---------------------------------------------------------
Main Menu --
1. Organization Preferences
2. Server Settings
3. Folder Defaults
4. General Options
5. Themes
6. Address Books
7. Message of the Day (MOTD)
8. Plugins
9. Database
10. Languages
D. Set pre-defined settings for specific IMAP servers
C Turn color on
S Save data
Q Quit
Command >> <-- 8
SquirrelMail Configuration : Read: config.php (1.4.0)
---------------------------------------------------------
Plugins
Installed Plugins
1. view_as_html
Available Plugins:
2. administrator
3. bug_report
4. calendar
5. change_sqlpass
6. compatibility
7. delete_move_next
8. demo
9. filters
10. fortune
11. info
12. listcommands
13. mail_fetch
14. message_details
15. newmail
16. sent_subfolders
17. spamcop
18. squirrelspell
19. test
20. translate
R Return to Main Menu
C Turn color on
S Save data
Q Quit
Command >> <-- 6 (or whatever number the compatibility plugin has - it's needed by the change_sqlpass plugin)
SquirrelMail Configuration : Read: config.php (1.4.0)
---------------------------------------------------------
Plugins
Installed Plugins
1. view_as_html
2. compatibility
Available Plugins:
3. administrator
4. bug_report
5. calendar
6. change_sqlpass
7. delete_move_next
8. demo
9. filters
10. fortune
11. info
12. listcommands
13. mail_fetch
14. message_details
15. newmail
16. sent_subfolders
17. spamcop
18. squirrelspell
19. test
20. translate
R Return to Main Menu
C Turn color on
S Save data
Q Quit
Command >> <-- 6 (the number of the change_sqlpass plugin)
SquirrelMail Configuration : Read: config.php (1.4.0)
---------------------------------------------------------
Plugins
Installed Plugins
1. view_as_html
2. compatibility
3. change_sqlpass
Available Plugins:
4. administrator
5. bug_report
6. calendar
7. delete_move_next
8. demo
9. filters
10. fortune
11. info
12. listcommands
13. mail_fetch
14. message_details
15. newmail
16. sent_subfolders
17. spamcop
18. squirrelspell
19. test
20. translate
R Return to Main Menu
C Turn color on
S Save data
Q Quit
Command >> <-- S
SquirrelMail Configuration : Read: config.php (1.4.0)
---------------------------------------------------------
Plugins
Installed Plugins
1. view_as_html
2. compatibility
3. change_sqlpass
Available Plugins:
4. administrator
5. bug_report
6. calendar
7. delete_move_next
8. demo
9. filters
10. fortune
11. info
12. listcommands
13. mail_fetch
14. message_details
15. newmail
16. sent_subfolders
17. spamcop
18. squirrelspell
19. test
20. translate
R Return to Main Menu
C Turn color on
S Save data
Q Quit
Command >> S
Data saved in config.php
Press enter to continue... <-- press ENTER
SquirrelMail Configuration : Read: config.php (1.4.0)
---------------------------------------------------------
Plugins
Installed Plugins
1. view_as_html
2. compatibility
3. change_sqlpass
Available Plugins:
4. administrator
5. bug_report
6. calendar
7. delete_move_next
8. demo
9. filters
10. fortune
11. info
12. listcommands
13. mail_fetch
14. message_details
15. newmail
16. sent_subfolders
17. spamcop
18. squirrelspell
19. test
20. translate
R Return to Main Menu
C Turn color on
S Save data
Q Quit
Command >> <-- Q
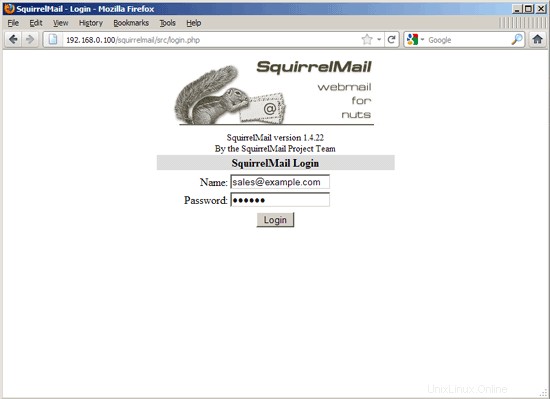
Now you can type in http://server1.example.com/squirrelmail or http://192.168.0.100/squirrelmail in your browser to access SquirrelMail.
Log in with your email address (e.g. [email protected]) and your password:
You should find the welcome email in your inbox:
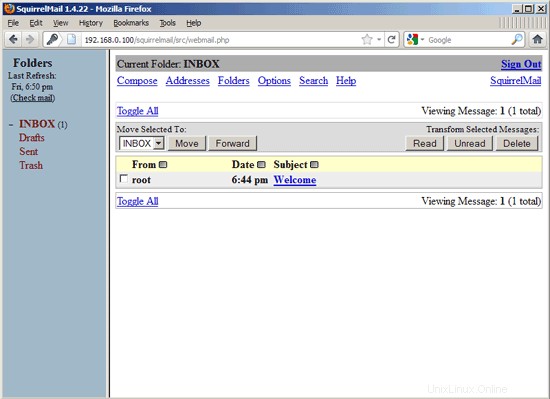

To change your password, go to Options and then select Change Password:

Type in your current password and then your new password twice:
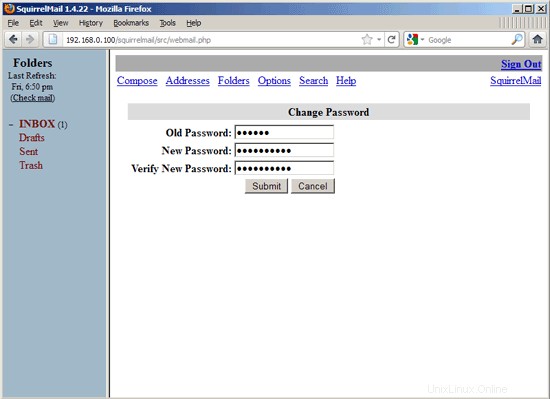
If the password has been changed successfully, you will see the following error message which means you must log in again with your new password (because the old one isn't active anymore):
16 VMA (Virtual Mail Admin Interface)
Virtual Mail Admin (VMA) is a small PHP-based web app written to manage the email system set up in this guide. I didn't test it, but I thought I'd share.
This is what the developer (Charl Loubser) wrote to me in an email:
"Hi There,
I don't know if you'll like this, or if this has any use to you, but I thought I'd Share:
I wrote a silly little webapp for the setup you did in the Howto:https://www.howtoforge.com/virtual-users-domains-postfix-courier-mysql-squirrelmail-ubuntu-10.04
If you approve and think it worthy of sharing on your tutorial, you are more than welcome, and can feel free to do so.
As mentioned in the readme, this is not a perfect app, but it does the job for now, and I'd thing it's relatively safe in a closed environment (LAN setup between servers).
The rar file with the app is attached, but can also be downloaded at :http://code.google.com/p/vma/"
17 References
- Tutorial:ISP-style Email Service with Debian-Sarge and Postfix 2.1:http://workaround.org/articles/ispmail-sarge/
- Postfix + Quota:http://vhcs.net/new/modules/newbb/viewtopic.php?topic_id=3496&forum=17
- Mail Passwords Encrypted using saslauthd:http://www.syscp.de/docs/public/contrib/cryptedmailpws
18 Links
- Postfix MTA:http://www.postfix.org/
- Postfix Quota Patch:http://web.onda.com.br/nadal/
- phpMyAdmin:http://www.phpmyadmin.net/
- SquirrelMail:http://www.squirrelmail.org/
- Ubuntu:http://www.ubuntu.com/
- Virtual Mail Admin Interface (VMA):http://code.google.com/p/vma/