Tutorial singkat ini menjelaskan cara melihat suhu CPU di Linux menggunakan lm_sensors . Lm_sensors, kependekan dari L inux-m memantau sensor , adalah perangkat lunak gratis yang menyediakan alat dan driver yang diperlukan untuk memantau suhu, voltase, kelembapan, dan kipas CPU. Itu juga dapat mendeteksi intrusi sasis. Jadi, Anda dapat menemukan komponen perangkat keras yang rusak, dan menggantinya untuk menghindari masalah sistem hang atau overheating.
Instal lm_sensors di Linux
Lm_sensors sudah diinstal sebelumnya dengan sebagian besar sistem operasi Linux modern. Jika belum terinstal, Anda dapat menginstalnya seperti gambar di bawah ini.
Di Arch Linux dan turunannya:
$ sudo pacman -S lm_sensors
Di RHEL, CentOS, Fedora:
$ sudo yum install lm_sensors
Atau,
$ sudo dnf install lm_sensors
Di Debian, Ubuntu, Linux Mint:
$ sudo apt-get install lm-sensors
Di SUSE, openSUSE:
$ sudo zypper in sensorsUnduh - Lembar Cheat Gratis:"Lembar Cheat Baris Perintah Linux"
Konfigurasikan Lm_sensors
Setelah terinstal, jalankan perintah berikut untuk mengonfigurasi lm_sensors:
$ sudo sensors-detect
sensor-deteksi adalah program yang berdiri sendiri untuk mendeteksi perangkat keras yang terpasang dan merekomendasikan modul tertentu untuk dimuat. Jawaban "aman" adalah default, jadi tekan saja ENTER untuk menerima nilai default. Itu tidak akan menimbulkan masalah. Ini akan membuat /etc/conf.d/lm_sensors file konfigurasi yang digunakan oleh lm_sensors.service untuk memuat modul kernel secara otomatis saat boot.
Contoh output dari perintah di atas di Laptop DELL saya:
# sensors-detect version 3.6.0
# System: Dell Inc. Inspiron N5050 [Not Specified] (laptop)
# Board: Dell Inc. 01HXXJ
# Kernel: 5.4.0-42-generic x86_64
# Processor: Intel(R) Core(TM) i3-2350M CPU @ 2.30GHz (6/42/7)

This program will help you determine which kernel modules you need
to load to use lm_sensors most effectively. It is generally safe
and recommended to accept the default answers to all questions,
unless you know what you're doing.

Some south bridges, CPUs or memory controllers contain embedded sensors.
Do you want to scan for them? This is totally safe. (YES/no):
Module cpuid loaded successfully.
Silicon Integrated Systems SIS5595... No
VIA VT82C686 Integrated Sensors... No
VIA VT8231 Integrated Sensors... No
AMD K8 thermal sensors... No
AMD Family 10h thermal sensors... No
AMD Family 11h thermal sensors... No
AMD Family 12h and 14h thermal sensors... No
AMD Family 15h thermal sensors... No
AMD Family 16h thermal sensors... No
AMD Family 15h power sensors... No
AMD Family 16h power sensors... No
Intel digital thermal sensor... Success!
 (driver `coretemp')
Intel AMB FB-DIMM thermal sensor... No
Intel 5500/5520/X58 thermal sensor... No
VIA C7 thermal sensor... No
VIA Nano thermal sensor... No

Some Super I/O chips contain embedded sensors. We have to write to
standard I/O ports to probe them. This is usually safe.
Do you want to scan for Super I/O sensors? (YES/no):
Probing for Super-I/O at 0x2e/0x2f
Trying family `National Semiconductor/ITE'... No
Trying family `SMSC'... No
Trying family `VIA/Winbond/Nuvoton/Fintek'... No
Trying family `ITE'... No
Probing for Super-I/O at 0x4e/0x4f
Trying family `National Semiconductor/ITE'... Yes
Found unknown chip with ID 0xfc11

Some hardware monitoring chips are accessible through the ISA I/O ports.
We have to write to arbitrary I/O ports to probe them. This is usually
safe though. Yes, you do have ISA I/O ports even if you do not have any
ISA slots! Do you want to scan the ISA I/O ports? (YES/no):
Probing for `National Semiconductor LM78' at 0x290... No
Probing for `National Semiconductor LM79' at 0x290... No
Probing for `Winbond W83781D' at 0x290... No
Probing for `Winbond W83782D' at 0x290... No

Lastly, we can probe the I2C/SMBus adapters for connected hardware
monitoring devices. This is the most risky part, and while it works
reasonably well on most systems, it has been reported to cause trouble
on some systems.
Do you want to probe the I2C/SMBus adapters now? (YES/no):
Using driver `i2c-i801' for device 0000:00:1f.3: Intel Cougar Point (PCH)
Module i2c-dev loaded successfully.

Next adapter: SMBus I801 adapter at f040 (i2c-0)
Do you want to scan it? (YES/no/selectively):
Client found at address 0x50
Probing for `Analog Devices ADM1033'... No
Probing for `Analog Devices ADM1034'... No
Probing for `SPD EEPROM'... Yes
 (confidence 8, not a hardware monitoring chip)
Probing for `EDID EEPROM'... No

Next adapter: i915 gmbus ssc (i2c-1)
Do you want to scan it? (yes/NO/selectively):

Next adapter: i915 gmbus vga (i2c-2)
Do you want to scan it? (yes/NO/selectively):

Next adapter: i915 gmbus panel (i2c-3)
Do you want to scan it? (yes/NO/selectively):

Next adapter: i915 gmbus dpc (i2c-4)
Do you want to scan it? (yes/NO/selectively):

Next adapter: i915 gmbus dpb (i2c-5)
Do you want to scan it? (yes/NO/selectively):

Next adapter: i915 gmbus dpd (i2c-6)
Do you want to scan it? (yes/NO/selectively):

Next adapter: DPDDC-B (i2c-7)
Do you want to scan it? (yes/NO/selectively):


Now follows a summary of the probes I have just done.
Just press ENTER to continue:

Driver `coretemp':
 * Chip `Intel digital thermal sensor' (confidence: 9)

Do you want to overwrite /etc/conf.d/lm_sensors? (YES/no):
Unloading i2c-dev... OK
Unloading cpuid... OK
Selesai! Mari kita lanjutkan dan lihat cara menggunakan menemukan suhu CPU.
Melihat suhu CPU di Linux menggunakan lm_sensors
Ketik perintah berikut untuk melihat informasi suhu CPU dari kotak Linux Anda:
$ sensors
Contoh keluaran:
coretemp-isa-0000
Adapter: ISA adapter
Package id 0:  +57.0°C  (high = +80.0°C, crit = +85.0°C)
Core 0:        +57.0°C  (high = +80.0°C, crit = +85.0°C)
Core 1:        +54.0°C  (high = +80.0°C, crit = +85.0°C)

BAT0-acpi-0
Adapter: ACPI interface
in0:          12.43 V
curr1:       1000.00 uA

dell_smm-virtual-0
Adapter: Virtual device
Processor Fan: 3449 RPM
CPU:            +57.0°C
Other:          +52.0°C
Other:          +51.0°C
GPU:            +16.0°C
Other:          +55.0°C

acpitz-acpi-0
Adapter: ACPI interface
temp1:        +57.5°C  (crit = +84.0°C)
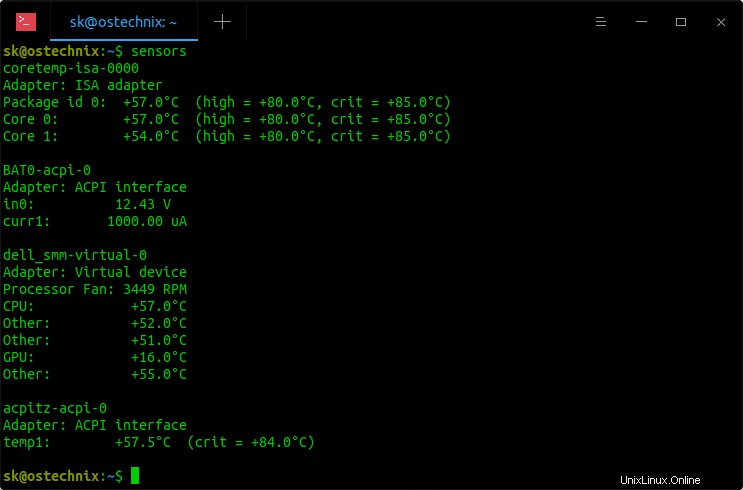
Lihat Suhu CPU Di Linux Menggunakan Lm_sensors
Seperti yang Anda lihat pada output di atas, lm_sensors menampilkan suhu CPU saya saat ini, suhu tinggi dan kritis dalam tanda kurung. Jika Anda mengetahui salah satu perangkat keras Anda mencapai suhu tinggi atau kritis, Anda mungkin perlu memeriksa perangkat keras tersebut.
Secara default, Lm_sensors menampilkan suhu dalam Celcius.
Untuk menampilkan suhu dalam Fahrenheit alih-alih Celcius, gunakan -f pilihan.
$ sensors -f
Contoh keluaran:
coretemp-isa-0000
Adapter: ISA adapter
Package id 0: +131.0°F  (high = +176.0°F, crit = +185.0°F)
Core 0:       +131.0°F  (high = +176.0°F, crit = +185.0°F)
Core 1:       +123.8°F  (high = +176.0°F, crit = +185.0°F)

BAT0-acpi-0
Adapter: ACPI interface
in0:          12.43 V
curr1:       1000.00 uA

dell_smm-virtual-0
Adapter: Virtual device
Processor Fan: 3510 RPM
CPU:           +127.4°F
Other:         +120.2°F
Other:         +120.2°F
GPU:            +60.8°F
Other:         +123.8°F

acpitz-acpi-0
Adapter: ACPI interface
temp1:       +128.3°F  (crit = +183.2°F)
Untuk memantau suhu CPU secara real time, Anda dapat menggunakan 'watch' perintah seperti di bawah ini.
$ watch sensors
Contoh keluaran:

Pantau suhu CPU secara real time dengan lm_sensors di Linux
Hasilnya akan diperbarui setiap 2 detik. Tekan CTRL+C untuk menghentikan pemantauan kapan saja.
Untuk detail lebih lanjut, lihat halaman manual.
$ man sensors