Lingkungan Multiserver Virtual Dengan Web Khusus &MySQL, Server Email &DNS Di Debian Squeeze Dengan ISPConfig 3
Versi 1.0
Penulis:Michel Käser
Tutorial ini menjelaskan bagaimana Anda dapat mengatur satu server khusus sebagai lingkungan multiserver virtual menggunakan OpenVZ dengan server Web &MySQL, Email, dan DNS khusus di Debian Squeeze. Juga, Anda akan belajar bagaimana memelihara semua server ini. Sebagai tambahan, Anda akan mempelajari cara menginstal beberapa paket yang sangat berguna pada semuanya, cara melindunginya, dan cara memantaunya.
Pada akhirnya Anda akan memiliki lingkungan multiserver virtual yang berfungsi penuh, siap untuk hosting bersama.
Saya tidak memberikan jaminan apa pun bahwa ini akan berhasil untuk Anda!
1 Persyaratan
Untuk mengikuti tutorial ini, Anda memerlukan yang berikut:
- server khusus
- minimal 5 IP
- banyak waktu
2 Catatan Awal
Dalam tutorial ini saya menggunakan dedicated server ini:http://www.hetzner.de/hosting/produkte_rootserver/ex4 dengan Flexi-Pack dan tambahan /28 subnet (14 IP).
Tujuannya adalah untuk memiliki server ini:
- Jenis:Simpul
- Perangkat Keras:Khusus
- Nama host:root.example.tld
- 192.168.1.1
- Jenis:Wadah
- Perangkat Keras:Virtual
- Nama host:web.example.tld
- 192.168.1.2
- Jenis:Wadah
- Perangkat Keras:Virtual
- Nama host:mail.example.tld
- 192.168.1.3
- Jenis:Wadah
- Perangkat Keras:Virtual
- Nama host:ns1.example.tld
- 192.168.1.4
- Jenis:Wadah
- Perangkat Keras:Virtual
- Nama host:ns2.example.tld
- 192.168.1.5
3 Sistem Dasar
Saya berasumsi Anda menggunakan dedicated server yang sama seperti yang saya lakukan. Antarmuka Web Hetzner memungkinkan Anda menginstal berbagai distribusi. Gunakan minimal Debian 6.0 64-bit.
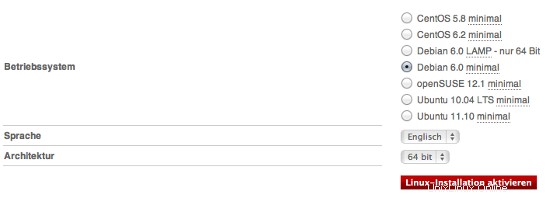
Ini akan menginstal sistem dasar untuk Anda dan Anda tidak perlu mengkonfigurasinya sendiri. Anda juga akan mendapatkan kata sandi root.
4 Memasang Panel Web OpenVZ + OVZ
Segera setelah server Anda siap, login menggunakan kredensial yang diterima. Kami akan melakukan update/upgrade terlebih dahulu:
apt-get update &&apt-get -y upgrade &&apt-get -y dist-upgrade
yang akan meningkatkan server kami ke versi terbaru.
Kami menginstal beberapa paket tambahan untuk:
apt-get -y install nano wget ntp ntpdate
4.1 Menginstal OpenVZ
Kami sekarang ingin menginstal OpenVZ, basis untuk lingkungan multiserver virtual kami.
Kernel OpenVZ dan paket vzctl, vzquota, dan vzdump tersedia di repositori Debian Squeeze, jadi kita dapat menginstalnya sebagai berikut:
apt-get install linux-image-openvz-amd64 vzctl vzquota vzdump
Buat symlink dari /var/lib/vz ke /vz untuk memberikan kompatibilitas mundur:
ln -s /var/lib/vz /vz
Buka /etc/sysctl.conf dan pastikan Anda memiliki pengaturan berikut di dalamnya:
nano /etc/sysctl.conf
[...]net.ipv4.conf.all.rp_filter=1net.ipv4.icmp_echo_ignore_broadcasts=1net.ipv4.conf.default.forwarding=1net.ipv4.conf.default.proxy_arp =0net.ipv4.ip_forward=1kernel.sysrq =1net.ipv4.conf.default.send_redirects =1net.ipv4.conf.all.send_redirects =0net.ipv4.conf.eth0.proxy_arp=1[...]
Jika Anda perlu memodifikasi /etc/sysctl.conf, jalankan
sysctl -p
setelah itu.
Langkah berikut ini penting jika alamat IP mesin virtual Anda berasal dari subnet yang berbeda dari alamat IP sistem host. Jika Anda tidak melakukan ini, jaringan tidak akan berfungsi di mesin virtual!
Buka /etc/vz/vz.conf dan setel NEIGHBOUR_DEVS ke semua:
nano /etc/vz/vz.conf
[...]# Mengontrol antarmuka mana untuk mengirim permintaan ARP dan mengubah tabel APR.NEIGHBOUR_DEVS=all[...]
Terakhir, reboot sistem:
mulai ulang
Jika sistem Anda reboot tanpa masalah, maka semuanya baik-baik saja!
Jalankan
uname -r
dan kernel OpenVZ baru Anda akan muncul:
contoh@unixlinux.online:~# uname -r
2.6.32-5-openvz-amd64
Karena Hetzner memasang /home pada hard disk terpisah, kita dapat menggunakannya sebagai lokasi pencadangan OpenVZ. Untuk melakukannya, jalankan:
rm -rf /var/lib/vz/dump
ln -s /home/backup/vz /var/lib/vz/dump
Karena kami akan menggunakan fail2ban dalam wadah virtual kami, kami harus mengaktifkan beberapa dukungan IPTables untuk mereka. Kami melakukannya dengan mengedit file /etc/vz/vz.conf:
nano /etc/vz/vz.conf
Cari baris yang dimulai dengan IPTABLES dan beri komentar (#). Rekatkan yang berikut ini setelahnya:
[...]IPTABLES="ipt_REJECT ipt_tos ipt_limit ipt_multiport iptable_filter iptable_mangle ipt_TCPMSS ipt_tcpmss ipt_ttl ipt_length ipt_state"
Selanjutnya, aktifkan modul state di kernel:
modprobe xt_state
4.2 Memasang Panel Web OVZ
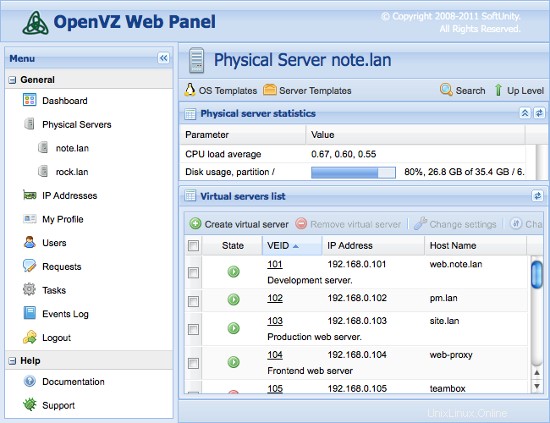
Panel Web OpenVZ adalah antarmuka berbasis web GUI untuk mengontrol perangkat keras dan server virtual dengan teknologi virtualisasi OpenVZ.
Cara paling sederhana untuk menginstal OpenVZ Web Panel adalah dengan menjalankan perintah berikut:
wget -O - http://ovz-web-panel.googlecode.com/svn/installer/ai.sh | sy
Setelah Panel instalasi harus tersedia dengan URL berikut:
http://<192.168.1.1>:3000
Kredensial administrator default adalah:admin/admin. Jangan lupa untuk mengganti password default.
Lingkungan Multiserver Virtual Dengan Web Khusus &MySQL, Server Email &DNS Di Debian Squeeze Dengan ISPConfig 3 - Halaman 2
5 Membuat Server Virtual
Kami sekarang akan menggunakan Panel Web OVZ untuk membuat server virtual kami. Masuk ke panel dan tambahkan IP Anda di bawah Alamat IP. Kemudian, klik localhost dan OS Templates.
Sekarang kita harus mendownload template untuk server virtual kita. Kami melakukannya dengan mengklik Instal Template OS Baru -> Kontribusi dan pilih debian-6.0-amd64-minimal.
Sekarang kembali ke localhost dan klik Buat server virtual. Isi kolom seperti di bawah ini:
- ID Server (VEID):angka (saya akan memilih bagian terakhir dari IP Anda, jadi 2 untuk yang pertama)
- Template OS:sudah dipilih yang benar
- Template Server:tidak terbatas
- Alamat IP:192.168.1.2
- Nama Inang:web.example.tld
- Server DNS:8.8.4.4 8.8.8.8 (yang merupakan DNS Google)
- biarkan sisanya apa adanya dan tetapkan Ruang Disk, RAM, dan CPU seperti yang Anda inginkan...
Ulangi langkah ini untuk semua server virtual Anda (akhirnya 4 kali:Web, Mail, 2x DNS).
5.1 Mempersiapkan Server virtual
Anda sekarang harus login ke setiap server virtual dan menjalankan perintah ini:
apt-get update &&apt-get -y upgrade &&apt-get -y dist-upgrade
apt-get -y install nano wget ntp ntpdate
yang akan meningkatkannya ke versi terbaru dan menginstal beberapa paket yang hilang.
6 Memasang Server Khusus
6.1 Memasang Server Web/DB
Edit file host dan tambahkan alamat IP dan nama host untuk semua server. Nama host dan alamat IP harus disesuaikan agar sesuai dengan pengaturan Anda.
nano /etc/hosts
127.0.0.1 localhost192.168.1.2 web.example.tld192.168.1.3 mail.example.tld192.168.1.4 ns1.example.tld192.168.1.5 ns2.example.tld# Baris berikut diinginkan untuk Host berkemampuan IPv6::1 localhost ip6-localhost ip6-loopbackfe00::0 ip6-localnetff00::0 ip6-mcastprefixff02::1 ip6-allnodesff02::2 ip6-allroutersff02::3 ip6-allhosts
Setel nama host server:
echo web.example.tld> /etc/hostname
/etc/init.d/hostname.sh start
Instal server MySQL. Instance server MySQL diperlukan di setiap server karena ISPConfig menggunakannya untuk menyinkronkan konfigurasi antar server.
apt-get -y install mysql-client mysql-server
Masukkan kata sandi baru untuk MySQL saat diminta oleh penginstal.
Kami ingin MySQL mendengarkan semua antarmuka di server master, bukan hanya localhost, oleh karena itu kami mengedit /etc/mysql/my.cnf dan mengomentari baris bind-address =127.0.0.1:
nano /etc/mysql/my.cnf
[...]# Alih-alih melewatkan jaringan, defaultnya sekarang adalah mendengarkan hanya di# localhost yang lebih kompatibel dan tidak kurang aman.#bind-address =127.0.0.1[...]
Kemudian restart MySQL:
/etc/init.d/mysql restart
Sekarang instal Apache2, PHP5, phpMyAdmin, FCGI, suExec, Pear, dan mcrypt sebagai berikut:
apt-get -y install apache2 apache2.2-common apache2-doc apache2-mpm-prefork apache2-utils libexpat1 ssl-cert libapache2-mod-php5 php5 php5-common php5-gd php5-mysql php5-imap phpmyadmin php5-cli php -cgi libapache2-mod-fcgid apache2-suexec php-pear php-auth php5-mcrypt mcrypt php5-imagick imagemagick libapache2-mod-suphp libopenssl-ruby libapache2-mod-ruby sudo zip wget
Anda akan melihat pertanyaan berikut:
Server web untuk mengkonfigurasi ulang secara otomatis:<-- apache2
Kemudian jalankan perintah berikut untuk mengaktifkan modul Apache suexec, rewrite, ssl, actions, headers, expired dan include:
a2enmod suexec menulis ulang tindakan ssl termasuk ruby dav_fs dav auth_digest headers kedaluwarsa
PureFTPd dapat diinstal dengan perintah berikut:
apt-get -y install pure-ftpd-common pure-ftpd-mysql
Edit file /etc/default/pure-ftpd-common...
vi /etc/default/pure-ftpd-common
... dan pastikan virtualchroot disetel VIRTUALCHROOT=true:
[...]VIRTUALCHROOT=true[...]
Sekarang kita mengkonfigurasi PureFTPd untuk mengizinkan sesi FTP dan TLS. FTP adalah protokol yang sangat tidak aman karena semua kata sandi dan semua data ditransfer dalam teks yang jelas. Dengan menggunakan TLS, seluruh komunikasi dapat dienkripsi, sehingga membuat FTP jauh lebih aman.
Jika Anda ingin mengizinkan sesi FTP dan TLS, jalankan
echo 1> /etc/pure-ftpd/conf/TLS
Untuk menggunakan TLS, kita harus membuat sertifikat SSL. Saya membuatnya di /etc/ssl/private/, oleh karena itu saya membuat direktori itu terlebih dahulu:
mkdir -p /etc/ssl/private/
Setelah itu, kita dapat membuat sertifikat SSL sebagai berikut:
openssl req -x509 -nodes -days 7300 -newkey rsa:2048 -keyout /etc/ssl/private/pure-ftpd.pem -out /etc/ssl/private/pure-ftpd.pem
Nama Negara (kode 2 huruf) [AU]:<-- Masukkan Nama Negara Anda (mis., "DE").
Nama Negara Bagian atau Provinsi (nama lengkap) [Some-State]:<-- Masukkan Negara Bagian Anda atau Nama Provinsi.
Nama Lokalitas (mis., kota) []:<-- Masukkan Kota Anda.
Nama Organisasi (mis., perusahaan) [Internet Widgits Pty Ltd]:<-- Masukkan Nama Organisasi Anda (mis., nama perusahaan Anda).
Nama Unit Organisasi (mis., seksi) []:<-- Masukkan Nama Unit Organisasi Anda (mis. "Departemen TI").
Nama Umum (mis. nama ANDA) []:<-- Masukkan Nama Domain yang Memenuhi Syarat dari sistem (misalnya "web.example.tld").
Alamat Email []:<-- Masukkan Alamat Email Anda.
Ubah izin sertifikat SSL:
chmod 600 /etc/ssl/private/pure-ftpd.pem
Instal vlogger, webalizer, dan awstats:
apt-get -y install vlogger webalizer awstats
Buka /etc/cron.d/awstats setelahnya...
vi /etc/cron.d/awstats
... dan beri komentar pada kedua tugas cron di file itu:
#*/10 * * * * www-data [ -x /usr/share/awstats/tools/update.sh ] &&/usr/share/awstats/tools/update.sh# Buat laporan statis:#10 03 * * * www-data [ -x /usr/share/awstats/tools/buildstatic.sh ] &&/usr/share/awstats/tools/buildstatic.sh
Instal Jailkit:Jailkit diperlukan hanya jika Anda ingin chroot pengguna SSH. Ini dapat diinstal sebagai berikut (penting:Jailkit harus diinstal sebelum ISPConfig - tidak dapat diinstal setelahnya!):
apt-get -y install build-essential autoconf automake1.9 libtool flex bison debhelper
cd /tmp
wget http://olivier.sessink.nl/jailkit/jailkit-2.14.tar.gz
tar xvfz jailkit-2.14.tar.gz
cd jailkit-2.14
./debian/rules biner
cd ..
dpkg -i jailkit_2.14-1_*.deb
rm -rf jailkit-2.14*
Instal fail2ban:Ini opsional tetapi disarankan, karena monitor ISPConfig mencoba menampilkan log:
apt-get install fail2ban
Untuk membuat monitor fail2ban PureFTPd, buat file /etc/fail2ban/jail.local:
vi /etc/fail2ban/jail.local
[pureftpd]enabled =trueport =ftpfilter =pureftpdlogpath =/var/log/syslogmaxretry =3
Kemudian buat file filter berikut:
vi /etc/fail2ban/filter.d/pureftpd.conf
[Definition]failregex =.*pure-ftpd:\(.*@\) \[PERINGATAN\] Otentikasi gagal untuk pengguna.*ignoreregex =
Mulai ulang fail2ban setelahnya:
/etc/init.d/fail2ban restart
Selanjutnya kita akan menginstal ISPConfig 3. Untuk mendapatkan URL download ISPConfig 3 stable release terbaru, silahkan kunjungi website ISPConfig :http://www.ispconfig.org/ispconfig-3/download/
Server ini adalah server master dalam pengaturan kami yang menjalankan antarmuka panel kontrol ISPConfig. Untuk mengizinkan instance MySQL lainnya terhubung ke database MySQL pada node ini selama instalasi, kita harus menambahkan catatan pengguna root MySQL di database master untuk setiap nama host server budak dan alamat IP. Cara termudah untuk melakukannya adalah dengan menggunakan alat administrasi phpmyadmin berbasis web yang telah kami instal. Buka URL http://192.168.1.2/phpmyadmin di browser web, masuk sebagai pengguna root MySQL dan jalankan kueri MySQL ini:
BUAT PENGGUNA 'root'@'192.168.1.3' DIIDENTIFIKASI DENGAN 'myrootpassword';
BERIKAN SEMUA HAK ISTIMEWA DI * . * UNTUK 'root'@'192.168.1.3' DIIDENTIFIKASI DENGAN 'myrootpassword' DENGAN GRANT OPTION MAX_QUERIES_PER_HOUR 0 MAX_CONNECTIONS_PER_HOUR 0 MAX_UPDATES_PER_HOUR 0 MAX_USER_CONNECTIONS 0;
BUAT PENGGUNA 'root'@'192.168.1.4' DIIDENTIFIKASI DENGAN 'myrootpassword';
BERIKAN SEMUA HAK ISTIMEWA DI * . * UNTUK 'root'@'192.168.1.4' DIIDENTIFIKASI DENGAN 'myrootpassword' DENGAN GRANT OPTION MAX_QUERIES_PER_HOUR 0 MAX_CONNECTIONS_PER_HOUR 0 MAX_UPDATES_PER_HOUR 0 MAX_USER_CONNECTIONS 0;
BUAT PENGGUNA 'root'@'192.168.1.5' DIIDENTIFIKASI DENGAN 'myrootpassword';
BERIKAN SEMUA HAK ISTIMEWA DI * . * UNTUK 'root'@'192.168.1.5' DIIDENTIFIKASI DENGAN 'myrootpassword' DENGAN GRANT OPTION MAX_QUERIES_PER_HOUR 0 MAX_CONNECTIONS_PER_HOUR 0 MAX_UPDATES_PER_HOUR 0 MAX_USER_CONNECTIONS 0;
BUAT PENGGUNA 'root'@'mail.example.tld' DIIDENTIFIKASI DENGAN 'myrootpassword';
BERIKAN SEMUA HAK ISTIMEWA DI * . * UNTUK 'root'@'mail.example.tld' DIIDENTIFIKASI DENGAN 'myrootpassword' DENGAN GRANT OPTION MAX_QUERIES_PER_HOUR 0 MAX_CONNECTIONS_PER_HOUR 0 MAX_UPDATES_PER_HOUR 0 MAX_USER_CONNECTIONS 0;
BUAT PENGGUNA 'root'@'ns1.example.tld' DIIDENTIFIKASI DENGAN 'myrootpassword';
BERIKAN SEMUA HAK ISTIMEWA DI * . * UNTUK 'root'@'ns1.example.tld' DIIDENTIFIKASI DENGAN 'myrootpassword' DENGAN GRANT OPTION MAX_QUERIES_PER_HOUR 0 MAX_CONNECTIONS_PER_HOUR 0 MAX_UPDATES_PER_HOUR 0 MAX_USER_CONNECTIONS 0;
BUAT PENGGUNA 'root'@'ns2.example.tld' DIIDENTIFIKASI DENGAN 'myrootpassword';
BERIKAN SEMUA HAK ISTIMEWA DI * . * UNTUK 'root'@'ns2.example.tld' DIIDENTIFIKASI DENGAN 'myrootpassword' DENGAN GRANT OPTION MAX_QUERIES_PER_HOUR 0 MAX_CONNECTIONS_PER_HOUR 0 MAX_UPDATES_PER_HOUR 0 MAX_USER_CONNECTIONS 0;
Dalam perintah sql di atas, ganti alamat IP (192.168.1.3 - 192.168.1.5) dengan alamat IP server Anda dan ganti mail.example.tld, ns1.example.tld dan ns2.example.tld dengan nama host Anda server dan myrootpassword dengan kata sandi root yang diinginkan.
Klik tombol reload permissions atau restart MySQL. Kemudian tutup phpmyadmin.
Kembali ke shell web.example.tld dan unduh rilis stabil ISPConfig 3 terbaru:
cd /tmp
wgethttp://www.ispconfig.org/downloads/ISPConfig-3-stable.tar.gz
tar xfz ISPConfig-3-stable.tar.gz
cd ispconfig3_install/ instal/
Kemudian mulai skrip instalasi:
php -q install.php
Pilih bahasa (en,de) [en]:<-- en
Mode penginstalan (standar,pakar) [standar]:<-- pakar
Nama host yang memenuhi syarat penuh (FQDN) dari server, misalnya server2 .domain.tld [web.example.tld]:<-- web.example.tld
Nama host server MySQL [localhost]:<-- localhost
Nama pengguna root MySQL [root]:<-- root
Kata sandi root MySQL []:<-- Masukkan kata sandi root MySQL Anda di sini
Database MySQL untuk membuat [dbispconfig]:<-- dbispconfig
MySQL charset [utf8]:<-- utf8
Apakah server ini akan bergabung dengan pengaturan multiserver ISPConfig yang ada (y,n) [n]:<-- n
Konfigurasi Mail (y,n) [y]:<-- n
Konfigurasi Jailkit (y,n) [y]:<-- y
Konfigurasi Server FTP (y,n) [y]:<-- y
Konfigurasi Server DNS (y,n) [y]:<-- n
Konfigurasi Server Apache (y,n) [y]:<-- y
Konfigurasi Server Firewall (y,n) [y]:<--n
Instal ISPConfig Web -Antarmuka (y,n) [y]:<--y
Port ISPConfig [8080]:<-- 8080
Aktifkan SSL untuk antarmuka web ISPConfig (y,n) [y]:<-- y
Nama Negara (kode 2 huruf) [AU]:<-- ENT ER
Nama Negara Bagian atau Provinsi (nama lengkap) [Beberapa Negara Bagian]:<-- ENTER
Nama Lokalitas (mis., kota) []:<-- ENTER
Nama Organisasi (mis. perusahaan) [Internet Widgits Pty Ltd]:<-- ENTER
Nama Unit Organisasi (misalnya, bagian) []:<-- ENTER
Nama Umum (misalnya, nama ANDA) []:<-- ENTER
Alamat Email []:<-- ENTER
Password tantangan []:<-- ENTER
Nama perusahaan opsional []:<-- ENTER
Bersihkan direktori instal:
cd /tmp
rm -rf /tmp/ispconfig3_install/install
rm -f /tmp/ISPConfig-3-stable.tar.gz
6.2 Memasang Server Mail
Edit file host dan tambahkan alamat IP dan nama host untuk semua server. Nama host dan alamat IP harus disesuaikan agar sesuai dengan pengaturan Anda.
nano /etc/hosts
127.0.0.1 localhost192.168.1.2 web.example.tld192.168.1.3 mail.example.tld192.168.1.4 ns1.example.tld192.168.1.5 ns2.example.tld# Baris berikut diinginkan untuk Host berkemampuan IPv6::1 localhost ip6-localhost ip6-loopbackfe00::0 ip6-localnetff00::0 ip6-mcastprefixff02::1 ip6-allnodesff02::2 ip6-allroutersff02::3 ip6-allhosts
Setel nama host server:
echo mail.example.tld> /etc/hostname
echo mail.example.tld> /etc/mailname
/etc/init.d/hostname.sh start
Instal postfix, dovecot, dan MySQL dengan satu perintah:
apt-get -y install postfix postfix-mysql postfix-doc mysql-client mysql-server openssl getmail4 rkhunter binutils dovecot-imapd dovecot-pop3d
Masukkan kata sandi baru untuk mysql saat diminta oleh penginstal dan jawab pertanyaan berikutnya seperti yang dijelaskan di bawah ini:
Jenis konfigurasi umum? <-- Situs Internet
Nama email? <-- mail.example.tld
Untuk menginstal amavisd-new, SpamAssassin, dan ClamAV, kami menjalankan:
apt-get -y install amavisd-new spamassassin clamav clamav-daemon zoo unzip bzip2 arj nomarch lzop cabextract apt-listchanges libnet-ldap-perl libauthen-sasl-perl clamav-docs daemon libio-string-perl libio-socket-s libnet-ident-perl zip libnet-dns-perl
Jika Anda ingin menggunakan milis di server Anda, maka instal tukang pos. Langkah ini opsional. mailman memerlukan server web apache, jadi jika Anda tidak ingin menjalankan instance apache di server email Anda, jangan instal mailman.
apt-get -y install mailman
Pemasang apt untuk tukang pos akan meminta Anda untuk memilih bahasa untuk milis. Aktifkan semua bahasa yang ingin Anda gunakan untuk tukang pos. Selanjutnya buat milis "mailman".
tukang pos daftar baru
dan masukkan alamat email dan kata sandi baru untuk administrator milis. Itulah langkah terakhir dari penginstalan tukang pos. Perintah selanjutnya untuk menginstal php harus dijalankan di setiap server, terlepas dari apakah Anda menginstal mailman atau tidak.
Kemudian install install versi commandline PHP untuk dapat menjalankan script shell berbasis PHP untuk ISPConfig:
apt-get -y install php5-cli php5-mysql php5-mcrypt mcrypt
Instal fail2ban:Ini opsional tetapi disarankan, karena monitor ISPConfig mencoba menampilkan log:
apt-get install fail2ban
Untuk membuat monitor fail2ban PureFTPd dan Dovecot, buat file /etc/fail2ban/jail.local:
vi /etc/fail2ban/jail.local
[dovecot-pop3imap]enabled =truefilter =dovecot-pop3imapaction =iptables-multiport[name=dovecot-pop3imap, port="pop3,pop3s,imap,imaps", protocol=tcp]logpath =/var/log/mail .logmaxretry =5
Kemudian buat file filter berikut:
vi /etc/fail2ban/filter.d/dovecot-pop3imap.conf
[Definisi]failregex =(?:pop3-login|imap-login):.*(?:Authentication failure|Aborted login \(auth failed|Aborted login \(mencoba menggunakan nonaktif|Terputus \(auth gagal| Login dibatalkan \(\d+ upaya autentikasi).*rip=(?P\S*),.*ignoreregex =
Mulai ulang fail2ban setelahnya:
/etc/init.d/fail2ban restart
Sekarang saya akan menginstal ISPConfig 3 di server ini. Untuk mendapatkan URL unduhan rilis stabil ISPConfig 3 terbaru, silakan kunjungi situs web ISPConfig:http://www.ispconfig.org/ispconfig-3/download/
Unduh rilis stabil ISPConfig 3 terbaru:
cd /tmp
wgethttp://www.ispconfig.org/downloads/ISPConfig-3-stable.tar.gz
tar xfz ISPConfig-3-stable.tar.gz
cd ispconfig3_install/ instal/
Kemudian mulai skrip instalasi:
php -q install.php
Pilih bahasa (en,de) [en]:<-- en
Mode penginstalan (standar,pakar) [standar]:<-- pakar
Nama host yang memenuhi syarat penuh (FQDN) dari server, misalnya server1 .domain.tld [mail.example.tld]:<-- mail.example.tld
Nama host server MySQL [localhost]:<-- localhost
Nama pengguna root MySQL [root]:<-- root
Kata sandi root MySQL []:<-- Masukkan kata sandi root MySQL Anda di sini
Database MySQL untuk membuat [dbispconfig]:<-- dbispconfig
MySQL charset [utf8]:<-- utf8
Apakah server ini akan bergabung dengan pengaturan multiserver ISPConfig yang ada (y,n) [n]:<-- y
Nama host server master MySQL []:<-- web.example.tld
master MySQL nama pengguna root server [root]:<-- root
Kata sandi root server master MySQL []:<-- Masukkan kata sandi root server master di sini
Nama database server master MySQL [dbispconfig]:<- - dbispconfig
Konfigurasi Email (y,n) [y]:<-- y
Nama Negara (kode 2 huruf) [AU]:<-- DE (Masukkan kode negara ISO tempat Anda tinggal di sini)
Nama Negara Bagian atau Provinsi (nama lengkap) [Some-State]:<-- Niedersachsen (Masukkan negara tempat Anda tinggal di sini)
Nama Lokalitas (mis., kota) []:<-- Lueneburg (Masukkan kota di sini)
Nama Organisasi (mis., perusahaan) [Internet Widgits Pty Ltd]:<-- ENTER
Nama Unit Organisasi (misalnya, bagian) []:<-- ENTER
Nama Umum (misalnya, nama ANDA) []:<-- ENTER
Alamat Email []:<-- MASUKKAN
Konfigurasi Jailkit (y,n) [y]:<-- n
Konfigurasi Server FTP (y,n) [y]:<-- n
Konfigurasi Server DNS (y,n) [y] :<-- n
Konfigurasi Server Apache (y,n) [y]:<-- n
Konfigurasi Server Firewall (y,n) [y]:<--n
Instal ISPConfig Web-Interface (y,n) [y]:<--n
Jalankan...
rm -f /var/www/ispconfig
... untuk menghapus tautan antarmuka ISPConfig di direktori /var/www.
Bersihkan direktori instal:
rm -rf /tmp/ispconfig3_install/install
rm -f /tmp/ISPConfig-3-stable.tar.gz
Lingkungan Multiserver Virtual Dengan Web Khusus &MySQL, Server Email &DNS Pada Debian Squeeze Dengan ISPConfig 3 - Halaman 3
6.3 Memasang Server DNS Primer
Edit file host dan tambahkan alamat IP dan nama host untuk semua server. Nama host dan alamat IP harus disesuaikan agar sesuai dengan pengaturan Anda.
nano /etc/hosts
127.0.0.1 localhost192.168.1.2 web.example.tld192.168.1.3 mail.example.tld192.168.1.4 ns1.example.tld192.168.1.5 ns2.example.tld# Baris berikut diinginkan untuk Host berkemampuan IPv6::1 localhost ip6-localhost ip6-loopbackfe00::0 ip6-localnetff00::0 ip6-mcastprefixff02::1 ip6-allnodesff02::2 ip6-allroutersff02::3 ip6-allhosts
Setel nama host server:
echo ns1.example.tld> /etc/hostname
/etc/init.d/hostname.sh start
Instal klien dan server MySQL:
apt-get -y install mysql-client mysql-server
Masukkan kata sandi baru untuk MySQL saat diminta oleh penginstal.
Kemudian install install versi commandline PHP untuk dapat menjalankan script shell berbasis PHP untuk ISPConfig:
apt-get -y install php5-cli php5-mysql php5-mcrypt mcrypt
Instal fail2ban:Ini opsional tetapi disarankan, karena monitor ISPConfig mencoba menampilkan log:
apt-get install fail2ban
Instal Server DNS BIND:
apt-get -y install bind9 dnsutils
Selanjutnya install ISPConfig 3 di dns server. Untuk mendapatkan URL unduhan rilis stabil ISPConfig 3 terbaru, silakan kunjungi situs web ISPConfig:http://www.ispconfig.org/ispconfig-3/download/
Unduh rilis stabil ISPConfig 3 terbaru:
cd /tmp
wgethttp://www.ispconfig.org/downloads/ISPConfig-3-stable.tar.gz
tar xfz ISPConfig-3-stable.tar.gz
cd ispconfig3_install/ instal/
Kemudian mulai skrip instalasi:
php -q install.php
Pilih bahasa (en,de) [en]:<-- en
Mode penginstalan (standar,pakar) [standar]:<-- pakar
Nama host yang memenuhi syarat penuh (FQDN) dari server, misalnya server2 .domain.tld [ns1.example.tld]:<-- ns1.example.tld
Nama host server MySQL [localhost]:<-- localhost
Nama pengguna root MySQL [root]:<-- root
Kata sandi root MySQL []:<-- Masukkan kata sandi root MySQL Anda di sini
Database MySQL untuk membuat [dbispconfig]:<-- dbispconfig
MySQL charset [utf8]:<-- utf8
Apakah server ini akan bergabung dengan pengaturan multiserver ISPConfig yang ada (y,n) [n]:<-- y
Nama host server master MySQL []:<-- web.example.tld
master MySQL nama pengguna root server [root]:<-- root
Kata sandi root server master MySQL []:<-- Masukkan kata sandi root server master di sini
Nama database server master MySQL [dbispconfig]:<- - dbispconfig
Konfigurasi Mail (y,n) [y]:<-- n
Konfigurasi Jailkit (y,n) [y]:<-- n
Konfigurasi Server FTP (y, n) [y]:<-- n
Konfigurasi Server DNS (y,n) [y]:<-- y
Konfigurasi e Server Apache (y,n) [y]:<-- n
Konfigurasi Server Firewall (y,n) [y]:<--n
Instal ISPConfig Web-Interface (y,n) [y]:<--n
Jalankan...
rm -f /var/www/ispconfig
... untuk menghapus tautan antarmuka ISPConfig di direktori /var/www.
Bersihkan direktori instal:
rm -rf /tmp/ispconfig3_install/install
rm -f /tmp/ISPConfig-3-stable.tar.gz
6.4 Memasang Server DNS Sekunder
Edit file host dan tambahkan alamat IP dan nama host untuk semua server. Nama host dan alamat IP harus disesuaikan agar sesuai dengan pengaturan Anda.
nano /etc/hosts
127.0.0.1 localhost192.168.1.2 web.example.tld192.168.1.3 mail.example.tld192.168.1.4 ns1.example.tld192.168.1.5 ns2.example.tld# Baris berikut diinginkan untuk Host berkemampuan IPv6::1 localhost ip6-localhost ip6-loopbackfe00::0 ip6-localnetff00::0 ip6-mcastprefixff02::1 ip6-allnodesff02::2 ip6-allroutersff02::3 ip6-allhosts
Setel nama host server:
echo ns2.example.tld> /etc/hostname
/etc/init.d/hostname.sh start
Instal klien dan server MySQL:
apt-get -y install mysql-client mysql-server
Masukkan kata sandi baru untuk MySQL saat diminta oleh penginstal.
Kemudian install install versi commandline PHP untuk dapat menjalankan script shell berbasis PHP untuk ISPConfig:
apt-get -y install php5-cli php5-mysql php5-mcrypt mcrypt
Instal fail2ban:Ini opsional tetapi disarankan, karena monitor ISPConfig mencoba menampilkan log:
apt-get install fail2ban
Instal Server DNS BIND:
apt-get -y install bind9 dnsutils
Selanjutnya install ISPConfig 3 di dns server. Untuk mendapatkan URL unduhan rilis stabil ISPConfig 3 terbaru, silakan kunjungi situs web ISPConfig:http://www.ispconfig.org/ispconfig-3/download/
Unduh rilis stabil ISPConfig 3 terbaru:
cd /tmp
wgethttp://www.ispconfig.org/downloads/ISPConfig-3-stable.tar.gz
tar xfz ISPConfig-3-stable.tar.gz
cd ispconfig3_install/ instal/
Kemudian mulai skrip instalasi:
php -q install.php
Pilih bahasa (en,de) [en]:<-- en
Mode penginstalan (standar,pakar) [standar]:<-- pakar
Nama host yang memenuhi syarat penuh (FQDN) dari server, misalnya server2 .domain.tld [ns2.example.tld]:<-- ns2.example.tld
Nama host server MySQL [localhost]:<-- localhost
Nama pengguna root MySQL [root]:<-- root
Kata sandi root MySQL []:<-- Masukkan kata sandi root MySQL Anda di sini
Database MySQL untuk membuat [dbispconfig]:<-- dbispconfig
MySQL charset [utf8]:<-- utf8
Apakah server ini akan bergabung dengan pengaturan multiserver ISPConfig yang ada (y,n) [n]:<-- y
Nama host server master MySQL []:<-- web.example.tld
master MySQL nama pengguna root server [root]:<-- root
Kata sandi root server master MySQL []:<-- Masukkan kata sandi root server master di sini
Nama database server master MySQL [dbispconfig]:<- - dbispconfig
Konfigurasi Mail (y,n) [y]:<-- n
Konfigurasi Jailkit (y,n) [y]:<-- n
Konfigurasi Server FTP (y, n) [y]:<-- n
Konfigurasi Server DNS (y,n) [y]:<-- y
Konfigurasi e Server Apache (y,n) [y]:<-- n
Konfigurasi Server Firewall (y,n) [y]:<--n
Instal ISPConfig Web-Interface (y,n) [y]:<--n
Jalankan...
rm -f /var/www/ispconfig
... untuk menghapus tautan antarmuka ISPConfig di direktori /var/www.
Bersihkan direktori instal:
rm -rf /tmp/ispconfig3_install/install
rm -f /tmp/ISPConfig-3-stable.tar.gz
6.5 Menyesuaikan Pengaturan Server Di ISPConfig
Masuk ke ISPConfig di server master dengan browser web:
http://192.168.1.2:8080
Klik System> Server services> web.example.tld dan nonaktifkan semua kotak centang kecuali kotak centang Webserver, Fileserver dan DB-Server dan klik Save.

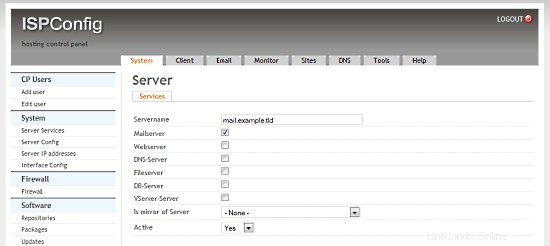
Klik Sistem> Layanan server> mail.example.tld dan nonaktifkan semua kotak centang kecuali kotak centang Server surat dan klik Simpan.
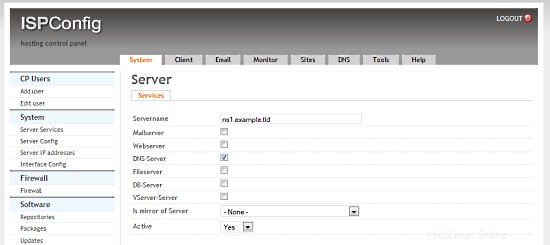
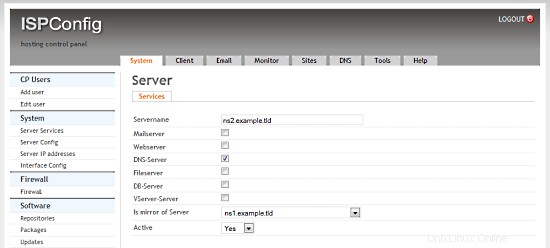
Klik Sistem> Layanan server> ns1.example.tld dan nonaktifkan semua kotak centang kecuali kotak centang DNS-Server dan klik Simpan.
Klik System> Server services> ns2.example.tld dan nonaktifkan semua kotak centang kecuali kotak centang DNS-Server dan pilih ns1.example.tld di kotak pilih Is mirror of Server dan klik Simpan.
6.6 Menyetel DNS Terbalik
Karena sebagian besar server email memeriksa entri DNS Terbalik yang valid, kami harus menyiapkannya untuk server email kami. Hetzner mengizinkan kami melakukan ini di Antarmuka Web mereka:
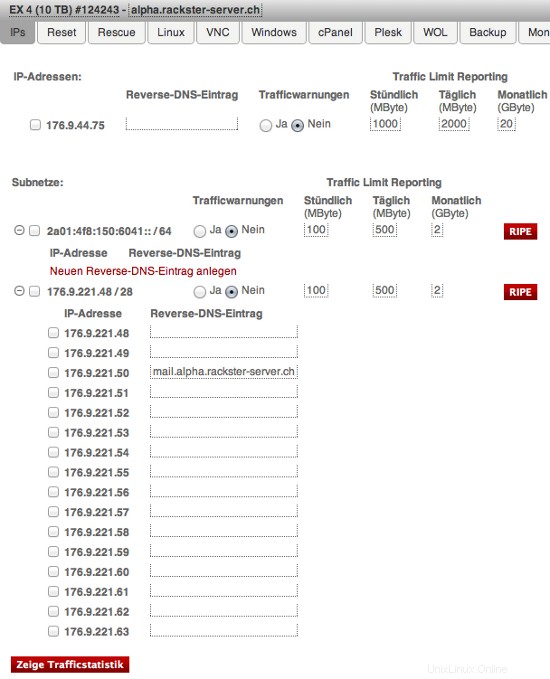
Perhatikan entri untuk IP 176.9.221.50. Untuk Anda, di bawah IP 192.168.1.3 Anda harus mengisi:mail.example.tld
Lingkungan Multiserver Virtual Dengan Web Khusus &MySQL, Server Email &DNS Pada Debian Squeeze Dengan ISPConfig 3 - Halaman 4
7 Memperluas Server Kami
Kami sekarang memiliki lingkungan kerja yang sempurna dari satu server khusus yang menjalankan server virtual kami. Namun ada banyak tweak yang bisa dan harus kita terapkan pada mereka. Kami akan melakukan ini sekarang. Bukan berarti semua ini optimal, tetapi sangat disarankan.
Langkah pertama dapat diulang di semua server.
7.0.1 SSH dengan kunci otentikasi, bukan sandi
Menggunakan otentikasi kunci SSH jauh lebih aman daripada kata sandi, karena Anda harus memiliki kunci pribadi untuk mengakses server. Jika Anda belum memilikinya, buat dan pasangan kunci RSA (di komputer lokal Anda):
ssh-keygen
Membuat pasangan kunci rsa publik/pribadi.
Masukkan file untuk menyimpan kunci (/home/username/.ssh/id_rsa):Masukkan frasa sandi (kosongkan tanpa frasa sandi):
Masukkan frasa sandi yang sama lagi:
Identifikasi Anda telah disimpan di /home/username/.ssh/id_rsa.
Kunci publik Anda telah disimpan di /home/username/.ssh/id_rsa.pub.
Setelah kunci publik dipasang di server, akses akan diberikan tanpa pertanyaan kata sandi. SSH biasanya dilengkapi dengan utilitas bernama ssh-copy-id yang hanya menambahkan konten ~/.ssh/id_rsa.pub klien ke ~/.ssh/authorized_keys:
serverssh-copy-id -i .ssh/id_rsa.pub contoh@unixlinux.online
Pada titik ini, akun root di server dapat dikunci untuk otentikasi kata sandi:
Silakan coba akses server terlebih dahulu menggunakan kunci sebelum menjalankan perintah ini!
passwd -l root
7.0.2 Memasang Logwatch
Logwatch adalah paket kecil yang akan mengirimi Anda laporan terperinci tentang apa yang terjadi/sedang berjalan di server Anda. Ini sangat berguna untuk pemantauan.
apt-get -y install logwatch
Kemudian sesuaikan konfigurasinya:
nano /usr/share/logwatch/default.conf/logwatch.conf
dan atur nilai ini:
Output =mailFormat =textMailTo =example@unixlinux.onlineDetail =HighService =Semua
Anda sekarang akan menerima email dari Logwatch setiap hari. Anda akan lihat, ini luar biasa!
7.0.3 Mengaktifkan aturan fail2ban tambahan
Fail2ban adalah cara yang bagus untuk memblokir pengguna yang tidak diinginkan mengakses server kami. Karena kami telah menginstalnya di Server Web &MySQL kami juga di Server Mail kami, Anda dapat melewati langkah pertama pada mereka. Jalankan ini di node Anda dan kedua server DNS:
apt-get -y install fail2ban
Kami sekarang akan memberi tahu fail2ban layanan apa yang harus dipantau dan bagaimana menangani permintaan buruk:
Ini harus dijalankan di semua server (termasuk server Web &MySQL dan server Mail):
nano /etc/fail2ban/jail.local
dan tambahkan yang berikut ini ke file (jangan ganti konten yang sudah ada!):
[ssh]enables =trueport =sshfilter =sshdlogpath =/var/log/auth.logmaxretry =3[ssh-ddos]enabled =trueport =sshfilter =sshd-ddoslogpath =/var/log/auth.logmaxretry =5Fail2ban sekarang akan mendeteksi upaya pembobolan SSH dan memblokirnya. Terakhir, restart fail2ban:
/etc/init.d/fail2ban restart
7.1 Memperluas Server Node
7.1.1 Memasang Ajenti
Ajenti adalah panel kontrol server yang bagus. Saya menggunakannya terutama untuk mengelola firewall dan karena pengelola file, konsol, dan terminal bawaan.
Pertama kita harus menambahkan repositorinya ke sources.list kita:
nano /etc/apt/sources.listdan tambahkan:
deb http://repo.ajenti.org/debian main utamaSetelah itu Anda harus mengimpor Kuncinya:
wget http://repo.ajenti.org/debian/key -O- | sudo apt-key add -Anda sekarang dapat mengakses CP melalui:http://192.168.1.1:8000. Nama pengguna/kata sandi default adalah:admin
Jika Anda berencana untuk menggunakan terminal bawaan, Anda harus menginstal modul Python PIL:
apt-get -y install python-imaging
7.1.2 Memasang Archey
This is very optional, however I like it. Archey will show you some nice information on login.

To install it, simply run:
apt-get install lsb-release scrot
cd /tmp
wget https://github.com/downloads/djmelik/archey/archey-0.2.8.deb
dpkg -i archey-0.2.8.deb
rm archey-0.2.8.deb
nano /etc/bash.bashrcAt the very end, add:archey.
7.2 Extending The Web/DB Server
These steps are only run on our Web/DB server.
7.2.1 Installing cURL
apt-get -y install curl php5-curl libcurl3-dev
7.2.2 Installing ionCube Loader
You should now be able to do this by yourself. Just download the correct version over at http://www.ioncube.com/loaders.php and follow its introductions.
7.2.3 Installing APC and other useful apps
In this section we will install apc (php accelarator), which is developed by the guys who develop php and some apps (htop, iptraf, logwatch, tiger).
apt-get -y install php-apc htop iptraf tigerEdit /etc/php5/conf.d/apc.ini, so as to increase the memory cache:
nano /etc/php5/conf.d/apc.iniAnd append the following line:
apc.shm_size=128Finally restart Apache:
/etc/init.d/apache2 restartWith htop you can see system info in a better way than top, with iptraf you can see real time statistics for your connection and with tiger you can have yourself mailed with a periodically report of your system's security vulnerabilities (if any exists).
As a lot of scripts/apps send a lot of mails to user root, you can alias root's mail, to a more 'real' email address. So, after you set up a 'real' mail for your example.tld domain, you can edit the aliases and add an alias to root user:
nano /etc/aliasesand change the line
root:rootto something like
root:example@unixlinux.onlineAfter this execute:
newaliasIf you want to install Drupal (or other cms) you will propably need uploadprogress and json. To accomplish their installation, do:
apt-get -y install php5-dev php-services-json
pecl install uploadprogress
touch /etc/php5/apache2/conf.d/uploadprogress.ini
nano /etc/php5/apache2/conf.d/uploadprogress.iniAnd append the following line:
extension=uploadprogress.soFinally restart Apache:
/etc/init.d/apache2 restart
7.2.4 Installing mod_security
Install the apache mod-security 2 module with apt from the Debian repositories:
apt-get -y install libapache-mod-securityCreate the folder for the mod-security configuration files:
mkdir /etc/apache2/mod-security
chmod 600 /etc/apache2/mod-securityDownload and unpack the mod-security rules:
cd /tmp
wget http://www.modsecurity.org/download/modsecurity-core-rules_2.5-1.6.1.tar.gz
tar fvx modsecurity-core-rules_2.5-1.6.1.tar.gz
mv *.conf /etc/apache2/mod-security/
ln -s /var/log/apache2 /etc/apache2/logsConfigure apache to load the activated mod-security rules:
nano /etc/apache2/conf.d/mod-security.confInclude /etc/apache2/mod-security/*.confTo enable mod-security, edit the file
nano /etc/apache2/mod-security/modsecurity_crs_10_config.confand remove the # in front of the line:
SecDefaultAction"phase:2,log,deny,status:403,t:lowercase,t:replaceNulls,t:compressWhitespace"Then reload Apache.
/etc/init.d/apache2 force-reloadMod security will now start to block hack attempts to your websites and log the actions in the file /var/log/apache2/modsec_audit.log.
tail /var/log/apache2/modsec_audit.logYou will see very likely some falsely blocked URL's. To whitelist them, you can add the ID's of the rules that should not be used in the whitelist file.
Example:
nano /etc/apache2/mod-security/modsecurity_crs_99_whitelist.confSecRuleRemoveById 960015SecRuleRemoveById 960016
7.2.5 MySQL Tuning
Download tuning-primer.sh and mysqltuner.pl. These will help you to improve mysql's configuration file.
cd /root/scripts
wget http://www.day32.com/MySQL/tuning-primer.sh
wget http://mysqltuner.com/mysqltuner.pl
chmod 700 tuning-primer.sh mysqltuner.plTo execute them:
perl /root/scripts/mysqltuner.pl
/root/scripts/tuning-primer.shThe scripts will ask some simple questions (user/pass) and will display in red colour, their suggestions for critical settings. You can use their suggestions to boost the performance of mysql-server.
7.2.6 Installing RoundCube
Following the above instructions you can install roundcube via apt-get. However following another logic (if you have the time and the courage) you can install roundcube in it's own subdomain, manually.
In "Perfect Server ...." you usually install Squirrelmai. However if you don't want it you can remove it:
apt-get remove squirrelmail
rm /etc/apache2/conf.d/squirrelmail.confInstall roundcube. (You MUST have the mysql administrator's password before you proceed -- Let dbconfig-common configure the database. You will be asked some questions about the password of the db administrator and the password of the new user that will be created for roundcube. Answer those questions and continue:
apt-get -y install roundcube roundcube-mysqlExamle answers:
"Configure database for roundcube with dbconfig-common?" .... Answer Yes
"Database type to be used by roundcube:...Answer mysql
"Password of the database's administrativeuser:" ... Answer your-admin-DB-password
"MySQL application password for roundcube:" ... Answer the-password-you-want-to-give-to-the-roundcube-user
"Password confirmation:"... Answer the-password-you-want-to-give-to-the-roundcube-userIf something goes wrong you can always run:
dpkg-reconfigure roundcube-coreFor more information, please see this post.
For everyone to be able to access his webmail (under his domain name) you have to create or edit the file /etc/apache2/conf.d/roundcube so as to set the alias to 'webmail'. If you want SSL you should include the last two directives (IfModule mod_rewrite.c) to have apache ALWAYS redirect to your SSL installation of ISPConfig.
nano /etc/apache2/conf.d/roundcube# Those aliases do not work properly with several hosts on your apache server
# Uncomment them to use it or adapt them to your configuration
# Alias /roundcube/program/js/tiny_mce/ /usr/share/tinymce/www/
Alias /roundcube /var/lib/roundcube
Alias /webmail /var/lib/roundcube
# Access to tinymce files
Options Indexes MultiViews FollowSymLinks
AllowOverride None
Order allow,deny
allow from all
Options +FollowSymLinks
# This is needed to parse /var/lib/roundcube/.htaccess. See its
# content before setting AllowOverride to None.
AllowOverride All
order allow,deny
allow from all
# Protecting basic directories:
Options -FollowSymLinks
AllowOverride None
Options -FollowSymLinks
AllowOverride None
Order allow,deny
Deny from all
Options -FollowSymLinks
AllowOverride None
Order allow,deny
Deny from all
RewriteEngine on
RewriteCond %{HTTPS} !^on$ [NC]
RewriteRule . https://%{HTTP_HOST}:50443%{REQUEST_URI} [L]
RewriteEngine on
RewriteCond %{HTTPS} !^on$ [NC]
RewriteRule . https://%{HTTP_HOST}:50443%{REQUEST_URI} [L]
Edit /var/lib/roundcube/config/main.inc.php:
nano /var/lib/roundcube/config/main.inc.phpand SET some variables in the file (if this is the first time you edit the file the lines are 60 and 66):
auto_create_user =TRUE;
$rcmail_config['default_host'] ='mail.example.tld';If you will install the following plugin (the logger that helps fail2ban) you have to extend the list of plugins in the same file. Ifthe only plugin is the one that will be istalled right afterward you have to edit the line (42) as below:
$rcmail_config['plugins'] =array('fail2ban');Install the roundcube logger plugin from http://mattrude.com/projects/roundcube-fail2ban-plugin/.
Basically you have to download the file (fail2ban.php) and paste it in the fail2ban folder in the plugins folder of roundcube. Finally you must have this file: /usr/share/roundcube/plugins/fail2ban/fail2ban.php. Execute:
cd /usr/share/roundcube/plugins/
wget --no-check-certificate http://cloud.github.com/downloads/mattrude/rc-plugin-fail2ban/roundcube-fail2ban-plugin.1.1.tgz
tar -xvzf roundcube-fail2ban-plugin.1.1.tgz
touch /var/log/roundcube/userlogins
rm roundcube-fail2ban-plugin.1.1.tgz
chown www-data:www-data /var/log/roundcube/userloginsThis plugin will update the log file with each failed login attempt:/var/log/roundcube/userlogins
Don't forget to edit the link for the webmail in ISPConfig (System -> Interface Config -> (tab) Mail) and set it to /webmail. Lastly, restart apache.
/etc/init.d/apache2 restartYou can now access webmail at http://web.example.tld/webmail
Virtual Multiserver Environment With Dedicated Web &MySQL, Email &DNS Servers On Debian Squeeze With ISPConfig 3 - Page 5
Di halaman ini
- 7.2.7 Installing fail2ban
- 7.2.8 Installing mod_evasive With fail2ban Support
- 7.3 Extending the Mail Server
- 7.3.1 Enhanced e-mail SPAM protection
- 7.3.2 Installing Postgrey
- 7.4 Securing The Servers Using SSL
7.2.7 Installing fail2ban
Extend the jail.local file that falko suggests in ThePerfect Server - Debian Squeeze (Debian 6.0) With BIND &Courier [ISPConfig 3]:/etc/fail2ban/jail.local
nano /etc/fail2ban/jail.local
You have to append or edit the following:
[roundcube]
enabled =true
port =http
filter =roundcube
logpath =/var/log/roundcube/userlogins
maxretry =5
Last (and very important) don't forget to create the roundcube.conf file /etc/fail2ban/filter.d/roundcube.conf.
nano /etc/fail2ban/filter.d/roundcube.conf
with the following contents:
[Definition]failregex =FAILED login for .*. fromignoreregex =
Restart fail2ban:
/etc/init.d/fail2ban restart
You can check that all jails are active with the command:
iptables -L -n
7.2.8 Installing mod_evasive With fail2ban Support
mod_evasive is an Apache module for handling DDoS attacks. We will install it and configure fail2ban to auto ban/unban reported attacks.
apt-get install libapache2-mod-evasive
mkdir /var/lock/mod-evasive
chown www-data /var/lock/mod-evasive
ln -s /etc/alternatives/mail /bin/mail
nano /etc/apache2/mods-available/mod-evasive.conf
and paste:
DOSHashTableSize 3097 DOSPageCount 3 DOSSiteCount 60 DOSPageInterval 1 DOSSiteInterval 2 DOSBlockingPeriod 15 DOSEmailNotify example@unixlinux.online DOSLogDir "/var/lock/mod_evasive"
Afterwards we activate the module and restart apache
a2enmod mod-evasive
/etc/init.d/apache2 restart
mod_evasive will not detect DDoS attacks. To ban them by IPTables, we have to create the file:/etc/fail2ban/filter.d/apache-dosevasive.conf:
# Fail2Ban configuration file## Author:Xela## $Revision:728 $#[Definition]# Option:failregex# Notes.:regex to match the Forbidden log entrys in apache error.log# maybe (but not only) provided by mod_evasive## Values:TEXT#failregex =^\[[^\]]*\]\s+\[error\]\s+\[client\] client denied by server configuration:\s# Option:ignoreregex# Notes.:regex to ignore. If this regex matches, the line is ignored.# Values:TEXT#ignoreregex =
and to /etc/fail2ban/jail.local we add:
[apache-dosevasive]enabled =truefilter =apache-dosevasiveaction =iptables-allports[name=dos]logpath =/var/log/apache*/*error.logbantime =600maxretry =10
7.3 Extending the Mail Server
7.3.1 Enhanced e-mail SPAM protection
The command below enables a stricter SPAM handling for postfix on ISPConfig 3 servers.
postconf -e 'smtpd_recipient_restrictions =permit_mynetworks, permit_sasl_authenticated, reject_invalid_hostname, reject_non_fqdn_hostname, reject_unknown_recipient_domain, reject_non_fqdn_recipient, reject_unauth_destination, reject_non_fqdn_sender, reject_unknown_sender_domain, reject_unknown_recipient_domain, reject_rbl_client cbl.abuseat.org,reject_rbl_client dul.dnsbl.sorbs.net,reject_rbl_client ix.dnsbl.manitu.net, check_recipient_access mysql:/etc/postfix/mysql-virtual_recipient.cf, reject_unauth_destination'
Then restart postfix:
/etc/init.d/postfix restart
7.3.2 Installing Postgrey
Postgrey will eliminate 99% of all spam emails you receive. To install it, run these commands:
apt-get install postgrey
/etc/init.d/postgrey start
The Postfix configuration files are located in /etc/postfix. Edit /etc/postfix/main.cf and add check_policy_service inet:127.0.0.1:60000 to the smtpd_recipient_restrictions.
Then reload postfix's configuration:
postfix reload
7.4 Securing The Servers Using SSL
Last but not least you should follow this tutorial:https://www.howtoforge.com/securing-your-ispconfig-3-installation-with-a-free-class1-ssl-certificate-from-startssl. Don't forget to execute the commands on the right server!
8 Maintaining Our Servers
You should regulary run this to keep your servers up-to-date:
apt-get update &&apt-get -y upgrade &&apt-get -y dist-upgrade
9 Links/Credits/Sources
Since most is not from me, here are all the links used for this tutorial:
- http://www.faqforge.com/linux/enhanced-e-mail-spam-protection-in-ispconfig-3/
- https://www.howtoforge.com/greylisting_postfix_postgrey
- https://www.howtoforge.com/extending-perfect-server-debian-squeeze-ispconfig-3-p4
- http://spielwiese.la-evento.com/xelasblog/archives/56-Apache-DOS-Attacken-erschweren-mit-mod_evasive.html
- http://www.faqforge.com/linux/apache-mod-security-installation-on-debian-6-0-squeeze/
- http://forum.whmcs.com/showpost.php?s=f876c3e3a7d56bd2f325685a80d746cf&p=16768&postcount=4
- https://www.howtoforge.com/extending-perfect-server-debian-squeeze-ispconfig-3-p3
- http://debian.nimmervoll.eu/tag/debian-logwatch-einrichten/
- http://www.debian-administration.org/articles/530
- https://www.howtoforge.com/securing-your-ispconfig-3-installation-with-a-free-class1-ssl-certificate-from-startssl
- https://www.howtoforge.com/multiserver-setup-with-dedicated-web-email-dns-and-mysql-database-servers-on-debian-squeeze-with-ispconfig-3
- http://debian.nimmervoll.eu/archey-debian-installation/
- http://ajenti.org/
- http://code.google.com/p/ovz-web-panel/wiki/Installation
- https://www.howtoforge.com/installing-and-using-openvz-on-debian-squeeze-amd64