OTRS (perangkat lunak sistem tiket masalah sumber terbuka) adalah perangkat lunak sumber terbuka canggih yang digunakan oleh perusahaan untuk meningkatkan operasi mereka terkait dengan dukungan pelanggan, meja bantuan, pusat panggilan dan banyak lagi. OTRS ditulis dalam PERL dan menyediakan fitur-fitur penting berikut:
- Pelanggan dapat mendaftar dan membuat/berinteraksi dengan Tiket melalui portal pelanggan dan melalui email, telepon, dan faks di setiap antrean (kotak pos Petugas/Teknisi).
- Tiket dapat dikelola berdasarkan prioritas, penugasan, transmisi, dan tindak lanjutnya. Tiket dapat dibagi, digabungkan, tindakan massal dapat diterapkan, dan tautan satu sama lain serta pemberitahuan dapat diatur. Layanan dapat dikonfigurasi melalui katalog layanan.
- Untuk meningkatkan kapasitas tim, email otomatis (jawaban otomatis), template teks, dan tanda tangan dapat dikonfigurasi. Sistem mendukung catatan dan lampiran pada tiket.
- Kemampuan lainnya meliputi:statistik dan laporan (CSV/PDF), SLA, dan banyak fitur lainnya.
Lingkungan
Artikel ini mencakup instalasi OTRS 5 dan konfigurasi dasar. Artikel ini ditulis berdasarkan lingkungan berikut:VM Kotak Virtual dengan Minimal CENTOS 7, RAM 2 GB, HD 8 GB, dan 2 antarmuka jaringan (khusus host dan NAT).
Persiapan
Dengan asumsi Anda menggunakan penginstalan baru Centos 7 Minimal, sebelum menginstal OTRS, jalankan perintah berikut untuk memperbarui sistem dan menginstal paket tambahan:
yum update
Transaction Summary ================================================================================ Install 1 Package Upgrade 39 Packages Total download size: 91 M Is this ok [y/d/N]: y
Instal editor teks atau gunakan VI. Pada artikel ini kami menggunakan VIM, jalankan perintah berikut untuk menginstalnya:
yum install vim
Untuk menginstal paket WGET, jalankan perintah berikut:
yum install wget
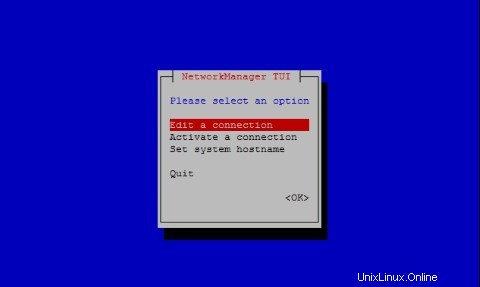
Untuk mengkonfigurasi jaringan Centos 7, jalankan perintah berikut untuk membuka alat NMTUI (Network Manager Text User Interface) dan mengedit antarmuka dan nama host jika perlu:
nmtui
Setelah pengaturan pengaturan jaringan dan nama host pada CentOS 7, jalankan perintah berikut untuk menerapkan perubahan:
service networks restart
Untuk memverifikasi informasi jaringan, jalankan perintah berikut:
ip addr
Outputnya terlihat seperti ini di sistem saya:
1: lo: <LOOPBACK,UP,LOWER_UP> mtu 65536 qdisc noqueue state UNKNOWN qlen 1
    link/loopback 00:00:00:00:00:00 brd 00:00:00:00:00:00
    inet 127.0.0.1/8 scope host lo
       valid_lft forever preferred_lft forever
    inet6 ::1/128 scope host
       valid_lft forever preferred_lft forever
2: enp0s3: <BROADCAST,MULTICAST,UP,LOWER_UP> mtu 1500 qdisc pfifo_fast state UP qlen 1000
    link/ether 08:00:27:67:bc:73 brd ff:ff:ff:ff:ff:ff
    inet 10.0.2.15/24 brd 10.0.2.255 scope global dynamic enp0s3
       valid_lft 84631sec preferred_lft 84631sec
    inet6 fe80::9e25:c982:1091:90eb/64 scope link
       valid_lft forever preferred_lft forever
3: enp0s8: <BROADCAST,MULTICAST,UP,LOWER_UP> mtu 1500 qdisc pfifo_fast state UP qlen 1000
    link/ether 08:00:27:68:88:f3 brd ff:ff:ff:ff:ff:ff
    inet 192.168.56.101/24 brd 192.168.56.255 scope global dynamic enp0s8
       valid_lft 1044sec preferred_lft 1044sec
    inet6 fe80::a00:27ff:fe68:88f3/64 scope link
       valid_lft forever preferred_lft forever
Nonaktifkan SELINUX (Security Enhanced Linux) di Centos 7, edit file konfigurasi berikut:
vim /etc/selinux/config
"/etc/selinux/config" 14L, 547C# This file controls the state of SELinux on the system.
# SELINUX= can take one of these three values:
#     enforcing - SELinux security policy is enforced.
#     permissive - SELinux prints warnings instead of enforcing.
#     disabled - No SELinux policy is loaded.
SELINUX=enforcing
# SELINUXTYPE= can take one of three two values:
#     targeted - Targeted processes are protected,
#     minimum - Modification of targeted policy. Only selected processes are prootected.
#     mls - Multi Level Security protection.
SELINUXTYPE=targeted
Ubah nilai menegakkan dari arahan SELINUX ke dinonaktifkan , simpan file dan reboot server.
Untuk mengecek status SELinux pada Centos 7, jalankan perintah berikut:
getenforce
Outputnya harus:
Disabled
Instal MariaDB di Centos 7
Untuk menginstal MariaDB di Centos 7, jalankan perintah berikut:
yum -y install mariadb-server
Buat file dengan nama zotrs.cnf di direktori berikut:
/etc/my.cnf.d/
Untuk membuat dan mengedit file, jalankan perintah berikut:
vim /etc/my.cnf.d/zotrs.cnf
Isi file dengan konten berikut dan simpan:
max_allowed_packet = 20M
query_cache_size = 32M
innodb_log_file_size = 256M
Untuk memulai MariaDB, jalankan perintah berikut:
systemctl start mariadb
Untuk meningkatkan keamanan MariaDB, jalankan perintah berikut:
/usr/bin/mysql_secure_installation
Atur opsi sesuai dengan output berikut:
NOTE: RUNNING ALL PARTS OF THIS SCRIPT IS RECOMMENDED FOR ALL MariaDB
      SERVERS IN PRODUCTION USE!  PLEASE READ EACH STEP CAREFULLY!

In order to log into MariaDB to secure it, we'll need the current
password for the root user.  If you've just installed MariaDB, and
you haven't set the root password yet, the password will be blank,
so you should just press enter here.

Enter current password for root (enter for none):<Press Enter>
OK, successfully used password, moving on... Setting the root password ensures that nobody can log into the MariaDB root user without the proper authorisation. Set root password? [Y/n] <Press Y>
Setel sandi root:
New password:
Re-enter new password:
Password updated successfully!
Reloading privilege tables..
 ... Success!

By default, a MariaDB installation has an anonymous user, allowing anyone
to log into MariaDB without having to have a user account created for
them.  This is intended only for testing, and to make the installation
go a bit smoother.  You should remove them before moving into a
production environment.

Remove anonymous users? [Y/n] <Press Y>
 ... Success!

Normally, root should only be allowed to connect from 'localhost'.  This
ensures that someone cannot guess at the root password from the network.

Disallow root login remotely? [Y/n] <Choose acording your needs>
 ... Success!

By default, MariaDB comes with a database named 'test' that anyone can
access.  This is also intended only for testing, and should be removed
before moving into a production environment.

Remove test database and access to it? [Y/n] <Press Y>
 - Dropping test database...
 ... Success!
 - Removing privileges on test database...
 ... Success!

Reloading the privilege tables will ensure that all changes made so far
will take effect immediately.

Reload privilege tables now? [Y/n] <Press Y>
 ... Success!

Cleaning up...

All done!  If you've completed all of the above steps, your MariaDB
installation should now be secure.

Thanks for using MariaDB!
Siapkan MariaDB untuk memulai secara otomatis saat boot:
systemctl enable mariadb.service
Untuk mengunduh OTRS, jalankan perintah berikut:
wget http://ftp.otrs.org/pub/otrs/RPMS/rhel/7/otrs-5.0.15-01.n oarch.rpm
Instal EPEL
Sebelum kita menginstal OTRS, siapkan repositori EPEL di Centos 7. Jalankan perintah berikut untuk melakukannya:
[[email protected] ~]# yum -y http://mirror.globo.com/epel/7/x86_64/e/epel-r release-7-9.noarch.rpm
Instal OTRS
Instal OTRS dengan perintah berikut:
yum install -nogpgcheck otrs-5.0.15-01.noarch.rpm
Daftar paket perangkat lunak akan diinstal, mis. Apache dan semua dependensi akan diselesaikan secara otomatis, di akhir output tekan Y:
Transaction Summary
================================================================================
Install  1 Package (+143 Dependent packages)

Total size: 148 M
Total download size: 23 M
Installed size: 181 M
Is this ok [y/d/N]: y
Untuk memulai Apache (httpd), jalankan perintah berikut:
systemctl start httpd.service
Untuk mengaktifkan startup Apache (httpd) dengan systemd di Centos7, jalankan perintah berikut:
systemctl enable httpd.service
Aktifkan SSL di Apache dan konfigurasikan Sertifikat SelfSigned. Instal modul Mod_SSL untuk Apache HTTP Server, jalankan perintah berikut:
yum -y install mod_ssl
Untuk membuat sertifikat SSL yang ditandatangani sendiri, buka direktori berikut:
cd /etc/pki/tls/certs/
Dan jalankan perintah berikut untuk menghasilkan kunci (centos7.key adalah nama sertifikat saya, jangan ragu untuk mengubahnya):
make centos7.key
umask 77 ; \ /usr/bin/openssl genrsa -aes128 2048 > centos7.key Generating RSA private key, 2048 bit long modulus .+++ .........................................................................................+++ e is 65537 (0x10001) Enter pass phrase: <Insert your Own Password>
Verifying - Enter pass phrase:<Retype the Password>
Untuk membuat kunci privat SSL server dengan OpenSSL, jalankan perintah berikut:
openssl rsa -in centos7.key -out centos7.key
Enter pass phrase for centos7.key: <Type the Password> writing RSA key
Jalankan perintah berikut untuk membuat file CSR (Certificate Signing Request) (centos7.csr adalah nama sertifikat saya, jangan ragu untuk mengubahnya):
make centos7.csr
Isi pertanyaan sesuai kebutuhan Anda:
umask 77 ; \ /usr/bin/openssl req -utf8 -new -key centos7.key -out centos7.csr You are about to be asked to enter information that will be incorporated into your certificate request. What you are about to enter is what is called a Distinguished Name or a DN. There are quite a few fields but you can leave some blank For some fields there will be a default value, If you enter '.', the field will be left blank. -----
Country Name (2 letter code) [XX]:
State or Province Name (full name) []:
Locality Name (eg, city) [Default City]:
Organization Name (eg, company) [Default Company Ltd]:
Organizational Unit Name (eg, section) []:
Centos7 Common Name (eg, your name or your server's hostname) []:
Email Address []:
Please enter the following 'extra' attributes to be sent with your certificate request A challenge password []: <press enter>
An optional company name []:
Buat CSR (Permintaan Penandatanganan Sertifikat) untuk server dengan alat OpenSSL:
openssl x509 -in centos7.csr -out centos7.crt -req -signkey centos7.key
Outputnya adalah:
Signature ok subject=/C=BR/ST=SP/L=Campinas/O=Centos7/OU=Centos7/CN=centos7.local Getting Private key
Sebelum kita mengedit file ssl.conf, buatlah salinan file tersebut dengan perintah berikut:
cp /etc/httpd/conf.d/ssl.conf /etc/httpd/conf.d/ssl.conf.old
Kemudian edit filenya:
vim /etc/httpd/conf.d/ssl.conf
Temukan arahan berikut, batalkan komentar masing-masing dan edit seperti ini:
SSLCertificateKeyFile /etc/pki/tls/certs/centos7.key
SSLCertificateFile /etc/pki/tls/certs/centos7.csr
SSLProtocol -All +TLSv1 +TLSv1.1 +TLSv1.2
ServerName centos7.local:443
Restart Apache dengan perintah berikut:
systemctl restart httpd
Untuk memaksa OTRS berjalan dalam mode https, edit file berikut:
vim /etc/httpd/conf/httpd.conf
Di akhir file, batalkan komentar pada arahan berikut:
IncludeOptional conf.d/*.conf
Edit file zzz_otrs.conf:
vim /etc/httpd/conf.d/zzz_otrs.conf
Setelah baris 26 (sebelum modul baris mod_version.c) tambahkan perintah berikut:
RewriteEngine On
RewriteCond %{HTTPS} off
RewriteRule (.*) https://%{HTTP_HOST}%{REQUEST_URI}
Mulai ulang Apache:
[[email protected] ~]# systemctl restart httpd
Untuk menggunakan fitur tambahan di OTRS, kita harus menginstal beberapa modul PERL. Jalankan perintah berikut untuk menginstalnya:
yum -y install "perl(Text::CSV_XS)" "perl(Crypt::Eksblowfish::Bcrypt)" "perl(YAML::XS)" "perl(JSON::XS)" "perl(Encode::HanExtra)" "perl(Mail::IMAPClient)" "perl(ModPerl::Util)"
Sistem OTRS memiliki alat untuk memeriksa modul PERL, jalankan seperti ini untuk memverifikasi persyaratan sistem:
cd /opt/otrs/bin
dan jalankan:
./otrs.CheckModules.pl
Output untuk konfigurasi kita harus:
o Apache::DBI......................ok (v1.12) o Apache2::Reload..................ok (v0.13) o Archive::Tar.....................ok (v1.92) o Archive::Zip.....................ok (v1.30) o Crypt::Eksblowfish::Bcrypt.......ok (v0.009) o Crypt::SSLeay....................ok (v0.64) o Date::Format.....................ok (v2.24) o DBI..............................ok (v1.627) o DBD::mysql.......................ok (v4.023) o DBD::ODBC........................Not installed! (optional - Required to connect to a MS-SQL database.) o DBD::Oracle......................Not installed! (optional - Required to connect to a Oracle database.) o DBD::Pg..........................Not installed! Use: 'yum install "perl(DBD::Pg)"' (optional - Required to connect to a PostgreSQL database.) o Digest::SHA......................ok (v5.85) o Encode::HanExtra.................ok (v0.23) o IO::Socket::SSL..................ok (v1.94) o JSON::XS.........................ok (v3.01) o List::Util::XS...................ok (v1.27) o LWP::UserAgent...................ok (v6.13) o Mail::IMAPClient.................ok (v3.37) o IO::Socket::SSL................ok (v1.94) o ModPerl::Util....................ok (v2.000010) o Net::DNS.........................ok (v0.72) o Net::LDAP........................ok (v0.56) o Template.........................ok (v2.24) o Template::Stash::XS..............ok (undef) o Text::CSV_XS.....................ok (v1.00) o Time::HiRes......................ok (v1.9725) o Time::Piece......................ok (v1.20_01) o XML::LibXML......................ok (v2.0018) o XML::LibXSLT.....................ok (v1.80) o XML::Parser......................ok (v2.41) o YAML::XS.........................ok (v0.54)
Untuk memulai Daemon OTRS dengan pengguna "otrs", jalankan perintah berikut:
su -c "/opt/otrs/bin/otrs.Daemon.pl start" -s /bin/bash otrs
Untuk menonaktifkan firewall CentOS 7, jalankan perintah berikut:
systemctl stop firewalld
Untuk menonaktifkan CentOS 7 Firewall untuk memulai secara otomatis, jalankan:
systemctl disable firewalld.service
Mulai Daemon OTRS dengan:
su -c "/opt/otrs/bin/otrs.Daemon.pl start" -s /bin/bash otrsCron.sh
Output dari perintah harus:
/opt/otrs/bin Cron.sh - start/stop OTRS cronjobs Copyright (C) 2001-2012 OTRS AG, http://otrs.org/ (using /opt/otrs) done
Jika Anda ingin memeriksa status Daemon OTRS, jalankan perintah berikut:
su -c "/opt/otrs/bin/otrs.Daemon.pl status" -s /bin/bash otrsCron.sh
Konfigurasi OTRS di crontab. Ubah root pengguna menjadi otrs dan mulai mengedit crontab:
su otrs
crontab -e
Isi crontab dengan konten berikut dan simpan:
# --
# Copyright (C) 2001-2016 OTRS AG, http://otrs.com/
# --
# This software comes with ABSOLUTELY NO WARRANTY. For details, see
# the enclosed file COPYING for license information (AGPL). If you
# did not receive this file, see http://www.gnu.org/licenses/agpl.txt.
# --

# Who gets the cron emails?
MAILTO="[email protected]"
# --
# Copyright (C) 2001-2016 OTRS AG, http://otrs.com/
# --
# This software comes with ABSOLUTELY NO WARRANTY. For details, see
# the enclosed file COPYING for license information (AGPL). If you
# did not receive this file, see http://www.gnu.org/licenses/agpl.txt.
# --

# check OTRS daemon status
*/5 * * * *    $HOME/bin/otrs.Daemon.pl start >> /dev/null
Konfigurasi OTRS di CentOS 7
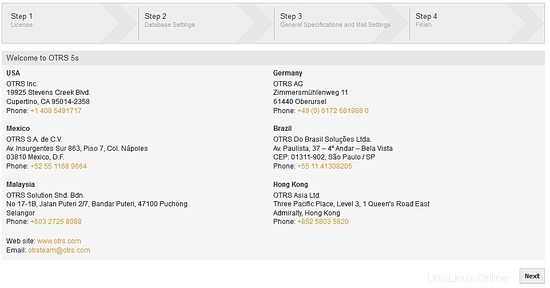
Buka browser web dan buka URL https://centos7.local/otrs/installer.pl. Ingat, centos7.local adalah nama server saya, masukkan nama host atau alamat IP Anda. Layar pertama menunjukkan 4 langkah untuk mengakhiri instalasi OTRS, tekan Next.
Lisensi:untuk melanjutkan, membaca, dan menerima lisensi untuk melanjutkan:

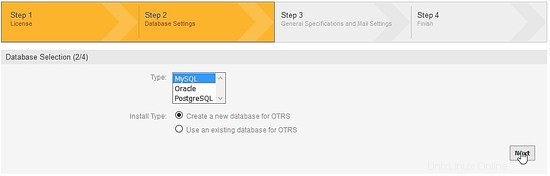
Pemilihan Basis Data:pilih opsi MySQL dan di Jenis Instal, tandai opsi Buat database baru untuk OTRS dan klik tombol berikutnya:
Konfigurasi MySQL:isi kolom User, Password dan Host (ingat data konfigurasi MariaDB yang kita buat) dan tekan check database settings:

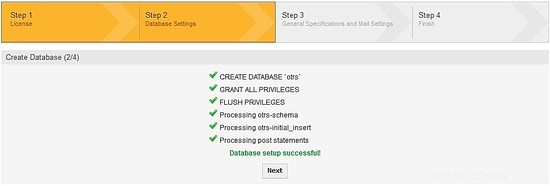
Installer OTRS akan membuat database di MariaDB, tekan tombol next:
Basis data OTRS berhasil dibuat:
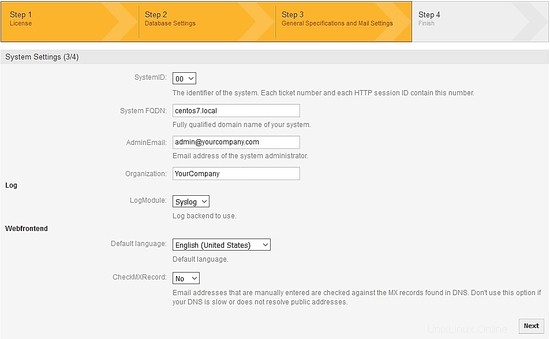
Pengaturan sistem konfigurasi:isi bidang dengan informasi Anda sendiri dan tekan berikutnya:
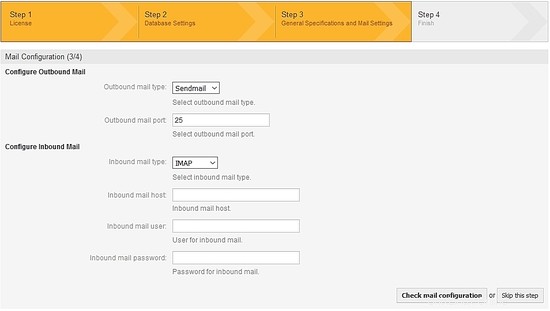
Konfigurasi email OTRS:isi kolom sesuai dengan server email Anda. Dalam pengaturan saya, untuk email keluar saya menggunakan SMPTTLS dan port 587, untuk email masuk, saya menggunakan pop3, Anda memerlukan akun email. Periksa konfigurasi email atau lewati langkah ini:
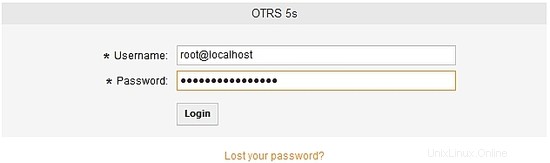
Untuk mengakhiri, catat user dan password untuk mengakses OTRS, setelah login anda bisa mengganti password:
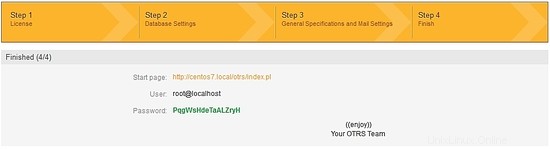
Login url OTRS adalah https://centos7.local/otrs/index.pl?. Ingat, centos7.local adalah nama server saya, masukkan nama host atau alamat IP Anda.:
Masuk di OTRS:
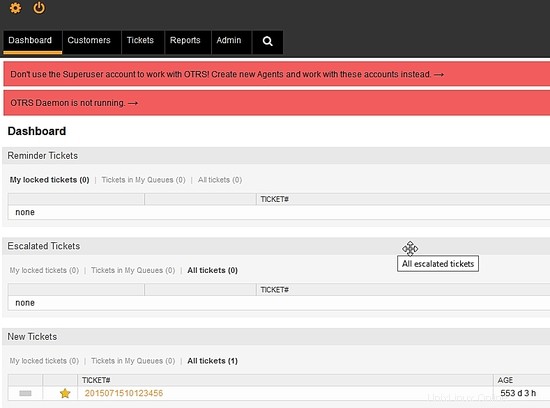
OTRS telah diinstal dan siap dikonfigurasi dengan aturan dukungan atau model bisnis Anda.