
Pengantar
Dalam artikel panduan ini, kami akan memandu Anda dalam membangun server email lengkap di Ubuntu 14.04 dengan Postfix. Membangun server email Linux dari awal bisa menjadi proses yang menyakitkan kecuali Anda melakukannya hari demi hari, tetapi kami akan menunjukkan cara melakukannya tanpa rasa sakit semampu kami.
Server email biasanya terdiri dari berbagai paket berbeda yang menangani SMTP, POP3/IMAP, penyimpanan email, dan tugas terkait spam, dan semuanya harus berbicara bersama. Berikut adalah garis besar paket dan tujuan untuk artikel panduan ini.
Garis Besar Paket dan Langkah Konfigurasi
1 – Persiapan Server Dasar
2 – Membangun Server Web LAMP
3 – Konfigurasi PHP
4 – Konfigurasi Apache2
5 – Instal dan Konfigurasi Memcached
6 – Instal Mail server Packages
7 – Membuat Database MySQL untuk Mail Server
8.1 – Install Postfix Admin
8.2 – Konfigurasi Postfix Admin
9 – Menambahkan User Account (mailbox) ke Postfix Admin
10 – Membuat pengguna sistem untuk menangani Direktori Surat Virtual
11 – Mengonfigurasi Dovecot
12 – Mengonfigurasi Filter Spam dan Anti-Virus
13 – Mengonfigurasi Postfix
14 – Reverse DNS Lookup
15 – Instal RoundCube Webmail
Prasyarat
– Server Ubuntu 14.04 yang diperbarui sepenuhnya, jika Anda tidak memiliki server Ubuntu yang berjalan di server seperti server cloud Linux Atlantic.net.
– Akses ke nama domain yang akan Anda atur emailnya (kami akan menggunakan “example.tld ” dalam contoh dalam artikel ini).
.
1 – Persiapan Server Dasar
Instalasi dasar Ubuntu hadir dengan paket terbatas, jadi hal pertama yang ingin kita lakukan adalah menginstal alat yang akan kita gunakan untuk menyelesaikan semua tugas.
Pertama, pastikan Anda masuk sebagai akun pengguna root.
sudo su -
Sekarang, mari kita instal alat dasar agar kita dapat mengunduh file, dan mengedit file konfigurasi dengan mudah.
apt-get install wget nano ssl-cert
- wget :paket untuk mengambil file menggunakan HTTP, HTTPS, dan FTP, protokol Internet yang paling banyak digunakan.
- nano :editor teks baris perintah dengan kontrol yang mudah digunakan.
- ssl-cert :paket yang memungkinkan kemampuan untuk membuat sertifikat SSL.
Selanjutnya, kami akan memperbarui nama host dan nama domain server sehingga ketika Anda mengirim email, itu akan cocok dengan catatan DNS penunjuk balik yang kami atur dengan penyedia hosting Anda. Kami juga akan memperbarui /etc/hostname mengajukan. Pastikan untuk mengganti contoh dengan nama host dan nama domain asli Anda.
nama host mail.example.tldecho "mail.example.tld"> /etc/hostname
Sekarang kita akan mengedit secara manual /etc/hosts file konfigurasi sehingga cocok dengan nama yang baru saja kita masukkan.
nano /etc/hosts
Edit baris pertama dan tambahkan FQDN Anda (nama domain yang sepenuhnya memenuhi syarat) tepat setelah alamat IP 127.0.0.1.
127.0.0.1 mail.example.tld localhost
Kami sekarang akan memperbarui sertifikat SSL default di server sehingga cocok dengan nama host baru kami. Jika Anda membeli sertifikat SSL untuk server email Anda, Anda dapat melewati langkah ini.
make-ssl-cert generate-default-snakeoil --force-overwrite
Perintah ini memberi tahu server untuk membuat ulang sertifikat SSL sistem default dan memaksanya untuk menimpa file CRT dan KEY asli.
Kami sekarang telah menyelesaikan Persiapan Server Dasar dan dapat melanjutkan untuk menginstal layanan server web kami.
[Kembali ke atas]
2 – Membangun Server Web LAMP
Selama langkah ini, kita akan menginstal paket "LAMP". LAMP adalah singkatan dari Linux, Apache, MySQL, dan PHP. Gabungan paket-paket ini akan memungkinkan server Anda menyediakan layanan web dinamis dengan konektivitas MySQL.
Pertama, mari kita instal paket-paketnya. Ini disebut instalasi paket tugas.
apt-get install lamp-server^
Untuk melihat daftar paket yang termasuk dalam instalasi grup ini, Anda dapat menjalankan yang berikut ini:
tasksel --task-packages lamp-server
Saat paket-paket ini sedang diinstal, server akan meminta Anda memasukkan kata sandi untuk instalasi database MySQL Anda. Kata sandi ini akan disetel untuk “root ” akun pengguna database MySQL. Pastikan kata sandi ini adalah kata sandi yang aman, dan pastikan Anda mendokumentasikan kata sandi yang digunakan karena Anda akan memerlukannya lagi di seluruh artikel ini.
Setelah semua paket terinstal, kita akan siap untuk menginstal beberapa modul PHP tambahan. Modul tambahan ini akan memungkinkan server Anda mendukung APC User Cache untuk PHP 5, memcached, cURL, parser XML, dan pemrosesan gambar GD.
apt-get install php-apc php5-memcache php5-curl php5-gd php-xml-parser php5-imap
[Kembali ke atas]
3 – Konfigurasi PHP
Sekarang kita akan memperbarui konfigurasi PHP. Konfigurasi default biasanya cukup untuk sebagian besar sistem; namun, kami ingin memastikan bahwa PHP tidak memaparkan informasi kepada penyerang potensial. Kita akan mengedit file /etc/php5/apache2/php.ini .
nano /etc/php5/apache2/php.ini
Cari variabel expose_php dan perbarui nilai dari On ke Off . Dengan nano, Anda dapat mencari dengan menekan CTRL-W lalu masukkan kata pencarian Anda.
367;;;;;;;;;;;;;;;;;368; Lain-lain;369;;;;;;;;;;;;;;;;;370 371; Memutuskan apakah PHP dapat mengekspos fakta bahwa itu diinstal pada server372; (misalnya dengan menambahkan tanda tangannya ke header server Web). Bukan keamanan373; ancaman dengan cara apa pun, tetapi memungkinkan untuk menentukan apakah Anda menggunakan PHP374; di server Anda atau tidak.375; http://php.net/expose-php376 expose_php =Off377
[Kembali ke atas]
4 – Konfigurasi Apache2
Kami sekarang siap untuk melanjutkan untuk menyesuaikan konfigurasi layanan web Apache. Hasil akhir untuk Apache adalah ia akan melayani satu situs web dengan beberapa aplikasi web yang berjalan:Webmail (RoundCube) dan Admin Postfix. Semua lalu lintas akan diarahkan ke layanan web HTTPS (aman).
Pertama, kita akan meminimalkan informasi yang ditampilkan Apache kepada publik. Menggunakan nano, kita akan mengedit file konfigurasi /etc/apache2/conf-available/security.conf .
nano /etc/apache2/conf-available/security.conf
Cari variabel konfigurasi ServerTokens dan atur nilainya dari OS ke Prod .
# ServerTokens# Arahan ini mengonfigurasi apa yang Anda kembalikan sebagai respons HTTP Server# Header. Standarnya adalah 'Penuh' yang mengirimkan informasi tentang Tipe-OS# dan dikompilasi dalam modul.# Atur ke salah satu dari:Penuh | OS | Minimal | Kecil | Mayor | Prod# dimana Full menyampaikan informasi paling banyak, dan Prod paling sedikit.#ServerTokens MinimalServerTokens Prod#ServerTokens Full
Sekarang cari variabel konfigurasi ServerSignature dan atur nilainya dari On ke Off .
# Secara opsional tambahkan baris yang berisi versi server dan nama host virtual# ke halaman yang dibuat server (dokumen kesalahan internal, direktori FTP# daftar, mod_status dan keluaran mod_info dll., tetapi bukan dokumen yang dihasilkan # CGI atau dokumen kesalahan khusus) .# Set ke "EMail" untuk juga menyertakan mailto:link ke ServerAdmin.# Set ke salah satu dari:On | Mati | EMailServerSignature Nonaktif#ServerSignature Aktif
Anda sekarang dapat menyimpan dan keluar dari file konfigurasi ini.
Sekarang kita akan mengaktifkan modul tambahan rewrite , dan ssl di Apache sehingga kami dapat mengarahkan lalu lintas HTTP default ke port HTTPS serta mendukung sertifikat SSL di dalam Apache.
a2enmod menulis ulang ssla2ensite default-ssl
Kami sekarang beralih untuk menyesuaikan konfigurasi situs web. File-file ini terletak di direktori /etc/apache2/sites-available . Kami akan memperbarui file konfigurasi default yang ada untuk mendukung layanan SSL.
Pertama, edit file konfigurasi 000-default.conf . Anda dapat mengganti konfigurasi yang ada dengan di bawah ini, cukup ganti ServerName variabel dengan nama host Anda.
nano /etc/apache2/sites-available/000-default.conf
# Direktif ServerName menetapkan skema permintaan, nama host, dan port yang # digunakan server untuk mengidentifikasi dirinya sendiri. Ini digunakan saat membuat # URL pengalihan. Dalam konteks host virtual, ServerName # menentukan nama host apa yang harus muncul di header Host:permintaan agar # cocok dengan host virtual ini. Untuk host virtual default (file ini) nilai # ini tidak menentukan karena digunakan sebagai host pilihan terakhir. # Namun, Anda harus mengaturnya untuk host virtual selanjutnya secara eksplisit. ServerName mail.example.tld DocumentRoot /var/www/html Opsi FollowSymLinks AllowOverride All # Level log yang tersedia:trace8, ..., trace1, debug, info, pemberitahuan, memperingatkan, # kesalahan, kritik, peringatan, muncul. # Dimungkinkan juga untuk mengonfigurasi loglevel untuk # modul tertentu, mis. Info LogLevel ssl:warn ErrorLog ${APACHE_LOG_DIR}/error.log CustomLog ${APACHE_LOG_DIR}/access.log gabungan # Untuk sebagian besar file konfigurasi dari conf-available/, yang # diaktifkan atau dinonaktifkan di tingkat global, dimungkinkan untuk # sertakan satu baris hanya untuk satu host virtual tertentu. Misalnya # baris berikut mengaktifkan konfigurasi CGI untuk host ini saja # setelah dinonaktifkan secara global dengan "a2disconf". #Sertakan conf-available/serve-cgi-bin.conf
Anda sekarang dapat menyimpan dan keluar dari file konfigurasi ini.
Jika Anda belum membeli sertifikat SSL Anda sendiri, file konfigurasi SSL default sistem default-ssl.conf akan bekerja untuk kebutuhan kita. Namun, jika Anda telah membeli sertifikat SSL khusus, Anda perlu mengedit file konfigurasi dan memperbarui variabel SSLCertificateFile , SSLCertificateKeyFile dan SSLCertificateChainFile untuk menunjuk ke lokasi tempat Anda menyimpan sertifikat dan file kunci (konsultasikan otoritas sertifikat atau vendor Anda untuk bantuan konfigurasi tambahan).
Sekarang kita akan membuat .htaccess file konfigurasi yang akan memaksa pengunjung ke server web Anda untuk menggunakan protokol HTTPS (SSL).
nano /var/www/html/.htaccess
Salin dan tempel variabel berikut ke dalam .htaccess konfigurasi.
RewriteEngine OnRewriteCond %{SERVER_PORT} 80RewriteRule ^(.*) https://%{HTTP_HOST}/$1 [L] Variabel konfigurasi ini memberi tahu Apache untuk mengaktifkan mesin mod_rewrite, lalu mengarahkan pengunjung di HTTP (port 80) ke URL HTTPS (port 443).
[Kembali ke atas]
5 – Instal dan Konfigurasi Memcached
Memcached adalah sistem cache objek memori terdistribusi berkinerja tinggi. Paket ini akan membantu mempercepat aplikasi web dinamis, seperti RoundCube dan Postfix Webadmin.
Pertama, mari kita instal paket menggunakan apt-get.
apt-get install memcached
Untuk sistem yang lebih kecil, konfigurasi default biasanya cukup. Ini mengunci akses ke localhost dan memberikan nilai alokasi memori yang cukup. Namun, jika Anda sedang membangun server yang lebih besar yang mungkin akan banyak digunakan, kemungkinan besar Anda ingin mengubah nilai alokasi memori menjadi lebih tinggi dari standar 64M.
File konfigurasi memcached terletak di /etc/memcached.conf .
[Kembali ke atas]
6 – Instal Paket Mailserver
Kami sekarang siap untuk menginstal paket server surat. Sekali lagi, ini terletak di tasksel grup paket.
apt-get install mail-server^
Untuk melihat daftar paket yang termasuk dalam instalasi grup ini, Anda dapat menjalankan yang berikut ini:
tasksel --task-packages mail-server
Selama instalasi paket, Postfix akan menanyakan serangkaian pertanyaan kepada Anda:
- Jenis konfigurasi penginstalan —
Anda dapat memilih “Situs Internet ” sebagai jenis konfigurasi. - Nama host server email —
Pastikan untuk memasukkan nama host yang sama (FQDN) yang Anda gunakan di Langkah #1 - Buat Sertifikat SSL yang ditandatangani sendiri —
Pilih opsi 'Ya' - Siapkan Nama Umum Sertifikat SSL —
Masukkan nama host yang sama (FQDN) yang Anda gunakan di Langkah #1
Sekarang kita akan menginstal sisa paket yang diperlukan untuk server email untuk mendukung pengguna berbasis MySQL serta paket deteksi Spam dan AntiVirus. (Catatan:paket-paket ini dapat diinstal melalui satu apt-get install perintah, dengan setiap nama paket dipisahkan oleh spasi, tetapi disajikan di sini sebagai perintah terpisah untuk kemudahan membaca.)
apt-get install postfix-mysql dovecot-mysql dovecot-imapd postgreyapt-get install amavis clamav clamav-daemon spamassassinapt-get install php5-imap
Kumpulan paket opsional berikutnya ini memperluas kemampuan paket deteksi anti-spam dan antivirus dengan memungkinkan pemeriksaan lebih besar terhadap file terlampir yang masuk ke server email Anda.
apt-get install libnet-dns-perl pyzor razorapt-get install arj bzip2 cabextract file cpio gzip nomarch pax unzip zip
Sekarang, mari kita restart layanan Apache2 sehingga akan melihat modul baru yang telah kita sediakan.
layanan apache2 restart
[Kembali ke atas]
7 – Membuat Database MySQL untuk Server EMail
Kami sekarang siap untuk membuat database untuk akun pengguna kami dan fungsi server email lainnya.
Untuk memulai, kita perlu masuk ke layanan database MySQL sebagai pengguna root. Anda akan memerlukan kata sandi yang pertama kali Anda masukkan di Langkah #2.
mysql -u root -p
Anda sekarang akan melihat prompt baris perintah yang berbeda (mysql> ). Ini adalah konsol MySQL CLI tempat Anda dapat mengelola database dan tabel server MySQL Anda.
Pertama, kita akan membuat database baru bernama "mail", dan kemudian kita akan membuat akun pengguna sistem dengan izin penuh ke database baru ini. Pastikan untuk mengganti <secure password> variabel dengan kata sandi aman *baru* lainnya untuk akun ini. Jangan gunakan sandi yang sama dengan yang Anda gunakan untuk akun pengguna root .
buat database mail;berikan semua pada email.* ke 'mail'@'localhost' diidentifikasi dengan '';flush privileges;exit;
Kami sekarang telah menyiapkan database yang akan digunakan oleh layanan server email Anda.
[Kembali ke atas]
8.1 – Menginstal Admin Postfix
Postfix Admin adalah alat manajemen berbasis web yang dibuat untuk Postfix. Ini adalah aplikasi berbasis PHP yang menangani domain virtual gaya Postfix dan pengguna yang disimpan di MySQL atau PostgreSQL.
Pertama, kita perlu mengunduh rilis aplikasi terbaru. Contoh ini akan mengunduh versi 2.92–selalu periksa versi di situs web penyedia untuk memastikan Anda mendapatkan rilis terbaru .
cd /tmpwget http://downloads.sourceforge.net/project/postfixadmin/postfixadmin/postfixadmin-2.92/postfixadmin-2.92.tar.gz
Sekarang kita akan mengekstrak aplikasi dan menyalinnya ke direktori HTML /var/www/html/postfixadmin di server kami.
tar -xvf postfixadmin-2.92.tar.gzcp -r postfixadmin-2.92/ /var/www/html/postfixadmin
Sekarang kita perlu memperbarui izin folder baru ini sehingga www-data akun pengguna memiliki akses ke sana.
chown -R www-data:www-data /var/www/html/postfixadmin
[Kembali ke atas]
8.2 – Konfigurasi Admin Postfix
Kami sekarang memiliki beberapa konfigurasi untuk diperbarui di file Admin Postfix. Pertama, kita akan memodifikasi config.inc.php file sehingga tahu bagaimana berkomunikasi dengan database yang baru saja kita buat di Langkah #7.
nano /var/www/html/postfixadmin/config.inc.php
Cari variabel 'configured' dan atur ulang nilainya dari false untuk true .
$CONF['configured'] =true;
Sekarang cari variabel 'database_' dan ganti nilai untuk konfigurasi server MySQL Anda. Pastikan untuk mengganti variabel <your secure password> dengan kata sandi untuk "mail" pengguna database yang Anda masukkan pada Langkah #7.
$CONF['database_type'] ='mysqli';$CONF['database_host'] ='localhost';$CONF['database_user'] ='mail';$CONF['database_password'] ='';$CONF['database_name'] ='mail';
Sekarang cari variabel 'admin_email' dan ganti nilainya dengan alamat email yang akan Anda siapkan untuk akun email administrator Anda.
$CONF['admin_email'] ='contoh@unixlinux.online';
Sekarang cari variabel 'domain_path' dan ganti nilainya dari ‘YES ‘ menjadi ‘NO ‘.
$CONF['domain_path'] ='TIDAK';
Sekarang cari variabel 'domain_in_mailbox' dan ganti nilainya dari ‘NO ‘ ke ‘YES ‘.
$CONF['domain_in_mailbox'] ='YA';
Variabel konfigurasi terakhir ini tidak menentukan jalur ke mana data kotak surat pengguna yang sebenarnya akan disimpan di server. Ini akan ditentukan nanti selama langkah-langkah konfigurasi Dovecot.
Anda sekarang siap untuk menyimpan file konfigurasi, tetapi jangan keluar dulu!
Kita sekarang akan membuka web browser masukkan URL mail server anda, arahkan langsung ke setup.php halaman konfigurasi. Pastikan untuk mengganti mail.example.tld dengan nama host server asli Anda.
http://mail.example.tld/postfixadmin/setup.php
Saat Anda mengakses URL, skrip akan secara otomatis memeriksa server dan mengonfirmasi bahwa semua modul prasyarat telah diinstal dan berfungsi.
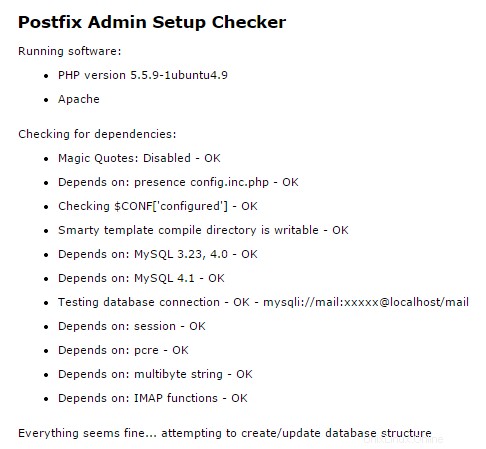
Output pemeriksa penyiapan Admin Postfix
Setelah pemeriksaan selesai, Anda akan diminta untuk memasukkan kata sandi pengaturan. Kata sandi ini digunakan untuk membuat akun admin master untuk antarmuka web Admin Postfix.
Masukkan kata sandi yang aman dan tekan tombol “Buat Kata Sandi Hash”.
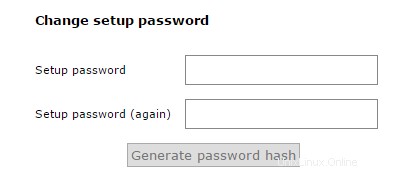 Admin Postfix membuat hash sandi

Contoh hash sandi Admin Postfix
JANGAN tutup browser web dulu! Kami akan kembali ke sini dalam beberapa menit.
Setelah membuat hash kata sandi, kita perlu memperbarui config.inc.php file lagi dengan kata sandi ini. Cari variabel 'setup_password' dan ganti nilainya dengan yang dihasilkan dari skrip.
// Untuk mengatur Postfixadmin, Anda HARUS menentukan kata sandi hash di sini.// Untuk membuat hash, kunjungi setup.php di browser dan ketik kata sandi ke dalam bidang,// saat pengiriman kata sandi akan digemakan kepada Anda sebagai nilai hash.$CONF['setup_password'] ='';
Anda sekarang dapat menyimpan dan keluar dari file konfigurasi.
Kami sekarang siap untuk kembali ke browser web dan membuat akun "admin super" untuk portal Admin Postfix.
Ketika Anda mengklik tombol 'Buat Kata Sandi Hash', bidang formulir berubah menjadi seperti contoh di bawah ini. Sekarang Anda dapat mengisi formulir untuk membuat akun admin super.
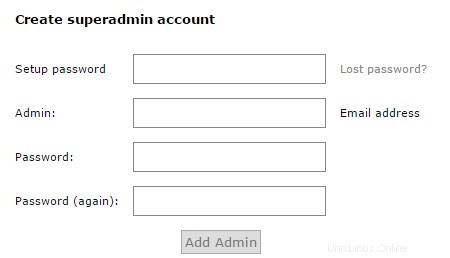
Membuat akun superadmin dengan Admin Postfix
[Kembali ke atas]
9 – Menambahkan Akun Pengguna (kotak surat) ke Admin Postfix
Kami sekarang siap untuk membuat akun pengguna virtual di server email kami. Untuk melakukan ini, kami akan kembali ke URL Admin Postfix di browser web kami dan memasukkan URL server email Anda. Pastikan untuk mengganti mail.example.tld dengan nama host server asli Anda.
https://mail.example.tld/postfixadmin/
Sekarang Anda akan dapat masuk ke portal Admin Postfix di mana Anda dapat mengelola domain virtual dan akun pengguna virtual. Masukkan username dan password super admin yang Anda buat di atas selama konfigurasi Admin Postfix, lalu tekan tombol “Login”.
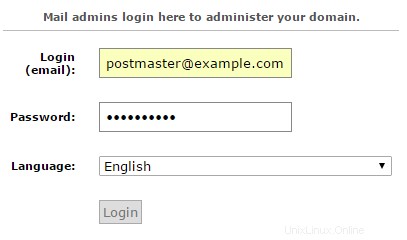
Login admin untuk Admin Postfix
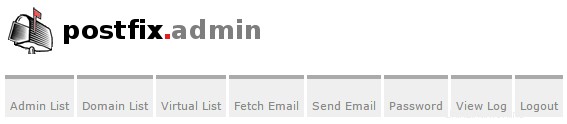
Setelah Anda masuk ke portal Admin Postfix, Anda akan melihat menu di bagian atas halaman.
Opsi menu menyediakan kemampuan untuk mengelola domain dan pengguna virtual server email Postfix Anda dan untuk melihat file log.
Menu Admin Postfix
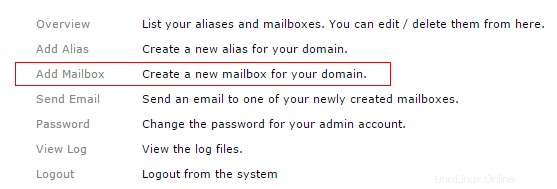
Admin Postfix Tambahkan opsi Kotak Surat
Untuk membuat kotak surat pengguna, klik tautan cepat “Tambah Kotak Surat”. Anda sekarang akan dibawa ke layar "Add Mailbox Wizard". Isi detail di formulir dan tekan tombol “Tambah Kotak Surat” setelah selesai. Wizard akan membuat akun pengguna virtual (kotak surat) pertama Anda.
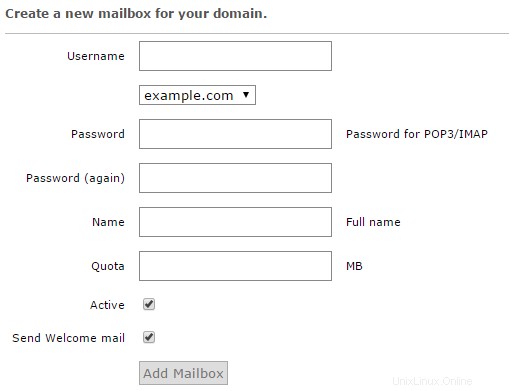
Membuat kotak surat baru di Admin Postfix
[Kembali ke atas]
10 – Buat Pengguna Sistem Untuk Menangani Direktori Surat Virtual
Pengguna virtual adalah mereka yang secara teknis tidak ada di server Linux Anda, dan mereka tidak menggunakan metode standar Linux untuk otentikasi atau pengiriman dan penyimpanan email. Akun pengguna virtual server email Anda ditentukan dalam database yang dibuat oleh Admin Postfix daripada yang ada sebagai akun pengguna sistem. Jadi kita harus membuat akun pengguna sistem tunggal yang akan menangani layanan seperti penyimpanan email dan otentikasi Dovecot.
Pertama, mari kita buat akun pengguna sistem bernama vmail dan berikan izin ke direktori yang diperlukan. Akun sistem ini akan bertanggung jawab atas operasi backend untuk penyimpanan dan layanan kotak surat.
useradd -r -u 150 -g mail -d /var/vmail -s /sbin/nologin -c "Virtual MailDir Handler" vmailmkdir -p /var/vmailchown vmail:mail /var/vmailchmod 770 /var/vmail
Penjelasan dari perintah di atas:
- Kami membuat akun pengguna sistem
vmail, menetapkan direktori home sebagai/var/vmail, dan membatasi kemampuan akun ini untuk masuk melalui shell atau konsol. - Kami kemudian secara manual membuat direktori home
/var/vmailuntuk akun pengguna sistem baru. - Kami kemudian menetapkan pemilik dan grup untuk
/var/vmaildirektori. - Kami kemudian memberikan izin penuh kepada pengguna sistem
vmaildan grup keamananmailditugaskan ke direktori/var/vmail.
[Kembali ke atas]
11 – Mengonfigurasi Dovecot
Dovecot adalah server email IMAP dan POP3 open-source yang ditulis dengan mempertimbangkan keamanan. Dovecot memiliki banyak fitur bawaan, yang dapat Anda lihat di situs web publik mereka, http://www.dovecot.org.
Dovecot akan bertanggung jawab untuk mengelola koneksi IMAP dan POP3, mengelola direktori surat lokal, dan menerima surat masuk yang diserahkan dari proses server surat SMTP Postfix. Dovecot juga akan mengelola otentikasi untuk koneksi SMTP. Banyak file berbeda di dalam /etc/dovecot direktori menangani konfigurasi Dovecot.
Pertama, mari kita konfigurasikan Dovecot untuk menggunakan database yang diatur oleh Admin Postfix. Kita edit dulu file konfigurasi /etc/dovecot/conf.d/auth-sql.conf.ext
nano /etc/dovecot/conf.d/auth-sql.conf.ext
Edit atau perbarui konten untuk memiliki konfigurasi berikut.
# Cari kata sandi pengguna dari database SQL seperti# didefinisikan dalam /etc/dovecot/dovecot-sql.conf.extpassdb { driver =sql args =/etc/dovecot/dovecot-sql.conf.ext}# Cari informasi pengguna dari database SQL sebagaimana# didefinisikan dalam /etc/dovecot/dovecot-sql.conf.extuserdb { driver =sql args =/etc/dovecot/dovecot-sql.conf.ext} Setelah selesai, simpan dan keluar dari file konfigurasi.
File Konfigurasi SQL
Sekarang kita akan membuat cadangan file konfigurasi SQL asli /etc/dovecot/dovecot-sql.conf.ext dan buat file konfigurasi baru untuk digunakan Dovecot.
mv /etc/dovecot/dovecot-sql.conf.ext /etc/dovecot/dovecot-sql.conf.ext.originalnano /etc/dovecot/dovecot-sql.conf.ext
Sekarang salin konten di bawah ini ke dalam file konfigurasi dan perbarui nilai untuk database email yang Anda siapkan di Langkah 7.
# Driver database:mysql, pgsql, sqlitedriver =mysql# Koneksi Database:# connect =host=192.168.1.1 dbname=users# connect =host=sql.example.com dbname=virtual user=virtual password=blarg# connect =/etc/dovecot/authdb.sqlite#connect =host=localhost dbname=mail user=mail password=# Skema password default.## Daftar skema yang didukung ada di# http://wiki2.dovecot. org/Authentication/PasswordSchemes## Skema enkripsi yang lemah tetapi umum:default_pass_scheme =MD5-CRYPT# # Beri komentar di atas dan batalkan komentar di bawah # untuk enkripsi yang lebih kuat:#default_pass_scheme - SHA256-CRYPT# Tentukan kueri untuk mendapatkan kata sandi pengguna.password_query =\ PILIH nama pengguna sebagai pengguna, kata sandi, '/var/vmail/%d/%n' sebagai userdb_home, \ 'maildir:/var/vmail/%d/%n' sebagai userdb_mail, 150 sebagai userdb_uid, 8 sebagai userdb_gid \ FROM mailbox WHERE username ='%u' AND active ='1'# Tentukan query untuk mendapatkan informasi pengguna.user_query =\ SELECT '/var/vmail/%d/%n' sebagai home, 'maildir:/var/vmail/ %d /%n' sebagai mail, \ 150 AS uid, 8 AS gid, concat('dirsize:storage=', quota) AS quota \ FROM mailbox WHERE username ='%u' AND active ='1'
Setelah selesai, simpan dan keluar dari file konfigurasi ini.
File Definisi Otentikasi
Sekarang kita akan membuat cadangan file definisi otentikasi /etc/dovecot/conf.d/10-auth.conf dan buat yang baru.
mv /etc/dovecot/conf.d/10-auth.conf /etc/dovecot/conf.d/10-auth.conf.originalnano /etc/dovecot/conf.d/10-auth.confSekarang salin konten di bawah ini ke dalam file definisi.
# Nonaktifkan perintah LOGIN dan semua otentikasi plaintext lainnya kecuali# SSL/TLS digunakan (kemampuan LOGINDISABLED). Perhatikan bahwa jika IP jarak jauh# cocok dengan IP lokal (mis. Anda tersambung dari komputer yang sama),# sambungan dianggap aman dan otentikasi teks biasa diizinkan.disable_plaintext_auth =yes# Daftar mekanisme otentikasi yang diinginkan yang dipisahkan spasi:# polos login digest-md5 cram-md5 ntlm rpa apop anonymous gssapi otp skey# gss-spnego# CATATAN:Lihat juga disable_plaintext_auth setting.auth_mechanisms =plain login#### Kata sandi dan basis data pengguna## ## Basis data kata sandi digunakan untuk memverifikasi kata sandi pengguna (dan tidak lebih).# Anda dapat memiliki banyak passdbs dan userdbs. Ini berguna jika Anda ingin# mengizinkan pengguna sistem (/etc/passwd) dan pengguna virtual untuk login tanpa# menduplikasi pengguna sistem ke dalam basis data virtual.#### Basis data pengguna menentukan di mana mail berada dan ID pengguna/grup # apa yang memilikinya. Untuk konfigurasi single-UID gunakan "static" userdb.## # Gunakan konfigurasi database SQL daripada yang lain.!include auth-sql.conf.ext Setelah selesai, simpan dan keluar dari file.
File Definisi Email
Selanjutnya, kami akan memberi tahu Dovecot tempat menyimpan email pengguna virtual. Kami akan mencadangkan file definisi surat
/etc/dovecot/conf.d/10-mail.confdan membuat yang baru.mv /etc/dovecot/conf.d/10-mail.conf /etc/dovecot/conf.d/10-mail.conf.originalnano /etc/dovecot/conf.d/10-mail.confSekarang salin konten di bawah ini ke dalam file definisi.
# Lokasi untuk kotak surat pengguna. Standarnya kosong, yang berarti Dovecot# mencoba menemukan kotak surat secara otomatis. Ini tidak akan berfungsi jika pengguna# belum memiliki email apa pun, jadi Anda harus secara eksplisit memberi tahu Dovecot lokasi# lengkapnya.## Jika Anda menggunakan mbox, berikan jalur ke file INBOX (mis. /var/ mail/%u)# tidak cukup. Anda juga harus memberi tahu Dovecot di mana kotak surat lainnya# disimpan. Ini disebut "direktori email root", dan itu harus menjadi# jalur pertama yang diberikan dalam pengaturan lokasi_mail.## Ada beberapa variabel khusus yang dapat Anda gunakan, misalnya:## %u - nama pengguna# %n - pengguna bagian di example@unixlinux.online, sama seperti %u jika tidak ada domain# %d - bagian domain di example@unixlinux.online, kosongkan jika tidak ada domain# %h - direktori home## Lihat doc/wiki/Variables.txt untuk daftar lengkap. Beberapa contoh:## mail_location =maildir:~/Maildir# mail_location =mbox:~/mail:INBOX=/var/mail/%u# mail_location =mbox:/var/mail/%d/%1n/%n:INDEX =/var/indexes/%d/%1n/%n###mail_location =maildir:/var/vmail/%d/%n# Pengguna sistem dan grup yang digunakan untuk mengakses email. Jika Anda menggunakan beberapa, userdb# dapat menimpanya dengan mengembalikan bidang uid atau gid. Anda dapat menggunakan nomor# atau nama. mail_uid =vmailmail_gid =mail# Rentang UID yang valid untuk pengguna, default 500 ke atas. Ini sebagian besar# untuk memastikan bahwa pengguna tidak dapat masuk sebagai daemon atau pengguna sistem lain.# Perhatikan bahwa menolak login root di-hardcode ke biner dovecot dan tidak dapat# dilakukan bahkan jika first_valid_uid disetel ke 0.## Gunakan uid pengguna vmail di sini.first_valid_uid =150last_valid_uid =150# Jika Anda perlu mengatur beberapa lokasi kotak surat atau ingin mengubah pengaturan default# namespace, Anda dapat melakukannya dengan mendefinisikan bagian namespace.## Anda dapat memiliki ruang nama pribadi, bersama, dan publik. Ruang nama pribadi# adalah untuk email pribadi pengguna. Ruang nama bersama adalah untuk mengakses # kotak surat pengguna lain yang telah dibagikan. Ruang nama publik adalah untuk # kotak surat bersama yang dikelola oleh sysadmin. Jika Anda membuat # ruang nama bersama atau publik, Anda biasanya ingin mengaktifkan plugin ACL juga, jika tidak semua# pengguna dapat mengakses semua kotak surat bersama, dengan asumsi mereka memiliki izin# pada tingkat sistem file untuk melakukannya. Kotak masuk namespace { # Namespace type:private, shared atau public #type =private # Pemisah hierarki untuk digunakan. Anda harus menggunakan pemisah yang sama untuk semua # ruang nama atau beberapa klien menjadi bingung. '/' biasanya bagus. # Namun defaultnya tergantung pada format penyimpanan email yang mendasarinya. #separator =# Awalan diperlukan untuk mengakses namespace ini. Ini harus berbeda untuk # semua ruang nama. Misalnya "Publik/". #prefix =# Lokasi fisik kotak surat. Ini dalam format yang sama dengan # mail_location, yang juga merupakan default untuk itu. #location =# Hanya boleh ada satu INBOX, dan pengaturan ini menentukan namespace # mana yang memilikinya. inbox =yes # If namespace is hidden, it's not advertised to clients via NAMESPACE # extension. You'll most likely also want to set list=no. This is mostly # useful when converting from another server with different namespaces which # you want to deprecate but still keep working. For example you can create # hidden namespaces with prefixes "~/mail/", "~%u/mail/" and "mail/". #hidden =no # Show the mailboxes under this namespace with LIST command. This makes the # namespace visible for clients that don't support NAMESPACE extension. # "children" value lists child mailboxes, but hides the namespace prefix. #list =yes # Namespace handles its own subscriptions. If set to "no", the parent # namespace handles them (empty prefix should always have this as "yes") #subscriptions =yes} Once done, save and exit the file.
SSL Definition File
If you have an SSL certificate that you would like to install, you will need to modify the Dovecot SSL definition file
/etc/dovecot/conf.d/10-ssl.confwith your valid certificate. Remember, you will have to also include your CA certificate bundle if one has been provided by the certificate issuer.Dovecot Master Definition File
We are now going to update the Dovecot master definition file
/etc/dovecot/10-master.confto include the system user account and the postfix settings.nano /etc/dovecot/conf.d/10-master.confSearch for the config definition
service authand replace the definition block with the following.service auth { # auth_socket_path points to this userdb socket by default. It's typically # used by dovecot-lda, doveadm, possibly imap process, etc. Users that have # full permissions to this socket are able to get a list of all usernames and # get the results of everyone's userdb lookups. # # The default 0666 mode allows anyone to connect to the socket, but the # userdb lookups will succeed only if the userdb returns an "uid" field that # matches the caller process's UID. Also if caller's uid or gid matches the # socket's uid or gid the lookup succeeds. Anything else causes a failure. # # To give the caller full permissions to lookup all users, set the mode to # something else than 0666 and Dovecot lets the kernel enforce the # permissions (e.g. 0777 allows everyone full permissions). unix_listener auth-userdb { mode =0600 user =vmail group =mail } # Postfix smtp-auth unix_listener /var/spool/postfix/private/auth { mode =0660 # Assuming the default Postfix userid and groupid user =postfix group =postfix } }Once done, save and exit the file.
LDA Definition File
In some cases, you may have to explicitly define the postmaster email address for your server. To do this, you will need to edit the LDA definition file
/etc/dovecot/conf.d/15-lda.conf. If you see errors messages likeInvalid settings: postmaster_address setting not givenshowing up in the mail server logs, then this configuration change is the likely fix for that error.nano /etc/dovecot/conf.d/15-lda.confSearch for the definition
postmaster_addressand update the value to include your domain’s postmaster account.# Alamat yang digunakan saat mengirim email penolakan.# Defaultnya adalah example@unixlinux.online. %d expands to recipient domain.#postmaster_address =postmaster_address =example@unixlinux.online Once done, save and exit the file.
We now need to update the Dovecot configuration directory to be accessible to the Dovecot service account as well as the vmail system account.
chown -R vmail:dovecot /etc/dovecotchmod -R o-rwx /etc/dovecotYou have now completed the configuration of the Dovecot service and we can now move on to the antivirus and anti-spam services.
[Back to top]12 – Configuring Amavis, ClamAV, and SpamAssassin
What are these packages ?
– Amavis is an interface between Postfix and content filtering packages such as SpamAssassin and ClamAV.
– ClamAV is a high-performance antivirus engine for detecting trojans, viruses, malware &other malicious threats.
– SpamAssassin is a high-performance anti-spam platform famous for its Bayesian spam filtering capabilities. It gives system administrators a filter to classify messages and block unsolicited bulk email.
We will now walk you through the process of installing some protection for your mail server. For the most part, the default configurations are sufficient for a good line of defense against spam and viruses getting through your mail server. If you have special requirements, you can, of course, spend a good amount of time crafting intricate processing rules.
Let’s first create the two system user accounts, amavis and clamav, and allow them to collaborate together.
adduser clamav amavisadduser amavis clamavWe are now going to enable the Amavis daemon by editing the
/etc/amavis/conf.d/15-content_filter_modefile konfigurasi.nano /etc/amavis/conf.d/15-content_filter_modeuse strict; # You can modify this file to re-enable SPAM checking through spamassassin# and to re-enable antivirus checking. ## Default antivirus checking mode# Please note, that anti-virus checking is DISABLED by# default.# If You wish to enable it, please uncomment the following lines:@bypass_virus_checks_maps =( %bypass_virus_checks, @bypass_virus_checks_acl, $bypass_virus_checks_re); ## Default SPAM checking mode# Please note, that anti-spam checking is DISABLED by# default.# If You wish to enable it, please uncomment the following lines:@bypass_spam_checks_maps =( %bypass_spam_checks, @bypass_spam_checks_acl, $bypass_spam_checks_re); 1; # ensure a defined returnOnce done, you can save and exit the file.
We are now going to enable the SpamAssassin software by editing the
/etc/default/spamassassinfile konfigurasi.nano /etc/default/spamassassinFirst, locate the variable
ENABLED=0in the configuration file and change the value to 1.# Change to one to enable spamdENABLED=1Now search for the variable
CRON=0in the configuration file and change the value to 1.# Cronjob# Set to anything but 0 to enable the cron job to automatically update# spamassassin's rules on a nightly basisCRON=1We are now going to set up Amavis to use the database from Postfix Admin to identify mail that is arriving for local delivery. By default, SpamAssassin and Amavis will only check mail that is determined to be arriving for local delivery. Because we are set up to use virtual user mailboxes, we have to tell the services where to locate the user accounts.
To do this, we need to update the configuration file
/etc/amavis/conf.d/50-user.nano /etc/amavis/conf.d/50-userReplace the contents of this configuration file with the below. Be sure to update the MySQL database password to use the password for the database user “mail” that you entered in Step #7.
use strict; ## Place your configuration directives here. They will override those in# earlier files.## See /usr/share/doc/amavisd-new/ for documentation and examples of# the directives you can use in this file# # Three concurrent processes. This should fit into the RAM available on an# AWS micro instance. This has to match the number of processes specified# for Amavis in /etc/postfix/master.cf.$max_servers =3; # Add spam info headers if at or above that level - this ensures they# are always added.$sa_tag_level_deflt =-9999; # Check the database to see if mail is for local delivery, and thus# should be spam checked.@lookup_sql_dsn =( ['DBI:mysql:database=mail;host=127.0.0.1;port=3306', 'mail', '']);$sql_select_policy ='SELECT domain from domain WHERE CONCAT("@",domain) IN (%k)'; # Uncomment to bump up the log level when testing.# $log_level =2; #------------ Do not modify anything below this line -------------1; # ensure a defined return Once done, save and exit the configuration file.
We will now need to restart the Amavis and SpamAssassin services so that they see the new configuration settings.
service amavis restartservices spamassassin restart[Back to top]
13 – Configuring Postfix
We are now ready to configure the Postfix mail server. Postfix handles all of the incoming and outgoing mail via the SMTP protocol, and we are going to configure it to integrate will all of the other software packages that we have just configured.
From a high level view, we are needing Postfix to hand off incoming mail to the SpamAssassin and ClamAV scanners for filtering, and then to pass unblocked mail messages on to the Dovecot services for final mailbox delivery. Postfix will also authenticate the virtual users who connect via SMTP in order to send email messages.
We are going to create a definition file for Postfix to identify users and mailboxes. Please note that the “hosts” directive in these configuration files must be exactly the same as the “bind-address” in the
/etc/mysql/my.cnffile konfigurasi.First, let’s look up the value of the bind-address in the MySQL configuration files.
cat /etc/mysql/my.cnf | grep bind-address<Now that we have the configuration value, we are going to create the required Postfix definition files.
Copy and paste the content for each file. Make sure to update the password value with the password for the database user “mail” that you entered in Step #7.
/etc/postfix/mysql_virtual_alias_domainaliases_maps.cf
nano /etc/postfix/mysql_virtual_alias_domainaliases_maps.cfuser =mail password =hosts =127.0.0.1 dbname =mail query =SELECT goto FROM alias,alias_domain WHERE alias_domain.alias_domain ='%d' AND alias.address=concat('%u', '@', alias_domain.target_domain) AND alias.active =1 Once done, save and exit the configuration file.
/etc/postfix/mysql_virtual_alias_maps.cf
nano /etc/postfix/mysql_virtual_alias_maps.cfuser =mailpassword =hosts =127.0.0.1dbname =mailtable =aliasselect_field =gotowhere_field =addressadditional_conditions =and active ='1' Once done, save and exit the configuration file.
/etc/postfix/mysql_virtual_domains_maps.cf
nano /etc/postfix/mysql_virtual_domains_maps.cfuser =mailpassword =hosts =127.0.0.1dbname =mailtable =domainselect_field =domainwhere_field =domainadditional_conditions =and backupmx ='0' and active ='1' Once done, save and exit the configuration file.
/etc/postfix/mysql_virtual_mailbox_domainaliases_maps.cf
nano /etc/postfix/mysql_virtual_mailbox_domainaliases_maps.cfuser =mailpassword =hosts =127.0.0.1dbname =mailquery =SELECT maildir FROM mailbox, alias_domain WHERE alias_domain.alias_domain ='%d' AND mailbox.username=concat('%u', '@', alias_domain.target_domain ) AND mailbox.active =1 Once done, save and exit the configuration file.
/etc/postfix/mysql_virtual_mailbox_maps.cf
nano /etc/postfix/mysql_virtual_mailbox_maps.cfuser =mailpassword =hosts =127.0.0.1dbname =mailtable =mailboxselect_field =CONCAT(domain, '/', local_part)where_field =usernameadditional_conditions =and active ='1' Once done, save and exit the configuration file.
We are now going to create the Postfix header-checking directives. These directives remove certain headers when relaying mail through the system. This helps improve privacy for sending users by removing specific headers like origin IP Address and the mail software identifiers. Copy and paste the below content into the file.
nano /etc/postfix/header_checks/^Received:/ IGNORE/^User-Agent:/ IGNORE/^X-Mailer:/ IGNORE/^X-Originating-IP:/ IGNORE/^x-cr-[a-z]*:/ IGNORE/^Thread-Index:/ IGNOREOnce done, save and exit.
We are now ready to make some changes to the system default Postfix
/etc/postfix/main.cffile konfigurasi.This file contains a large amount of complex choices and options for a Postfix server installation. It is far beyond the scope of this article to explain every option or best practice available, so we strongly suggest that you read through the Postfix configuration options
/usr/share/postfix/main.cf.distor the software vendor online manual. O’Reilly has also published a very good book named Postfix:The Definitive Guide .First, we are going to create a backup of the original
main.cfconfiguration file and then create a new copy of the file.mv /etc/postfix/main.cf /etc/postfix/main.cf.originalnano /etc/postfix/main.cfNow, copy the below content into the
/etc/postfix/main.cffile konfigurasi.# See /usr/share/postfix/main.cf.dist for a commented, more complete version # The first text sent to a connecting process.smtpd_banner =$myhostname ESMTP $mail_namebiff =no# appending .domain is the MUA's job.append_dot_mydomain =noreadme_directory =no # SASL parameters# ---------------------------------# Use Dovecot to authenticate.smtpd_sasl_type =dovecot# Referring to /var/spool/postfix/private/authsmtpd_sasl_path =private/authsmtpd_sasl_auth_enable =yesbroken_sasl_auth_clients =yessmtpd_sasl_security_options =noanonymoussmtpd_sasl_local_domain =smtpd_sasl_authenticated_header =yes # TLS parameters# --------------------------------- # Replace this with your SSL certificate path if you are using one.smtpd_tls_cert_file=/etc/ssl/certs/ssl-cert-snakeoil.pemsmtpd_tls_key_file=/etc/ssl/private/ssl-cert-snakeoil.key# The snakeoil self-signed certificate has no need for a CA file. But# if you are using your own SSL certificate, then you probably have# a CA certificate bundle from your provider. The path to that goes# here.#smtpd_tls_CAfile=/path/to/ca/file smtp_tls_note_starttls_offer =yessmtpd_tls_loglevel =1smtpd_tls_received_header =yessmtpd_tls_session_cache_timeout =3600stls_random_source =dev:/dev/urandom#smtpd_tls_session_cache_database =btree:${data_directory}/smtpd_scache#smtp_tls_session_cache_database =btree:${data_directory}/smtp_scache # Note that forcing use of TLS is going to cause breakage - most mail servers# don't offer it and so delivery will fail, both incoming and outgoing. This is# unfortunate given what various governmental agencies are up to these days. # These are Postfix 2.2 only.## Enable (but don't force) use of TLS on incoming smtp connections.smtpd_use_tls =yessmtpd_enforce_tls =no# Enable (but don't force) use of TLS on outgoing smtp connections.smtp_use_tls =yessmtp_enforce_tls =no # These are Postfix 2.3 and later.## Enable (but don't force) all incoming smtp connections to use TLS.smtpd_tls_security_level =may# Enable (but don't force) all outgoing smtp connections to use TLS.smtp_tls_security_level =may # See /usr/share/doc/postfix/TLS_README.gz in the postfix-doc package for# information on enabling SSL in the smtp client. # SMTPD parameters# --------------------------------- # Uncomment the next line to generate "delayed mail" warnings#delay_warning_time =4h# will it be a permanent error or temporaryunknown_local_recipient_reject_code =450# how long to keep message on queue before return as failed.# some have 3 days, I have 16 days as I am backup server for some people# whom go on holiday with their server switched off.maximal_queue_lifetime =7d# max and min time in seconds between retries if connection failedminimal_backoff_time =1000smaximal_backoff_time =8000s# how long to wait when servers connect before receiving rest of datasmtp_helo_timeout =60s# how many address can be used in one message.# effective stopper to mass spammers, accidental copy in whole address list# but may restrict intentional mail shots.smtpd_recipient_limit =16# how many error before back off.smtpd_soft_error_limit =3# how many max errors before blocking it.smtpd_hard_error_limit =12 # This next set are important for determining who can send mail and relay mail# to other servers. It is very important to get this right - accidentally producing# an open relay that allows unauthenticated sending of mail is a Very Bad Thing.## You are encouraged to read up on what exactly each of these options accomplish. # Requirements for the HELO statementsmtpd_helo_restrictions =permit_mynetworks, warn_if_reject reject_non_fqdn_hostname, reject_invalid_hostname, permit# Requirements for the sender detailssmtpd_sender_restrictions =permit_sasl_authenticated, permit_mynetworks, warn_if_reject reject_non_fqdn_sender, reject_unknown_sender_domain, reject_unauth_pipelining, permit# Requirements for the connecting server# This is primarily the RBL (Realtime Blacklist) Filteringsmtpd_client_restrictions =reject_rbl_client b.barracudacentral.org, reject_rbl_client zen.spamhaus.org, reject_rbl_client spam.dnsbl.sorbs.net# Requirement for the recipient address. Note that the entry for# "check_policy_service inet:127.0.0.1:10023" enables Postgrey.smtpd_recipient_restrictions =reject_unauth_pipelining, permit_mynetworks, permit_sasl_authenticated, reject_non_fqdn_recipient, reject_unknown_recipient_domain, reject_unauth_destination, check_policy_service inet:127.0.0.1:10023, permitsmtpd_data_restrictions =reject_unauth_pipelining# This is a new option as of Postfix 2.10+, and is required in addition to# smtpd_recipient_restrictions for things to work properly in this setup.smtpd_relay_restrictions =reject_unauth_pipelining, permit_mynetworks, permit_sasl_authenticated, reject_non_fqdn_recipient, reject_unknown_recipient_domain, reject_unauth_destination, check_policy_service inet:127.0.0.1:10023, permit # require proper helo at connectionssmtpd_helo_required =yes# waste spammers time before rejecting themsmtpd_delay_reject =yesdisable_vrfy_command =yes # General host and delivery info# ---------------------------------- myhostname =mail.example.commyorigin =/etc/hostname# Some people see issues when setting mydestination explicitly to the server# subdomain, while leaving it empty generally doesn't hurt. So it is left empty here.# mydestination =mail.example.com, localhostmydestination =# If you have a separate web server that sends outgoing mail through this# mailserver, you may want to add its IP address to the space-delimited list in# mynetworks, e.g. as 111.222.333.444/32.mynetworks =127.0.0.0/8 [::ffff:127.0.0.0]/104 [::1]/128mailbox_size_limit =0recipient_delimiter =+inet_interfaces =allmynetworks_style =host # This specifies where the virtual mailbox folders will be located.virtual_mailbox_base =/var/vmail# This is for the mailbox location for each user. The domainaliases# map allows us to make use of Postfix Admin's domain alias feature.virtual_mailbox_maps =mysql:/etc/postfix/mysql_virtual_mailbox_maps.cf, mysql:/etc/postfix/mysql_virtual_mailbox_domainaliases_maps.cf# and their user idvirtual_uid_maps =static:150# and group idvirtual_gid_maps =static:8# This is for aliases. The domainaliases map allows us to make# use of Postfix Admin's domain alias feature.virtual_alias_maps =mysql:/etc/postfix/mysql_virtual_alias_maps.cf, mysql:/etc/postfix/mysql_virtual_alias_domainaliases_maps.cf# This is for domain lookups.virtual_mailbox_domains =mysql:/etc/postfix/mysql_virtual_domains_maps.cf # Integration with other packages# --------------------------------------- # Tell postfix to hand off mail to the definition for dovecot in master.cfvirtual_transport =dovecotdovecot_destination_recipient_limit =1 # Use amavis for virus and spam scanningcontent_filter =amavis:[127.0.0.1]:10024 # Header manipulation# -------------------------------------- # Getting rid of unwanted headers. See:https://posluns.com/guides/header-removal/header_checks =regexp:/etc/postfix/header_checks# getting rid of x-original-toenable_original_recipient =noOnce done, save and exit.
We are now ready to move on to the Postfix
/etc/postfix/master.cfconfiguration file. This configuration file also contains a large amount of complex choices and options for a Postfix server installation that is far beyond the scope of this article to explain.We are going to create a backup of the original
master.cfconfiguration file and then create a new file.mv /etc/postfix/master.cf /etc/postfix/master.cf.originalnano /etc/postfix/master.cfNow, copy the below content into the
/etc/postfix/master.cffile konfigurasi.## Postfix master process configuration file. For details on the format# of the file, see the master(5) manual page (command:"man 5 master").## Do not forget to execute "postfix reload" after editing this file.## ==========================================================================# service type private unpriv chroot wakeup maxproc command + args# (yes) (yes) (yes) (never) (100)# ==========================================================================# SMTP on port 25, unencrypted.smtp inet n - - - - smtpd#smtp inet n - - - 1 postscreen#smtpd pass - - - - - smtpd#dnsblog unix - - - - 0 dnsblog#tlsproxy unix - - - - 0 tlsproxy # SMTP with TLS on port 587.submission inet n - - - - smtpd -o syslog_name=postfix/submission -o smtpd_tls_security_level=encrypt -o smtpd_sasl_auth_enable=yes -o smtpd_enforce_tls=yes -o smtpd_client_restrictions=permit_sasl_authenticated,reject_unauth_destination,reject -o smtpd_sasl_tls_security_options=noanonymous # SMTP over SSL on port 465.smtps inet n - - - - smtpd -o syslog_name=postfix/smtps -o smtpd_tls_wrappermode=yes -o smtpd_sasl_auth_enable=yes -o smtpd_tls_auth_only=yes -o smtpd_client_restrictions=permit_sasl_authenticated,reject_unauth_destination,reject -o smtpd_sasl_security_options=noanonymous,noplaintext -o smtpd_sasl_tls_security_options=noanonymous #628 inet n - - - - qmqpdpickup fifo n - - 60 1 pickup -o content_filter=-o receive_override_options=no_header_body_checkscleanup unix n - - - 0 cleanupqmgr fifo n - n 300 1 qmgr#qmgr fifo n - n 300 1 oqmgrtlsmgr unix - - - 1000? 1 tlsmgrrewrite unix - - - - - trivial-rewritebounce unix - - - - 0 bouncedefer unix - - - - 0 bouncetrace unix - - - - 0 bounceverify unix - - - - 1 verifyflush unix n - - 1000? 0 flushproxymap unix - - n - - proxymapproxywrite unix - - n - 1 proxymapsmtp unix - - - - - smtprelay unix - - - - - smtp# -o smtp_helo_timeout=5 -o smtp_connect_timeout=5showq unix n - - - - showqerror unix - - - - - errorretry unix - - - - - errordiscard unix - - - - - discardlocal unix - n n - - localvirtual unix - n n - - virtuallmtp unix - - - - - lmtpanvil unix - - - - 1 anvilscache unix - - - - 1 scache## ====================================================================# Interfaces to non-Postfix software. Be sure to examine the manual# pages of the non-Postfix software to find out what options it wants.## Many of the following services use the Postfix pipe(8) delivery# agent. See the pipe(8) man page for information about ${recipient}# and other message envelope options.# ====================================================================## maildrop. See the Postfix MAILDROP_README file for details.# Also specify in main.cf:maildrop_destination_recipient_limit=1#maildrop unix - n n - - pipe flags=DRhu user=vmail argv=/usr/bin/maildrop -d ${recipient}## ====================================================================## Recent Cyrus versions can use the existing "lmtp" master.cf entry.## Specify in cyrus.conf:# lmtp cmd="lmtpd -a" listen="localhost:lmtp" proto=tcp4## Specify in main.cf one or more of the following:# mailbox_transport =lmtp:inet:localhost# virtual_transport =lmtp:inet:localhost## ====================================================================## Cyrus 2.1.5 (Amos Gouaux)# Also specify in main.cf:cyrus_destination_recipient_limit=1##cyrus unix - n n - - pipe# user=cyrus argv=/cyrus/bin/deliver -e -r ${sender} -m ${extension} ${user}## ====================================================================# Old example of delivery via Cyrus.##old-cyrus unix - n n - - pipe# flags=R user=cyrus argv=/cyrus/bin/deliver -e -m ${extension} ${user}## ====================================================================## See the Postfix UUCP_README file for configuration details.#uucp unix - n n - - pipe flags=Fqhu user=uucp argv=uux -r -n -z -a$sender - $nexthop!rmail ($recipient)## Other external delivery methods.#ifmail unix - n n - - pipe flags=F user=ftn argv=/usr/lib/ifmail/ifmail -r $nexthop ($recipient)bsmtp unix - n n - - pipe flags=Fq. user=bsmtp argv=/usr/lib/bsmtp/bsmtp -t$nexthop -f$sender $recipientscalemail-backend unix - n n - 2 pipe flags=R user=scalemail argv=/usr/lib/scalemail/bin/scalemail-store ${nexthop} ${user} ${extension}mailman unix - n n - - pipe flags=FR user=list argv=/usr/lib/mailman/bin/postfix-to-mailman.py ${nexthop} ${user} # The next two entries integrate with Amavis for anti-virus/spam checks.amavis unix - - - - 3 smtp -o smtp_data_done_timeout=1200 -o smtp_send_xforward_command=yes -o disable_dns_lookups=yes -o max_use=20127.0.0.1:10025 inet n - - - - smtpd -o content_filter=-o local_recipient_maps=-o relay_recipient_maps=-o smtpd_restriction_classes=-o smtpd_delay_reject=no -o smtpd_client_restrictions=permit_mynetworks,reject -o smtpd_helo_restrictions=-o smtpd_sender_restrictions=-o smtpd_recipient_restrictions=permit_mynetworks,reject -o smtpd_data_restrictions=reject_unauth_pipelining -o smtpd_end_of_data_restrictions=-o mynetworks=127.0.0.0/8 -o smtpd_error_sleep_time=0 -o smtpd_soft_error_limit=1001 -o smtpd_hard_error_limit=1000 -o smtpd_client_connection_count_limit=0 -o smtpd_client_connection_rate_limit=0 -o receive_override_options=no_header_body_checks,no_unknown_recipient_checks # Integration with Dovecot - hand mail over to it for local delivery, and# run the process under the vmail user and mail group.dovecot unix - n n - - pipe flags=DRhu user=vmail:mail argv=/usr/lib/dovecot/dovecot-lda -d $(recipient)Once done, save and exit.
We are now ready to restart all of the mail services and test the server.
service postfix restartservice spamassassin restartservice clamav-daemon restartservice amavis restartservice dovecot restartWhile testing your new mail server, make sure to watch the log files closely for any errors or unusual responses.
The mail server log files are located here:
- General Logging:
/var/log/mail.log - Error Logging:
/var/log/mail.err
[Back to top]
14 – Reverse DNS Lookup
You will now need to set up reverse DNS lookup for your mail server.
Reverse DNS is IP-address-to-domain-name mapping – the opposite of forward (normal) DNS which maps domain names to IP addresses. Reverse DNS is mostly used by people for such things as tracking where a website visitor came from or where an email message originated, for example. Reverse DNS is also important for mail server applications. Many email servers on the Internet are configured to reject incoming emails from any IP address which does not have reverse DNS record configured.
Unless you also administer your own DNS server, you can update reverse DNS with your ISP (Internet Service Provider) or via the hosting provider of your server.
[Back to top]
15 – Install RoundCube Webmail
Now we are going to install the RoundCube Webmail application. This application will allow your remote users to connect to their mailbox through a web browser.
apt-get install roundcube roundcube-mysql roundcube-plugins roundcube-plugins-extra
During the installation process, the system will ask you the prerequisite install questions. Note:you will need the password for the MySQL root user you set up in Step 2.
Configure database for roundcube with dbconfig-common?>> Select 'YES'Database type to be used by roundcube:>> Select 'mysql'Password of the database's administrative user:>> Enter the 'root' MySQL password that you created.MySQL application password for roundcube:>> Enter a new secure password for the RoundCube application to use.
Once you are finished with the pre-installation questions, you should see the following output. Double check the output to make sure there are not errors posted during the installation process.
dbconfig-common:writing config to /etc/dbconfig-common/roundcube.conf Creating config file /etc/dbconfig-common/roundcube.conf with new versionCreating config file /etc/roundcube/debian-db.php with new versiongranting access to database roundcube for example@unixlinux.online:success.verifying access for example@unixlinux.online:success.creating database roundcube:success.verifying database roundcube exists:success.populating database via sql... done.dbconfig-common:flushing administrative passwordCreating config file /etc/roundcube/main.inc.php with new versionapache2_invoke:Enable configuration roundcube.conf * Reloading web server apache2 * * Reloading web server apache2 * Setting up roundcube (0.9.5-4) ...Setting up roundcube-plugins (0.9.5-4) ...Setting up roundcube-plugins-extra (0.9.2-20130819) ...Processing triggers for dictionaries-common (1.20.5) ...aspell-autobuildhash:processing:en [en-common]aspell-autobuildhash:processing:en [en-variant_0]aspell-autobuildhash:processing:en [en-variant_1]aspell-autobuildhash:processing:en [en-variant_2]aspell-autobuildhash:processing:en [en-w_accents-only]aspell-autobuildhash:processing:en [en-wo_accents-only]aspell-autobuildhash:processing:en [en_CA-variant_0]aspell-autobuildhash:processing:en [en_CA-variant_1]aspell-autobuildhash:processing:en [en_CA-w_accents-only]aspell-autobuildhash:processing:en [en_CA-wo_accents-only]aspell-autobuildhash:processing:en [en_GB-ise-w_accents-only]aspell-autobuildhash:processing:en [en_GB-ise-wo_accents-only]aspell-autobuildhash:processing:en [en_GB-ize-w_accents-only]aspell-autobuildhash:processing:en [en_GB-ize-wo_accents-only]aspell-autobuildhash:processing:en [en_GB-variant_0]aspell-autobuildhash:processing:en [en_GB-variant_1]aspell-autobuildhash:processing:en [en_US-w_accents-only]aspell-autobuildhash:processing:en [en_US-wo_accents-only]Setting up aspell (0.60.7~20110707-1ubuntu1) ...Processing triggers for dictionaries-common (1.20.5) ...Setting up aspell-en (7.1-0-1) ...Processing triggers for libc-bin (2.19-0ubuntu6.6) ...Processing triggers for dictionaries-common (1.20.5) ...example@unixlinux.online#
Next, we need to customize some of the RoundCube configuration files. First, we are going to add the RoundCube application into our current Apache configuration files using path alias directives. The default configuration file is installed at /etc/apache2/conf-available/roundcube.conf
nano /etc/apache2/conf-available/roundcube.conf
We now need to remove the two comment flags in front of the alias directives. If you would like to use a different alias name, you can change that here as well. The default alias will use the URL http://<your-server-url>/roundcube/
Alias /roundcube/program/js/tiny_mce/ /usr/share/tinymce/www/ Alias /roundcube /var/lib/roundcube
Once done, save and exit the file.
Now we are going to modify the /etc/roundcube/main.inc.php configuration file. This file is where you can customize the RoundCube advanced settings.
nano /etc/roundcube/main.inc.php
Locate the following directives and update the values to match the following.
$rcmail_config['default_host'] ='localhost';$rcmail_config['default_port'] =143;$rcmail_config['smtp_server'] ='localhost';$rcmail_config['smtp_port'] =25;$rcmail_config['smtp_user'] ='%u';$rcmail_config['smtp_pass'] ='%p';$rcmail_config['force_https'] =true;$rcmail_config['use_https'] =true;
Once done, save and exit the configuration file.
We are now going to enable the php5-mcrypt module in Apache. This will allow for the RoundCube webmail session to use encrypted login sessions. You will also need to restart the Apache service.
php5enmod mcryptservice apache2 restart
You should now be able to use your new RoundCube webmail application for sending and receiving message.
[Back to top]
Congratulations!
You have now setup a fully functional and secure mail server.