Baru-baru ini, saat bereksperimen dengan GTK dan binding Ruby-nya, saya memutuskan untuk menulis tutorial yang memperkenalkan fungsi ini. Dalam posting ini, kita akan membuat aplikasi ToDo sederhana (seperti yang kita buat dengan Ruby on Rails) menggunakan gtk3 gem (alias binding GTK+ Ruby).
Anda dapat menemukan kode tutorialnya di GitHub.
Apa itu GTK+?
Menurut situs web GTK+:
GTK+, atau GIMP Toolkit, adalah toolkit multi-platform untuk membuat antarmuka pengguna grafis. Menawarkan satu set widget lengkap, GTK+ cocok untuk proyek mulai dari alat kecil sekali pakai hingga rangkaian aplikasi lengkap.
Situs ini juga menjelaskan mengapa GTK+ dibuat:
GTK+ awalnya dikembangkan untuk dan digunakan oleh GIMP, Program Manipulasi Gambar GNU. Ini disebut "The GIMP ToolKit" sehingga asal-usul proyek diingat. Hari ini lebih dikenal sebagai GTK+ untuk jangka pendek dan digunakan oleh sejumlah besar aplikasi termasuk desktop GNOME proyek GNU.
Prasyarat
GTK+:
Konten terkait
Pastikan Anda telah menginstal GTK+. Saya mengembangkan aplikasi tutorial di Ubuntu 16.04, yang memiliki GTK+ (versi 3.18) yang terinstal secara default.
Anda dapat memeriksa versi Anda dengan perintah berikut: dpkg -l libgtk-3-0 .
Ruby:
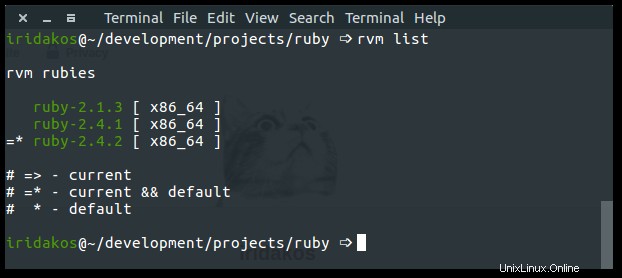
Anda harus menginstal Ruby di sistem Anda. Saya menggunakan RVM untuk mengelola beberapa versi Ruby yang diinstal di sistem saya. Jika Anda ingin melakukannya juga, Anda dapat menemukan petunjuk penginstalan RVM di berandanya dan petunjuk untuk menginstal versi Ruby (alias, Rubi) di halaman dokumentasi terkait.
Tutorial ini menggunakan Ruby 2.4.2. Anda dapat memeriksa versi Anda menggunakan ruby --version atau melalui RVM dengan rvm list .
Glade:
Per situs web Glade, "Glade adalah alat RAD untuk memungkinkan pengembangan antarmuka pengguna yang cepat &mudah untuk toolkit GTK+ dan lingkungan desktop GNOME."
Kami akan menggunakan Glade untuk mendesain antarmuka pengguna aplikasi kami. Jika Anda menggunakan Ubuntu, instal glade dengan sudo apt install glade .
Permata GTK3:
Permata ini menyediakan binding Ruby untuk toolkit GTK+. Dengan kata lain, ini memungkinkan kita untuk berbicara dengan GTK+ API menggunakan bahasa Ruby.
Instal permata dengan gem install gtk3 .
Mendefinisikan spesifikasi aplikasi
Aplikasi yang akan kita buat dalam tutorial ini akan:
- Memiliki antarmuka pengguna (yaitu, aplikasi desktop)
- Izinkan pengguna menyetel berbagai properti untuk setiap item (mis., prioritas)
- Izinkan pengguna membuat dan mengedit item ToDo
- Semua item akan disimpan sebagai file di direktori home pengguna dalam folder bernama
.gtk-todo-tutorial
- Semua item akan disimpan sebagai file di direktori home pengguna dalam folder bernama
- Izinkan pengguna untuk mengarsipkan item ToDo
- Item yang diarsipkan harus diletakkan di foldernya sendiri yang disebut
archived
- Item yang diarsipkan harus diletakkan di foldernya sendiri yang disebut
Struktur aplikasi
gtk-todo-tutorial # root directory

  |-- application

    |-- ui # everything related to the ui of the application

    |-- models # our models

    |-- lib # the directory to host any utilities we might need

  |-- resources # directory to host the resources of our application

  gtk-todo # the executable that will start our application
Membangun aplikasi ToDo
Menginisialisasi aplikasi
Buat direktori untuk menyimpan semua file yang dibutuhkan aplikasi. Seperti yang Anda lihat pada struktur di atas, saya menamai milik saya gtk-todo-tutorial .
Buat file bernama gtk-todo (benar, tanpa ekstensi) dan tambahkan berikut ini:
#!/usr/bin/env ruby
require 'gtk3'
app = Gtk::Application.new 'com.iridakos.gtk-todo', :flags_none
app.signal_connect :activate do |application|
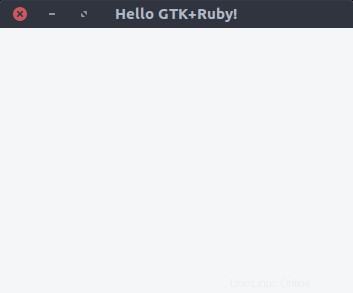
window = Gtk::ApplicationWindow.new(application)
window.set_title 'Hello GTK+Ruby!'
window.present
end
puts app.run
Ini akan menjadi skrip yang memulai aplikasi.
Perhatikan shebang (#! ) pada baris pertama. Beginilah cara kami menentukan juru bahasa mana yang akan mengeksekusi skrip di bawah sistem operasi Unix/Linux. Dengan cara ini, kita tidak perlu menggunakan ruby gtk-todo; kita cukup menggunakan nama skrip:gtk-todo .
Namun, jangan mencobanya, karena kami belum mengubah mode file menjadi executable. Untuk melakukannya, ketik perintah berikut di terminal setelah menavigasi ke direktori root aplikasi:
chmod +x ./gtk-todo # make the script executable Dari konsol, jalankan:
./gtk-todo # execute the script
Catatan:
- Objek aplikasi yang kami definisikan di atas (dan semua widget GTK+ secara umum) memancarkan sinyal untuk memicu peristiwa. Setelah aplikasi mulai berjalan, misalnya, itu memancarkan sinyal untuk memicu
mengaktifkanperistiwa. Yang harus kita lakukan adalah menentukan apa yang kita inginkan terjadi ketika sinyal ini dipancarkan. Kami menyelesaikan ini dengan menggunakansignal_connectmetode instance dan meneruskannya ke blok yang kodenya akan dieksekusi pada acara yang diberikan. Kami akan sering melakukan ini sepanjang tutorial. - Saat kami menginisialisasi
Gtk::Applicationobjek, kami melewati dua parameter:com.iridakos.gtk-todo:Ini adalah ID aplikasi kami dan, secara umum, ini harus berupa pengenal gaya DNS terbalik. Anda dapat mempelajari lebih lanjut tentang penggunaan dan praktik terbaiknya di wiki GNOME.:flags_none:Bendera ini mendefinisikan perilaku aplikasi. Kami menggunakan perilaku default. Lihat semua flag dan jenis aplikasi yang mereka definisikan. Kita dapat menggunakan flag yang setara dengan Ruby, seperti yang didefinisikan dalamGio::ApplicationFlags.constants. Misalnya, alih-alih menggunakan:flags_none, kita bisa menggunakanGio::ApplicationFlags::FLAGS_NONE.
Misalkan objek aplikasi yang kita buat sebelumnya (Gtk::Application ) memiliki banyak hal yang harus dilakukan ketika mengaktifkan sinyal dipancarkan atau bahwa kami ingin terhubung ke lebih banyak sinyal. Kami akhirnya akan membuat gtk-todo yang sangat besar file skrip, sehingga sulit untuk dibaca/dipertahankan. Saatnya untuk memfaktorkan ulang.
Seperti yang dijelaskan dalam struktur aplikasi di atas, kami akan membuat folder bernama application dan sub-folder ui , model , dan lib .
- Dalam
uifolder, kami akan menempatkan semua file yang terkait dengan antarmuka pengguna kami. - Dalam
modelfolder, kami akan menempatkan semua file yang terkait dengan model kami. - Dalam
libfolder, kami akan menempatkan semua file yang tidak termasuk dalam salah satu kategori tersebut.
Kami akan mendefinisikan subkelas baru dari Gtk::Application kelas untuk aplikasi kita. Kami akan membuat file bernama application.rb di bawah application/ui/todo dengan isi sebagai berikut:
module ToDo

  class Application < Gtk::Application

    def initialize

      super 'com.iridakos.gtk-todo', Gio::ApplicationFlags::FLAGS_NONE


      signal_connect :activate do |application|

        window = Gtk::ApplicationWindow.new(application)

        window.set_title 'Hello GTK+Ruby!'

        window.present

      end

    end

  end

end
Kami akan mengubah gtk-todo skrip yang sesuai:
#!/usr/bin/env ruby


require 'gtk3'


app = ToDo::Application.new


puts app.run
Jauh lebih bersih, bukan? Ya, tapi itu tidak berhasil. Kami mendapatkan sesuatu seperti:
./gtk-todo:5:in `<main>': uninitialized constant ToDo (NameError)
Masalahnya adalah kita tidak memerlukan file Ruby yang ditempatkan di aplikasi map. Kita perlu mengubah file skrip sebagai berikut dan menjalankannya lagi.
#!/usr/bin/env ruby


require 'gtk3'


# Require all ruby files in the application folder recursively

application_root_path = File.expand_path(__dir__)

Dir[File.join(application_root_path, '**', '*.rb')].each { |file| require file }


app = ToDo::Application.new


puts app.run
Sekarang seharusnya baik-baik saja.
Sumber daya
Di awal tutorial ini, kami mengatakan bahwa kami akan menggunakan Glade untuk mendesain antarmuka pengguna aplikasi. Glade menghasilkan xml file dengan elemen dan atribut yang sesuai yang mencerminkan apa yang kami rancang melalui antarmuka penggunanya. Kita perlu menggunakan file-file itu untuk aplikasi kita untuk mendapatkan UI yang kita rancang.
File-file ini adalah sumber daya untuk aplikasi, dan GResource API menyediakan cara untuk mengemas semuanya bersama-sama dalam file biner yang nantinya dapat diakses dari dalam aplikasi dengan keuntungan—dibandingkan dengan secara manual harus berurusan dengan sumber daya yang sudah dimuat, lokasinya di sistem file, dll. Baca lebih lanjut tentang GResource API.
Mendeskripsikan sumber daya
Pertama, kita perlu membuat file yang menjelaskan sumber daya aplikasi. Buat file bernama gresources.xml dan letakkan langsung di bawah resources folder.
<?xml version="1.0" encoding="UTF-8"?>

<gresources>

  <gresource prefix="/com/iridakos/gtk-todo">

    <file preprocess="xml-stripblanks">ui/application_window.ui</file>

  </gresource>

</gresources>
Deskripsi ini pada dasarnya mengatakan:"Kami memiliki sumber daya yang terletak di bawah ui direktori (relatif terhadap xml ini) file) dengan nama application_window.ui . Sebelum memuat sumber daya ini, harap hapus bagian yang kosong." Tentu saja, ini belum akan berfungsi, karena kami belum membuat sumber daya melalui Glade. Namun, jangan khawatir, satu per satu.
Catatan :xml-stripblanks direktif akan menggunakan xmllint perintah untuk menghapus bagian yang kosong. Di Ubuntu, Anda harus menginstal paket libxml2-utils .
Membuat file biner sumber daya
Untuk menghasilkan file sumber daya biner, kita akan menggunakan utilitas perpustakaan GLib lain yang disebut glib-compile-resources . Periksa apakah Anda telah menginstalnya dengan dpkg -l libglib2.0-bin . Anda akan melihat sesuatu seperti ini:
ii libglib2.0-bin 2.48.2-0ubuntu amd64 Programs for the GLib library
Jika tidak, instal paket (Sudo apt install libglib2.0-bin di Ubuntu).
Mari kita membangun file. Kami akan menambahkan kode ke skrip kami sehingga sumber daya akan dibangun setiap kali kami menjalankannya. Ubah gtk-todo scriptnya sebagai berikut:
#!/usr/bin/env ruby


require 'gtk3'

require 'fileutils'


# Require all ruby files in the application folder recursively

application_root_path = File.expand_path(__dir__)

Dir[File.join(application_root_path, '**', '*.rb')].each { |file| require file }


# Define the source & target files of the glib-compile-resources command

resource_xml = File.join(application_root_path, 'resources', 'gresources.xml')

resource_bin = File.join(application_root_path, 'gresource.bin')


# Build the binary

system("glib-compile-resources",

       "--target", resource_bin,

       "--sourcedir", File.dirname(resource_xml),

       resource_xml)


at_exit do

  # Before existing, please remove the binary we produced, thanks.

  FileUtils.rm_f(resource_bin)

end


app = ToDo::Application.new

puts app.run
Saat kami menjalankannya, hal berikut terjadi di konsol; nanti kami perbaiki:
/.../gtk-todo-tutorial/resources/gresources.xml: Failed to locate 'ui/application_window.ui' in any source directory. Inilah yang kami lakukan:
- Menambahkan
persyaratanpernyataan untukfileutilsperpustakaan sehingga kami dapat menggunakannya diat_exittelepon - Mendefinisikan sumber dan file target dari
glib-compile-resourcesperintah - Mengeksekusi
glib-compile-resourcesperintah - Setel pengait sehingga file biner akan dihapus sebelum keluar dari skrip (yaitu, sebelum aplikasi keluar) sehingga pada waktu berikutnya akan dibuat lagi
Memuat file biner sumber daya
Kami telah menjelaskan sumber daya dan mengemasnya dalam file biner. Sekarang kita harus memuat dan mendaftarkannya di aplikasi sehingga kita dapat menggunakannya. Ini semudah menambahkan dua baris berikut sebelum at_exit kait:
resource = Gio::Resource.load(resource_bin)

Gio::Resources.register(resource)
Itu dia. Mulai sekarang, kita dapat menggunakan sumber daya dari mana saja di dalam aplikasi. (Kita akan melihat caranya nanti.) Untuk saat ini, skrip gagal karena tidak dapat memuat biner yang tidak diproduksi. Bersabarlah; kita akan segera sampai ke bagian yang menarik. Sebenarnya sekarang.
Mendesain jendela aplikasi utama
Memperkenalkan Glade
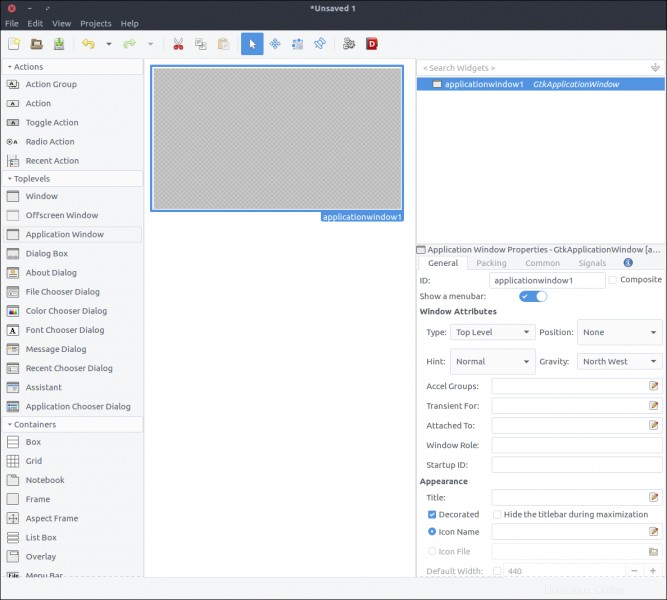
Untuk memulai, buka Glade.

Inilah yang kami lihat:
- Di sebelah kiri, ada daftar widget yang bisa diseret dan dijatuhkan di bagian tengah. (Anda tidak dapat menambahkan jendela tingkat atas di dalam widget label.) Saya akan menyebutnya bagian Widget .
- Bagian tengah berisi widget kami karena akan muncul (sebagian besar waktu) di aplikasi. Saya akan menyebutnya bagian Desain .
- Di sebelah kanan ada dua subbagian:
- Bagian atas berisi hierarki widget saat ditambahkan ke sumber daya. Saya akan menyebutnya bagian Hirarki .
- Bagian bawah berisi semua properti yang dapat dikonfigurasi melalui Glade untuk widget yang dipilih di atas. Saya akan menyebutnya bagian Properti .
Saya akan menjelaskan langkah-langkah untuk membangun UI tutorial ini menggunakan Glade, tetapi jika Anda tertarik untuk membangun aplikasi GTK+, Anda harus melihat sumber daya &tutorial resmi alat tersebut.
Buat desain jendela aplikasi
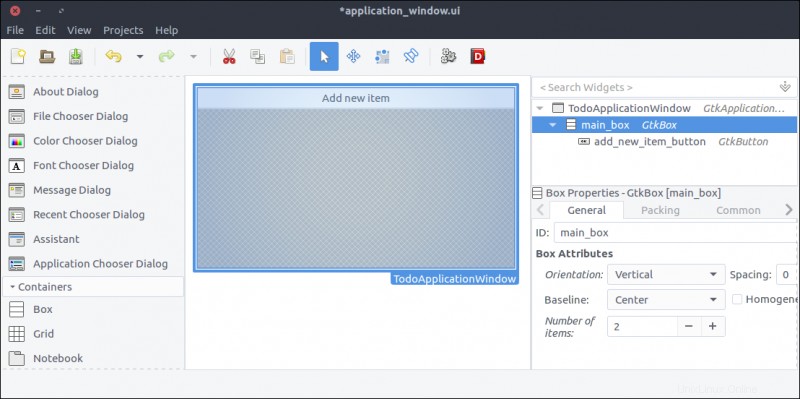
Mari kita buat jendela aplikasi hanya dengan menyeret Jendela Aplikasi widget dari bagian Widget ke bagian Desain.
Gtk::Builder adalah objek yang digunakan dalam aplikasi GTK+ untuk membaca deskripsi tekstual antarmuka pengguna (seperti yang akan kita buat melalui Glade) dan membangun widget objek yang dijelaskan.
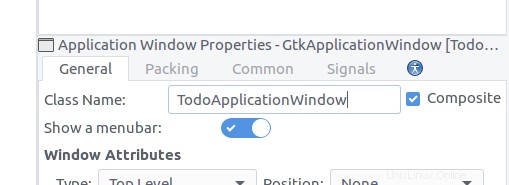
Hal pertama di bagian Properties adalah ID , dan memiliki nilai default applicationWindow1 . Jika kita membiarkan properti ini apa adanya, nanti kita akan membuat Gtk::Builder melalui kode kami yang akan memuat file yang dihasilkan oleh Glade. Untuk mendapatkan jendela aplikasi, kita harus menggunakan sesuatu seperti:
application_window = builder.get_object('applicationWindow1')


application_window.signal_connect 'whatever' do |a,b|

...
application_window objek akan menjadi kelas Gtk::ApplicationWindow; jadi apa pun yang harus kita tambahkan ke perilakunya (seperti mengatur judulnya) akan terjadi di luar kelas asli. Juga, seperti yang ditunjukkan dalam cuplikan di atas, kode untuk menghubungkan ke sinyal jendela akan ditempatkan di dalam file yang membuat instance itu.
Kabar baiknya adalah GTK+ memperkenalkan fitur pada tahun 2013 yang memungkinkan pembuatan template widget komposit, yang (di antara keuntungan lainnya) memungkinkan kami untuk menentukan kelas kustom untuk widget (yang pada akhirnya diturunkan dari GTK::Widget
Untuk mendefinisikan desain kita sebagai template, periksa Composite kotak centang di widget properti. Perhatikan bahwa ID properti diubah menjadi Class Name . Isi TodoApplicationWindow . Ini adalah kelas yang akan kita buat dalam kode kita untuk mewakili widget ini.
Simpan file dengan nama application_window.ui di folder baru bernama ui di dalam sumber daya . Inilah yang kita lihat jika kita membuka file dari editor:
<?xml version="1.0" encoding="UTF-8"?>

<!-- Generated with glade 3.18.3 -->

<interface>

  <requires lib="gtk+" version="3.12"/>

  <template class="TodoApplicationWindow" parent="GtkApplicationWindow">

    <property name="can_focus">False</property>

    <child>

      <placeholder/>

    </child>

  </template>

</interface>
Widget kami memiliki kelas dan atribut induk. Mengikuti konvensi atribut kelas induk, kelas kita harus didefinisikan di dalam modul bernama Todo . Sebelum ke sana, mari kita coba memulai aplikasi dengan menjalankan skrip (./gtk-todo ).
Ya! Dimulai!
Buat kelas jendela aplikasi
Jika kita memeriksa isi direktori root aplikasi saat menjalankan aplikasi, kita dapat melihat gresource.bin mengajukan di sana. Meskipun aplikasi berhasil dijalankan karena resource bin ada dan dapat didaftarkan, kami belum akan menggunakannya. Kami masih akan memulai Gtk::ApplicationWindow biasa di application.rb kami mengajukan. Sekarang saatnya untuk membuat kelas jendela aplikasi kustom kita.
Buat file bernama application_window.rb di aplikasi/ui/todo folder dan tambahkan konten berikut:
module Todo
class ApplicationWindow < Gtk::ApplicationWindow
# Register the class in the GLib world
type_register
class << self
def init
# Set the template from the resources binary
set_template resource: '/com/iridakos/gtk-todo/ui/application_window.ui'
end
end
def initialize(application)
super application: application
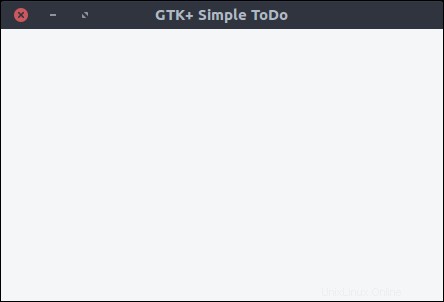
set_title 'GTK+ Simple ToDo'
end
end
end
Kami mendefinisikan init metode sebagai metode tunggal di kelas setelah membuka kelas eigen untuk mengikat template widget ini ke file sumber daya yang terdaftar sebelumnya.
Sebelum itu, kami memanggil type_register metode kelas, yang mendaftarkan dan menyediakan kelas widget khusus kami ke GLib dunia.
Terakhir, setiap kali kita membuat instance dari jendela ini, kita menetapkan judulnya menjadi GTK+ Simple ToDo .
Sekarang, mari kita kembali ke application.rb file dan gunakan apa yang baru saja kita terapkan:
module ToDo

  class Application < Gtk::Application

    def initialize

      super 'com.iridakos.gtk-todo', Gio::ApplicationFlags::FLAGS_NONE


      signal_connect :activate do |application|

        window = Todo::ApplicationWindow.new(application)

        window.present

      end

    end

  end

end
Jalankan skrip.
Tentukan model
Untuk kesederhanaan, kami akan menyimpan item ToDo dalam file dalam format JSON di bawah folder tersembunyi khusus di direktori home pengguna kami. Dalam aplikasi nyata, kita akan menggunakan database, tapi itu di luar cakupan tutorial ini.
Todo::Item kami model akan memiliki properti berikut:
- id :ID item
- judul :Judul
- catatan :Catatan apa saja
- prioritas :Prioritasnya
- waktu_tanggal pembuatan :Tanggal dan waktu item dibuat
- nama file :Nama file tempat item disimpan
Kami akan membuat file bernama item.rb di bawah aplikasi/model direktori dengan isi sebagai berikut:
require 'securerandom'

require 'json'


module Todo

  class Item

    PROPERTIES = [:id, :title, :notes, :priority, :filename, :creation_datetime].freeze


    PRIORITIES = ['high', 'medium', 'normal', 'low'].freeze


    attr_accessor *PROPERTIES


    def initialize(options = {})

      if user_data_path = options[:user_data_path]

        # New item. When saved, it will be placed under the :user_data_path value

        @id = SecureRandom.uuid

        @creation_datetime = Time.now.to_s

        @filename = "#{user_data_path}/#{id}.json"

      elsif filename = options[:filename]

        # Load an existing item

        load_from_file filename

      else

        raise ArgumentError, 'Please specify the :user_data_path for new item or the :filename to load existing'

      end

    end


    # Loads an item from a file

    def load_from_file(filename)

      properties = JSON.parse(File.read(filename))


      # Assign the properties

      PROPERTIES.each do |property|

        self.send "#{property}=", properties[property.to_s]

      end

    rescue => e

      raise ArgumentError, "Failed to load existing item: #{e.message}"

    end


    # Resolves if an item is new

    def is_new?

      !File.exists? @filename

    end


    # Saves an item to its `filename` location

    def save!

      File.open(@filename, 'w') do |file|

        file.write self.to_json

      end

    end


    # Deletes an item

    def delete!

      raise 'Item is not saved!' if is_new?


      File.delete(@filename)

    end


    # Produces a json string for the item

    def to_json

      result = {}

      PROPERTIES.each do |prop|

        result[prop] = self.send prop

      end


      result.to_json

    end

  end

end
Di sini kami mendefinisikan metode untuk:
- Inisialisasi item:
- Sebagai "baru" dengan mendefinisikan
:user_data_pathyang nantinya akan disimpan - Sebagai "yang ada" dengan mendefinisikan
:filenameuntuk dimuat dari. Nama file harus berupa file JSON yang sebelumnya dibuat oleh item
- Sebagai "baru" dengan mendefinisikan
- Memuat item dari file
- Menyelesaikan apakah suatu item baru atau tidak (yaitu, disimpan setidaknya sekali di
:user_data_pathatau tidak) - Menyimpan item dengan menulis string JSON ke file
- Menghapus item
- Buat string JSON dari sebuah item sebagai hash dari propertinya
Tambahkan item baru
Buat tombol
Mari tambahkan tombol ke jendela aplikasi kita untuk menambahkan item baru. Buka resources/ui/application_window.ui file di Glade.
- Seret
Tomboldari bagian Widget ke bagian Desain. - Di bagian Properti, setel ID its nilai ke
add_new_item_button. - Di dekat bagian bawah Umum tab di bagian Properties, ada area teks tepat di bawah Label dengan gambar opsional pilihan. Ubah nilainya dari Tombol untuk Tambahkan item baru .
- Simpan file dan jalankan skripnya.

Jangan khawatir; desain akan kami perbaiki nanti. Sekarang, mari kita lihat cara menghubungkan fungsionalitas ke tombol kami yang diklik acara.
Pertama, kita harus memperbarui kelas jendela aplikasi kita agar mempelajari turunan barunya, tombol dengan id add_new_item_button . Kemudian kita dapat mengakses anak tersebut untuk mengubah perilakunya.
Ubah init caranya sebagai berikut:
def init

  # Set the template from the resources binary

  set_template resource: '/com/iridakos/gtk-todo/ui/application_window.ui'


  bind_template_child 'add_new_item_button'

end
Cukup sederhana, bukan? bind_template_child metode melakukan persis seperti yang dikatakannya, dan mulai sekarang setiap instance Todo::ApplicationWindow kami kelas akan memiliki add_new_item_button metode untuk mengakses tombol terkait. Jadi, mari kita ubah initialize caranya sebagai berikut:
def initialize(application)

  super application: application


  set_title 'GTK+ Simple ToDo'


  add_new_item_button.signal_connect 'clicked' do |button, application|

    puts "OMG! I AM CLICKED"

  end

end
Seperti yang Anda lihat, kami akan mengakses tombol dengan add_new_item_button metode, dan kami menentukan apa yang kami inginkan terjadi saat diklik. Mulai ulang aplikasi dan coba klik tombol. Di konsol, Anda akan melihat pesan OMG! SAYA DIKLIK saat Anda mengklik tombol.
Namun, apa yang kita inginkan terjadi ketika kita mengklik tombol ini adalah untuk menampilkan jendela baru untuk menyimpan item ToDo. Anda menebak dengan benar:Ini jam Glade.
Buat jendela item baru
- Buat proyek baru di Glade dengan menekan ikon paling kiri di bilah atas atau dengan memilih File> Baru dari menu aplikasi.
- Seret
Jendeladari bagian Widget ke area Desain. - Periksa
Kompositits properti dan beri nama kelasTodoNewItemWindow.
- Seret
Kisidari bagian Widget dan letakkan di jendela yang telah kita tambahkan sebelumnya. - Setel 5 baris dan 2 kolom di jendela yang muncul.
- Dalam Umum tab bagian Properti, atur spasi baris dan kolom ke 10 (piksel).
- Dalam Umum tab bagian Properties, atur
Widget Spacing> Margins> Top, Bottom, Left, Rightsemuanya menjadi 10 sehingga konten tidak menempel pada batas kisi.
- Seret empat
Labelwidget dari bagian Widget dan tempatkan satu di setiap baris kisi. - Ubah
Labeltheir properti, dari atas ke bawah, sebagai berikut:Id:Judul:Catatan:Prioritas:
- Dalam Umum tab bagian Properties, ubah Alignment and Padding> Alignment> Horizontal properti dari 0,50 hingga 1 untuk setiap properti untuk meratakan kanan teks label.
- Langkah ini opsional tetapi disarankan. Kami tidak akan mengikat label tersebut di jendela kami karena kami tidak perlu mengubah status atau perilakunya. Dalam konteks ini, kita tidak perlu menetapkan ID deskriptif untuk mereka seperti yang kita lakukan untuk
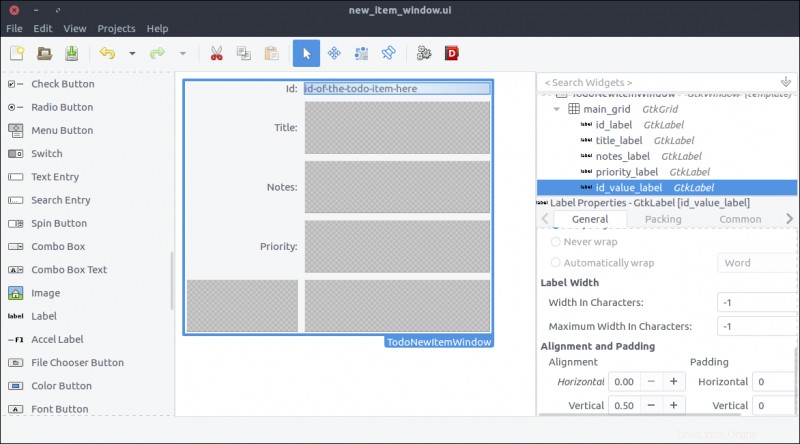
add_new_item_buttontombol di jendela aplikasi. TAPI kita akan menambahkan lebih banyak elemen ke desain kita, dan hierarki widget di Glade akan sulit dibaca jika tertulislabel1,label2, dll. Menyetel ID deskriptif (sepertiid_label,label_judul,label_catatan,label_prioritas) akan membuat hidup kita lebih mudah. Saya bahkan mengatur ID grid kemain_gridkarena saya tidak suka melihat angka atau nama variabel di ID.
- Seret
Labeldari bagian Widget ke kolom kedua dari baris pertama kisi. ID akan secara otomatis dihasilkan oleh model kami; kami tidak mengizinkan pengeditan, jadi label untuk menampilkannya sudah lebih dari cukup. - Setel
IDproperti keid_value_label. - Setel Perataan dan Padding> Perataan> Horizontal properti ke 0 sehingga teks rata di sebelah kiri.
- Kami akan mengikat widget ini ke kelas Window kami sehingga kami dapat mengubah teksnya setiap kali kami memuat jendela. Oleh karena itu, pengaturan label melalui Glade tidak diperlukan, tetapi membuat desain lebih dekat dengan tampilannya saat dirender dengan data aktual. Anda dapat mengatur label untuk apa pun yang paling cocok untuk Anda; Saya mengatur milik saya ke
id-of-the-todo-item-here.
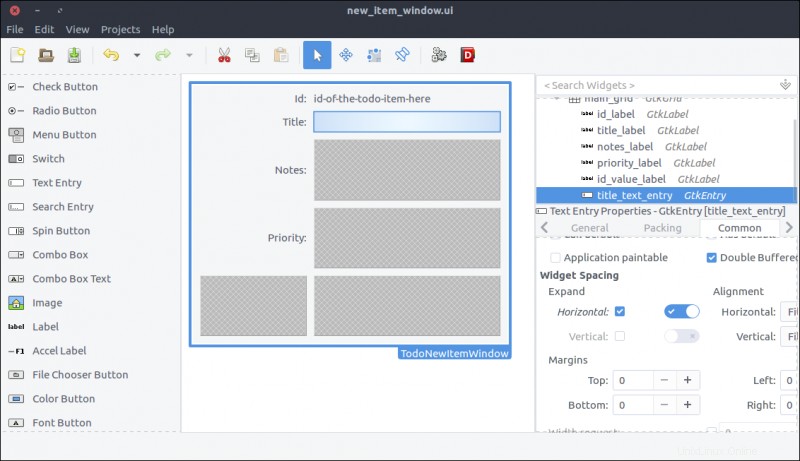
- Seret
Entri Teksdari bagian Widget ke kolom kedua dari baris kedua kisi. - Tetapkan properti ID-nya ke
title_text_entry. Seperti yang mungkin Anda perhatikan, saya lebih suka mendapatkan jenis widget di ID untuk membuat kode di kelas lebih mudah dibaca. - Dalam Umum tab bagian Properties, centang
Widget Spacing> Expand> Horizontalkotak centang dan nyalakan sakelar di sebelahnya. Dengan cara ini, widget akan melebar secara horizontal setiap kali induknya (alias kisi) diubah ukurannya.
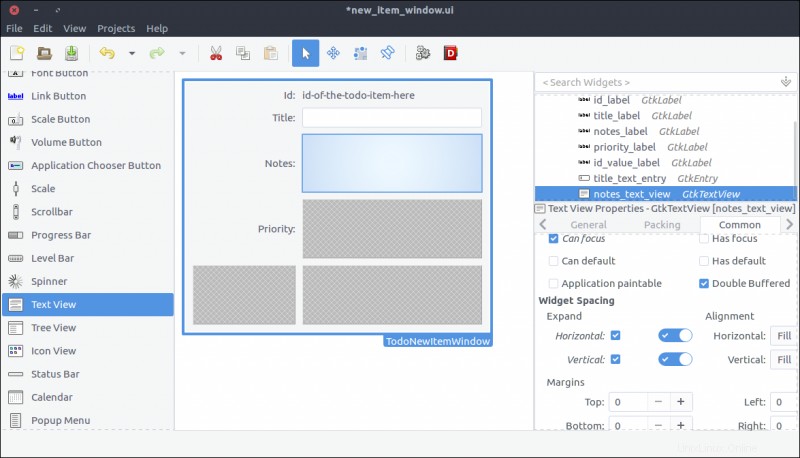
- Seret
Tampilan Teksdari bagian Widget ke kolom kedua dari baris ketiga kisi. - Setel
IDits untukcatatan. Tidak, hanya menguji Anda. SetelIDproperti kenotes_text_view. - Dalam Umum tab bagian Properties, centang
Widget Spacing> Expand> Horizontal, Verticalkotak centang dan nyalakan sakelar di sebelahnya. Dengan cara ini, widget akan mengembang secara horizontal dan vertikal setiap kali induknya (grid) diubah ukurannya.
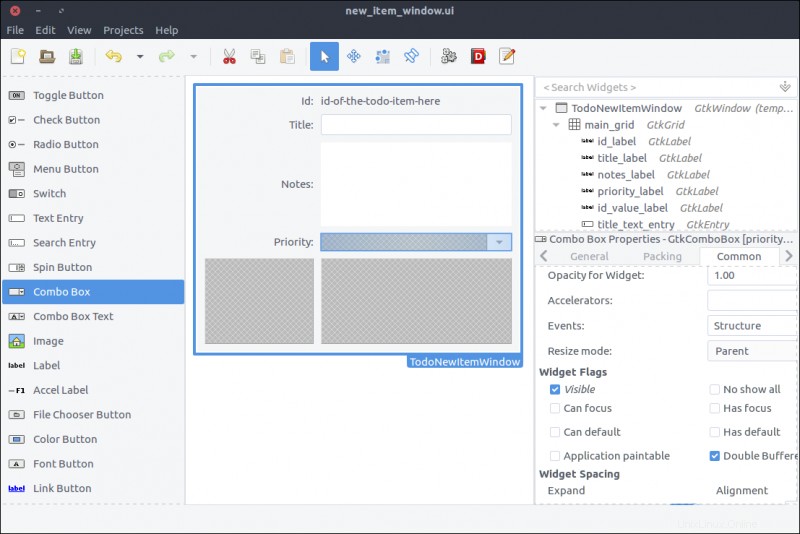
- Seret
Kotak Kombodari bagian Widget ke kolom kedua dari baris keempat kisi. - Setel
IDits kepriority_combo_box. - Dalam Umum tab bagian Properties, centang
Widget Spacing> Expand> Horizontalkotak centang dan nyalakan sakelar di sebelah kanannya. Ini memungkinkan widget meluas secara horizontal setiap kali induknya (grid) diubah ukurannya. - Widget ini adalah elemen tarik-turun. We will populate its values that can be selected by the user when it shows up inside our window class.
- Drag a
Button Boxfrom the Widget section to the second column of the last row of the grid. - In the pop-up window, select 2 items.
- In the General tab of the Properties section, set the Box Attributes> Orientation property to Horizontal .
- In the General tab of the Properties section, set the Box Attributes> Spacing property to 10 .
- In the Common tab of the Properties section, set the Widget Spacing> Alignment> Horizontal to Center .
- Again, our code won't alter this widget, but you can give it a descriptive
IDfor readability. I named mineactions_box.
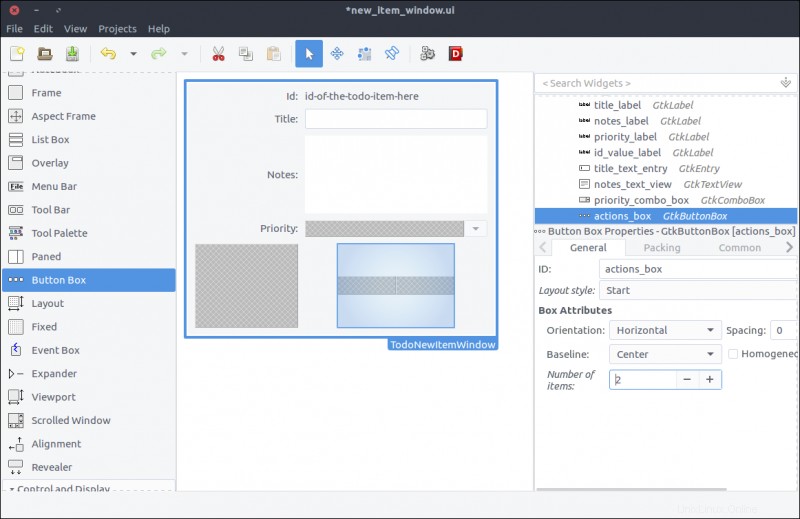
- Drag two
Buttonwidgets and place one in each box of the button box widget we added in the previous step. - Set their
IDproperties tocancel_buttonandsave_button, respectively. - In the General tab of the Properties window, set their Button Content> Label with option image property to Cancel and Save , respectively.
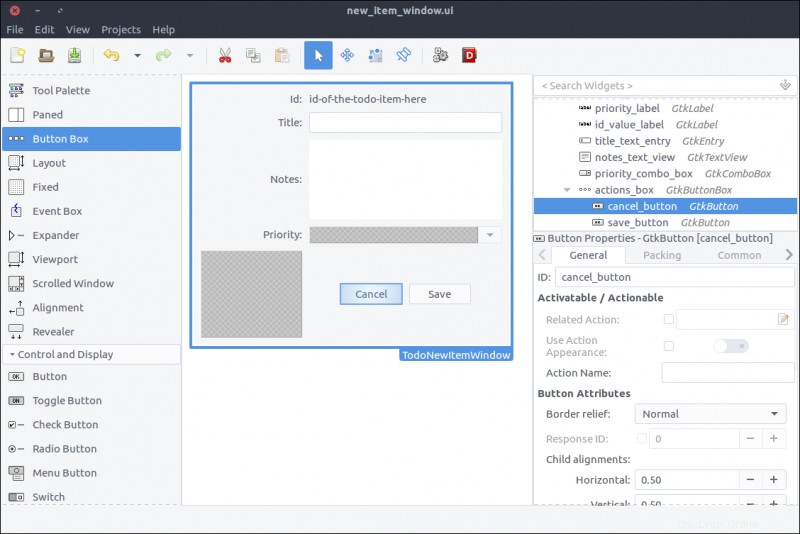
The window is ready. Save the file under resources/ui/new_item_window.ui .
It's time to port it into our application.
Implement the new item window class
Before implementing the new class, we must update our GResource description file (resources/gresources.xml ) to obtain the new resource:
<?xml version="1.0" encoding="UTF-8"?>

<gresources>

  <gresource prefix="/com/iridakos/gtk-todo">

    <file preprocess="xml-stripblanks">ui/application_window.ui</file>

    <file preprocess="xml-stripblanks">ui/new_item_window.ui</file>

  </gresource>

</gresources>
Now we can create the new window class. Create a file under application/ui/todo named new_item_window.rb and set its contents as follows:
module Todo

  class NewItemWindow < Gtk::Window

    # Register the class in the GLib world

    type_register


    class << self

      def init

        # Set the template from the resources binary

        set_template resource: '/com/iridakos/gtk-todo/ui/new_item_window.ui'

      end

    end


    def initialize(application)

      super application: application

    end

  end

end
There's nothing special here. We just changed the template resource to point to the correct file of our resources.
We have to change the add_new_item_button code that executes on the clicked signal to show the new item window. We'll go ahead and change that code in application_window.rb to this:
add_new_item_button.signal_connect 'clicked' do |button|

  new_item_window = NewItemWindow.new(application)

  new_item_window.present

end
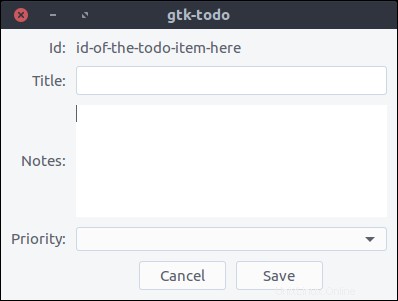
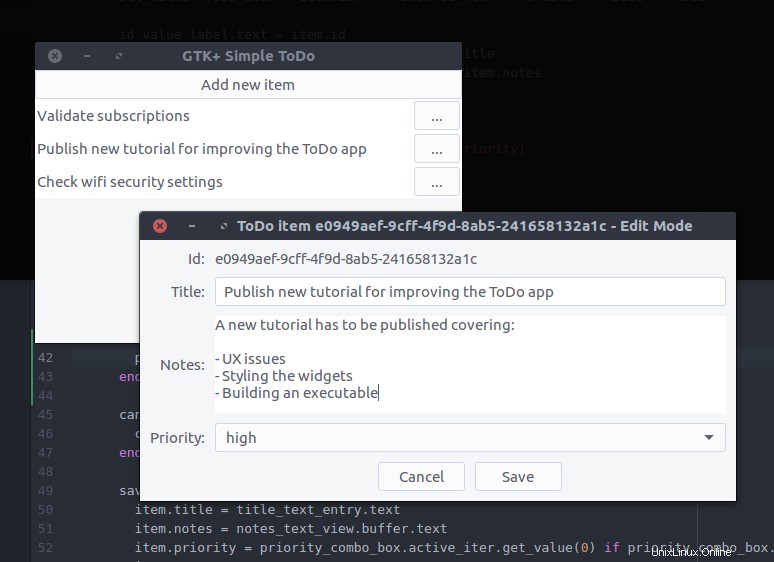
Let's see what we have done. Start the application and click on the Add new item tombol. Tadaa!
But nothing happens when we press the buttons. Let's fix that.
First, we'll bind the UI widgets in the Todo::NewItemWindow class.
Change the init method to this:
def init

  # Set the template from the resources binary

  set_template resource: '/com/iridakos/gtk-todo/ui/new_item_window.ui'


  # Bind the window's widgets

  bind_template_child 'id_value_label'

  bind_template_child 'title_text_entry'

  bind_template_child 'notes_text_view'

  bind_template_child 'priority_combo_box'

  bind_template_child 'cancel_button'

  bind_template_child 'save_button'

end
This window will be shown when either creating or editing a ToDo item, so the new_item_window naming is not very valid. We'll refactor that later.
For now, we will update the window's initialize method to require one extra parameter for the Todo::Item to be created or edited. We can then set a more meaningful window title and change the child widgets to reflect the current item.
We'll change the initialize method to this:
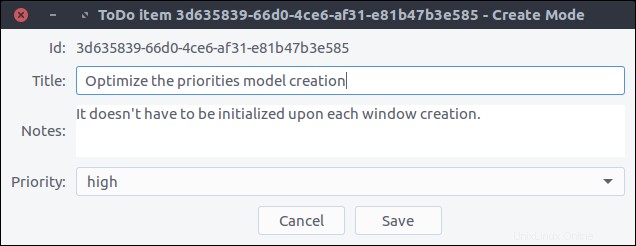
def initialize(application, item)

  super application: application

  set_title "ToDo item #{item.id} - #{item.is_new? ? 'Create' : 'Edit' } Mode"


  id_value_label.text = item.id

  title_text_entry.text = item.title if item.title

  notes_text_view.buffer.text = item.notes if item.notes


  # Configure the combo box

  model = Gtk::ListStore.new(String)

  Todo::Item::PRIORITIES.each do |priority|

    iterator = model.append

    iterator[0] = priority

  end


  priority_combo_box.model = model

  renderer = Gtk::CellRendererText.new

  priority_combo_box.pack_start(renderer, true)

  priority_combo_box.set_attributes(renderer, "text" => 0)


  priority_combo_box.set_active(Todo::Item::PRIORITIES.index(item.priority)) if item.priority

end
Then we'll add the constant PRIORITIES in the application/models/item.rb file just below the PROPERTIES constant:
PRIORITIES = ['high', 'medium', 'normal', 'low'].freeze What did we do here?
- We set the window's title to a string containing the current item's ID and the mode (depending on whether the item is being created or edited).
- We set the
id_value_labeltext to display the current item's ID. - We set the
title_text_entrytext to display the current item's title. - We set the
notes_text_viewtext to display the current item's notes. - We created a model for the
priority_combo_boxwhose entries are going to have only oneStringvalue. At first sight, aGtk::ListStoremodel might look a little confusing. Here's how it works.- Suppose we want to display in a combo box a list of country codes and their respective country names.
- We would create a
Gtk::ListStoredefining that its entries would consist of two string values:one for the country code and one for the country name. Thus we would initialize the ListStore as:model = Gtk::ListStore.new(String, String) - To fill the model with data, we would do something like the following (make sure you don't miss the comments in the snippet):
[['gr', 'Greece'], ['jp','Japan'], ['nl', 'Netherlands']].each do |country_pair|

  entry = model.append

  # Each entry has two string positions since that's how we initialized the Gtk::ListStore

  # Store the country code in position 0

  entry[0] = country_pair[0]

  # Store the country name in position 1

  entry[1] = country_pair[1]

end - We also configured the combo box to render two text columns/cells (again, make sure you don't miss the comments in the snippet):
country_code_renderer = Gtk::CellRendererText.new

# Add the first renderer

combo.pack_start(country_code_renderer, true)

# Use the value in index 0 of each model entry a.k.a. the country code

combo.set_attributes(country_code_renderer, 'text' => 0)


country_name_renderer = Gtk::CellRendererText.new

# Add the second renderer

combo.pack_start(country_name_renderer, true)

# Use the value in index 1 of each model entry a.k.a. the country name

combo.set_attributes(country_name_renderer, 'text' => 1) - I hope that made it a little clearer.
- We added a simple text renderer in the combo box and instructed it to display the only value of each model's entry (a.k.a., position
0). Imagine that our model is something like[['high'],['medium'],['normal'],['low']]and0is the first element of each sub-array. I will stop with the model-combo-text-renderer explanations now…
Configure the user data path
Remember that when initializing a new Todo::Item (not an existing one), we had to define a :user_data_path in which it would be saved. We are going to resolve this path when the application starts and make it accessible from all the widgets.
All we have to do is check if the .gtk-todo-tutorial path exists inside the user's home ~ direktori. If not, we will create it. Then we'll set this as an instance variable of the application. All widgets have access to the application instance. So, all widgets have access to this user path variable.
Change the application/application.rb file to this:
module ToDo

  class Application < Gtk::Application

    attr_reader :user_data_path


    def initialize

      super 'com.iridakos.gtk-todo', Gio::ApplicationFlags::FLAGS_NONE


      @user_data_path = File.expand_path('~/.gtk-todo-tutorial')

      unless File.directory?(@user_data_path)

        puts "First run. Creating user's application path: #{@user_data_path}"

        FileUtils.mkdir_p(@user_data_path)

      end


      signal_connect :activate do |application|

        window = Todo::ApplicationWindow.new(application)

        window.present

      end

    end

  end

end
One last thing we need to do before testing what we have done so far is to instantiate the Todo::NewItemWindow when the add_new_item_button is clicked complying with the changes we made. In other words, change the code in application_window.rb to this:
add_new_item_button.signal_connect 'clicked' do |button|

  new_item_window = NewItemWindow.new(application, Todo::Item.new(user_data_path: application.user_data_path))

  new_item_window.present

end
Start the application and click on the Add new item tombol. Tadaa! (Note the - Create mode part in the title).

Cancel item creation/update
To close the Todo::NewItemWindow window when a user clicks the cancel_button , we only have to add this to the window's initialize method:
cancel_button.signal_connect 'clicked' do |button|

  close

end
close is an instance method of the Gtk::Window class that closes the window.
Save the item
Saving an item involves two steps:
- Update the item's properties based on the widgets' values.
- Call the
save!method on theTodo::Iteminstance.
Again, our code will be placed in the initialize method of the Todo::NewItemWindow :
save_button.signal_connect 'clicked' do |button|

  item.title = title_text_entry.text

  item.notes = notes_text_view.buffer.text

  item.priority = priority_combo_box.active_iter.get_value(0) if priority_combo_box.active_iter

  item.save!

  close

end
Once again, the window closes after saving the item.
Let's try that out.
Now, by pressing Save and navigating to our ~/.gtk-todo-tutorial folder, we should see a file. Mine had the following contents:
{

        "id": "3d635839-66d0-4ce6-af31-e81b47b3e585",

        "title": "Optimize the priorities model creation",

        "notes": "It doesn't have to be initialized upon each window creation.",

        "priority": "high",

        "filename": "/home/iridakos/.gtk-todo-tutorial/3d635839-66d0-4ce6-af31-e81b47b3e585.json",

        "creation_datetime": "2018-01-25 18:09:51 +0200"

}
Don't forget to try out the Cancel button as well.
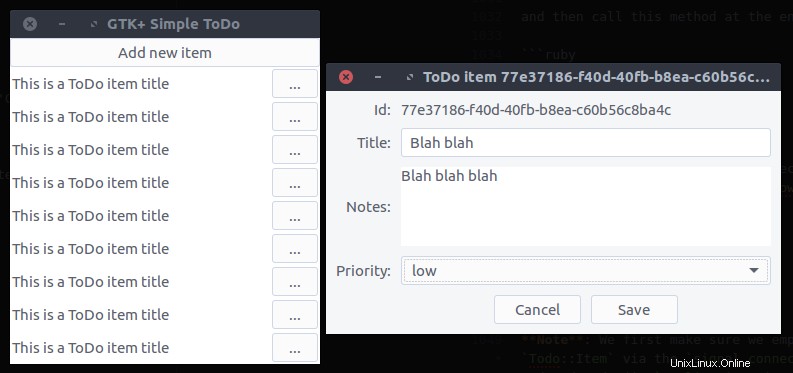
View ToDo items
The Todo::ApplicationWindow contains only one button. It's time to change that.
We want the window to have Add new item on the top and a list below with all of our ToDo items. We'll add a Gtk::ListBox to our design that can contain any number of rows.
Update the application window
- Open the
resources/ui/application_window.uifile in Glade. - Nothing happens if we drag a
List Boxwidget from the Widget section directly on the window. That is normal. First, we have to split the window into two parts:one for the button and one for the list box. Bear with me. - Right-click on the
new_item_windowin the Hierarchy section and select Add parent> Box . - In the pop-up window, set 2 for the number of items.
- The orientation of the box is already vertical, so we are fine.
- Now, drag a
List Boxand place it on the free area of the previously added box. - Set its
IDproperty totodo_items_list_box. - Set its
Selection modetoNonesince we won't provide that functionality.

Design the ToDo item list box row
Each row of the list box we created in the previous step will be more complex than a row of text. Each will contain widgets that allow the user to expand an item's notes and to delete or edit the item.
- Create a new project in Glade, as we did for the
new_item_window.ui. Save it underresources/ui/todo_item_list_box_row.ui. - Unfortunately (at least in my version of Glade), there is no List Box Row widget in the Widget section. So, we'll add one as the top-level widget of our project in a kinda hackish way.
- Drag a
List Boxfrom the Widget section to the Design area. - Inside the Hierarchy section, right-click on the
List Boxand selectAdd Row

- In the Hierarchy section, right-click on the newly added
List Box Rownested under theList Boxand selectRemove parent. There it is! TheList Box Rowis the top-level widget of the project now.
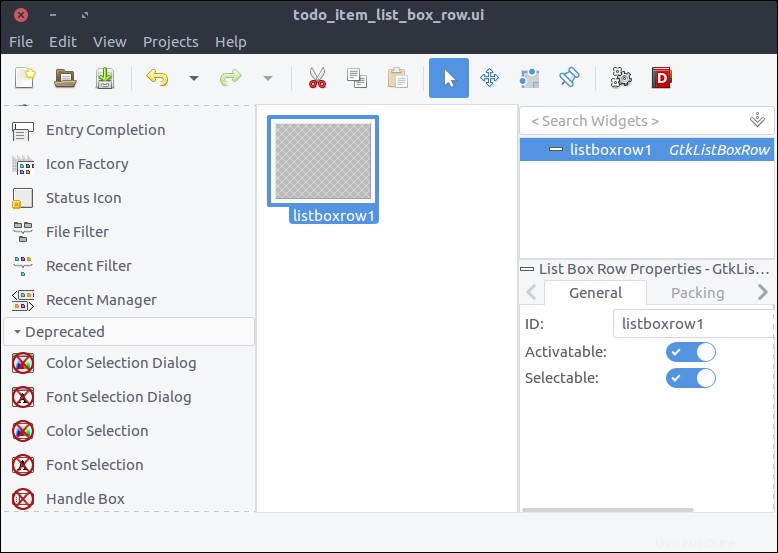
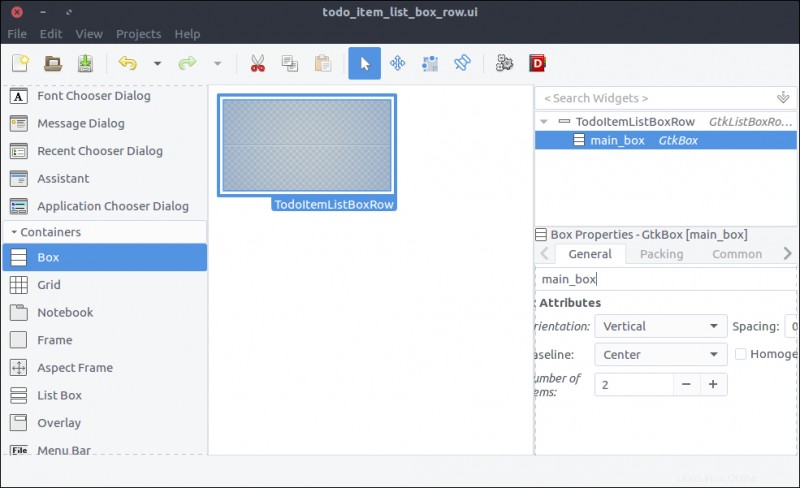
- Check the widget's
Compositeproperty and set its name toTodoItemListBoxRow. - Drag a
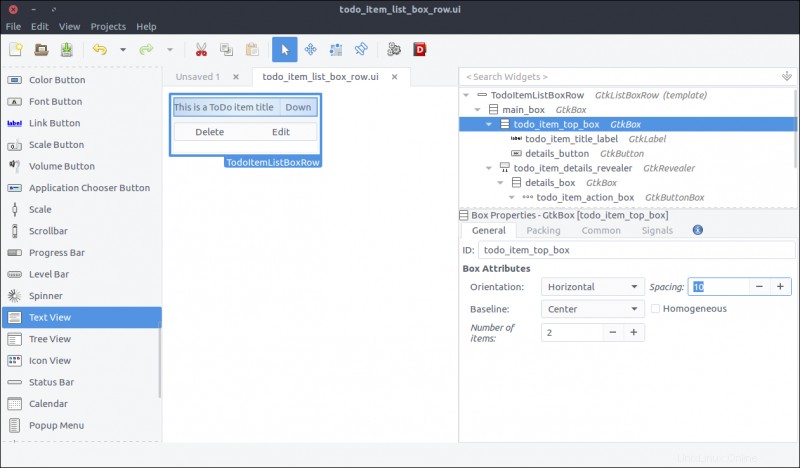
Boxfrom the Widget section to the Design area inside ourList Box Row. - Set 2 items in the pop-up window.
- Set its
IDproperty tomain_box.
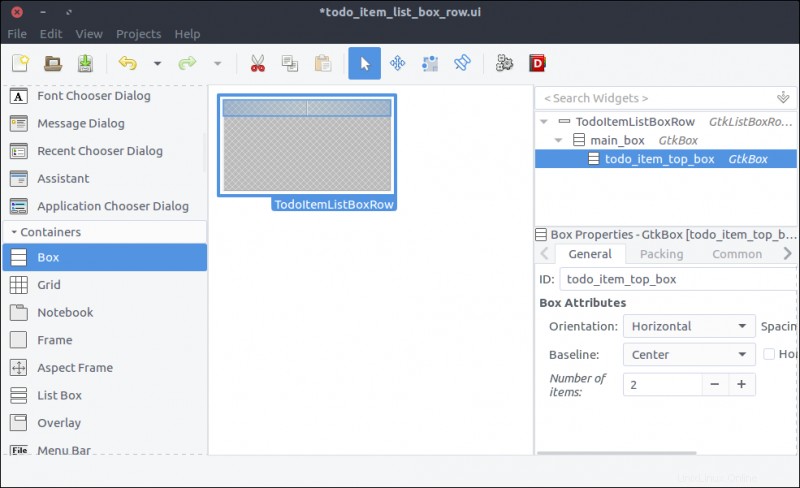
- Drag another
Boxfrom the Widget section to the first row of the previously added box. - Set 2 items in the pop-up window.
- Set its
IDproperty totodo_item_top_box. - Set its Orientation property to Horizontal .
- Set its
Spacing(General tab) property to 10 .
- Drag a
Labelfrom the Widget section to the first column of thetodo_item_top_box. - Set its
IDproperty totodo_item_title_label. - Set its Alignment and Padding> Alignment> Horizontal property to 0.00 .
- In the Common tab of the Properties section, check the Widget Spacing> Expand> Horizontal checkbox and turn on the switch next to it so the label will expand to the available space.
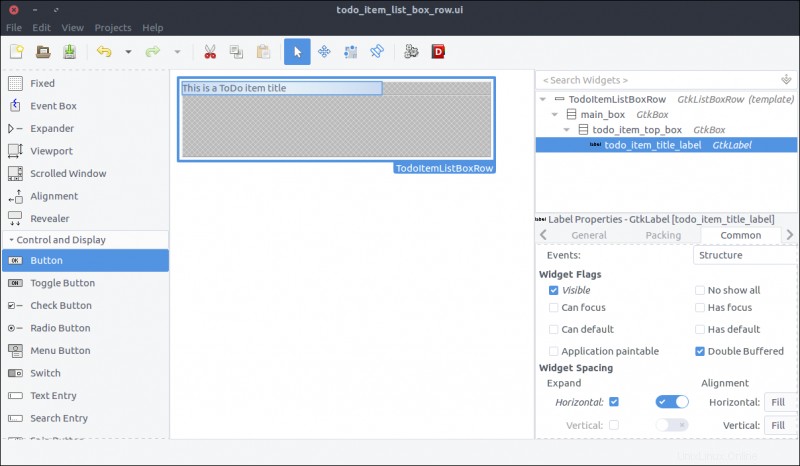
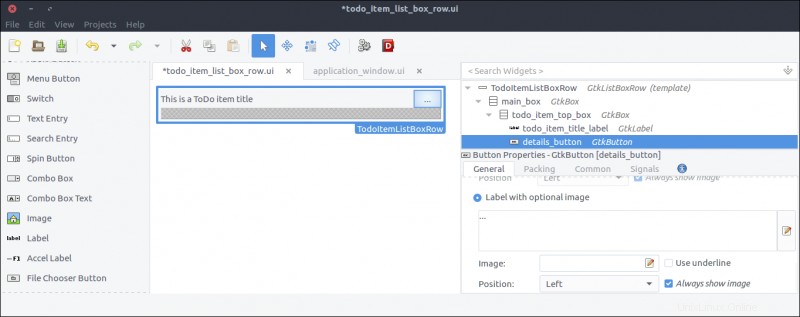
- Drag a
Buttonfrom the Widget section to the second column of thetodo_item_top_box. - Set its
IDproperty todetails_button. - Check the Button Content> Label with optional image radio and type
...(three dots).
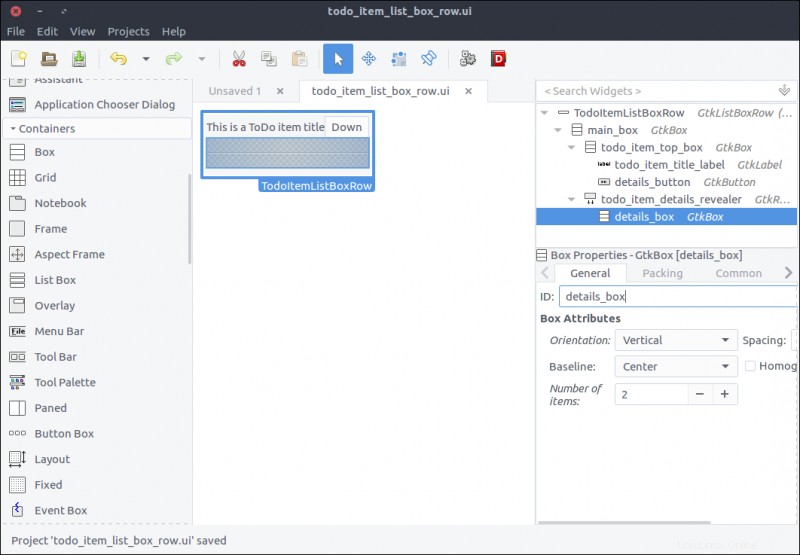
- Drag a
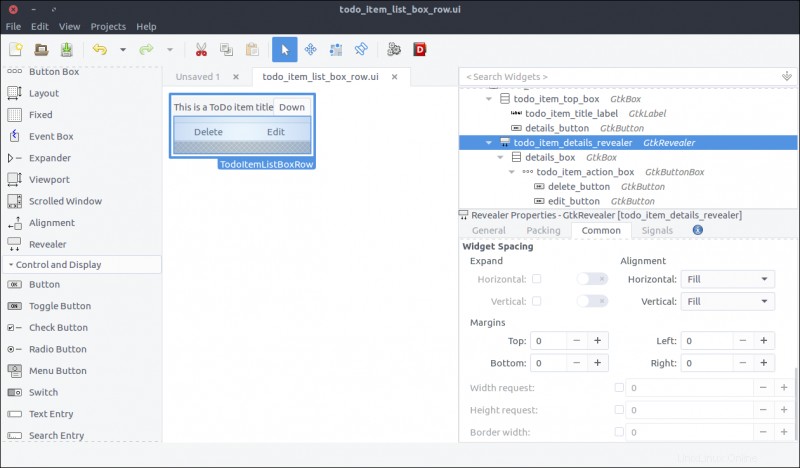
Revealerwidget from the Widget section to the second row of themain_box. - Turn off the
Reveal Childswitch in the General tab. - Set its
IDproperty totodo_item_details_revealer. - Set its
Transition typeproperty toSlide Down.
- Drag a
Boxfrom the Widget section to the reveal space. - Set its items to 2 in the pop-up window.
- Set its
IDproperty todetails_box. - In the Common tab, set its Widget Spacing> Margins> Top property to 10 .
- Drag a
Button Boxfrom the Widget section to the first row of thedetails_box. - Set its
IDproperty totodo_item_action_box. - Set its
Layout styleproperty toexpand.
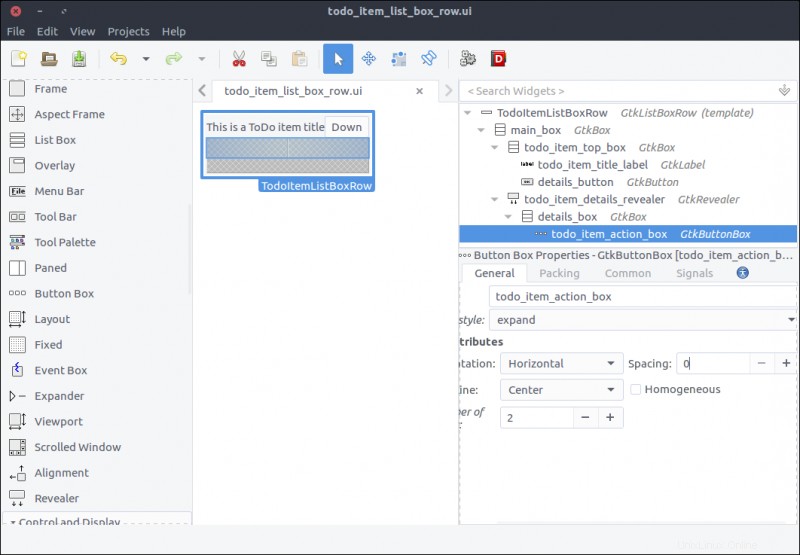
- Drag
Buttonwidgets to the first and second columns of thetodo_item_action_box. - Set their
IDproperties todelete_buttonandedit_button, respectively. - Set their Button Content> Label with optional image properties to Delete and Edit , respectively.
- Drag a
Viewportwidget from the Widget section to the second row of thedetails_box. - Set its
IDproperty totodo_action_notes_viewport. - Drag a
Text Viewwidget from the Widget section to thetodo_action_notes_viewportthat we just added. - Set its
IDtotodo_item_notes_text_view. - Uncheck its
Editableproperty in theGeneraltab of the Properties section.
Create the ToDo item list-box row class
Now we will create the class reflecting the UI of the list-box row we just created.
First we have to update our GResource description file to include the newly created design. Change the resources/gresources.xml file as follows:
<?xml version="1.0" encoding="UTF-8"?>

<gresources>

  <gresource prefix="/com/iridakos/gtk-todo">

    <file preprocess="xml-stripblanks">ui/application_window.ui</file>

    <file preprocess="xml-stripblanks">ui/new_item_window.ui</file>

    <file preprocess="xml-stripblanks">ui/todo_item_list_box_row.ui</file>

  </gresource>

</gresources>
Create a file named item_list_box_row.rb inside the application/ui folder and add the following:
module Todo

  class ItemListBoxRow < Gtk::ListBoxRow

    type_register


    class << self

      def init

        set_template resource: '/com/iridakos/gtk-todo/ui/todo_item_list_box_row.ui'

      end

    end


    def initialize(item)

      super()

    end

  end

end
We will not bind any children at the moment.
When starting the application, we have to search for files in the :user_data_path , and we must create a Todo::Item instance for each file. For each instance, we must also add a new Todo::ItemListBoxRow to the Todo::ApplicationWindow 's todo_items_list_box list box. One thing at a time.
First, let's bind the todo_items_list_box in the Todo::ApplicationWindow kelas. Change the init method as follows:
def init

  # Set the template from the resources binary

  set_template resource: '/com/iridakos/gtk-todo/ui/application_window.ui'


  bind_template_child 'add_new_item_button'

  bind_template_child 'todo_items_list_box'

end
Next, we'll add an instance method in the same class that will be responsible to load the ToDo list items in the related list box. Add this code in Todo::ApplicationWindow :
def load_todo_items

  todo_items_list_box.children.each { |child| todo_items_list_box.remove child }


  json_files = Dir[File.join(File.expand_path(application.user_data_path), '*.json')]

  items = json_files.map{ |filename| Todo::Item.new(filename: filename) }


  items.each do |item|

    todo_items_list_box.add Todo::ItemListBoxRow.new(item)

  end

end
Then we'll call this method at the end of the initialize method:
def initialize(application)

  super application: application


  set_title 'GTK+ Simple ToDo'


  add_new_item_button.signal_connect 'clicked' do |button|

    new_item_window = NewItemWindow.new(application, Todo::Item.new(user_data_path: application.user_data_path))

    new_item_window.present

  end


  load_todo_items

end
Catatan: We must first empty the list box of its current children rows then refill it. This way, we will call this method after saving a Todo::Item via the signal_connect of the save_button of the Todo::NewItemWindow , and the parent application window will be reloaded! Here's the updated code (in application/ui/new_item_window.rb ):
save_button.signal_connect 'clicked' do |button|

  item.title = title_text_entry.text

  item.notes = notes_text_view.buffer.text

  item.priority = priority_combo_box.active_iter.get_value(0) if priority_combo_box.active_iter

  item.save!


  close


  # Locate the application window

  application_window = application.windows.find { |w| w.is_a? Todo::ApplicationWindow }

  application_window.load_todo_items

end
Previously, we used this code:
json_files = Dir[File.join(File.expand_path(application.user_data_path), '*.json')] to find the names of all the files in the application-user data path with a JSON extension.
Let's see what we've created. Start the application and try adding a new ToDo item. After pressing the Save button, you should see the parent Todo::ApplicationWindow automatically updated with the new item!
What's left is to complete the functionality of the Todo::ItemListBoxRow .
First, we will bind the widgets. Change the init method of the Todo::ItemListBoxRow class as follows:
def init

  set_template resource: '/com/iridakos/gtk-todo/ui/todo_item_list_box_row.ui'


  bind_template_child 'details_button'

  bind_template_child 'todo_item_title_label'

  bind_template_child 'todo_item_details_revealer'

  bind_template_child 'todo_item_notes_text_view'

  bind_template_child 'delete_button'

  bind_template_child 'edit_button'

end
Then, we'll set up the widgets based on the item of each row.
def initialize(item)

  super()


  todo_item_title_label.text = item.title || ''


  todo_item_notes_text_view.buffer.text = item.notes


  details_button.signal_connect 'clicked' do

    todo_item_details_revealer.set_reveal_child !todo_item_details_revealer.reveal_child?

  end


  delete_button.signal_connect 'clicked' do

    item.delete!


    # Locate the application window

    application_window = application.windows.find { |w| w.is_a? Todo::ApplicationWindow }

    application_window.load_todo_items

  end


  edit_button.signal_connect 'clicked' do

    new_item_window = NewItemWindow.new(application, item)

    new_item_window.present

  end

end


def application

  parent = self.parent

  parent = parent.parent while !parent.is_a? Gtk::Window

  parent.application

end
- As you can see, when the
details_buttonis clicked, we instruct thetodo_item_details_revealerto swap the visibility of its contents. - After deleting an item, we find the application's
Todo::ApplicationWindowto call itsload_todo_items, as we did after saving an item. - When clicking to edit a button, we create a new instance of the
Todo::NewItemWindowpassing an item as the current item. Works like a charm! - Finally, to reach the application parent of a list-box row, we defined a simple instance method
applicationthat navigates through the widget's parents until it reaches a window from which it can obtain the application object.
Save and run the application. There it is!
This has been a really long tutorial and, even though there are so many items that we haven't covered, I think we better end it here.
Long post, cat photo.

Useful links
- This tutorial's code
- A set of bindings for the GNOME-2.x libraries to use from Ruby
- Gtk3 tutorial for Ruby based on the official C version
- GTK+ 3 Reference Manual
This was originally published on Lazarus Lazaridis's blog, iridakos.com, and is republished with permission.