Tutorial ini akan menunjukkan cara memonitor server Ubuntu 16.04 dengan Munin dan Monit. Munin menghasilkan grafik yang bagus tentang hampir setiap aspek server Anda, sedangkan Monit memeriksa ketersediaan layanan seperti Apache, MySQL, Postfix dan mengambil tindakan yang sesuai seperti memulai ulang jika menemukan layanan tidak berperilaku seperti yang diharapkan. Kombinasi keduanya memberi Anda pemantauan penuh:grafik yang memungkinkan Anda mengenali masalah saat ini atau yang akan datang, dan pengawas yang memastikan ketersediaan layanan yang dipantau. Tutorial ini berisi dua bab (opsional) tentang mengintegrasikan Munin dan Monit ke dalam ISPConfig 3.1.
1 Catatan Awal
Nama host sistem kami adalah server1.example.com, dan kami memiliki situs web www.example.com dengan root dokumen /var/www/www.example.com/web.
Langkah-langkah berikut harus dilakukan sebagai pengguna root. Untuk menjadi pengguna root di server Anda, jalankan perintah ini:
sudo -s
Pastikan sistem sudah mutakhir sebelum Anda mulai menginstal Munin, jalankan:
apt-get update
apt-get upgrade
Apache digunakan untuk menampilkan halaman Munin, modul apache fcgid diperlukan untuk fitur zoom grafik Munin. Saya akan menginstal apache dan modul libapache2-mod-fcgid dengan apt.
apt-get -y install apache2 libcgi-fast-perl libapache2-mod-fcgid
Aktifkan modul fcgid di Apache.
a2enmod fcgid
2 Instal dan Konfigurasi Munin
Untuk menginstal Munin di Ubuntu 16.04, jalankan perintah di bawah ini:
apt-get -y install munin munin-node munin-plugins-extra
Saat server menjalankan MySQL atau MariaDB, aktifkan beberapa plugin Munin tambahan untuk memantau MySQL:
cd /etc/munin/plugins
ln -s /usr/share/munin/plugins/mysql_ mysql_
ln -s /usr/share/munin/plugins/mysql_bytes mysql_bytes
ln -s /usr/share/munin/plugins/mysql_queries mysql_queries
ln -s /usr/share/munin/plugins/mysql_slowqueries mysql_slowqueries
ln -s /usr/share/munin/plugins/mysql_threads mysql_threads
Selanjutnya, kita harus mengedit file konfigurasi Munin /etc/munin/munin.conf. Batalkan komentar pada baris dbdir, htmldir, logdir, rundir, dan tmpldir (nilai defaultnya bagus). Kami ingin Munin menggunakan nama server1.example.com sebagai ganti localhost.localdomain dalam output HTML, oleh karena itu, kami mengganti localhost.localdomain dengan server1.example.com di bagian pohon host sederhana. Tanpa komentar, file yang diubah terlihat seperti ini:
nano /etc/munin/munin.conf
# Example configuration file for Munin, generated by 'make build'

# The next three variables specifies where the location of the RRD
# databases, the HTML output, logs and the lock/pid files. They all
# must be writable by the user running munin-cron. They are all
# defaulted to the values you see here.
#
dbdir /var/lib/munin
htmldir /var/cache/munin/www
logdir /var/log/munin
rundir /var/run/munin

# Where to look for the HTML templates
#
tmpldir /etc/munin/templates

# Where to look for the static www files
#
#staticdir /etc/munin/static

# temporary cgi files are here. note that it has to be writable by
# the cgi user (usually nobody or httpd).
#
# cgitmpdir /var/lib/munin/cgi-tmp

# (Exactly one) directory to include all files from.
includedir /etc/munin/munin-conf.d
[...]
# a simple host tree
[server1.example.com]
 address 127.0.0.1
 use_node_name yes
[...]
Kita harus menemukan file konfigurasi Apache untuk Munin /etc/munin/apache.conf - itu mendefinisikan alias yang disebut munin ke direktori keluaran HTML munin /var/cache/munin/www yang berarti kita dapat mengakses munin dari semua situs web di server ini dengan menggunakan jalur relatif /munin (mis. http://www.example.com /munin).
Sekarang kita akan mengedit file munin.conf untuk Apache untuk memungkinkan akses dari alamat IP eksternal. Buat cadangan dari file asli:
mv /etc/munin/apache24.conf /etc/munin/apache24.conf_bak
Buka file baru dengan editor:
nano /etc/munin/apache24.conf
Dan paste konten di bawah ini:
Alias /munin /var/cache/munin/www
<Directory /var/cache/munin/www>
 # Require local
 Require all granted
 Options FollowSymLinks SymLinksIfOwnerMatch
 Options None
</Directory>

ScriptAlias /munin-cgi/munin-cgi-graph /usr/lib/munin/cgi/munin-cgi-graph
<Location /munin-cgi/munin-cgi-graph>
 # Require local
 Require all granted
 Options FollowSymLinks SymLinksIfOwnerMatch
 <IfModule mod_fcgid.c>
 SetHandler fcgid-script
 </IfModule>
 <IfModule !mod_fcgid.c>
 SetHandler cgi-script
 </IfModule>
</Location>
Mulai ulang Apache:
service apache2 restart
Kemudian restart Munin:
service munin-node restart
Sekarang tunggu beberapa menit agar Munin dapat menghasilkan output pertamanya, lalu buka http://www.example.com/munin/ di browser Anda, dan Anda melihat statistik pertama:
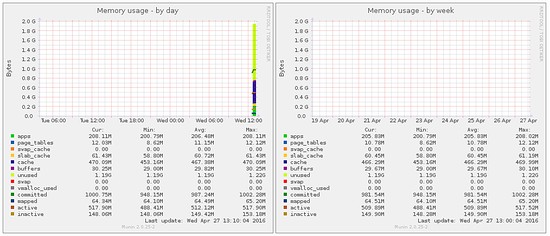
(Ini hanya kutipan kecil dari banyak grafik yang dihasilkan munin...)
3 Password-Lindungi Direktori Output Munin (Opsional, tapi sangat disarankan)
Sekarang adalah ide yang baik untuk melindungi direktori keluaran munin dengan kata sandi kecuali jika Anda ingin semua orang dapat melihat setiap statistik kecil tentang server Anda.
Untuk melakukan ini, kita harus membuat file kata sandi /etc/munin/munin-htpasswd. Kami ingin masuk dengan nama pengguna admin, jadi kami melakukan ini:
htpasswd -c /etc/munin/munin-htpasswd admin
Masukkan kata sandi untuk admin. Kemudian buka /etc/munin/apache.conf lagi...
nano /etc/munin/apache24.conf
... comment out "Wajibkan semua diberikan dan tambahkan baris yang saya tandai dengan warna merah:
Alias /munin /var/cache/munin/www
<Directory /var/cache/munin/www>
 # Require local
 # Require all granted
 AuthUserFile /etc/munin/munin-htpasswd
 AuthName "Munin"
 AuthType Basic
 Require valid-user
 Options None
</Directory>

ScriptAlias /munin-cgi/munin-cgi-graph /usr/lib/munin/cgi/munin-cgi-graph
<Location /munin-cgi/munin-cgi-graph>
 # Require local
 # Require all granted
 AuthUserFile /etc/munin/munin-htpasswd
 AuthName "Munin"
 AuthType Basic
 Require valid-user
 <IfModule mod_fcgid.c>
 SetHandler fcgid-script
 </IfModule>
 <IfModule !mod_fcgid.c>
 SetHandler cgi-script
 </IfModule>
</Location>
Kemudian restart Apache:
service apache2 restart
4 Aktifkan modul tambahan di Munin
Perintah Munin "munin-node-configure --suggest" dapat digunakan untuk mendapatkan rekomendasi modul Munin tambahan yang dapat diaktifkan di server. Jalankan:
munin-node-configure --suggest
Outputnya harus seperti ini:

Kolom "bekas" menunjukkan jika suatu modul diaktifkan, kolom "Saran" menunjukkan jika server menjalankan layanan yang dapat dipantau oleh modul ini. Buat symlink untuk modul di /etc/munin/plugins untuk mengaktifkannya.
Disini saya akan mengaktifkan modul apache_* misalnya:
cd /etc/munin/plugins
ln -s /usr/share/munin/plugins/apache_accesses
ln -s /usr/share/munin/plugins/apache_processes
ln -s /usr/share/munin/plugins/apache_volume
Mulai ulang Munin untuk memuat konfigurasi baru.
service munin-node restart
5 Konfigurasi Munin di ISPConfig (opsional)
Panel Kontrol Hosting ISPConfig memiliki opsi untuk menampilkan data Munin dalam modul Monitor ISPConfig. Data Munin dimuat dalam iframe, karena sebagian besar browser memblokir konten untuk dimuat dari http dalam situs https, kita harus menemukan cara untuk mengakses statistik Munin melalui SSL. Cara termudah adalah dengan menggunakan vhost ISPConfig yang diaktifkan SSL untuk ini dengan membuat symlink di dalam direktori web ISPConfig ke direktori data www Munin.
ln -s /var/cache/munin/www /usr/local/ispconfig/interface/web/munin
Sekarang kita dapat mengakses Munin di browser dengan https://server1.example.com:8080/munin melalui ISPConfig apache vhost.
Langkah selanjutnya adalah menambahkan konfigurasi di ISPConfig.
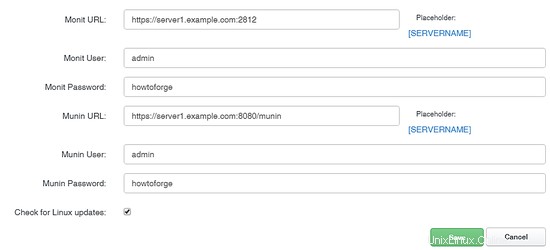
Login ke ISPConfig sebagai pengguna Administrator (admin) dan masuk ke System> Server config, isi URL, username dan password untuk Munin seperti gambar di bawah.
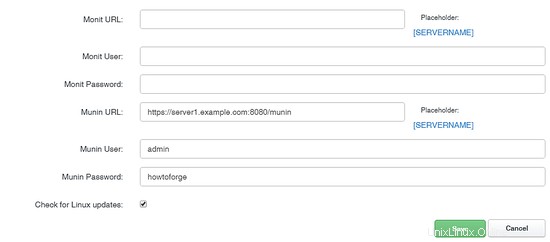
Pastikan Anda menggunakan https:// dan port 8080 di URL munin.
6 Instal dan Konfigurasikan Monit
Untuk menginstal Monit, kita lakukan ini:
apt-get -y install monit
Sekarang kita harus mengedit /etc/monit/monitrc.conf /etc/monit/monitrc default memiliki banyak contoh, dan Anda dapat menemukan lebih banyak contoh konfigurasi di http://mmonit.com/monit/documentation/. Namun, dalam kasus saya, saya ingin memantau proftpd, sshd, mysql, apache, dan postfix, saya ingin mengaktifkan antarmuka web Monit pada port 2812, saya ingin antarmuka web https, saya ingin masuk ke antarmuka web dengan nama pengguna admin dan password howtoforge, dan saya ingin Monit mengirim email peringatan ke [email protected], jadi file saya terlihat seperti ini (Saya telah menambahkan contoh untuk daemon lain ke konfigurasi sehingga Anda dapat menyesuaikan file dengan kebutuhan Anda):
cp /etc/monit/monitrc /etc/monit/monitrc_orig
cat /dev/null > /etc/monit/monitrc
nano /etc/monit/monitrc
set daemon 60
set logfile syslog facility log_daemon
set mailserver localhost
set mail-format { from: [email protected] }
set alert [email protected]
set httpd port 2812 and
 SSL ENABLE
 PEMFILE /var/certs/monit.pem
 allow admin:howtoforge

check process sshd with pidfile /var/run/sshd.pid
 start program "/usr/sbin/service ssh start"
 stop program "/usr/sbin/service ssh stop"
 if failed port 22 protocol ssh then restart
 if 5 restarts within 5 cycles then timeout

check process apache with pidfile /var/run/apache2/apache2.pid
 group www
 start program = "/usr/sbin/service apache2 start"
 stop program = "/usr/sbin/service apache2 stop"
 if failed host localhost port 80 protocol http
 and request "/monit/token" then restart
 if cpu is greater than 60% for 2 cycles then alert
 if cpu > 80% for 5 cycles then restart
 if totalmem > 500 MB for 5 cycles then restart
 if children > 250 then restart
 if loadavg(5min) greater than 10 for 8 cycles then stop
 if 3 restarts within 5 cycles then timeout

#check process mysql with pidfile /var/run/mysqld/mysqld.pid
# group database
# start program = "/usr/sbin/service mysql start"
# stop program = "/usr/sbin/service mysql stop"
# if failed host 127.0.0.1 port 3306 then restart
# if 5 restarts within 5 cycles then timeout

#check process proftpd with pidfile /var/run/proftpd.pid
# start program = "/usr/sbin/service proftpd start"
# stop program = "/usr/sbin/service proftpd stop"
# if failed port 21 protocol ftp then restart
# if 5 restarts within 5 cycles then timeout
#
#check process postfix with pidfile /var/spool/postfix/pid/master.pid
# group mail
# start program = "/usr/sbin/service postfix start"
# stop program = "/usr/sbin/service postfix stop"
# if failed port 25 protocol smtp then restart
# if 5 restarts within 5 cycles then timeout
#
#check process nginx with pidfile /var/run/nginx.pid
# start program = "/usr/sbin/service nginx start"
# stop program = "/usr/sbin/service nginx stop"
# if failed host 127.0.0.1 port 80 then restart
#
#check process memcached with pidfile /var/run/memcached.pid
# start program = "/usr/sbin/service memcached start"
# stop program = "/usr/sbin/service memcached stop"
# if failed host 127.0.0.1 port 11211 then restart
#
#check process pureftpd with pidfile /var/run/pure-ftpd/pure-ftpd.pid
# start program = "/usr/sbin/service pure-ftpd-mysql start"
# stop program = "/usr/sbin/service pure-ftpd-mysql stop"
# if failed port 21 protocol ftp then restart
# if 5 restarts within 5 cycles then timeout
#
#check process named with pidfile /var/run/named/named.pid
# start program = "/usr/sbin/service bind9 start"
# stop program = "/usr/sbin/service bind9 stop"
# if failed host 127.0.0.1 port 53 type tcp protocol dns then restart
# if failed host 127.0.0.1 port 53 type udp protocol dns then restart
# if 5 restarts within 5 cycles then timeout
#
#check process ntpd with pidfile /var/run/ntpd.pid
# start program = "/usr/sbin/service ntp start"
# stop program = "/usr/sbin/service ntp stop"
# if failed host 127.0.0.1 port 123 type udp then restart
# if 5 restarts within 5 cycles then timeout
#
#check process mailman with pidfile /var/run/mailman/mailman.pid
# group mail
# start program = "/usr/sbin/service mailman start"
# stop program = "/usr/sbin/service mailman stop"
#
#check process amavisd with pidfile /var/run/amavis/amavisd.pid
# group mail
# start program = "/usr/sbin/service amavis start"
# stop program = "/usr/sbin/service amavis stop"
# if failed port 10024 protocol smtp then restart
# if 5 restarts within 5 cycles then timeout
#
#check process courier-imap with pidfile /var/run/courier/imapd.pid
# group mail
# start program = "/usr/sbin/service courier-imap start"
# stop program = "/usr/sbin/service courier-imap stop"
# if failed host localhost port 143 type tcp protocol imap then restart
# if 5 restarts within 5 cycles then timeout
#
#check process courier-imap-ssl with pidfile /var/run/courier/imapd-ssl.pid
# group mail
# start program = "/usr/sbin/service courier-imap-ssl start"
# stop program = "/usr/sbin/service courier-imap-ssl stop"
# if failed host localhost port 993 type tcpssl sslauto protocol imap then restart
# if 5 restarts within 5 cycles then timeout
#
#check process courier-pop3 with pidfile /var/run/courier/pop3d.pid
# group mail
# start program = "/usr/sbin/service courier-pop start"
# stop program = "/usr/sbin/service courier-pop stop"
# if failed host localhost port 110 type tcp protocol pop then restart
# if 5 restarts within 5 cycles then timeout
#
#check process courier-pop3-ssl with pidfile /var/run/courier/pop3d-ssl.pid
# group mail
# start program = "/usr/sbin/service courier-pop-ssl start"
# stop program = "/usr/sbin/service courier-pop-ssl stop"
# if failed host localhost port 995 type tcpssl sslauto protocol pop then restart
# if 5 restarts within 5 cycles then timeout
#
#check process dovecot with pidfile /var/run/dovecot/master.pid
# group mail
# start program = "/usr/sbin/service dovecot start"
# stop program = "/usr/sbin/service dovecot stop"
# if failed host localhost port 143 type tcp protocol imap then restart
# if 5 restarts within 5 cycles then timeout
File konfigurasi cukup menjelaskan; jika Anda tidak yakin tentang suatu opsi, lihat dokumentasi Monit:http://mmonit.com/monit/documentation/monit.html
Di bagian Apache dari konfigurasi Monit Anda menemukan ini:
   if failed host localhost port 80 protocol http
      and request "/monit/token" then restart
yang berarti Monit mencoba terhubung ke localhost pada port 80 dan mencoba mengakses file /monit/token yaitu /var/www/html/monit/token karena akar dokumen situs web kami adalah /var/www/html. Jika Monit tidak berhasil berarti Apache tidak berjalan, dan Monit akan memulai ulang. Sekarang kita harus membuat file /var/www/html/monit/token dan menulis beberapa string acak ke dalamnya:
mkdir /var/www/html/monit
echo "hello" > /var/www/html/monit/token
Selanjutnya, kita membuat pem cert (/var/certs/monit.pem) yang kita butuhkan untuk antarmuka web Monit terenkripsi SSL:
mkdir /var/certs
cd /var/certs
Kami memerlukan file konfigurasi OpenSSL untuk membuat sertifikat kami. Ini bisa terlihat seperti ini:
nano /var/certs/monit.cnf
# create RSA certs - Server

RANDFILE = ./openssl.rnd

[ req ]
default_bits = 2048
encrypt_key = yes
distinguished_name = req_dn
x509_extensions = cert_type

[ req_dn ]
countryName = Country Name (2 letter code)
countryName_default = MO

stateOrProvinceName             = State or Province Name (full name)
stateOrProvinceName_default     = Monitoria

localityName                    = Locality Name (eg, city)
localityName_default            = Monittown

organizationName                = Organization Name (eg, company)
organizationName_default        = Monit Inc.

organizationalUnitName          = Organizational Unit Name (eg, section)
organizationalUnitName_default  = Dept. of Monitoring Technologies

commonName                      = Common Name (FQDN of your server)
commonName_default              = server.monit.mo

emailAddress                    = Email Address
emailAddress_default            = [email protected]

[ cert_type ]
nsCertType = server
Sekarang kita buat sertifikatnya seperti ini:
openssl req -new -x509 -days 365 -nodes -config ./monit.cnf -out /var/certs/monit.pem -keyout /var/certs/monit.pem
openssl gendh 1024 >> /var/certs/monit.pem
openssl x509 -subject -dates -fingerprint -noout -in /var/certs/monit.pem
chmod 600 /var/certs/monit.pem
Akhirnya, kita bisa memulai Monit:
service monit restart
Sekarang arahkan browser Anda ke https://www.example.com:2812/ (pastikan port 2812 tidak diblokir oleh firewall Anda), masuk dengan admin dan howtoforge, dan Anda akan melihat antarmuka web Monit. Seharusnya terlihat seperti ini:
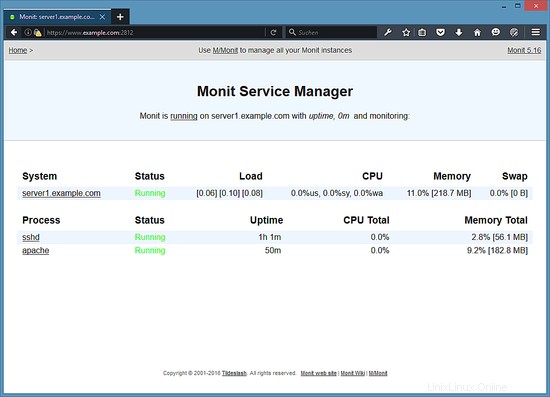
(Layar Utama)
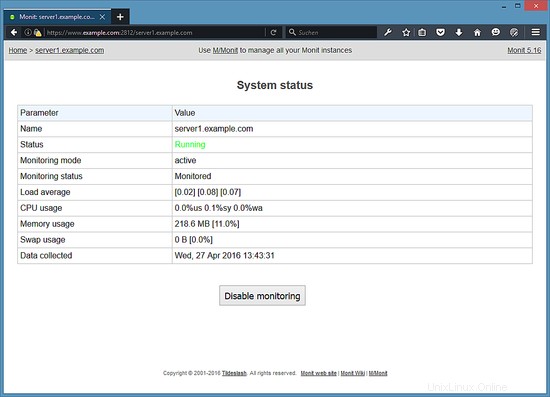
(Halaman Status Sistem)
Tergantung pada konfigurasi Anda di /etc/monit/monitrc monit akan memulai ulang layanan Anda jika gagal dan mengirim email pemberitahuan jika ID proses layanan berubah, dll.
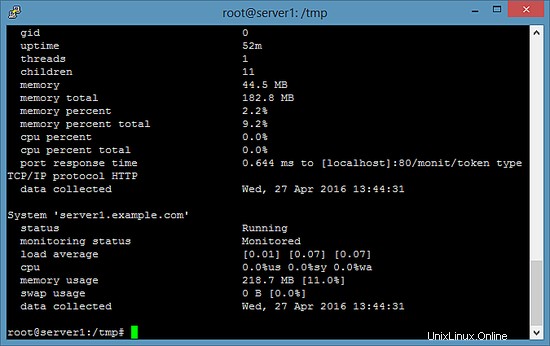
Untuk mendapatkan status Monit di shell, jalankan perintah "monit status":
monit status
Perintah akan menampilkan status semua layanan yang dipantau.
7 Konfigurasikan Monit di ISPConfig
Panel Kontrol Server ISPConfig dapat menampilkan data Monit di dalam modul Monitornya. Untuk mengaktifkan fungsi tersebut di ISPConfig, login ke ISPConfig sebagai pengguna Administrator (admin), masuk ke System> Server config, isi URL, username dan password untuk Monit seperti di bawah ini.
8 Tautan
- munin:http://munin-monitoring.org/
- monit:http://mmonit.com/monit/