Ghost adalah platform blogging gratis, open source, dan ringan yang dibangun di atas Node.js. Ini sederhana, dapat disesuaikan, dan memungkinkan Anda membuat dan mempublikasikan konten Anda di internet. Ini dirancang khusus untuk blogging sehingga jauh lebih cepat daripada platform blogging lainnya. Ini menawarkan serangkaian fitur yang kaya, beberapa di antaranya tercantum di bawah ini:
- Editor penurunan harga
- Penerbitan terjadwal
- Menyediakan aplikasi untuk Linux, Mac, dan Windows
- Menyediakan ratusan tema gratis dan premium
- Analisis bawaan
- Menyediakan plugin migrasi untuk bermigrasi dari WordPress ke Ghost
Tutorial ini akan menjelaskan cara menginstal Ghost dengan Nginx dan Let's Encrypt SSL di Ubuntu 20.04.
Prasyarat
- Server yang menjalankan Ubuntu 20.04.
- Nama domain yang valid menunjuk ke IP server Anda.
- Kata sandi root dikonfigurasi di server Anda.
Memulai
Pertama, disarankan untuk memperbarui cache paket APT ke versi terbaru. Anda dapat memperbaruinya dengan perintah berikut:
apt-get update -y
Setelah cache APT diperbarui, instal dependensi lain yang diperlukan menggunakan perintah berikut:
apt-get install gnupg2 curl unzip git acl -y
Selanjutnya, Anda juga perlu menginstal Node.js ke sistem Anda.
Pertama, tambahkan repositori Node.js dengan perintah berikut:
curl -sL https://deb.nodesource.com/setup_12.x | bash -
Setelah repositori terinstal, jalankan perintah berikut untuk menginstal Node.js ke sistem Anda.
apt-get install nodejs -y
Setelah instalasi selesai, verifikasi versi Node.js menggunakan perintah berikut:
node -v
Anda akan mendapatkan output berikut:
v12.22.1
Selanjutnya, verifikasi versi NPM dengan perintah berikut:
npm -v
Anda akan mendapatkan output berikut:
6.14.12
Instal Nginx dan MariaDB
Selanjutnya, Anda perlu menginstal server web Nginx dan server database MariaDB ke sistem Anda. Anda dapat menginstal kedua paket dengan perintah berikut:
apt-get install mariadb-server nginx -y
Setelah instalasi selesai, amankan instalasi MariaDB dan atur kata sandi root MariaDB dengan perintah berikut:
mysql_secure_installation
Jawab semua pertanyaan untuk mengamankan instalasi MariaDB:
Enter current password for root (enter for none):
Set root password? [Y/n] Y
New password:
Re-enter new password:
Remove anonymous users? [Y/n] Y
Disallow root login remotely? [Y/n] Y
Remove test database and access to it? [Y/n] Y
Reload privilege tables now? [Y/n] Y
Selanjutnya, login ke MariaDB dengan perintah berikut:
mysql -u root -p
Setelah login, buat database dan user untuk Ghost dengan perintah berikut:
MariaDB [(none)]> CREATE DATABASE ghostdb;
MariaDB [(none)]> CREATE USER 'ghostuser'@'localhost' IDENTIFIED BY 'password';
Selanjutnya, berikan semua hak istimewa ke database Ghost dengan perintah berikut:
MariaDB [(none)]> GRANT ALL ON ghostdb.* TO 'ghostuser'@'localhost';
Selanjutnya, flush hak istimewa dan keluar dari MariaDB dengan perintah berikut:
MariaDB [(none)]> FLUSH PRIVILEGES;
MariaDB [(none)]> EXIT;
Setelah selesai, Anda dapat melanjutkan ke langkah berikutnya.
Instal Kli Hantu
Selanjutnya, Anda perlu menginstal Ghost Cl untuk menginstal dan mengelola Ghost. Anda dapat menginstalnya menggunakan NPM seperti yang ditunjukkan di bawah ini:
npm install -g [email protected]
Setelah diinstal, verifikasi versi Ghost Cl yang diinstal dengan perintah berikut:
ghost version
Anda akan melihat output berikut:
Ghost-CLI version: 1.16.3
Instal Ghost
Pertama, buat pengguna terpisah untuk Ghost dengan perintah berikut:
adduser user1
Selanjutnya, tambahkan user1 ke sudo dan www-data group dengan perintah berikut:
adduser user1 sudo
adduser user1 www-data
Selanjutnya, login dengan user1 dan buat direktori untuk Ghost dengan perintah berikut:
su - user1
sudo mkdir /var/www/ghost
Selanjutnya, atur izin dan kepemilikan yang tepat dengan perintah berikut:
sudo chown -R www-data:www-data /var/www/ghost
sudo chown -R www-data:www-data /var/www/
sudo chmod 775 /var/www/ghost
sudo setfacl -R -m u:user1:rwx /var/www/ghost/
Selanjutnya, ubah direktori menjadi ghost dan instal platform blogging Ghost dengan perintah berikut:
cd /var/www/ghost
ghost install
Anda akan diminta untuk memberikan URL blog, nama database, nama pengguna, kata sandi, dan informasi lainnya seperti yang ditunjukkan di bawah ini:
? Enter your blog URL: https://ghost.linuxbuz.com
? Enter your MySQL hostname: localhost
? Enter your MySQL username: ghostuser
? Enter your MySQL password: [hidden]
? Enter your Ghost database name: ghostdb
? Configuring Ghost
? Setting up instance
+ sudo useradd --system --user-group ghost
+ sudo chown -R ghost:ghost /var/www/ghost/content
? Setting up "ghost" system user
? Setting up "ghost" mysql user [skipped]
? Do you wish to set up Nginx? Yes
+ sudo mv /tmp/ghost-linuxbuz-com/ghost.linuxbuz.com.conf /etc/nginx/sites-available/ghost.linuxbuz.com.conf
+ sudo ln -sf /etc/nginx/sites-available/ghost.linuxbuz.com.conf /etc/nginx/sites-enabled/ghost.linuxbuz.com.conf
+ sudo nginx -s reload
? Setting up SSL [skipped]
? Do you wish to set up Systemd? Yes
+ sudo mv /tmp/ghost-linuxbuz-com/ghost_ghost-linuxbuz-com.service /lib/systemd/system/ghost_ghost-linuxbuz-com.service
+ sudo systemctl daemon-reload
? Setting up Systemd
+ sudo systemctl is-active ghost_ghost-linuxbuz-com
? Do you want to start Ghost? (Y/n)
Pada titik ini, Ghost diinstal dan dimulai.
Amankan Ghost dengan Let's Encrypt SSL
Selanjutnya, Anda perlu mengamankan Ghost dengan Let's Encrypt SSL.
Pertama, instal klien Certbot dengan perintah berikut:
sudo apt-get install certbot python3-certbot-nginx -y
Setelah terinstal, jalankan perintah berikut untuk mengunduh Let's Encrypt SSL dan konfigurasikan Nginx untuk menggunakan sertifikat tersebut:
sudo certbot --nginx -d ghost.linuxbuz.com
Anda akan diminta untuk memberikan alamat email Anda dan menerima persyaratan layanan seperti yang ditunjukkan di bawah ini:
Saving debug log to /var/log/letsencrypt/letsencrypt.log
Plugins selected: Authenticator nginx, Installer nginx
Enter email address (used for urgent renewal and security notices) (Enter 'c' to
cancel): [email protected]

- - - - - - - - - - - - - - - - - - - - - - - - - - - - - - - - - - - - - - - -
Please read the Terms of Service at
https://letsencrypt.org/documents/LE-SA-v1.2-November-15-2017.pdf. You must
agree in order to register with the ACME server at
https://acme-v02.api.letsencrypt.org/directory
- - - - - - - - - - - - - - - - - - - - - - - - - - - - - - - - - - - - - - - -
(A)gree/(C)ancel: A

- - - - - - - - - - - - - - - - - - - - - - - - - - - - - - - - - - - - - - - -
Would you be willing to share your email address with the Electronic Frontier
Foundation, a founding partner of the Let's Encrypt project and the non-profit
organization that develops Certbot? We'd like to send you email about our work
encrypting the web, EFF news, campaigns, and ways to support digital freedom.
- - - - - - - - - - - - - - - - - - - - - - - - - - - - - - - - - - - - - - - -
(Y)es/(N)o: Y
Obtaining a new certificate
Performing the following challenges:
http-01 challenge for ghost.linuxbuz.com
Waiting for verification...
Cleaning up challenges
Deploying Certificate to VirtualHost /etc/nginx/sites-enabled/ghost.linuxbuz.com.conf
Selanjutnya, pilih apakah akan mengalihkan lalu lintas HTTP ke HTTPS atau tidak:
Please choose whether or not to redirect HTTP traffic to HTTPS, removing HTTP access.
- - - - - - - - - - - - - - - - - - - - - - - - - - - - - - - - - - - - - - - -
1: No redirect - Make no further changes to the webserver configuration.
2: Redirect - Make all requests redirect to secure HTTPS access. Choose this for
new sites, or if you're confident your site works on HTTPS. You can undo this
change by editing your web server's configuration.
- - - - - - - - - - - - - - - - - - - - - - - - - - - - - - - - - - - - - - - -
Select the appropriate number [1-2] then [enter] (press 'c' to cancel): 2
Ketik 2 dan tekan Enter untuk menyelesaikan instalasi.
Redirecting all traffic on port 80 to ssl in /etc/nginx/sites-enabled/ghost.linuxbuz.com.conf

- - - - - - - - - - - - - - - - - - - - - - - - - - - - - - - - - - - - - - - -
Congratulations! You have successfully enabled https://ghost.linuxbuz.com

You should test your configuration at:
https://www.ssllabs.com/ssltest/analyze.html?d=ghost.linuxbuz.com
- - - - - - - - - - - - - - - - - - - - - - - - - - - - - - - - - - - - - - - -

IMPORTANT NOTES:
 - Congratulations! Your certificate and chain have been saved at:
   /etc/letsencrypt/live/ghost.linuxbuz.com/fullchain.pem
   Your key file has been saved at:
   /etc/letsencrypt/live/ghost.linuxbuz.com/privkey.pem
   Your cert will expire on 2021-07-13. To obtain a new or tweaked
   version of this certificate in the future, simply run certbot again
   with the "certonly" option. To non-interactively renew *all* of
   your certificates, run "certbot renew"
 - Your account credentials have been saved in your Certbot
   configuration directory at /etc/letsencrypt. You should make a
   secure backup of this folder now. This configuration directory will
   also contain certificates and private keys obtained by Certbot so
   making regular backups of this folder is ideal.
 - If you like Certbot, please consider supporting our work by:

   Donating to ISRG / Let's Encrypt:   https://letsencrypt.org/donate
   Donating to EFF:                    https://eff.org/donate-le
Sekarang, Anda dapat memverifikasi situs web Ghost dengan perintah berikut;
ghost ls
Anda akan melihat output berikut:
+ sudo systemctl is-active ghost_ghost-linuxbuz-com
??????????????????????????????????????????????????????????????????????????????????????????????????????????????????????????????
? Name               ? Location       ? Version ? Status               ? URL                        ? Port ? Process Manager ?
??????????????????????????????????????????????????????????????????????????????????????????????????????????????????????????????
? ghost-linuxbuz-com ? /var/www/ghost ? 4.2.1   ? running (production) ? https://ghost.linuxbuz.com ? 2368 ? systemd         ?
??????????????????????????????????????????????????????????????????????????????????????????????????????????????????????????????
Anda juga dapat memverifikasi layanan Ghost dengan perintah berikut:
sudo systemctl status ghost_ghost-linuxbuz-com
Anda akan melihat output berikut:
? ghost_ghost-linuxbuz-com.service - Ghost systemd service for blog: ghost-linuxbuz-com
     Loaded: loaded (/lib/systemd/system/ghost_ghost-linuxbuz-com.service; enabled; vendor preset: enabled)
     Active: active (running) since Wed 2021-04-14 07:05:33 UTC; 9min ago
       Docs: https://ghost.org/docs/
   Main PID: 7546 (node)
      Tasks: 22 (limit: 2353)
     Memory: 134.3M
     CGroup: /system.slice/ghost_ghost-linuxbuz-com.service
             ??7546 ghost run
             ??7590 /usr/bin/node current/index.js

Apr 14 07:13:44 ubuntu node[7590]: [2021-04-14 07:13:44] INFO "GET /ghost/assets/img/dashboard/start-membership-baafa2c6558d118ae59cb1fddab045>
Apr 14 07:13:44 ubuntu node[7590]: [2021-04-14 07:13:44] INFO "GET /ghost/assets/img/dashboard/the-browser-f5e7e199fe82d8435913e84d022fa7e1.pn>
Apr 14 07:13:44 ubuntu node[7590]: [2021-04-14 07:13:44] INFO "GET /ghost/assets/img/dashboard/join-community-bb5478f7dca6c04a2d0baf2b02f880fb>
Apr 14 07:13:44 ubuntu node[7590]: [2021-04-14 07:13:44] INFO "GET /ghost/api/canary/admin/members/?filter=status%3Apaid&order=created_at%20as>
Apr 14 07:14:11 ubuntu node[7590]: [2021-04-14 07:14:11] INFO "GET /" 200 475ms
Apr 14 07:14:11 ubuntu node[7590]: [2021-04-14 07:14:11] INFO "GET /" 200 480ms
Apr 14 07:14:15 ubuntu node[7590]: [2021-04-14 07:14:15] INFO "GET /members/api/site/" 200 12ms
Apr 14 07:14:18 ubuntu node[7590]: [2021-04-14 07:14:18] INFO "GET /" 304 142ms
Apr 14 07:14:25 ubuntu node[7590]: [2021-04-14 07:14:25] INFO "GET /members/api/site/" 304 4ms
Apr 14 07:14:26 ubuntu node[7590]: [2021-04-14 07:14:26] INFO "GET /members/api/member/" 401 4ms
Akses Antarmuka Admin Hantu
Sekarang, buka browser web Anda dan akses antarmuka admin Ghost menggunakan URL https://ghost.linuxbuz.com/ghost/ . Anda akan melihat halaman berikut:
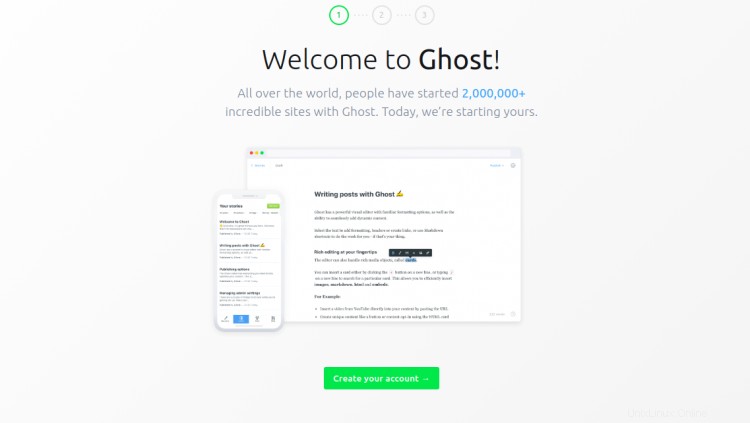
Klik Buat akun Anda tombol untuk membuat akun pertama Anda:
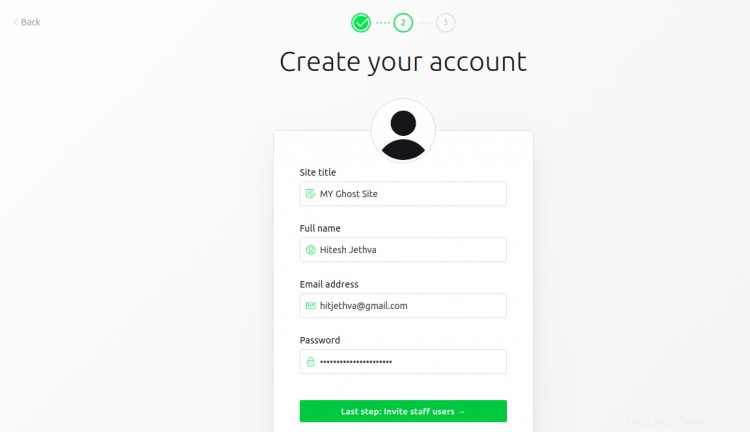
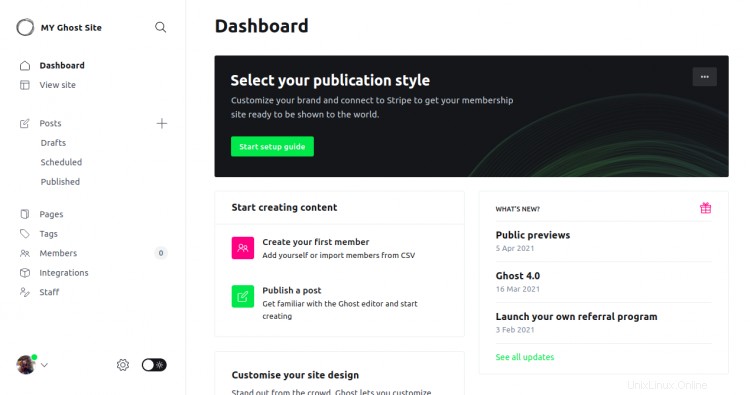
Berikan detail akun Anda dan klik pada Saya akan melakukannya nanti di bagian bawah layar. Anda akan melihat antarmuka admin Ghost di halaman berikut:
Anda juga dapat mengakses situs web Ghost Anda menggunakan URL https://ghost.linuxbuz.com/. Anda akan melihat halaman berikut:

Kesimpulan
Selamat! Anda telah berhasil menginstal platform blogging Ghost di Ubuntu 20.04. Sekarang Anda dapat membuat dan memublikasikan konten Anda sendiri dari antarmuka Ghost.