Hugo adalah kerangka kerja sumber terbuka dan gratis yang ditulis dalam bahasa Go yang dapat digunakan untuk membuat situs web dengan mudah. Ini adalah generator situs statis yang sederhana, cepat dan aman, Anda tidak memerlukan database apa pun untuk menjalankannya. Hugo mendukung jenis konten tak terbatas, taksonomi, menu, konten dinamis berbasis API, dan banyak lagi, semuanya tanpa plugin. Hugo hadir dengan serangkaian fitur yang kaya termasuk, Manajemen Konten yang Kuat, Template Bawaan, Kode Pendek, Output Kustom, Multibahasa, dan banyak lagi.
Dalam tutorial ini, kita akan mempelajari cara menginstal Hugo di server Ubuntu 18.04 LTS.
Persyaratan
- Server yang menjalankan Ubuntu 18.04.
- Alamat IP statis 136.243.240.39 dikonfigurasi di server Anda.
- Kata sandi root disiapkan untuk server Anda.
Memulai
Sebelum memulai, Anda perlu memperbarui sistem Anda dengan versi terbaru. Anda dapat melakukannya dengan menjalankan perintah berikut:
apt-get update -y
 apt-get upgrade -y
Setelah server Anda diperbarui, mulai ulang server Anda untuk menerapkan perubahan.
Instal Hugo
Secara default, versi terbaru Hugo tidak tersedia di repositori default Ubuntu 18.04. Jadi, Anda perlu mengunduhnya dari repositori Git. Anda dapat mengunduhnya dengan perintah berikut:
wget https://github.com/gohugoio/hugo/releases/download/v0.58.2/hugo_0.58.2_Linux-64bit.deb
Setelah unduhan selesai, instal Hugo dengan perintah berikut:
dpkg -i hugo_0.58.2_Linux-64bit.deb
Jika Anda mendapatkan kesalahan ketergantungan, jalankan perintah berikut untuk menyelesaikan ketergantungan:
apt-get install -f
Selanjutnya, Anda dapat memeriksa versi Hugo dengan perintah berikut:
hugo version
Anda akan mendapatkan output berikut:
Hugo Static Site Generator v0.58.2-253E5FDC linux/amd64 BuildDate: 2019-09-13T08:05:59Z
Anda juga dapat melihat daftar opsi yang tersedia dengan Hugo dengan menjalankan perintah berikut:
hugo --help
Anda akan mendapatkan output berikut:
hugo is the main command, used to build your Hugo site.

Hugo is a Fast and Flexible Static Site Generator
built with love by spf13 and friends in Go.

Complete documentation is available at http://gohugo.io/.

Usage:
  hugo [flags]
  hugo [command]

Available Commands:
  config      Print the site configuration
  convert     Convert your content to different formats
  deploy      Deploy your site to a Cloud provider.
  env         Print Hugo version and environment info
  gen         A collection of several useful generators.
  help        Help about any command
  import      Import your site from others.
  list        Listing out various types of content
  mod         Various Hugo Modules helpers.
  new         Create new content for your site
  server      A high performance webserver
  version     Print the version number of Hugo

Flags:
  -b, --baseURL string         hostname (and path) to the root, e.g. http://spf13.com/
  -D, --buildDrafts            include content marked as draft
  -E, --buildExpired           include expired content
  -F, --buildFuture            include content with publishdate in the future
      --cacheDir string        filesystem path to cache directory. Defaults: $TMPDIR/hugo_cache/
      --cleanDestinationDir    remove files from destination not found in static directories
      --config string          config file (default is path/config.yaml|json|toml)
      --configDir string       config dir (default "config")
  -c, --contentDir string      filesystem path to content directory
      --debug                  debug output
  -d, --destination string     filesystem path to write files to
      --disableKinds strings   disable different kind of pages (home, RSS etc.)
      --enableGitInfo          add Git revision, date and author info to the pages
  -e, --environment string     build environment
      --forceSyncStatic        copy all files when static is changed.
      --gc                     enable to run some cleanup tasks (remove unused cache files) after the build
  -h, --help                   help for hugo
      --i18n-warnings          print missing translations
      --ignoreCache            ignores the cache directory
      --ignoreVendor           ignores any _vendor directory
  -l, --layoutDir string       filesystem path to layout directory
      --log                    enable Logging
      --logFile string         log File path (if set, logging enabled automatically)
      --minify                 minify any supported output format (HTML, XML etc.)
      --noChmod                don't sync permission mode of files
      --noTimes                don't sync modification time of files
      --path-warnings          print warnings on duplicate target paths etc.
      --quiet                  build in quiet mode
      --renderToMemory         render to memory (only useful for benchmark testing)
  -s, --source string          filesystem path to read files relative from
      --templateMetrics        display metrics about template executions
      --templateMetricsHints   calculate some improvement hints when combined with --templateMetrics
  -t, --theme strings          themes to use (located in /themes/THEMENAME/)
      --themesDir string       filesystem path to themes directory
      --trace file             write trace to file (not useful in general)
  -v, --verbose                verbose output
      --verboseLog             verbose logging
  -w, --watch                  watch filesystem for changes and recreate as needed
Setelah selesai, Anda dapat melanjutkan ke langkah berikutnya.
Buat Situs Web dengan Hugo
Hugo sekarang terinstal, saatnya membuat situs web dan konten dengan Hugo.
Anda dapat membuat situs web baru bernama test.example.com dengan menjalankan perintah berikut:
hugo new site test.example.com
Setelah situs web berhasil dibuat, Anda akan mendapatkan output berikut:
Congratulations! Your new Hugo site is created in /root/test.example.com. Just a few more steps and you're ready to go: 1. Download a theme into the same-named folder. Choose a theme from https://themes.gohugo.io/, or create your own with the "hugo new theme" command. 2. Perhaps you want to add some content. You can add single files with "hugo new / . ". 3. Start the built-in live server via "hugo server". Visit https://gohugo.io/ for quickstart guide and full documentation.
Anda juga dapat membuat daftar semua file yang dibuat di bawah situs web Anda dengan perintah berikut:
ls test.example.com/
Anda akan melihat output berikut:
archetypes config.toml content data layouts static themes
Buat halaman Tentang dan Entri Blog
Sekarang, ubah direktori ke situs web Anda dan buat halaman about.md dengan perintah berikut:
cd test.example.com
 hugo new about.md
Anda akan melihat output berikut:
/root/test.example.com/content/about.md created
Selanjutnya, buka file about.md dan tambahkan beberapa konten:
nano content/about.md
Lakukan perubahan berikut:
---
title: "About"
date: 2019-09-10T06:57:08Z
draft: false
---

I am hitesh jethva working as a technical writer.
Simpan dan tutup file setelah Anda selesai. Kemudian, buat postingan pertama Anda dengan perintah berikut:
hugo new post/first.md
Anda akan melihat output berikut:
/root/test.example.com/content/post/first.md created
Selanjutnya, buka file terlebih dahulu.md dan tambahkan beberapa konten:
nano content/post/first.md
Lakukan perubahan berikut:
---
title: "First"
date: 2019-09-10T06:58:51Z
draft: false
---

## This is my first blog post

Hi How are you!
Siapkan Tema Pertama Anda
Halaman tentang dan postingan blog Anda sekarang telah dibuat, saatnya menyiapkan tema pertama Anda.
Pertama, ubah direktori menjadi tema dan unduh hugo-strata-theme dengan perintah berikut:
cd themes
 wget https://github.com/digitalcraftsman/hugo-strata-theme/archive/master.zip
Setelah diunduh, ekstrak tema yang diunduh dengan perintah berikut:
unzip master.zip
Selanjutnya, rename tema yang telah diekstrak seperti gambar di bawah ini:
mv hugo-strata-theme-master hugo-strata-theme
Selanjutnya, Anda perlu menyalin isi file contoh config.toml dari tema/hugo-strata-theme ke file config.toml situs Anda yang terletak di /root/test.example.com/config.toml.
ANDA dapat melakukannya dengan perintah berikut:
cat hugo-strata-theme/exampleSite/config.toml > ../config.toml
Selanjutnya, perbarui variabel baseurl dan sertakan juga halaman tentang baru Anda ke dalam navigasi tema ini di file config.toml seperti yang ditunjukkan di bawah ini:
nano ../config.toml
Perbarui URL dasar seperti yang ditunjukkan di bawah ini:
baseurl = "/"
Tambahkan juga baris berikut untuk menyertakan halaman tentang baru Anda:
 [[menu.main]]
  name = "About"
  url  = "about"
  weight = 5
Simpan dan tutup file setelah Anda selesai.
Selanjutnya, Anda juga perlu memperbarui tata letak laman landas dengan tata letak template tema yang terletak di themes/hugo-strata-theme/layouts/index.html ke test.example.com/layouts/index.html :
nano /root/test.example.com/layouts/index.html
Tambahkan konten berikut:
{{ define "main" }}
        {{ if not .Site.Params.about.hide }}
                {{ partial "about" . }}
        {{ end }}

        {{ if not .Site.Params.portfolio.hide }}
                {{ partial "portfolio" . }}
        {{ end }}

        {{ if not .Site.Params.recentposts.hide }}
                {{ partial "recent-posts" . }}
        {{ end }}

        {{ if not .Site.Params.contact.hide }}
                {{ partial "contact" . }}
        {{ end }}
{{ end }}
Simpan dan tutup file setelah Anda selesai.
Setelah selesai, Anda dapat melanjutkan ke langkah berikutnya.
Bangun Situs Web Anda
Tema Anda sekarang dikonfigurasi untuk situs web Anda. Saatnya membangun situs web Anda. Untuk melakukannya, ubah direktori ke situs web Anda dan buat situs dengan perintah berikut:
cd /root/test.example.com
 hugo
Anda akan melihat output berikut:
                   | EN
+------------------+----+
  Pages            | 17
  Paginator pages  |  0
  Non-page files   |  0
  Static files     | 26
  Processed images |  0
  Aliases          |  5
  Sitemaps         |  1
  Cleaned          |  0

Total in 18 ms
Sekarang, mulai server Hugo Anda dan ikat dengan alamat IP server Anda dengan menjalankan perintah berikut:
hugo server --bind=0.0.0.0 --baseUrl=http://136.243.240.39 -D -F
Setelah server berhasil dimulai, Anda akan melihat output berikut:
                   | EN
+------------------+----+
  Pages            | 17
  Paginator pages  |  0
  Non-page files   |  0
  Static files     | 26
  Processed images |  0
  Aliases          |  5
  Sitemaps         |  1
  Cleaned          |  0

Total in 28 ms
Watching for changes in /root/test.example.com/{content,data,layouts,static,themes}
Watching for config changes in /root/test.example.com/config.toml
Serving pages from memory
Running in Fast Render Mode. For full rebuilds on change: hugo server --disableFastRender
Web Server is available at http://136.243.240.39:1313/ (bind address 0.0.0.0)
Press Ctrl+C to stop
Setelah selesai, Anda dapat melanjutkan untuk mengakses antarmuka web Hugo.
Mengakses Server Hugo
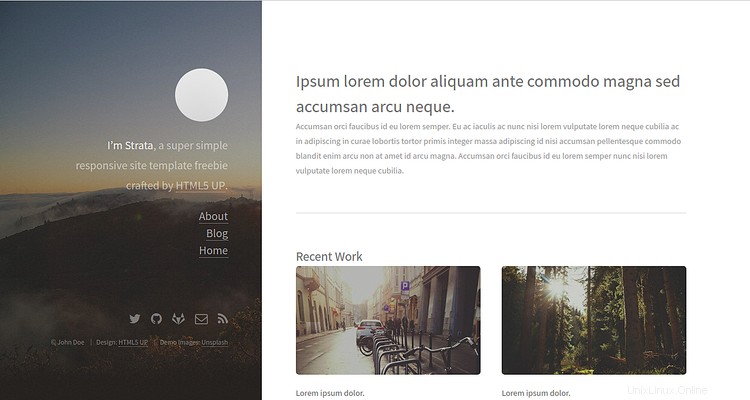
Server Hugo Anda sekarang dimulai dan mendengarkan pada port 1313. Selanjutnya, buka browser web Anda dan ketik URL http://136.243.240.39:1313. Anda akan diarahkan ke dasbor server Hugo Anda seperti yang ditunjukkan di bawah ini:
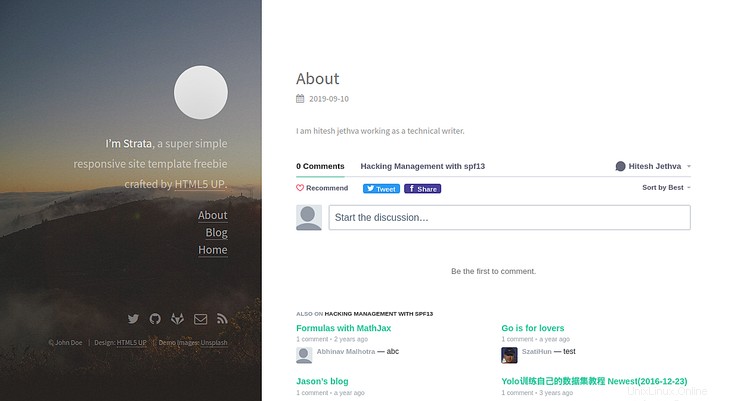
Sekarang, klik Tentang di panel kiri. Anda akan melihat halaman Tentang Anda pada gambar berikut:
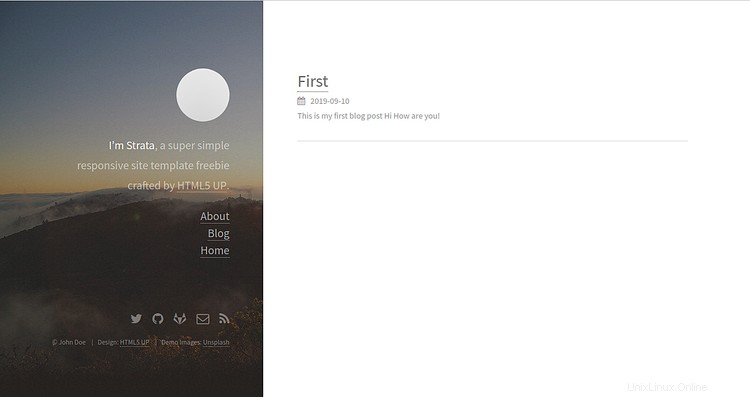
Sekarang, klik Blog tombol di panel kiri. Anda akan melihat posting blog Anda pada gambar berikut:
Kesimpulan
Dalam tutorial di atas, kita belajar cara menginstal server Hugo di server Ubuntu 18.04. Kami juga telah belajar cara membuat situs dengan halaman dan tema tentang dengan Hugo. Untuk informasi lebih lanjut tentang Hugo, Anda dapat mengunjungi dokumentasi resmi Hugo di Hugo Doc. Jangan ragu untuk bertanya kepada saya jika Anda memiliki pertanyaan.