Ini adalah "salin &tempel" Caranya! Cara termudah untuk mengikuti tutorial ini adalah dengan menggunakan klien baris perintah/klien SSH (seperti Putty untuk Windows) dan cukup salin dan tempel perintah (kecuali jika Anda harus memberikan informasi sendiri seperti alamat IP, nama host, kata sandi,... ). Ini membantu menghindari kesalahan ketik.
Pengaturan Sempurna - Debian Woody (3.0)
Versi 1.6
Penulis:Falko Timme
Ini adalah deskripsi mendetail tentang langkah-langkah yang harus diambil untuk menyiapkan Debian server berbasis (Debian Woody alias Debian 3.0) yang menawarkan semua layanan yang dibutuhkan oleh ISP dan hoster (server web (berkemampuan SSL), server surat (dengan SMTP-AUTH dan TLS!), server DNS, server FTP, server MySQL, POP3/IMAP, Kuota, Firewall, dll.).
Saya akan menggunakan perangkat lunak berikut:
- Server Web:Apache 1.3.x
- Server Email:Postfix (lebih mudah dikonfigurasi daripada sendmail; memiliki riwayat lubang keamanan yang lebih pendek daripada sendmail)
- Server DNS:BIND9
- Server FTP:proftpd (Anda juga dapat menggunakan vsftpd)
- POP3/IMAP:dalam contoh ini Anda dapat memilih antara format kotak surat UNIX tradisional (kemudian menggunakan qpopper/uw-imapd) atau Format maildir (dalam hal ini kita akan menggunakan Courier-POP3/Courier-IMAP).
- Webalizer untuk statistik situs web
Pada akhirnya Anda harus memiliki sistem yang bekerja dengan andal dan siap untuk panel kontrol webhosting gratis ISPConfig(yaitu, ISPConfig menjalankannya dari kotak).
Saya ingin mengatakan terlebih dahulu bahwa ini bukan satu-satunya cara untuk menyiapkan sistem seperti itu. Ada banyak cara untuk mencapai tujuan ini tetapi ini adalah cara yang saya ambil. Saya tidak memberikan jaminan apa pun bahwa ini akan berhasil untuk Anda!
Persyaratan
Untuk menginstal sistem seperti itu, Anda memerlukan yang berikut:
- CD 1 dari rilis Debian Woody (Debian 3.0) (tersedia dari http://www.debian.org)
- CD 1 rilis terbaru Mandrake Linux (9.2 pada saat penulisan ini) (tersedia dari http://www.mandrake -linux.com)(Anda tidak memerlukannya jika Anda tidak perlu membuat partisi pada hard drive Anda)
- koneksi internet karena saya akan menjelaskan instalasi jaringan dalam dokumen ini
1 Sistem Basis
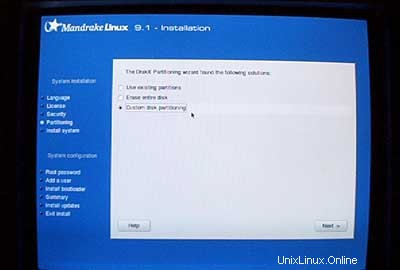
Jika Anda memiliki hard drive yang tidak digunakan, Anda harus membuat partisi terlebih dahulu (Anda dapat melewati langkah ini jika Anda sudah memiliki partisi di hard drive Anda ). Anda dapat menggunakan penginstal Debian untuk melakukan ini tetapi saya pikir itu sulit untuk digunakan (terutama untuk pemula). Di sinilah saya sedikit curang:Saya memasukkan CD Mandrake ke dalam CD-ROM saya dan menjalankan penginstal Mandrake (hanya sampai setelah saya partisi telah dibuat tanpa alat partisi Mandrake yang menurut saya adalah yang terbaik di dunia Linux).
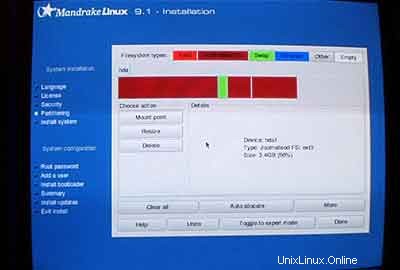
Saya membuat dua partisi:/dev/hda1 (dengan /boot sebagai titik pemasangan) dan /dev/hda6 (dengan / sebagai mount point). Selain itu, saya membuat partisi swap (biasanya di /dev/hda5 ). Saya rasa, 50 MB -100 MB adalah ukuran yang baik untuk /dev/hda1;500 MB seharusnya cukup untuk partisi swap; sisanya untuk /dev/hda6 (di mana situs web pengguna, dll. akan berada).
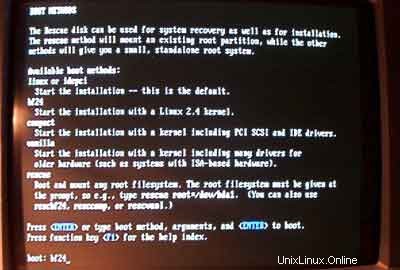
Setelah partisi dibuat, saya menghentikan instalasi Mandrake, memasukkan CD Debian saya dan mem-boot ulang sistem.
Pada prompt boot, masukkan bf24 untuk menginstalDebian dengan kernel Linux 2.4:
Kemudian pilih bahasa Anda:
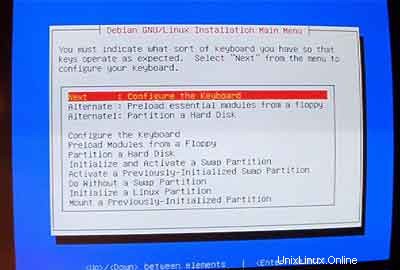
Setelah itu, Anda akan masuk ke menu utama installer Debian. Konfigurasikan keyboard Anda:
Inisialisasi dan aktifkan partisi swap:
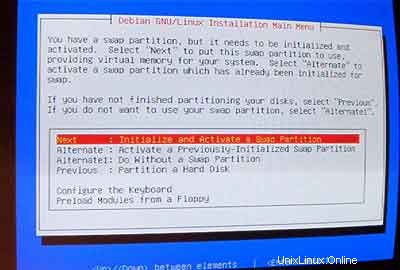
Saat ditanya Scan for Bad Blocks? , pilih Tidak .
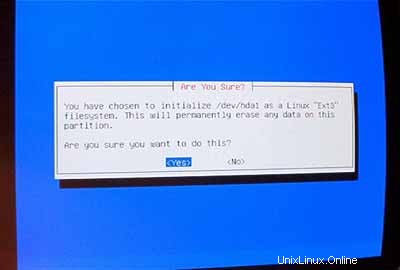
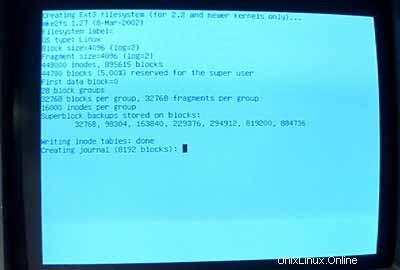
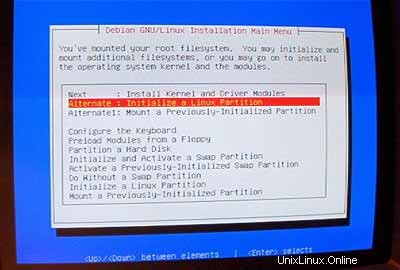
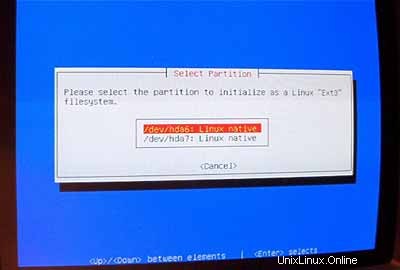
Kemudian inisialisasi partisi Linux:
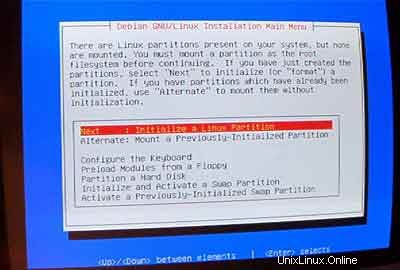
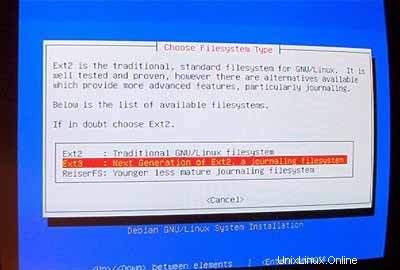
Pilih sistem file yang Anda inginkan. Saya mengambil ext3 di sini.
Pilih /dev/hda1 sebagai partisi yang akan diinisialisasi:
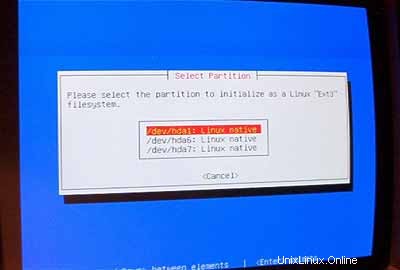
Saat ditanya Scan for Bad Blocks? , masukkan Tidak .
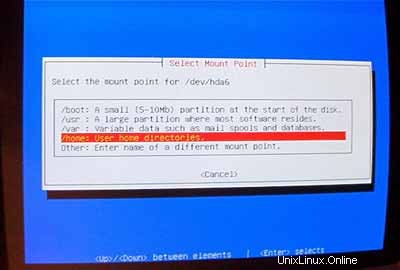
Pilih /boot sebagai titik pemasangan untuk /dev/hda1 :
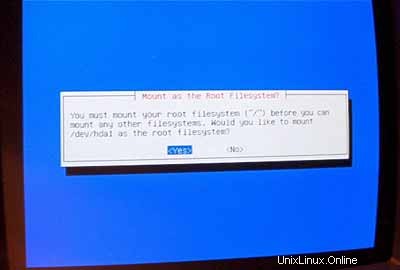
Sekarang Anda harus menginisialisasi partisi Linux kedua Anda:
Pilih sistem file pilihan Anda (sekali lagi, saya menggunakan ext3 di sini). Kemudian pilih /dev/hda6 sebagai partisi yang akan diinisialisasi:
Saat ditanya Scan for Bad Blocks? , masukkan Tidak .
Pilih / sebagai titik pemasangan untuk /dev/hda6 :
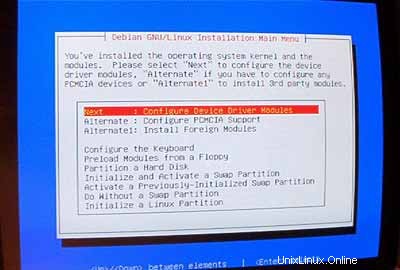
Setelah partisi Anda diformat dan diinisialisasi, pilih InstallKernel and Driver Modules dari menu utama. Saya rasa ini tidak perlu penjelasan lebih lanjut.
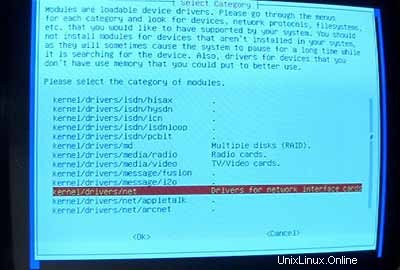
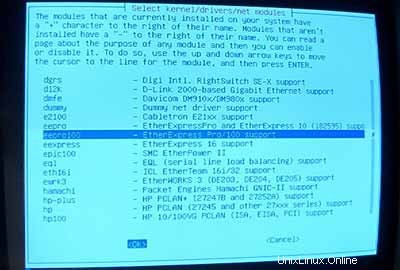
Konfigurasikan modul DeviceDriver:
Pastikan untuk menginstal driver untuk kartu jaringan Anda (jika Anda tidak tahu yang benar, aman untuk menginstal beberapa driver):
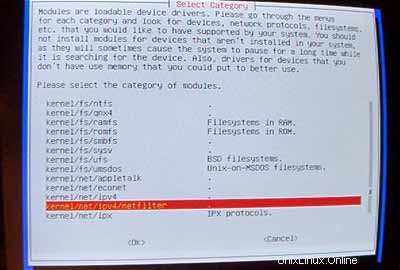
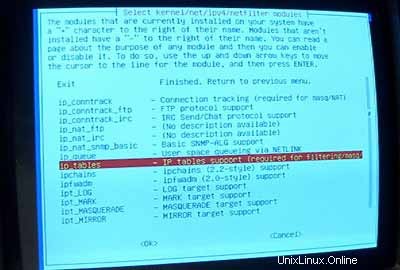
Sekarang pastikan untuk menyertakan dukungan iptables (Firewall!) di kernel Anda:
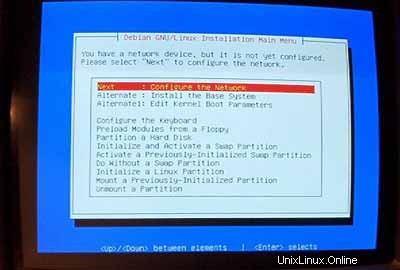
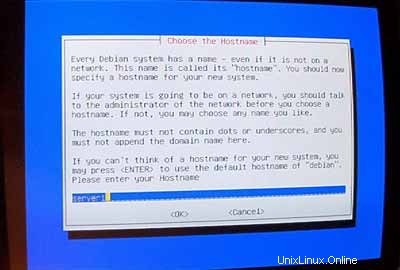
Setelah Anda keluar dari menu modul driver, Anda harus mengonfigurasi jaringan Anda:
Untuk nama host, saya sangat merekomendasikan subdomain yang nantinya tidak akan digunakan untuk situs virtual di server tersebut. Sesuatu seperti server1 ,server2 , ... akan sangat berguna karena memungkinkan Anda untuk membedakan server Anda jika Anda menjalankan beberapa dari mereka. Jadi jika domain Anda adalah example.com (disarankan domain asli!) Anda dapat mencapai server di bawah server1.example.com (jangan lupa untuk memperbarui data DNS untuk example.com !).
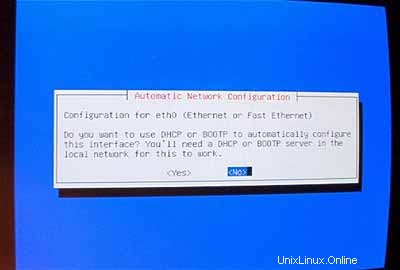
Saat dimintaKonfigurasi Jaringan Otomatis ,pilih Tidak .
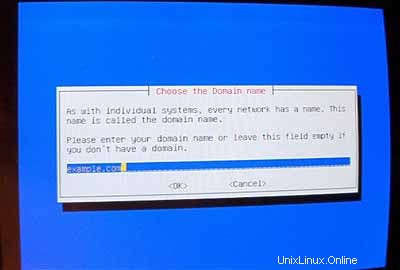
Kemudian masukkan alamat IP utama sistem, network mask, alamat gateway, dan domain sistem (di sini:example.com ).
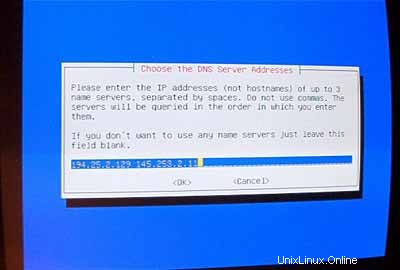
Tentukan server DNS yang harus digunakan sistem (mis. 193.174.32.18 dan 145.253.2.11 ).
Instal sistem dasar:

Jadikan sistem dapat di-boot:
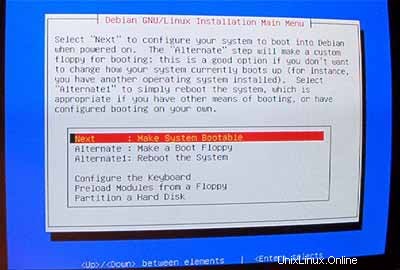
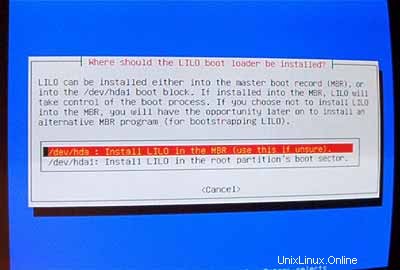
Pilih InstalLILO di MBR :
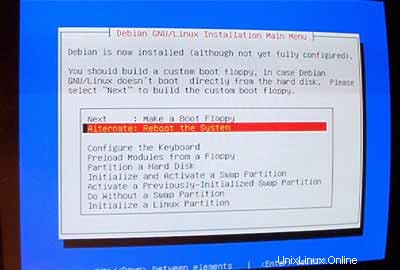
Kemudian reboot sistem. Pastikan untuk menghapus CD Debian dari CD-ROM Anda:
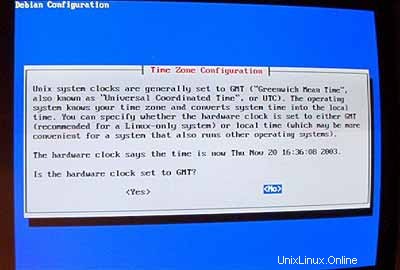
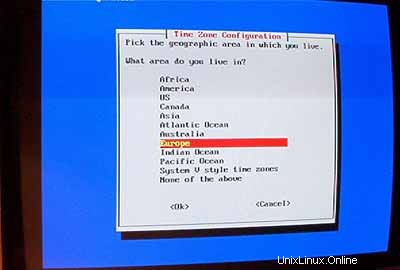
Setelah reboot, konfigurasikan zona waktu Anda:

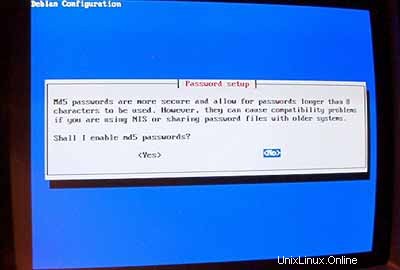
Jangan aktifkan md5passwords:
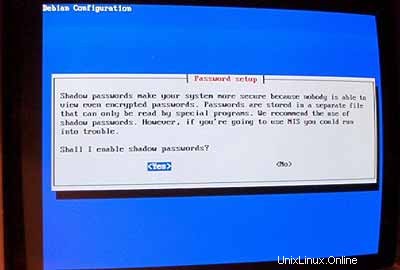
Aktifkan sandi bayangan:
Kemudian atur rootpassword , buat pengguna tambahan admin dan masukkan kata sandinya.
Jika Anda tidak membutuhkan paket pcmcia, hapus paket tersebut.
Jangan gunakan koneksi PPP untuk menginstal sistem (server harus memiliki koneksi permanen ke internet):
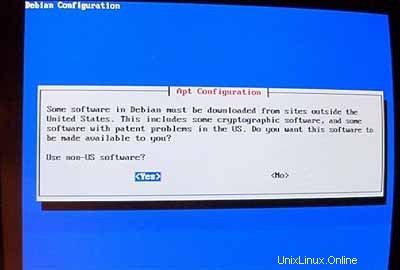
Saya ingin melakukan instalasi jaringan (itulah sebabnya saya hanya membutuhkan disk 1 dari tujuh CD-ROM Debian). Jadi saya memilih http sebagai metode untuk mengakses arsip Debian di bawah AptConfiguration :

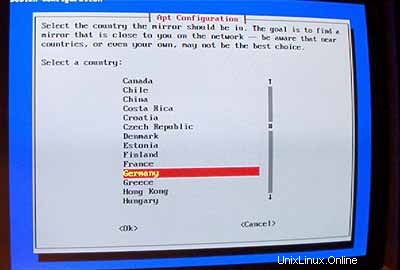
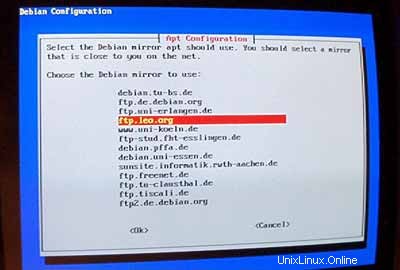
Pilih cermin yang dekat dengan Anda:
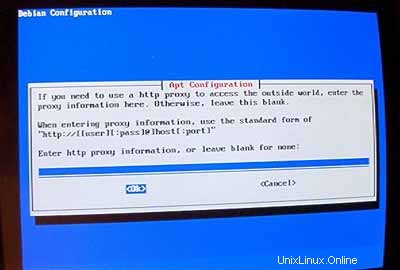
Biasanya, Anda tidak menggunakan proxy, jadi biarkan kolom kosong:
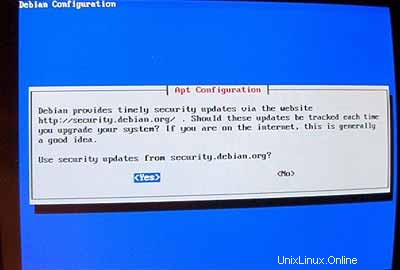
Saat ditanya Gunakan pembaruan keamanan dari security.debian.org? jawab Ya .
Penting: Sejak Juni 2005 Debian Sarge (3.1) adalah rilis stabil dari Debian. Karena kita ingin menginstal Debian Woody (3.0) disini daripada Sarge kita harus mengubah file /etc/apt/sources.list sekarang sebelum kita melanjutkan! Pemasang Woody masih menganggap bahwa Woody adalah rilis stabil. Tekan Ctrl + Alt + F2 pada keyboard Anda. Anda sekarang berada di cangkang. Masuk sebagai root . Kemudian edit /etc/apt/sources.list dengan editor teks (mis. vi ) dan ganti stabil dengan kayu di mana pun itu muncul. Setelah itu jalankan
apt-getupdate
dan tekan Ctrl+ Alt + F1 untuk kembali ke layar penginstalan.
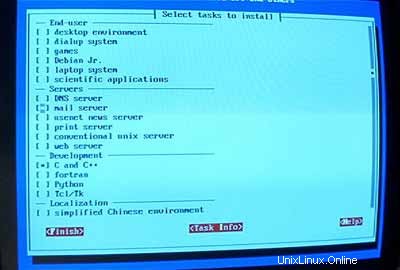
Lalu jalankan tasksel :
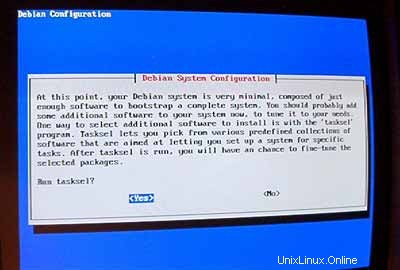
Saya ingin memiliki sistem minimal di awal jadi saya hanya memilih server surat dan C dan C++ (jadi saya dapat mengkompilasi sumber jika saya perlu). Perangkat lunak lain akan diinstal nanti.
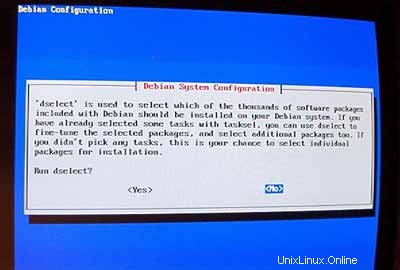
Jangan jalankan tidak pilih (jangan dipikirin, nanti kamu tersesat!):
Untuk langkah selanjutnya, Anda dapat menerima nilai default.
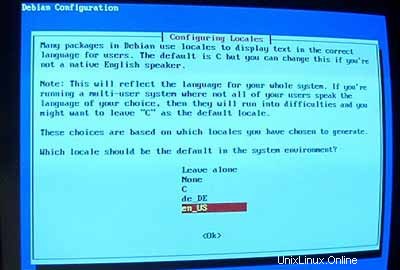
Kemudian konfigurasikan lokal Anda. Setidaknya pilih en_USISO-8859-1 :
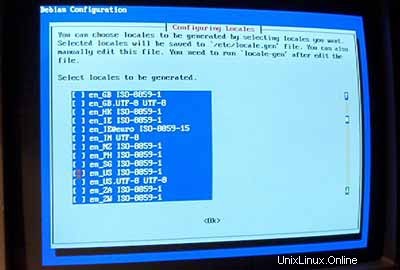
Sebagai lokal default saya memilih en_US :
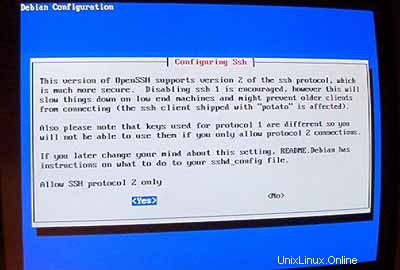
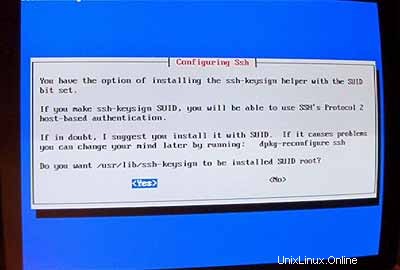
Kemudian siapkan server ssh Anda:
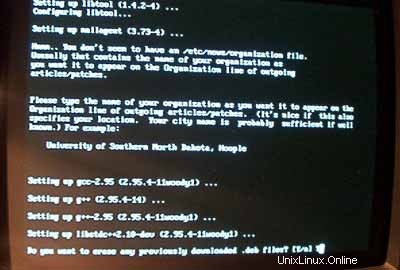
Instalasi dimulai. Pada akhirnya Anda akan ditanya apakah Anda ingin menghapus file.deb yang diunduh sebelumnya. Anda dapat menjawab Y di sini.
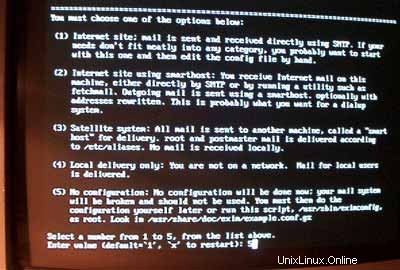
Bila penginstal ingin mengkonfigurasi exim masukkan 5 (tidak ada konfigurasi) karena kita akan menggunakan postfix sebagai server email kami.
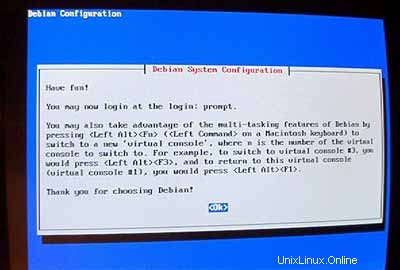
Sekarang sistem dasar sudah siap:
2 Memasang dan Mengonfigurasi Sistem Lainnya
Konfigurasikan Alamat IP tambahan
Jika Anda memiliki lebih dari satu alamat IP, Anda dapat menambahkan alamat IP tambahan dengan mengedit /etc/network/interfaces .Ini akan terlihat seperti ini:
# /etc/network/interfaces -- configuration file for ifup(8), ifdown(8) |
Jika Anda ingin menambahkan alamat IP 192.168.0.101 ke antarmuka eth0 Anda harus mengubah file agar terlihat seperti ini:
# /etc/network/interfaces -- configuration file for ifup(8), ifdown(8) |
Kemudian restart jaringan Anda:
/etc/init.d/networkingrestart
Menyetel NamaHost
echo server1.example.com> /etc/hostname
/bin/hostname -F /etc/hostname
Instal/Hapus Perangkat Lunak
Tambahkan
deb http://backports.debian.skynet.be woody cyrus-sasl2
ke /etc/apt/sources.list dan jalankan
apt-getupdate
apt-get install wgetbzip2 rdate fetchmail libdb3++-dev unzip zip ncftp xlispstat libarchive-zip-perlzlib1g-dev libpopt -dev nmap openssl (1 baris!)
apt-get remove lpr nfs-commonportmap pidentd pcmcia-cs pppoe pppoeconf ppp pppconfig
update-rc.d -f exim hapus
update-inetd --removedaytime
update-inetd --hapus telnet
update-inetd - -hapus waktu
update-inetd --hapus jari
update-inetd --hapus pembicaraan
update-inetd --hapus ntalk
update-inetd --hapus ftp
update-inetd --hapus buang
<- Ya [y]
/etc/init.d/inetd reload
Kuota
apt-get install quota quotatool
Edit /etc/fstab agar terlihat seperti ini (saya menambahkan ,usrquota,grpquota untuk mempartisi /dev/hda6 ):
# /etc/fstab: static file system information. |
Kemudian jalankan:
sentuh /quota.user /quota.group
chmod 600 /quota.*
mount -o remount /
quotacheck -avugm
quotaon -avug
Server DNS
apt-getinstall bind9
Untuk alasan keamanan, kami ingin menjalankan BIND chroot sehingga kami harus melakukan langkah-langkah berikut:
/etc/init.d/bind9 stop
Edit skrip startup /etc/init.d/bind9 sehingga daemon akan berjalan sebagai pengguna yang tidak memiliki hak 'tidak ada ', di-chroot ke /var/lib/named .Modifikasi baris:OPTS="" sehingga terbaca OPTS="-u none-t /var/lib/named" :
#!/bin/sh |
Buat direktori yang diperlukan di bawah /var/lib :
mkdir -p /var/lib/named/etc
mkdir /var/lib/named/dev
mkdir -p /var/lib/named/var/cache/bind
mkdir /var/lib/named/var/run
Then move the configdirectory from /etc to /var/lib/named/etc :
mv /etc/bind /var/lib/named/etc
Create a symlinkto the new config directory from the old location (to avoid problems when bindis upgraded in the future):
ln -s /var/lib/named/etc/bind/etc/bind
Make null and randomdevices, and fix permissions of the directories:
mknod /var/lib/named/dev/nullc 1 3
mknod /var/lib/named/dev/random c 1 8
chmod 666 /var/lib/named/dev/null /var/lib/named/dev/random
chown -R nobody:nogroup /var/lib/named/var/*
chown -R nobody:nogroup /var/lib/named/etc/bind
We need to modifythe startup script /etc/init.d/sysklogd of sysklogd so that wecan still get important messages logged to the system logs. Modify the line: SYSLOGD="" so that it reads:SYSLOGD="-a/var/lib/named/dev/log" :
#! /bin/sh |
Restart the loggingdaemon:
/etc/init.d/sysklogd restart
Start up BIND,and check /var/log/syslog for any errors:
/etc/init.d/bind9 start
MySQL
apt-getinstall mysql-server mysql-client libmysqlclient10-dev
<- No
<- Yes
mysqladmin -u root passwordyourrootsqlpassword
mysqladmin -h server1.example.com -u root password yourrootsqlpassword
In /etc/mysql/my.cnf comment out the following line:
skip-networking
It should now looksimilar to this:
# You can copy this to one of: |
Restart MySQL:
/etc/init.d/mysqlrestart
so that MySQL isaccessible on port 3306 (you can check that with netstat-tap ).
Postfix/Qpopper
addgroup sasl
apt-get install postfix-tlsqpopper sasl-bin libsasl-modules-plain libsasl2 libsasl-gssapi-mit libsasl-digestmd5-dessasl2-bin libsasl2-modules (1line!)
<- Kerberos:acceptdefault value (I don't want to use Kerberos so I don't really care about it)
<- Internetsite
<- Domainname
<- No
<- accept default values
<- Kerberos:accept default value
<- NONE
cd /etc/init.d/
wget http://hanselan.de/postfix/pwcheck
In case you cannotaccess http://hanselan.de/postfix/pwcheck here's the pwcheck script:
#! /bin/sh |
chmod 755 /etc/init.d/pwcheck
update-rc.d pwcheck defaults
mkdir -p /var/spool/postfix/var/run/pwcheck
chown postfix.root /var/spool/postfix/var/run/pwcheck/
chmod 700 /var/spool/postfix/var/run/pwcheck/
ln -s /var/spool/postfix/var/run/pwcheck /var/run/pwcheck
postconf -e 'smtpd_sasl_local_domain=$myhostname'
postconf -e 'smtpd_sasl_auth_enable =yes'
postconf -e 'smtpd_sasl_security_options =noanonymous'
postconf -e 'broken_sasl_auth_clients =yes'
postconf -e 'smtpd_recipient_restrictions =permit_sasl_authenticated,permit_mynetworks,check_relay_domains'
postconf -e 'inet_interfaces =all'
echo 'pwcheck_method:pwcheck'>> /etc/postfix/sasl/smtpd.conf
mkdir /etc/postfix/ssl
cd /etc/postfix/ssl/
openssl genrsa -des3 -rand /etc/hosts -out smtpd.key 1024
chmod 600 smtpd.key
openssl req -new -key smtpd.key -out smtpd.csr
openssl x509 -req -days 3650 -in smtpd.csr -signkey smtpd.key -out smtpd.crt
openssl rsa -in smtpd.key -out smtpd.key.unencrypted
mv -f smtpd.key.unencrypted smtpd.key
openssl req -new -x509 -extensions v3_ca -keyout cakey.pem -out cacert.pem -days3650
postconf -e 'smtpd_tls_auth_only=no'
postconf -e 'smtp_use_tls =yes'
postconf -e 'smtpd_use_tls =yes'
postconf -e 'smtp_tls_note_starttls_offer =yes'
postconf -e 'smtpd_tls_key_file =/etc/postfix/ssl/smtpd.key'
postconf -e 'smtpd_tls_cert_file =/etc/postfix/ssl/smtpd.crt'
postconf -e 'smtpd_tls_CAfile =/etc/postfix/ssl/cacert.pem'
postconf -e 'smtpd_tls_loglevel =1'
postconf -e 'smtpd_tls_received_header =yes'
postconf -e 'smtpd_tls_session_cache_timeout =3600s'
postconf -e 'tls_random_source =dev:/dev/urandom'
The file /etc/postfix/main.cf should now look like this:
# see /usr/share/postfix/main.cf.dist for a commented, fuller |
/etc/init.d/pwcheckstart
/etc/init.d/postfix restart
To see if SMTP-AUTHand TLS work properly now run the following command:
telnetlocalhost 25
After you haveestablished the connection to your postfix mail server type
ehlolocalhost
If you see thelines
250-STARTTLS
and
250-AUTH
everything is fine.
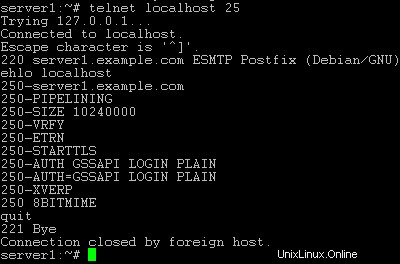
Type
quit
to return to thesystem's shell.
Courier-IMAP/Courier-POP3
If you want touse a POP3/IMAP daemon that has Maildir support (if you do not want to use thetraditional Unix mailbox format) you can install Courier-IMAP and Courier-POP3.Otherwise you can proceed with the Apache configuration.
apt-get install courier-imapcourier-pop
qpopper and UW-IMAPwill then be replaced.
Then configurePostfix to deliver emails to a user's Maildir*:
postconf -e 'home_mailbox=Maildir/'
postconf -e 'mailbox_command ='
/etc/init.d/postfix restart
*Please note:Youdo not have to do this if you intend to use ISPConfigon your system as ISPConfig does the necessary configuration using procmailrecipes. But please go sure to enable Maildir under Management -> Settings ->EMail in the ISPConfig web interface.
Apache
Add
deb http://packages.dotdeb.org ./
to /etc/apt/sources.list and run
apt-getupdate
apt-getinstall apache apache-doc libapache-mod-ssl libapache-mod-ssl-doc
apt-get install libapache-mod-php4php4 php4-cli php4-common php4-curl php4-dev php4-domxml php4-gd php4-gmp php4-imapphp4-ldap php4-mcal php4-mcrypt php4-mhash php4-ming php4-mysql php4-odbc php4-pearphp4-xslt curl libwww-perl imagemagick (1 line!)
Edit /etc/apache/httpd.conf .Under LoadModules add:
LoadModulephp4_module /usr/lib/apache/1.3/libphp4.so
LoadModule ssl_module /usr/lib/apache/1.3/mod_ssl.so
Under Listen add:
Listen80
Listen 443
Under "Addtypeapplication" insert:
AddType application/x-x509-ca-cert .crt
AddType application/x-pkcs7-crl .crl
Before "Section3 :Virtual Hosts" add:
SSLCACertificateFile /etc/apache/ssl.crt/ca-bundle.crt
SSLPassPhraseDialog builtin
SSLSessionCache dbm:/var/run/ssl_scache
SSLSessionCacheTimeout 300
SSLMutex file:/var/run/ssl_mutex
SSLRandomSeed startup builtin
SSLRandomSeed connect builtin
Change
DirectoryIndexindex.html index.htm index.shtml index.cgi
to
DirectoryIndexindex.html index.htm index.shtml index.cgi index.php index.php3 index.pl
Save /etc/apache/httpd.conf and run
/etc/init.d/apacherestart
Proftpd
apt-getinstall proftpd
<- No
For security reasonsyou can add the following lines to /etc/proftpd.conf (thanks to Reinaldo Carvalho; more information can be found here:http://proftpd.linux.co.uk/localsite/Userguide/linked/userguide.html):
DefaultRoot ~
IdentLookups off
ServerIdent on "FTP Server ready."
and restart Proftpd:
/etc/init.d/proftpd restart
Webalizer
apt-getinstall webalizer
<- accept default values
Synchronizethe System Clock
If you want tohave the system clock synchronized with an NTP server you can add the followinglines to /var/spool/cron/crontabs/root (if the file does not exist, create it by running
touch/var/spool/cron/crontabs/root ):
#update time with ntp server
0 3,9,15,21 * * * /usr/sbin/rdate time.nist.gov | logger -t NTP
Then run
chmod600 /var/spool/cron/crontabs/root
/etc/init.d/cronrestart
Install somePerl Modules needed by SpamAssassin (comes with ISPConfig)
Installationusing the Perl Shell
Login to your commandline as root and run the following command to start the Perl shell:
perl -MCPAN -e shell
If you run thePerl shell for the first time you will be asked some questions. In most casesthe default answers are ok.
Please note:Ifyou run a firewall on your system you might have to turn it off while workingon the Perl shell in order for the Perl shell to be able to fetch the neededmodules without a big delay. You can switch it on afterwards.
The big advantageof the Perl shell compared to the two other methods described here is that itcares about dependencies when installing new modules. I.e., if it turns outthat a prerequisite Perl module is missing when you install another module thePerl shell asks you if it should install the prerequisite module for you. Youshould answer that question with "Yes".
Run the followingcommands to install the modules needed by SpamAssassin:
install HTML::Parser
install DB_File
install Net::DNS (when prompted to enable tests, choose no)
install Digest::SHA1
q (to leave the Perl shell)
If a module isalready installed on your system you will get a message similar to this one:
HTML::Parseris up to date.
Successful installationof a module looks like this:
/usr/bin/makeinstall -- OK
Compile a CustomKernel
If you need tocompile a new kernel for some reason (e.g. because you want to use the latestbleeding-edge kernel or need a feature that the standard Debian kernel doesnot offer), you can find more information here:Debian-Kernel-Compile-Howto.
The End
The configurationof the server is now finished, and if you wish you can now install ISPConfigon it.
A Note On SuExec
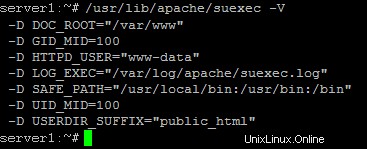
If you want torun CGI scripts under suExec, you should specify /var/www as the home directory for websites created by ISPConfig as Debian's suExec iscompiled with /var/www as Doc_Root .Run /usr/lib/apache/suexec -V ,and the output should look like this:
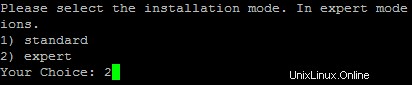
To select /var/www as the home directory for websites during the installation of ISPConfig do thefollowing:When you are asked for the installation mode, select the expertmode .
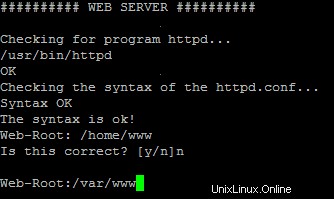
Later during theinstallation you are asked if the default directory /home/www should be the directory where ISPConfig will create websites in. Answer n and enter /var/www asthe home directory for websites.
Links
- http://www.debian.org
- http://www.debianplanet.org
- http://www.debianforum.de(German)
- http://www.debianhowto.de(German/English)
- http://www.ispconfig.org