
Hari ini kita akan belajar Cara Memasang LAMP Stack di AlmaLinux 8 / Rocky Linux 8, LAMP stack adalah sekelompok perangkat lunak sumber terbuka yang biasanya dipasang bersama untuk memungkinkan server menghosting situs web dan aplikasi web dinamis. Istilah ini sebenarnya merupakan akronim yang mewakili sistem operasi Linux, dengan web server Apache. Data situs disimpan dalam database MySQL, dan konten dinamis diproses oleh PHP.
Instal Apache Web Server di AlmaLinux 8 / Rocky Linux 8
Pertama, kita akan mulai dengan menginstal server web Apache. Untuk menyelesaikan instalasi, gunakan perintah berikut.
yum install httpd httpd-toolsKeluaran:
[[email protected] ~]# yum install httpd
AlmaLinux 8.3 - BaseOS                           14 MB/s | 2.6 MB     00:00
AlmaLinux 8.3 - AppStream                        21 MB/s | 6.5 MB     00:00
AlmaLinux 8.3 - PowerTools                      8.0 MB/s | 1.9 MB     00:00
AlmaLinux 8.3 - Extras                           12 kB/s | 1.2 kB     00:00
Dependencies resolved.
================================================================================
 Package     Arch   Version                                     Repo       Size
================================================================================
Installing:
 httpd       x86_64 2.4.37-30.module_el8.3.0+2016+8bf57d29.alma appstream 1.4 M
Setelah penginstalan selesai, aktifkan Apache (untuk memulai secara otomatis saat sistem boot), mulai server web dan verifikasi status menggunakan perintah di bawah ini.
systemctl enable httpd

systemctl start httpd

systemctl status httpd
Keluaran:
 [[email protected] ~]# systemctl status httpd
● httpd.service - The Apache HTTP Server
   Loaded: loaded (/usr/lib/systemd/system/httpd.service; enabled; vendor prese>
   Active: active (running) since Mon 2021-02-08 15:03:51 EST; 5s ago
     Docs: man:httpd.service(8)
 Main PID: 26398 (httpd)
   Status: "Started, listening on: port 80"
    Tasks: 213 (limit: 23680)
   Memory: 29.1M
   CGroup: /system.slice/httpd.service
           ├─26398 /usr/sbin/httpd -DFOREGROUND
           ├─26399 /usr/sbin/httpd -DFOREGROUND
Untuk membuat halaman Anda tersedia untuk umum, Anda harus mengedit aturan firewall Anda untuk mengizinkan permintaan HTTP dan HTTPS di server web Anda dengan menggunakan perintah berikut.
firewall-cmd --permanent --zone=public --add-service=http

firewall-cmd --permanent --zone=public --add-service=https

firewall-cmd --reload
Keluaran:
[[email protected] ~]# firewall-cmd --permanent --zone=public --add-service=http
success
[[email protected] ~]# firewall-cmd --permanent --zone=public --add-service=https
success
[[email protected] ~]# firewall-cmd --reload
success
Pastikan server web berjalan dan dapat diakses dengan mengakses alamat IP server Anda.
echo "Hello there, Apache webserver is now running" > /var/www/html/index.htmlDan mulai ulang Server Web untuk mencerminkan perubahan yang dibuat.
systemctl restart httpdDari browser Anda,
http://IP_address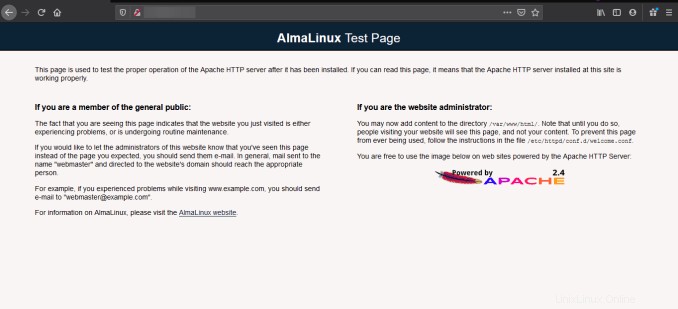
Cara menginstal Kernel Linux 5.13 di Rocky Linux 8 / AlmaLinux 8 /CentOS 8
Instal PHP di AlmaLinux 8 / Rocky Linux 8
Untuk menginstal PHP di RHEL 8 Anda, gunakan perintah di bawah ini.
yum install -y php-mysqlnd php-dom php-simplexml php-xml php-xmlreader php-curl php-exif php-ftp php-gd php-iconv php-json php-mbstring php-posix php-sockets php-tokenizerSekarang restart server web Anda sehingga Apache tahu bahwa ia akan melayani permintaan PHP juga.
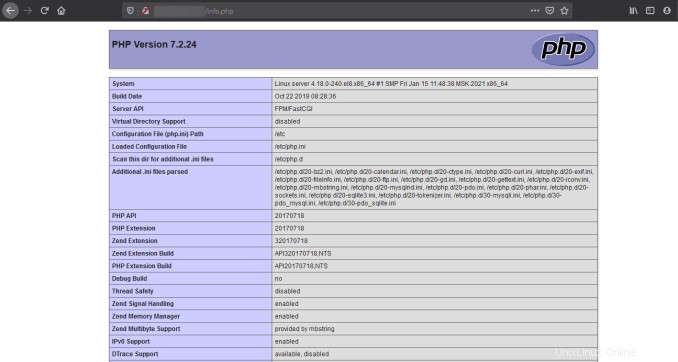
systemctl restart httpd Uji PHP Anda, dengan membuat file info.php sederhana dengan phinfo() di dalamnya. File harus ditempatkan di root direktori untuk server web Anda, yaitu /var/www/html.
Untuk membuat file gunakan:
echo "<?php phpinfo() ?>" > /var/www/html/info.phpSekarang lagi, akses http://localhost/info.php atau http://yourserver-ip-address/info.php. Anda akan melihat halaman yang mirip dengan halaman di bawah ini.
Aktifkan Layanan SSH di Rocky Linux 8 / CentOS 8
Instal MariaDB Server AlmaLinux 8 / Rocky Linux 8
MariaDB adalah server basis data yang populer. Instalasinya sederhana dan hanya membutuhkan beberapa langkah seperti yang ditunjukkan.
yum install mariadb-server mariadbKeluaran:
[[email protected] ~]# yum install mariadb-server mariadb
Last metadata expiration check: 0:05:56 ago on Mon 08 Feb 2021 03:03:08 PM EST.
Dependencies resolved.
================================================================================
 Package                    Arch   Version                      Repo       Size
================================================================================
Installing:
 mariadb                    x86_64 3:10.3.27-3.module_el8.3.0+2028+5e3224e9
                                                                appstream 6.0 M
 mariadb-server             x86_64 3:10.3.27-3.module_el8.3.0+2028+5e3224e9
                                                                appstream  16 M
Installing dependencies:
 mariadb-common             x86_64 3:10.3.27-3.module_el8.3.0+2028+5e3224e9
Setelah penginstalan selesai, aktifkan MariaDB (untuk memulai secara otomatis saat sistem boot), mulai MariaDB dan verifikasi status menggunakan perintah di bawah ini.
systemctl enable mariadb

systemctl start mariadb

systemctl status mariadb
Keluaran:
[[email protected] ~]# systemctl status mariadb
● mariadb.service - MariaDB 10.3 database server
   Loaded: loaded (/usr/lib/systemd/system/mariadb.service; enabled; vendor pre>
   Active: active (running) since Mon 2021-02-08 15:10:12 EST; 5s ago
     Docs: man:mysqld(8)
           https://mariadb.com/kb/en/library/systemd/
  Process: 30138 ExecStartPost=/usr/libexec/mysql-check-upgrade (code=exited, s>
  Process: 30004 ExecStartPre=/usr/libexec/mysql-prepare-db-dir mariadb.service>
  Process: 29979 ExecStartPre=/usr/libexec/mysql-check-socket (code=exited, sta>
 Main PID: 30107 (mysqld)
Terakhir, Anda ingin mengamankan instalasi MariaDB Anda dengan mengeluarkan perintah berikut.
mysql_secure_installationKeluaran:
[[email protected] ~]# mysql_secure_installation

NOTE: RUNNING ALL PARTS OF THIS SCRIPT IS RECOMMENDED FOR ALL MariaDB
      SERVERS IN PRODUCTION USE!  PLEASE READ EACH STEP CAREFULLY!

In order to log into MariaDB to secure it, we'll need the current
password for the root user.  If you've just installed MariaDB, and
you haven't set the root password yet, the password will be blank,
so you should just press enter here.

Enter current password for root (enter for none):
OK, successfully used password, moving on...

Setting the root password ensures that nobody can log into the MariaDB
root user without the proper authorisation.

Set root password? [Y/n] asdfghjkl
Set root password? [Y/n] y
New password:
Re-enter new password:
Password updated successfully!
Reloading privilege tables..
 ... Success!
Setelah diamankan, Anda dapat terhubung ke MySQL dan meninjau database yang ada di server database Anda dengan menggunakan perintah berikut.
mysql -e "SHOW DATABASES;" -pKeluaran:
[[email protected] ~]# mysql -e "SHOW DATABASES;" -p
Enter password:
+--------------------+
| Database           |
+--------------------+
| information_schema |
| mysql              |
| performance_schema |
+--------------------+
Selesai!