Dalam tutorial ini kita akan menginstal ISPConfig di CentOS 8.
ISPConfig adalah panel kontrol sumber terbuka untuk Linux. Ini memiliki antarmuka web yang ramah pengguna. Dengan menggunakan ISPConfig, pengguna dapat mengelola situs web, alamat email, akun FTP, catatan DNS, basis data, dan akun shell mereka.
Administrator, Reseller, Client, dan Email-user adalah empat tingkat yang berbeda dari akses pengguna ISPConfig. Setiap level pengguna memiliki jenis alamat yang berbeda.
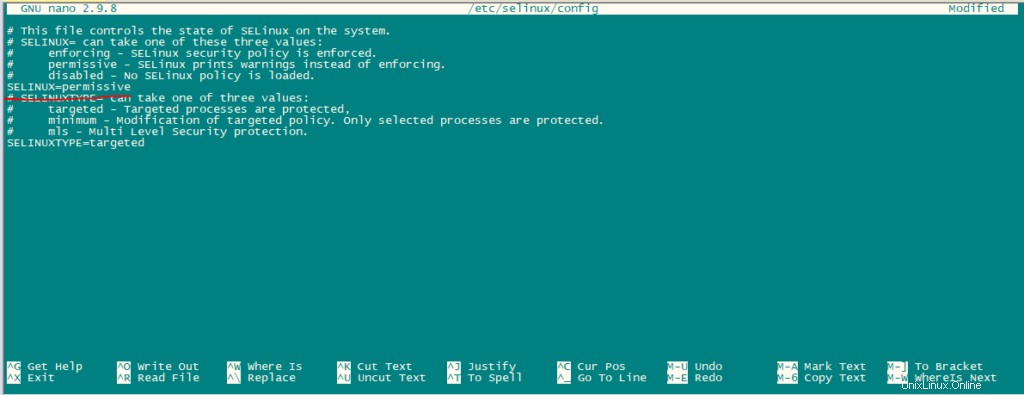
Pertama, setel SElinux ke mode permisif.
nano /etc/selinux/config Ubah mode dari enable menjadi permissive seperti pada gambar di bawah ini.
Sekarang reboot sistem.
reboot Aktifkan Repositori Tambahan:
Pertama, Impor kunci GPG untuk paket perangkat lunak.
rpm --import /etc/pki/rpm-gpg/RPM-GPG-KEY* Aktifkan repositori Epel.
dnf -y install epel-release 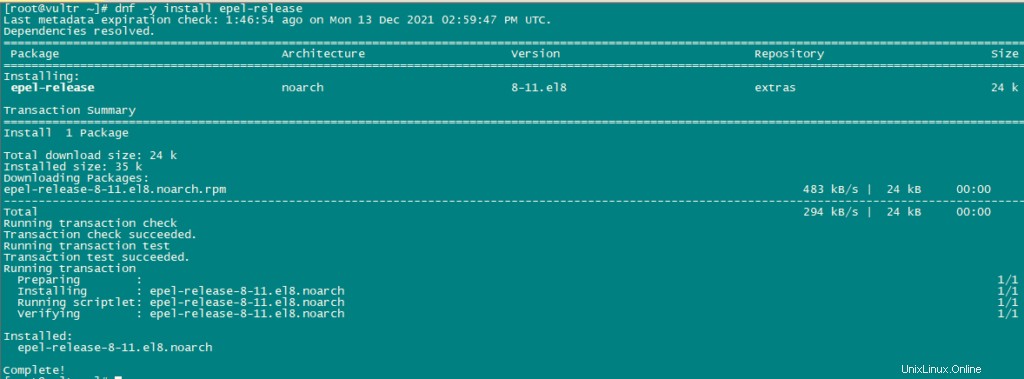
Sekarang kita akan mengaktifkan alat-alat listrik.
dnf config-manager --set-enabled powertools Kami sekarang akan memperbarui menggunakan perintah berikut:
dnf -y update 
Instal beberapa paket tambahan.
dnf -y groupinstall 'Development Tools' 
Kita harus mengaktifkan Remi Repository untuk mendapatkan versi PHP yang lebih baru.
dnf install http://rpms.remirepo.net/enterprise/remi-release-8.rpm
dnf -y install yum-utils
dnf -y module reset php
dnf -y module install php:remi-7.4
dnf update 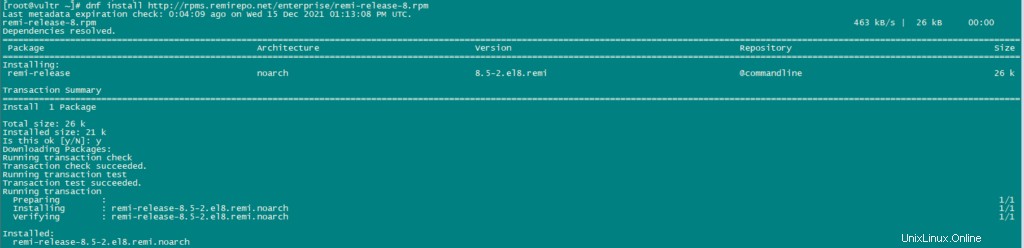
Gunakan perintah berikut untuk menginstal paket yang diperlukan:
dnf -y install httpd mod_ssl mariadb-server php php-mysqlnd php-mbstring 
Untuk keamanan, kami akan menonaktifkan header HTTP_PROXY di Apache secara global menggunakan perintah berikut:
echo "RequestHeader unset Proxy early" >> /etc/httpd/conf/httpd.conf Mulai ulang layanan httpd untuk menerapkan perubahan konfigurasi.
systemctl restart httpd 
Sekarang kita akan menginstal PhpMyAdmin.
cd /tmp
wget https://files.phpmyadmin.net/phpMyAdmin/5.0.2/phpMyAdmin-5.0.2-all-languages.tar.gz
tar xzvf phpMyAdmin-5.0.2-all-languages.tar.gz
mkdir /usr/share/phpmyadmin
mv phpMyAdmin-5.0.2-all-languages/* /usr/share/phpmyadmin/
mkdir /usr/share/phpmyadmin/tmp
chown -R apache:apache /usr/share/phpmyadmin
chmod 777 /usr/share/phpmyadmin/tmp 
Instal Dovecot – Instal ISPConfig di CentOS 8
Kami menggunakan perintah berikut untuk menginstal dovecot.
dnf -y install dovecot dovecot-mysql dovecot-pigeonhole 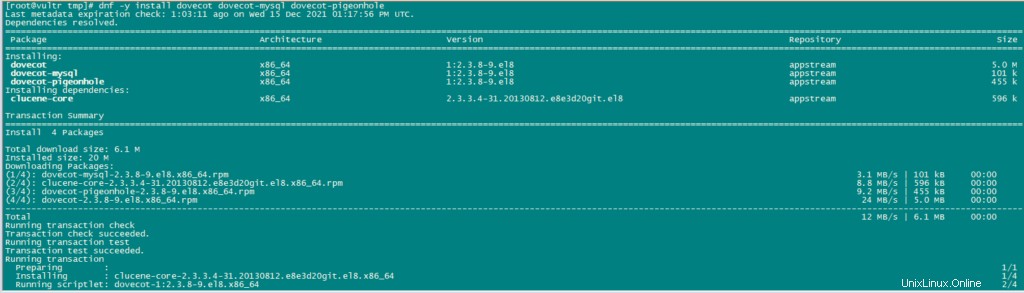
Buat file konfigurasi kosong dan buat symlink dengan file konfigurasi utama.
touch /etc/dovecot/dovecot-sql.conf
ln -s /etc/dovecot/dovecot-sql.conf /etc/dovecot-sql.conf
ln -s /etc/dovecot/dovecot.conf /etc/dovecot.conf
Sekarang Aktifkan Dovecot sehingga secara otomatis dapat mulai boot. Juga, mulai layanan.
systemctl enable dovecot
systemctl start dovecot 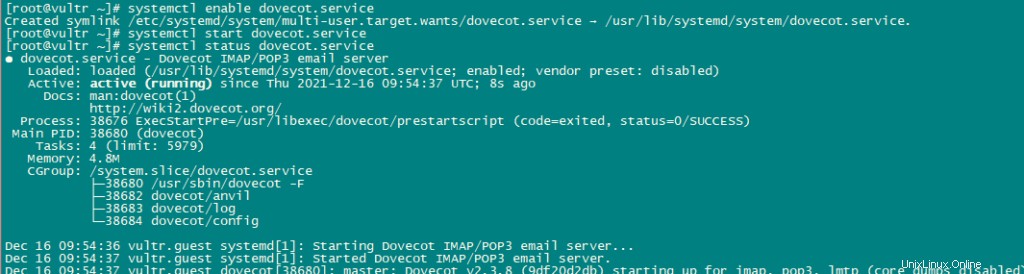
Instal Postfix:
Gunakan perintah berikut untuk menginstal postfix:
dnf -y install postfix postfix-mysql 
Sekarang kita akan membuka TLS/SSL dan port pengiriman di postfix.
nano /etc/postfix/master.cf Setelah mengedit file master.cf akan terlihat seperti ini:
submission inet n - n - - smtpd
 -o syslog_name=postfix/submission
 -o smtpd_tls_security_level=encrypt
 -o smtpd_sasl_auth_enable=yes
 -o smtpd_client_restrictions=permit_sasl_authenticated,reject
# -o smtpd_reject_unlisted_recipient=no
# -o smtpd_client_restrictions=$mua_client_restrictions
# -o smtpd_helo_restrictions=$mua_helo_restrictions
# -o smtpd_sender_restrictions=$mua_sender_restrictions
# -o smtpd_recipient_restrictions=
# -o smtpd_relay_restrictions=permit_sasl_authenticated,reject
# -o milter_macro_daemon_name=ORIGINATING
smtps inet n - n - - smtpd
 -o syslog_name=postfix/smtps
 -o smtpd_tls_wrappermode=yes
 -o smtpd_sasl_auth_enable=yes
 -o smtpd_client_restrictions=permit_sasl_authenticated,reject
# -o smtpd_reject_unlisted_recipient=no
# -o smtpd_client_restrictions=$mua_client_restrictions
# -o smtpd_helo_restrictions=$mua_helo_restrictions
# -o smtpd_sender_restrictions=$mua_sender_restrictions
# -o smtpd_recipient_restrictions=
# -o smtpd_relay_restrictions=permit_sasl_authenticated,reject
# -o milter_macro_daemon_name=ORIGINATING
Ubah saja barisnya, jangan hapus konten apa pun dalam file, cukup ubah baris yang disebutkan di atas.
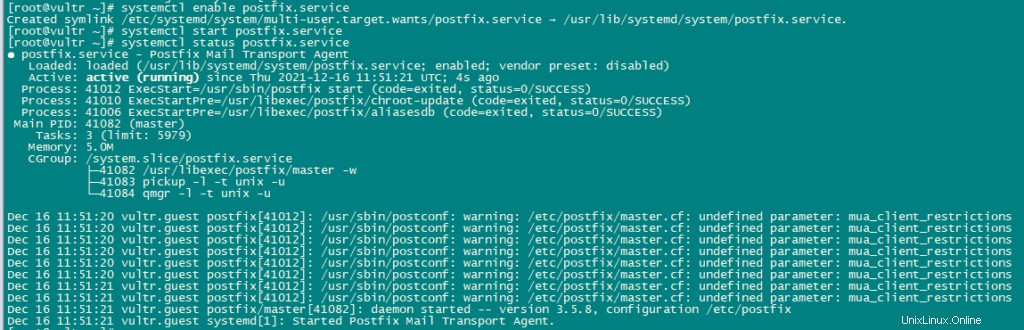
Aktifkan dan Mulai Layanan Postfix dan mariadb.
systemctl enable mariadb.service
systemctl start mariadb.service

systemctl enable postfix.service
systemctl restart postfix.service 
Instal Getmail:
Gunakan perintah berikut untuk menginstal getmail:
dnf install python2
cd /tmp
wget http://pyropus.ca/software/getmail/old-versions/getmail-5.14.tar.gz
tar xvfz getmail-5.14.tar.gz
cd getmail-5.14
python2 setup.py build
python2 setup.py install 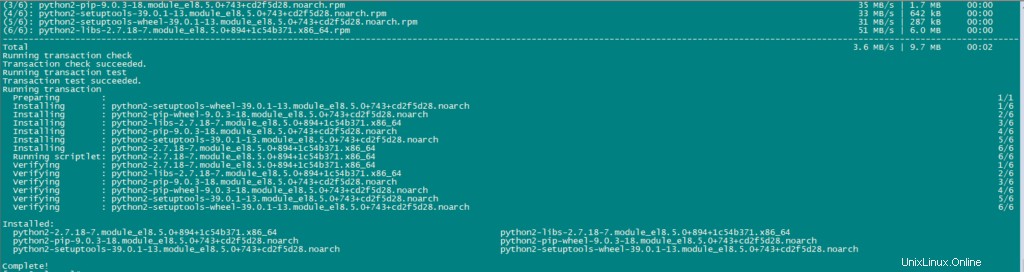

Sekarang kita akan mengatur MYSQL Password dan mengkonfigurasi phpMyAdmin.
Gunakan perintah berikut untuk konfigurasi mariadb:
mysql_secure_installation Atur semua konfigurasi seperti di bawah ini:
NOTE: RUNNING ALL PARTS OF THIS SCRIPT IS RECOMMENDED FOR ALL MariaDB
      SERVERS IN PRODUCTION USE!  PLEASE READ EACH STEP CAREFULLY!

In order to log into MariaDB to secure it, we'll need the current
password for the root user.  If you've just installed MariaDB, and
you haven't set the root password yet, the password will be blank,
so you should just press enter here.

Enter current password for root (enter for none):
OK, successfully used password, moving on...

Setting the root password ensures that nobody can log into the MariaDB
root user without the proper authorisation.

Set root password? [Y/n] y
New password:
Re-enter new password:
Password updated successfully!
Reloading privilege tables..
 ... Success!


By default, a MariaDB installation has an anonymous user, allowing anyone
to log into MariaDB without having to have a user account created for
them.  This is intended only for testing, and to make the installation
go a bit smoother.  You should remove them before moving into a
production environment.

Remove anonymous users? [Y/n] y
 ... Success!

Normally, root should only be allowed to connect from 'localhost'.  This
ensures that someone cannot guess at the root password from the network.

Disallow root login remotely? [Y/n] y
 ... Success!

By default, MariaDB comes with a database named 'test' that anyone can
access.  This is also intended only for testing, and should be removed
before moving into a production environment.

Remove test database and access to it? [Y/n] y
 - Dropping test database...
 ... Success!
 - Removing privileges on test database...
 ... Success!

Reloading the privilege tables will ensure that all changes made so far
will take effect immediately.

Reload privilege tables now? [Y/n] y
 ... Success!

Cleaning up...

All done!  If you've completed all of the above steps, your MariaDB
installation should now be secure.

Thanks for using MariaDB! 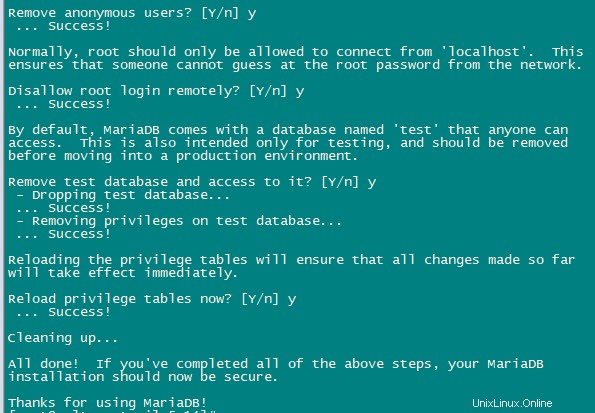
Sekarang kita akan Konfigurasi phpmyadmin.
nano /etc/httpd/conf.d/phpmyadmin.conf Tambahkan baris berikut dalam file:
# phpMyAdmin - Web based MySQL browser written in php
#
# Allows only localhost by default
#
# But allowing phpMyAdmin to anyone other than localhost should be considered
# dangerous unless properly secured by SSL

Alias /phpMyAdmin /usr/share/phpmyadmin
Alias /phpmyadmin /usr/share/phpmyadmin

<Directory /usr/share/phpmyadmin/>
   <IfModule mod_authz_core.c>
     # Apache 2.4
  #  <RequireAny>
     #  Require ip 127.0.0.1
     #  Require ip ::1
  #  </RequireAny>
   </IfModule>
   <IfModule !mod_authz_core.c>
     # Apache 2.2
     Order Deny,Allow
     Deny from All
     Allow from 127.0.0.1
     Allow from ::1
   </IfModule>
</Directory> 
Selanjutnya kita akan mengubah otentikasi di phpMyAdmin dari cookie menjadi http.
cp -pf /usr/share/phpmyadmin/config.sample.inc.php /usr/share/phpmyadmin/config.inc.php
nano /usr/share/phpmyadmin/config.inc.php
Ubah baris berikut:
$cfg['Servers'][$i]['auth_type'] = 'http'; 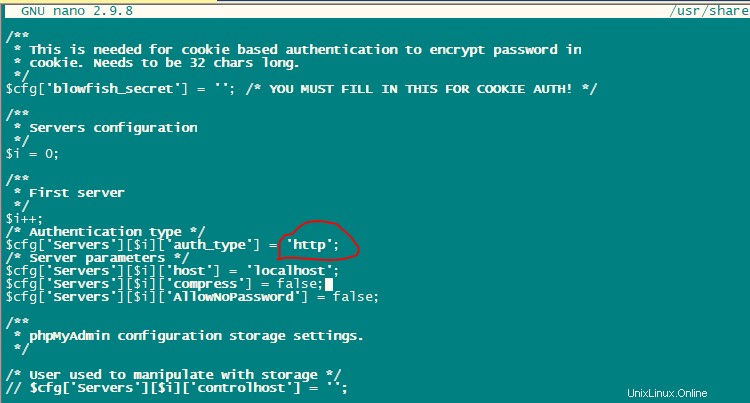
Aktifkan dan Mulai Layanan Apache.
systemctl enable httpd
systemctl restart httpd 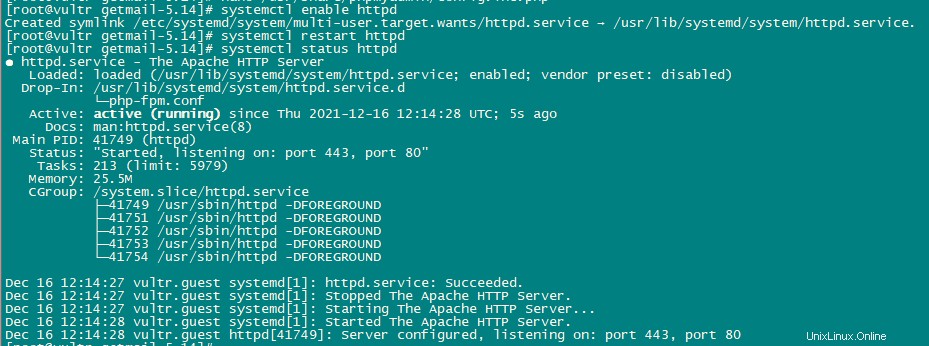
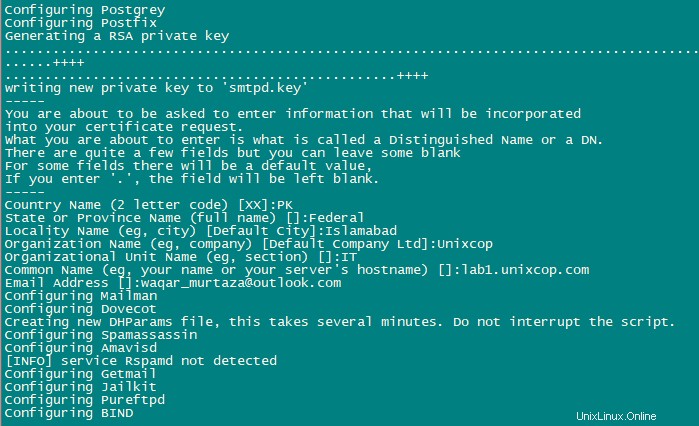
Instal Amavisd-new, SpamAssassin, ClamAV, dan Postgrey:
Kami akan menginstal amavisd-new, SpamAssassin dan ClamAV menggunakan perintah berikut:
dnf -y install amavisd-new spamassassin clamav-server clamav-data clamav-update clamav-filesystem clamav clamav-scanner-systemd clamav-devel clamav-lib clamav-server-systemd unzip bzip2 perl-DBD-mysql postgrey re2c Selanjutnya, kami akan mengaktifkan dan memulai layanan ini.
sa-update
freshclam
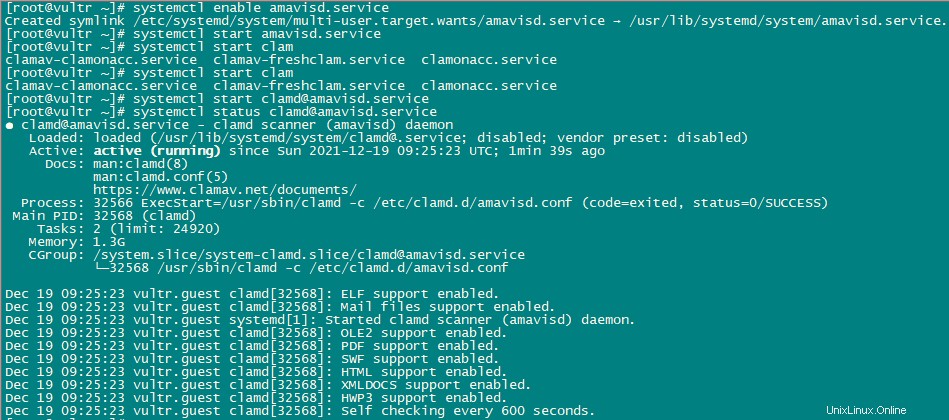
systemctl enable amavisd.service
systemctl start amavisd.service
systemctl start [email protected]
systemctl enable postgrey.service
systemctl start postgrey.service 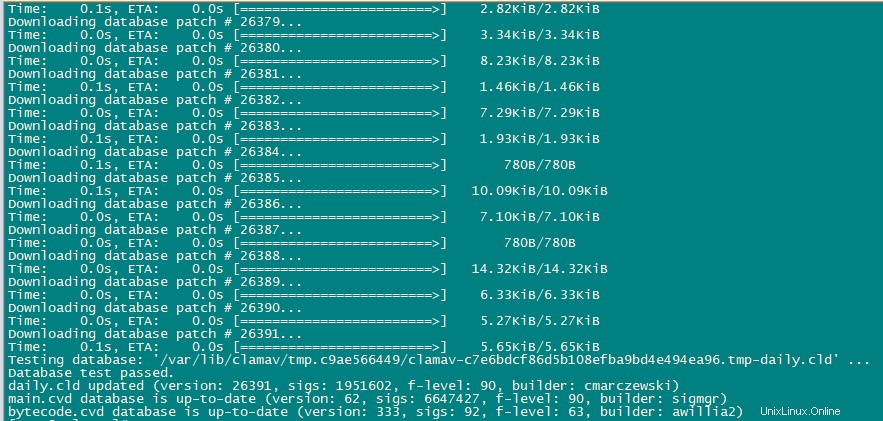
Sekarang kita akan mengkonfigurasi layanan postgrey.
nano /etc/sysconfig/postgrey

Change the following line

POSTGREY_TYPE="--unix=/var/spool/postfix/postgrey/socket"

to

POSTGREY_TYPE="--inet=10023" 
simpan dan keluar dari file dan mulai ulang layanan postgrey.
systemctl restart postgrey.service Sekarang Konfigurasikan Amivisd.
nano /etc/clamd.d/amavisd.conf

change the following line

LocalSocket /run/clamd.amavisd/clamd.sock

to

LocalSocket /var/spool/amavisd/clamd.sock 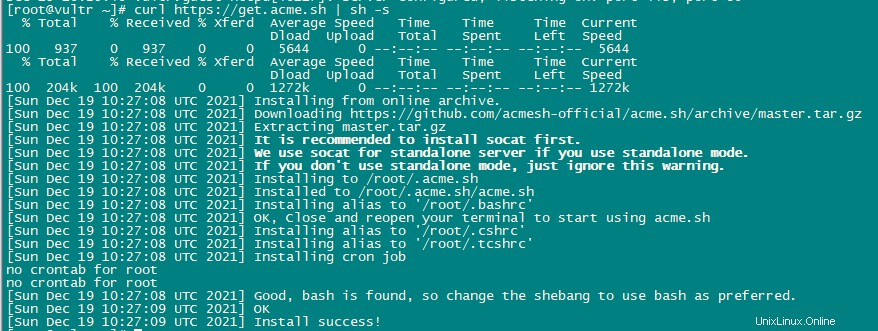
simpan dan keluar dari file dan mulai ulang layanan clamAV.
systemctl restart [email protected]
systemctl status [email protected] 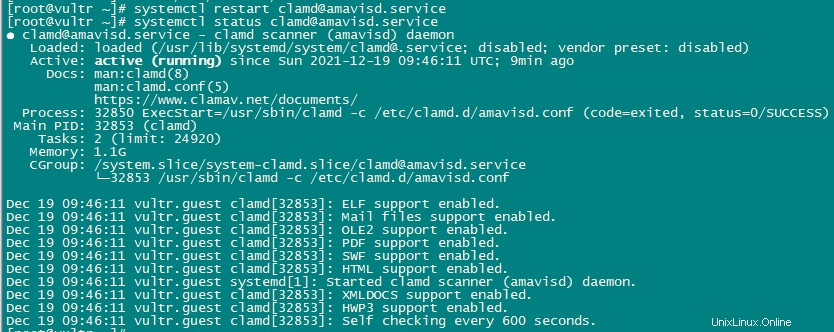
Sekarang kita akan membuat freshclam sebagai layanan sehingga dapat dimulai dan dihentikan menggunakan systemctl. Agar ini berfungsi, kita harus membuat file yang memiliki path /usr/lib/systemd/system/freshclam.service.
nano /usr/lib/systemd/system/freshclam.service Tambahkan konten berikut ke file:
[Unit]
Description = ClamAV Scanner
After = network.target

[Service]
Type = forking
# if you want to scan more than one in a day change the number 1 with your desired number in below line.
ExecStart = /usr/bin/freshclam -d -c 1
Restart = on-failure
PrivateTmp =true

[Install]
WantedBy=multi-user.target 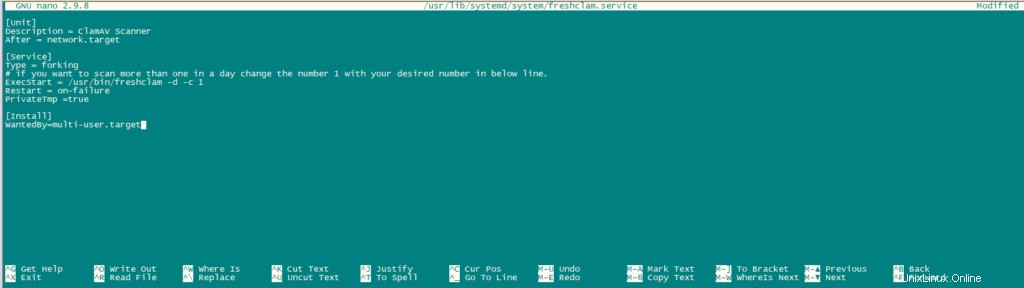
simpan dan keluar dari file.
Sekarang Aktifkan dan mulai layanan.
systemctl enable freshclam.service
systemctl start freshclam.service
systemctl status freshclam.service 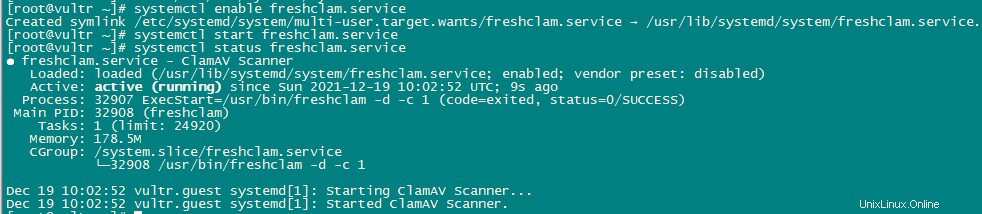
Instal Apache dengan mod_php, mod_fcgi/PHP, PHP-FPM:
ISPConfig 3 memungkinkan Anda untuk menggunakan mod_php, mod_fcgi/PHP, cgi/PHP, dan PHP-FPM sesuai basis situs web.
Instal Apache2 dengan mod_php, mod_fcgid, dan PHP menggunakan perintah berikut:
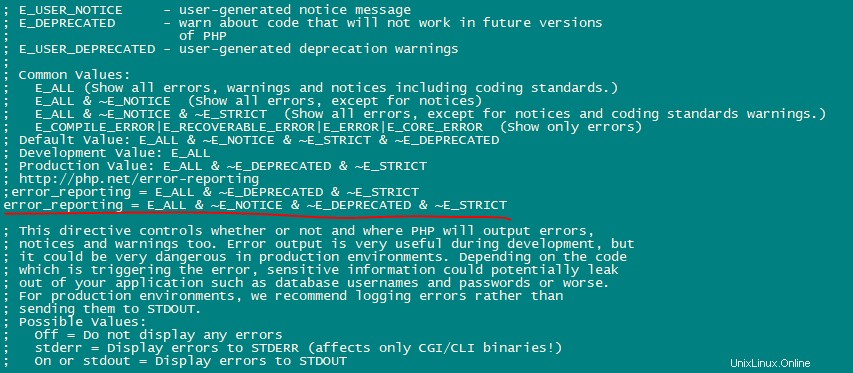
dnf -y install php php-devel php-gd php-imap php-ldap php-mysql php-odbc php-pear php-xml php-xmlrpc php-pecl-apc php-mbstring php-mcrypt php-snmp php-soap php-tidy curl curl-devel perl-libwww-perl ImageMagick libxml2 libxml2-devel mod_fcgid php-cli httpd-devel php-fpm php-intl php-imagick php-pspell wget Sekarang kita akan mengkonfigurasi file php.ini.
nano /etc/php.ini Ubah pelaporan kesalahan sehingga pemberitahuan tidak akan ditampilkan, atur zona waktu dan batalkan komentar pada baris “cgi.fix_pathinfo=1 “.


Aktifkan httpd dan PHP-FPM sehingga layanan dapat dimulai saat boot dan memulai layanan PHP-FPM.
systemctl start php-fpm.service
systemctl enable php-fpm.service
systemctl status php-fpm.service 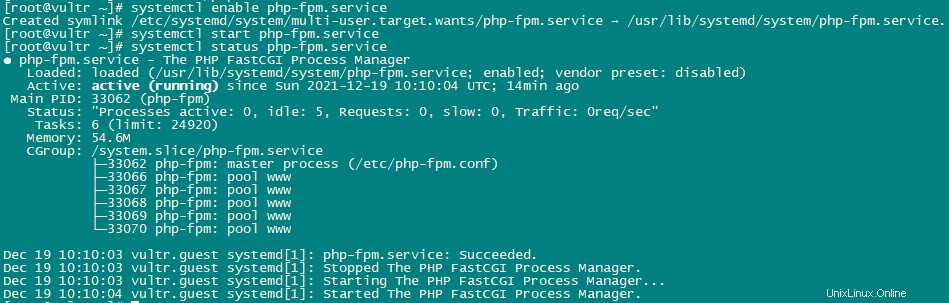
Sekarang aktifkan dan mulai ulang layanan apache.
systemctl enable httpd.service
systemctl restart httpd.service
systemctl status httpd.service 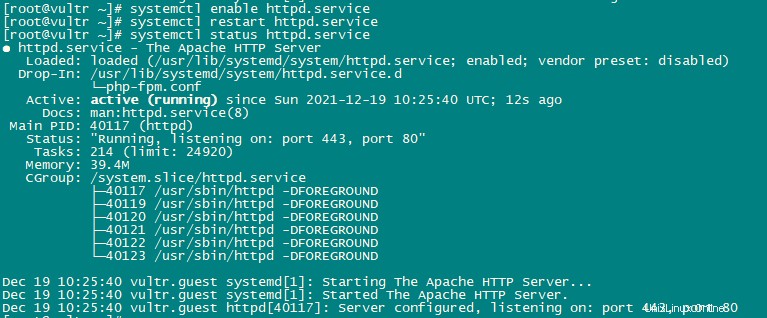
Sekarang kami akan menambahkan dukungan untuk Let's encrypt. ISPConfig menggunakan acme.sh sebagai klien Let's Encrypt. Instal acme.sh menggunakan perintah berikut:
curl https://get.acme.sh | sh -s Pemasangan mod_python:
mod_python adalah modul dari apache. Itu tidak tersedia sebagai RPM jadi kami harus mengompilasinya dari sumber. Pertama, kita akan menginstal file pengembangan python dan kemudian mengunduh versi file tar.gz mod_python saat ini.
dnf -y install python3-devel 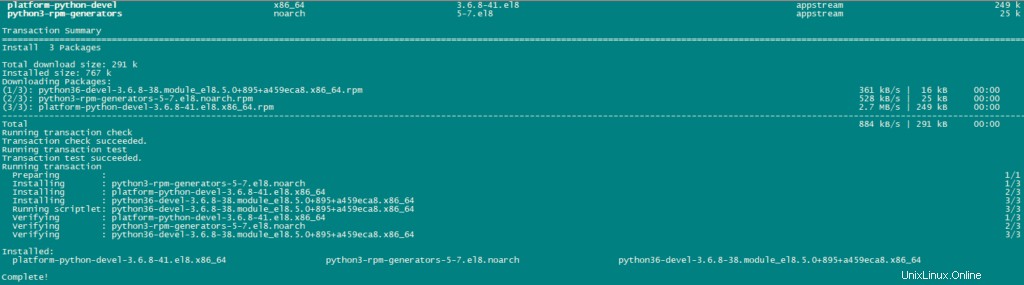
cd /usr/local/src/
wget http://dist.modpython.org/dist/mod_python-3.5.0.tgz
tar xfz mod_python-3.5.0.tgz
cd mod_python-3.5.0 
Sekarang kita akan mengkonfigurasi dan mengkompilasi mod_python.
./configure --with-python=/usr/bin/python3
make
Ada kesalahan dalam modul yang dikompilasi yang akan menyebabkan instalasi gagal dengan kesalahan “version =“fatal:Not a git repository (atau direktori induk mana pun):.git “. Untuk mengatasi kesalahan itu, jalankan perintah sed ini (perintahnya adalah satu baris!).
sed -e 's/(git describe --always)/(git describe --always 2>\/dev\/null)/g' -e 's/`git describe --always`/`git describe --always 2>\/dev\/null`/g' -i $( find . -type f -name Makefile\* -o -name version.sh ) Sekarang instal modul menggunakan perintah berikut:
make install 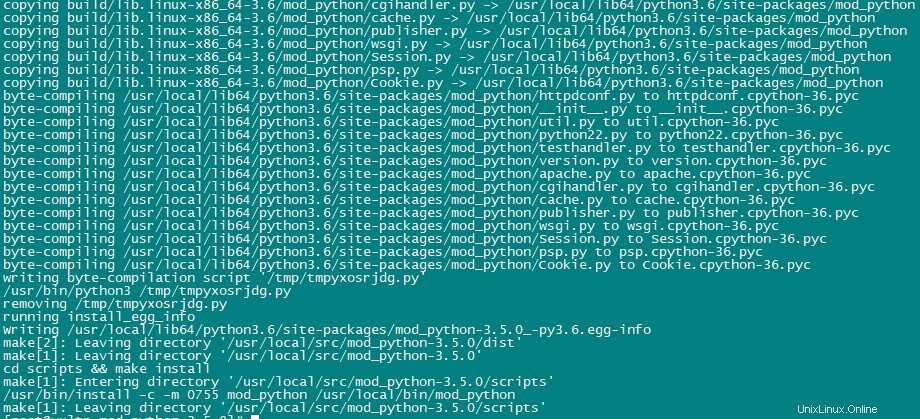
Aktifkan modul di Apache menggunakan perintah berikut:
echo 'LoadModule python_module modules/mod_python.so' > /etc/httpd/conf.modules.d/10-python.conf
systemctl restart httpd.service
systemctl status httpd.service 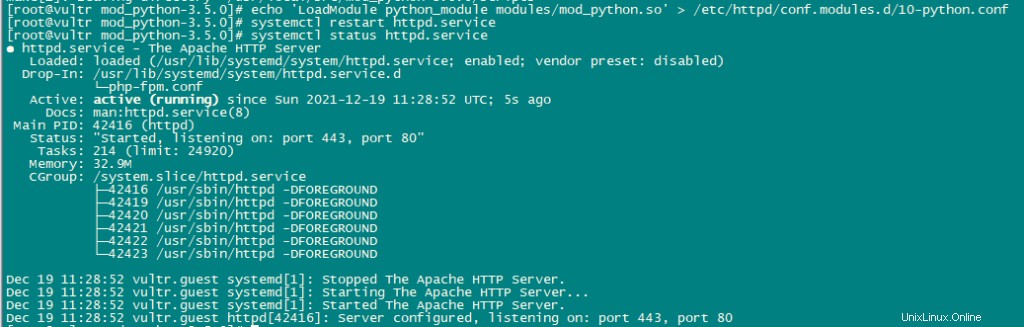
Instal PureFTPd:
PureFTPd dapat diinstal menggunakan perintah berikut:
dnf -y install pure-ftpd 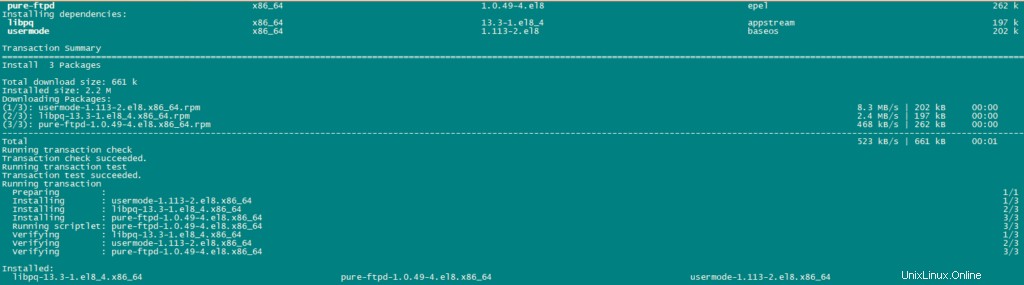
Aktifkan dan Mulai layanan PureFTPd.
systemctl enable pure-ftpd.service
systemctl start pure-ftpd.service
systemctl status pure-ftpd.service 
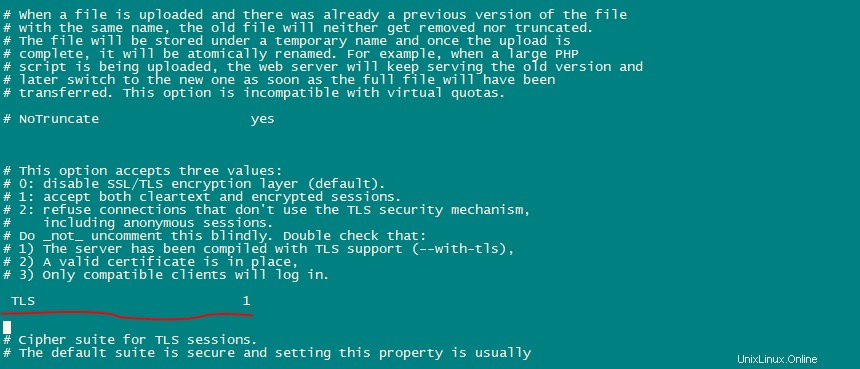
Sekarang, kita akan mengkonfigurasi PureFTPd untuk mengizinkan sesi FTP dan TLS. FTP adalah protokol yang sangat tidak aman karena semua kata sandi dan data ditransfer dalam teks yang jelas. Dengan menggunakan TLS, seluruh komunikasi dapat dienkripsi, sehingga membuat FTP jauh lebih aman.
OpenSSL dibutuhkan oleh TLS; untuk menginstal OpenSSL gunakan perintah berikut:
dnf install openssl Buka /etc/pure-ftpd/pure-ftpd.conf dan Aktifkan TLS.
nano /etc/pure-ftpd/pure-ftpd.conf Izinkan sesi FTP dan TLS, setel TLS ke 1 dengan menghapus # di depan garis TLS. Sangat disarankan untuk mengaktifkan TLS.
Untuk menggunakan TLS, kita harus membuat sertifikat SSL. buat di /etc/ssl/private/ , oleh karena itu kita akan membuat direktori tersebut terlebih dahulu:
mkdir -p /etc/ssl/private/ Sekarang, kita akan membuat sertifikat SSL menggunakan perintah berikut:
openssl req -x509 -nodes -days 7300 -newkey rsa:2048 -keyout /etc/ssl/private/pure-ftpd.pem -out /etc/ssl/private/pure-ftpd.pem 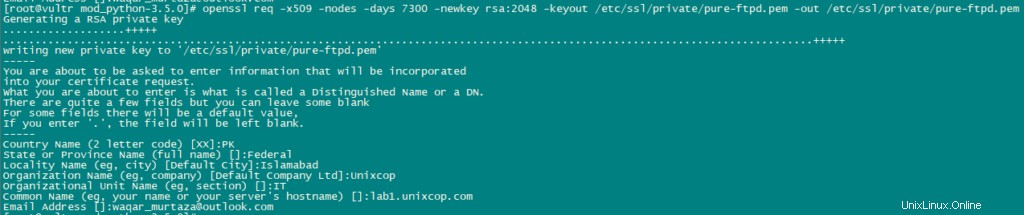
Ubah izin sertifikat SSL:
chmod 600 /etc/ssl/private/pure-ftpd.pem Sekarang, Buat file DHParam menggunakan perintah berikut:
openssl dhparam -out /etc/ssl/private/pure-ftpd-dhparams.pem 2048 
Mulai ulang Layanan PureFTPd untuk menerapkan semua konfigurasi.
systemctl restart pure-ftpd.service
systemctl status pure-ftpd.service
Instal BIND:
Instal BIND menggunakan perintah berikut:
dnf -y install bind bind-utils haveged 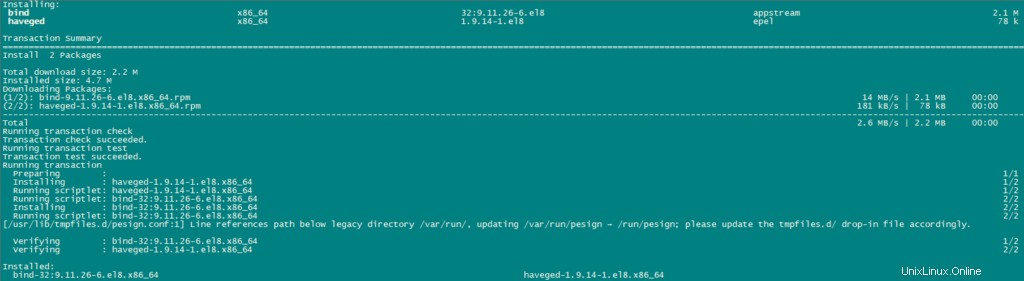
Kami akan mengkonfigurasi BIND sesuai kebutuhan kami oleh karena itu, Ambil cadangan file konfigurasi yang ada dan buat yang baru sebagai berikut:
cp /etc/named.conf /etc/named.conf_bak
cat /dev/null > /etc/named.conf
nano /etc/named.conf
Tambahkan baris berikut di file konfigurasi.
//
// named.conf
//
// Provided by Red Hat bind package to configure the ISC BIND named(8) DNS
// server as a caching only nameserver (as a localhost DNS resolver only).
//
// See /usr/share/doc/bind*/sample/ for example named configuration files.
//
options {
        listen-on port 53 { any; };
        listen-on-v6 port 53 { any; };
        directory       "/var/named";
        dump-file       "https://1118798822.rsc.cdn77.org/var/named/data/cache_dump.db";
        statistics-file "https://1118798822.rsc.cdn77.org/var/named/data/named_stats.txt";
        memstatistics-file "https://1118798822.rsc.cdn77.org/var/named/data/named_mem_stats.txt";
        allow-query     { any; };
				allow-recursion {"none";};
        recursion no;
};
logging {
        channel default_debug {
                file "data/named.run";
                severity dynamic;
        };
};
zone "." IN {
        type hint;
        file "named.ca";
};
include "https://1118798822.rsc.cdn77.org/etc/named.conf.local";
simpan dan keluar dari file.
Buat file /etc/named.conf.local yang disertakan di akhir /etc/named.conf “/etc/named.conf.local ” nantinya akan diisi oleh ISPConfig jika Anda membuat zona DNS di ISPConfig.
touch /etc/named.conf.local Aktifkan dan Mulai BIND dan nikmati.
systemctl enable named.service
systemctl start named.service
systemctl status named.service
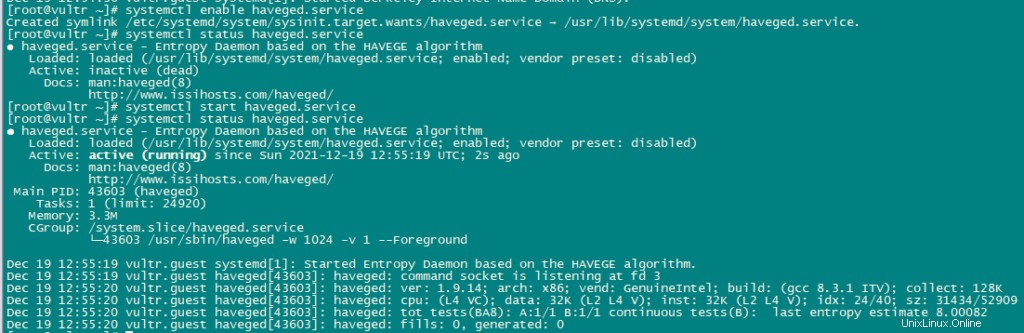
systemctl enable haveged.service
systemctl start haveged.service
systemctl status haveged.service 
Instal AWStats:
AWStats adalah aplikasi statistik web. Gunakan perintah berikut untuk menginstal AWStats:
dnf -y install awstats perl-DateTime-Format-HTTP perl-DateTime-Format-Builder 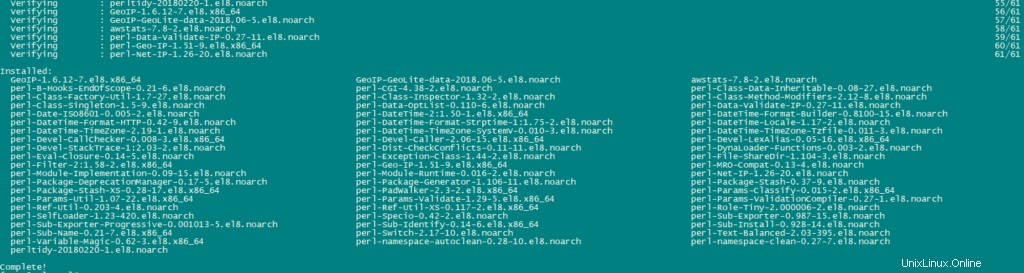
Instal Jailkit:
Kami akan menggunakan Jailkit untuk chroot pengguna SSH dan cronjobs. Itu dapat diinstal sebagai berikut:
ln -s /usr/bin/python2 /usr/bin/python
cd /tmp
wget http://olivier.sessink.nl/jailkit/jailkit-2.21.tar.gz
tar xvfz jailkit-2.21.tar.gz
cd jailkit-2.21
./configure
make
make install
cd ..
rm -rf jailkit-2.21* 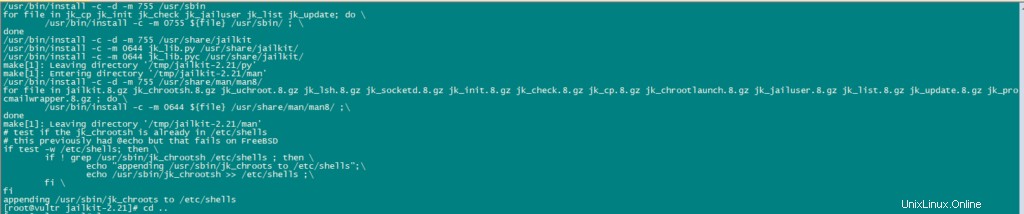
Instal Fail2Ban:
Fail2Ban bersifat opsional tetapi disarankan, karena monitor ISPConfig mencoba menampilkan log.
Gunakan perintah berikut untuk menginstal Fail2Ban.
dnf -y install iptables-services fail2ban fail2ban-systemd
systemctl stop firewalld.service
systemctl mask firewalld.service
systemctl disable firewalld.service 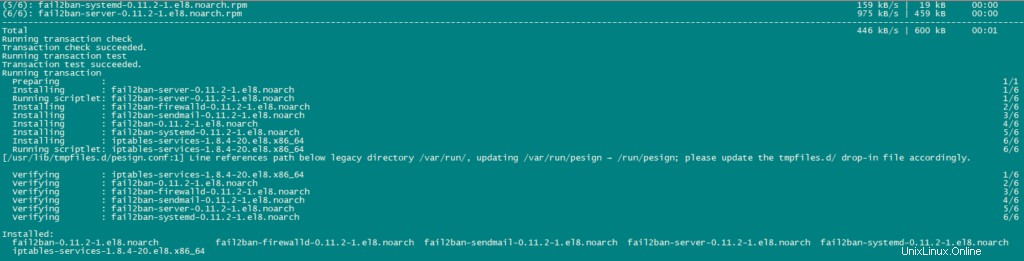
Selanjutnya, buat file /etc/fail2ban/jail.local dan aktifkan pemantauan untuk layanan ssh, email, dan ftp.
nano /etc/fail2ban/jail.local Tambahkan baris berikut dalam file:
[sshd]
enabled = true
action = iptables[name=sshd, port=ssh, protocol=tcp]

[pure-ftpd]
enabled = true
action = iptables[name=FTP, port=ftp, protocol=tcp]
maxretry = 3

[dovecot]
enabled = true
action = iptables-multiport[name=dovecot, port="pop3,pop3s,imap,imaps", protocol=tcp]
maxretry = 5

[postfix-sasl]
enabled = true
action = iptables-multiport[name=postfix-sasl, port="smtp,smtps,submission", protocol=tcp]
maxretry = 3
Aktifkan dan Mulai Layanan Fail2Ban.
systemctl enable fail2ban.service
systemctl start fail2ban.service
systemctl status fail2ban.service 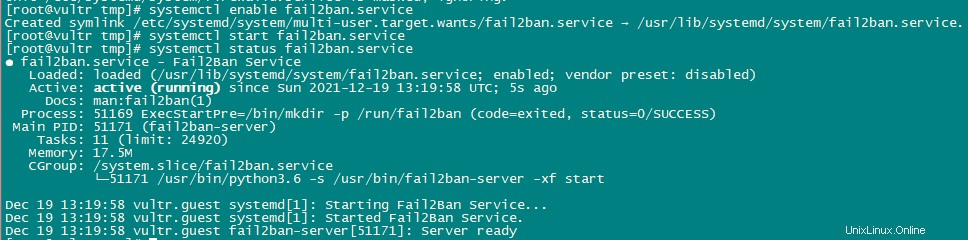
Instal rkhunter:
Sekarang kita akan menginstal rkhunter menggunakan perintah berikut:
dnf -y install rkhunter 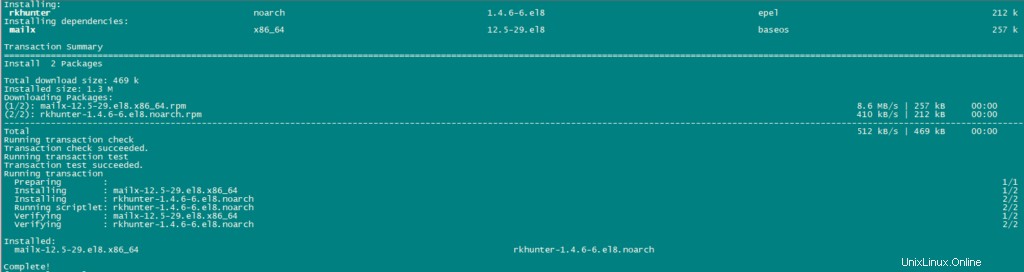
Instal Mailman:
Jika Anda ingin mengelola milis dengan Mailman di server Anda, maka instal mailman sekarang. Mailman didukung oleh ISPConfig, sehingga nanti Anda dapat membuat milis baru melalui ISPConfig.
dnf -y install mailman 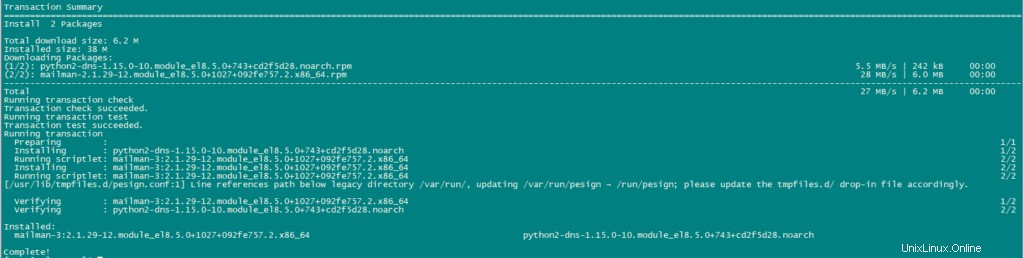
Sebelum memulai tukang pos, buat milis bernama tukang pos.
touch /var/lib/mailman/data/aliases
postmap /var/lib/mailman/data/aliases
/usr/lib/mailman/bin/newlist mailman
ln -s /usr/lib/mailman/mail/mailman /usr/bin/mailman 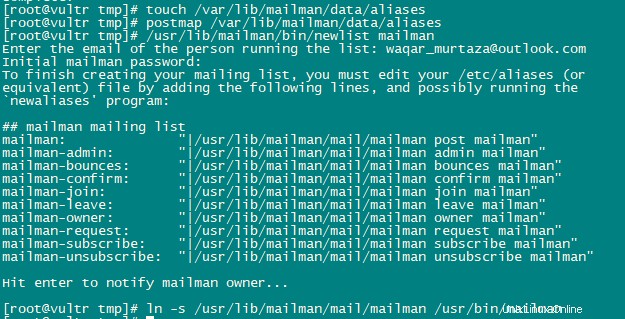
Buka Alias menggunakan perintah berikut:
nano /etc/aliases Tambahkan baris berikut dalam file:
mailman:              "|/usr/lib/mailman/mail/mailman post mailman"
mailman-admin:        "|/usr/lib/mailman/mail/mailman admin mailman"
mailman-bounces:      "|/usr/lib/mailman/mail/mailman bounces mailman"
mailman-confirm:      "|/usr/lib/mailman/mail/mailman confirm mailman"
mailman-join:         "|/usr/lib/mailman/mail/mailman join mailman"
mailman-leave:        "|/usr/lib/mailman/mail/mailman leave mailman"
mailman-owner:        "|/usr/lib/mailman/mail/mailman owner mailman"
mailman-request:      "|/usr/lib/mailman/mail/mailman request mailman"
mailman-subscribe:    "|/usr/lib/mailman/mail/mailman subscribe mailman"
mailman-unsubscribe: "|/usr/lib/mailman/mail/mailman unsubscribe mailman" 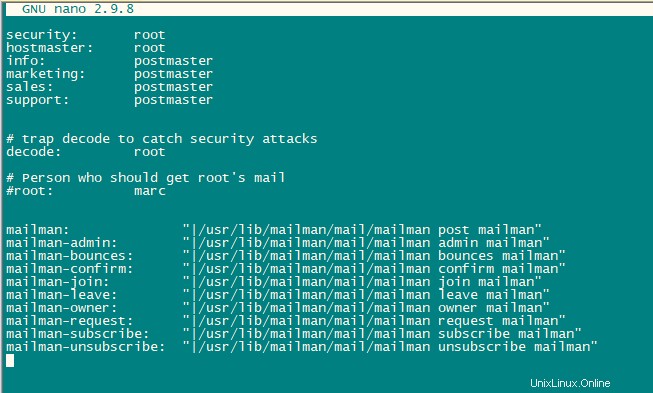
Jalankan perintah berikut untuk menerapkan konfigurasi yang baru ditambahkan:
newaliases Mulai ulang Postfix.
systemctl restart postfix.service Kami akan mengonfigurasi file konfigurasi tukang pos Apache.
nano /etc/httpd/conf.d/mailman.conf Tambahkan baris ScriptAlias /cgi-bin/mailman/ /usr/lib/mailman/cgi-bin/ . Beri komentar Alias /pipermail/ /var/lib/mailman/archives/public/ dan tambahkan baris Alias /pipermail /var/lib/mailman/archives/public/ .
Setelah mengedit file akan terlihat seperti ini:
#
#  httpd configuration settings for use with mailman.
#

ScriptAlias /mailman/ /usr/lib/mailman/cgi-bin/
ScriptAlias /cgi-bin/mailman/ /usr/lib/mailman/cgi-bin/
<Directory /usr/lib/mailman/cgi-bin/>
    AllowOverride None
    Options ExecCGI
    Require all granted
</Directory>


#Alias /pipermail/ /var/lib/mailman/archives/public/
Alias /pipermail /var/lib/mailman/archives/public/
<Directory /var/lib/mailman/archives/public>
    Options MultiViews FollowSymLinks
    AllowOverride None
    Require all granted
    AddDefaultCharset Off
</Directory>

# Uncomment the following line, replacing www.example.com with your server's
# name, to redirect queries to /mailman to the listinfo page (recommended).

# RedirectMatch ^/mailman[/]*$ http://www.example.com/mailman/listinfo 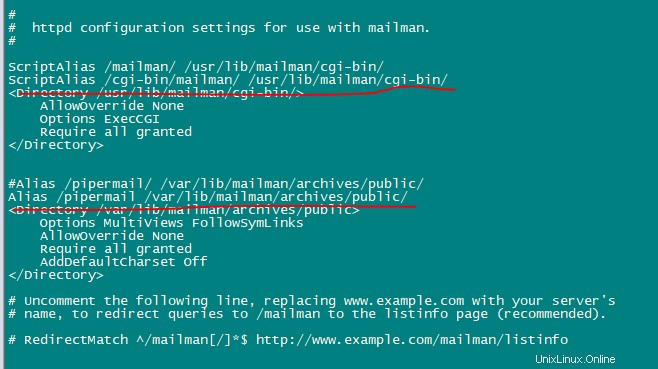
Mulai ulang Layanan Apache untuk menerapkan konfigurasi.
systemctl restart httpd.service Aktifkan dan Mulai Layanan Mailman.
systemctl enable mailman.service
systemctl start mailman.service
systemctl status mailman.service 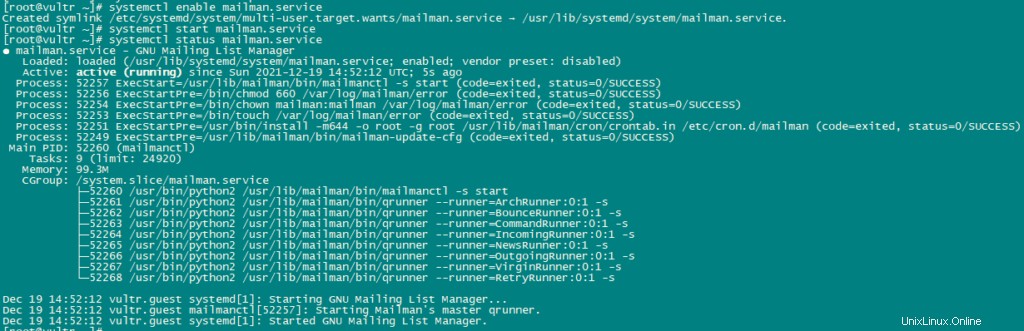
Setelah Anda akan Menginstal ISPConfig 3 Anda dapat menggunakan Mailman sebagai berikut:
Anda dapat menggunakan alias /cgi-bin/mailman untuk semua vhost Apache (harap dicatat bahwa suExec dan CGI harus dinonaktifkan untuk semua vhost dari mana Anda ingin mengakses Mailman!), yang berarti Anda dapat mengakses antarmuka admin Mailman untuk daftar di http:///cgi-bin/mailman/admin/, dan halaman web untuk pengguna milis dapat ditemukan di http:///cgi-bin/mailman/listinfo/.
Di bawah http:///pipermail/ Anda dapat menemukan arsip milis.
Instal email web Roundcube:
Kami akan mengunduh email web Roundcube menggunakan wget dan kemudian menginstalnya.
cd /tmp
wget https://github.com/roundcube/roundcubemail/releases/download/1.4.3/roundcubemail-1.4.3-complete.tar.gz 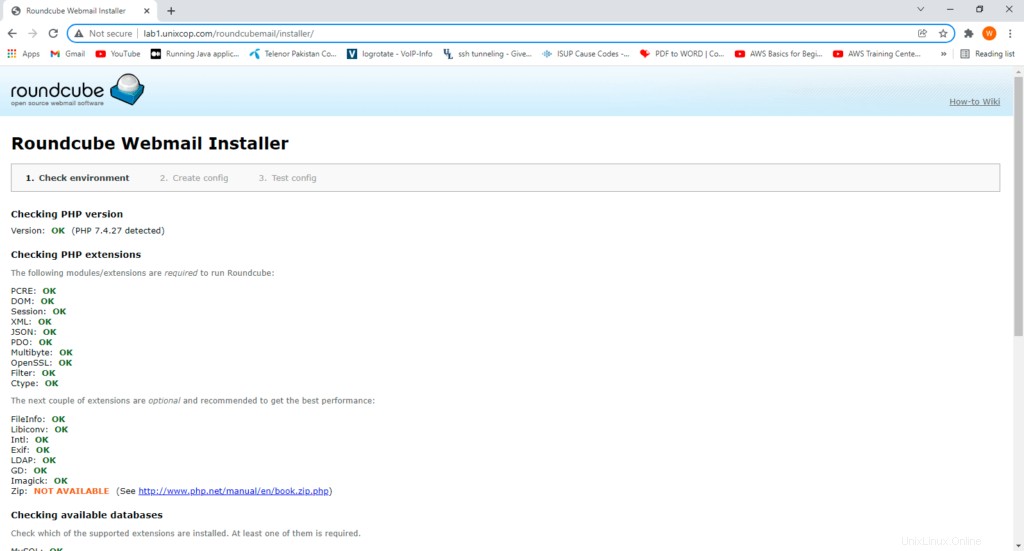
Buka paket file tar.gz dan pindahkan sumber RoundCube ke /usr/share/roundcubemail.
tar xfz roundcubemail-1.4.3-complete.tar.gz
mkdir /usr/share/roundcubemail
mv /tmp/roundcubemail-1.4.3/* /usr/share/roundcubemail/
chown -R root:root /usr/share/roundcubemail
chown apache /usr/share/roundcubemail/temp
chown apache /usr/share/roundcubemail/logs
buat file konfigurasi roundcube.
nano /etc/httpd/conf.d/roundcubemail.conf Tambahkan baris berikut dalam file:
#
# Round Cube Webmail is a browser-based multilingual IMAP client
#

Alias /roundcubemail /usr/share/roundcubemail
Alias /webmail /usr/share/roundcubemail

# Define who can access the Webmail
# You can enlarge permissions once configured

<Directory /usr/share/roundcubemail/>
        Options none
        AllowOverride Limit
        Require all granted
</Directory>

# Define who can access the installer
# keep this secured once configured

<Directory /usr/share/roundcubemail/installer>
        Options none
        AllowOverride Limit
        Require all granted
</Directory>


# Those directories should not be viewed by Web clients.
<Directory /usr/share/roundcubemail/bin/>
    Order Allow,Deny
    Deny from all
</Directory>
<Directory /usr/share/roundcubemail/plugins/enigma/home/>
    Order Allow,Deny
    Deny from all
</Directory>
Mulai ulang Apache.
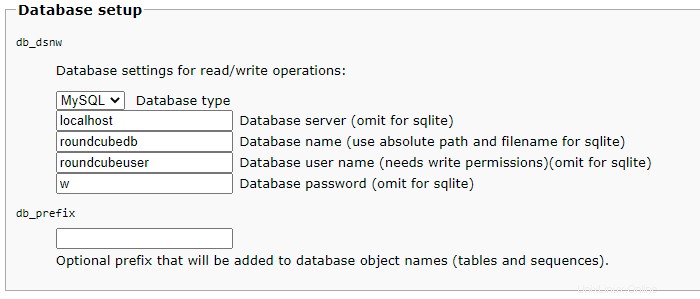
systemctl restart httpd.service Sekarang kita membutuhkan database untuk email RoundCube, kita akan membuatnya sebagai berikut:
mysql -u root -p gunakan kueri berikut untuk membuat Database:
CREATE DATABASE roundcubedb;
CREATE USER roundcubeuser@localhost IDENTIFIED BY 'roundcubepassword';
GRANT ALL PRIVILEGES on roundcubedb.* to roundcubeuser@localhost ;
FLUSH PRIVILEGES;
exit 
Sekarang kita akan menginstal RoundCube di browser di http://YOUR_IPAddress/roundcubemail/installer/
Sekarang buat file config.inc.php.
nano /usr/share/roundcubemail/config/config.inc.php Tambahkan baris berikut di dalamnya:
<?php

/* Local configuration for Roundcube Webmail */

// ----------------------------------
// SQL DATABASE
// ----------------------------------
// Database connection string (DSN) for read+write operations
// Format (compatible with PEAR MDB2): db_provider://user:password@host/database
// Currently supported db_providers: mysql, pgsql, sqlite, mssql, sqlsrv, oracle
// For examples see http://pear.php.net/manual/en/package.database.mdb2.intro-dsn.php
// NOTE: for SQLite use absolute path (Linux): 'sqlite:////full/path/to/sqlite.db?mode=0646'
// or (Windows): 'sqlite:///C:/full/path/to/sqlite.db'
$config['db_dsnw'] = 'mysql://roundcubeuser:roundcubepassword@localhost/roundcubedb';

// ----------------------------------
// IMAP
// ----------------------------------
// The IMAP host chosen to perform the log-in.
// Leave blank to show a textbox at login, give a list of hosts
// to display a pulldown menu or set one host as string.
// To use SSL/TLS connection, enter hostname with prefix ssl:// or tls://
// Supported replacement variables:
// %n - hostname ($_SERVER['SERVER_NAME'])
// %t - hostname without the first part
// %d - domain (http hostname $_SERVER['HTTP_HOST'] without the first part)
// %s - domain name after the '@' from e-mail address provided at login screen
// For example %n = mail.domain.tld, %t = domain.tld
// WARNING: After hostname change update of mail_host column in users table is
// required to match old user data records with the new host.
$config['default_host'] = 'localhost';
$config['smtp_server'] = 'localhost';
$config['smtp_port'] = 25;

// provide an URL where a user can get support for this Roundcube installation
// PLEASE DO NOT LINK TO THE ROUNDCUBE.NET WEBSITE HERE!
$config['support_url'] = '';

// This key is used for encrypting purposes, like storing of imap password
// in the session. For historical reasons it's called DES_key, but it's used
// with any configured cipher_method (see below).
$config['des_key'] = 'pb0UucO0eqjgvhrqYlFTBVjE';

// ----------------------------------
// PLUGINS
// ----------------------------------
// List of active plugins (in plugins/ directory)
$config['plugins'] = array();

// Set the spell checking engine. Possible values:
// - 'googie' - the default (also used for connecting to Nox Spell Server, see 'spellcheck_uri' setting)
// - 'pspell' - requires the PHP Pspell module and aspell installed
// - 'enchant' - requires the PHP Enchant module
// - 'atd' - install your own After the Deadline server or check with the people at http://www.afterthedeadline.com before using their API
// Since Google shut down their public spell checking service, the default settings
// connect to http://spell.roundcube.net which is a hosted service provided by Roundcube.
// You can connect to any other googie-compliant service by setting 'spellcheck_uri' accordingly.
$config['spellcheck_engine'] = 'pspell';
$config['enable_installer'] = true;
Now click Next in the web browser:
Then press continue and you will enter a new page where It will give you the configurations. Just copy these configurations and paste on config.php.ini file.

then initailize database.
Now, Open config file.
nano /usr/share/roundcubemail/config/config.inc.php

change the line:

$config['enable_installer'] = true;

to

$config['enable_installer'] = false; 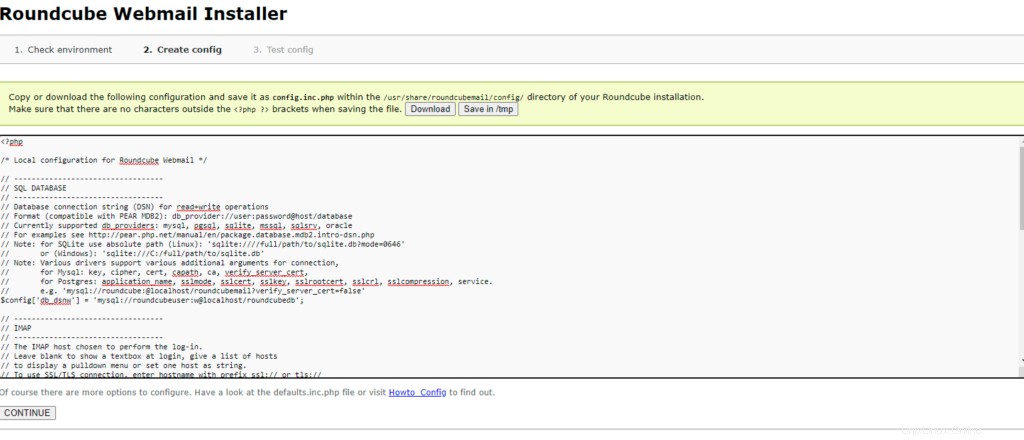
Roundcube is available now under the aliases /webmail and /roundcubemail on your server:
http://YOUR_IPAddress/webmail
The RoundCube login is the email address and password of an email account that you create later in ISPConfig.
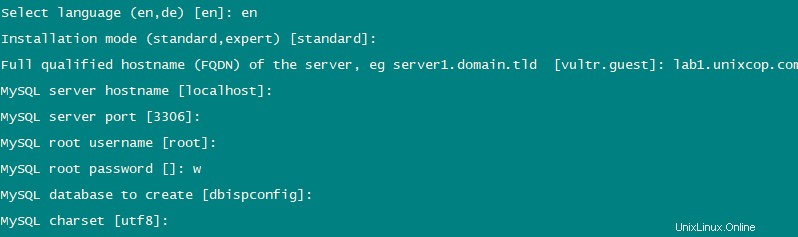
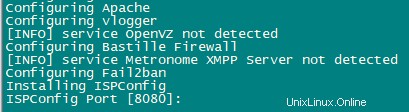
Install ISPConfig on CentOS 8
The ISPConfig installer will configure all services like Postfix, Dovecot, etc. for you.
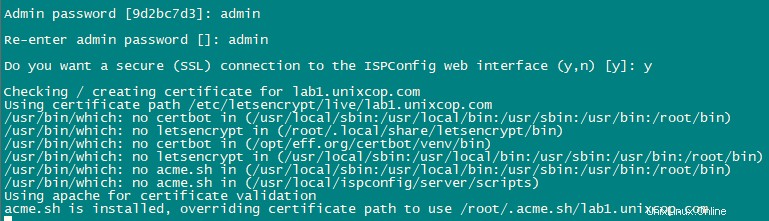
You also have the possibility to let the installer create an SSL vhost for the ISPConfig control panel
so that ISPConfig can be accessed using https:// instead of http://. To achieve this, just press ENTER when you see this question:
Do you want a secure (SSL) connection to the ISPConfig web interface (y,n) [y]:.
To install ISPConfig 3.2 nightly build, use the following commands:
cd /tmp
wget -O ispconfig.tar.gz https://www.ispconfig.org/downloads/ISPConfig-3-stable.tar.gz
tar xfz ispconfig.tar.gz
cd ispconfig3*/install/ 
The next step is to run:
php -q install.php 
This will start the ISPConfig 3 installer. The installer will configure all services like Postfix, Dovecot, etc. for you.
Hit Enter if the value in bracket is what you want you set otherwise enter your desired value and press Enter.
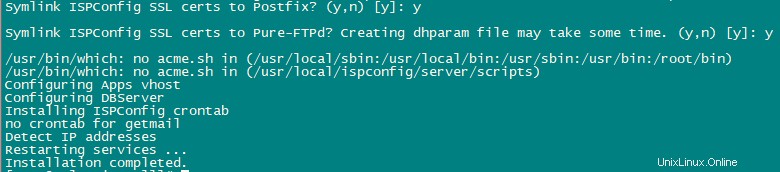
Installation is now complete.
Afterwards you can access ISPConfig 3 using https://YOUR-IPAddress:8080.
Login with admin as Username and Password. You should change the default password after first login.
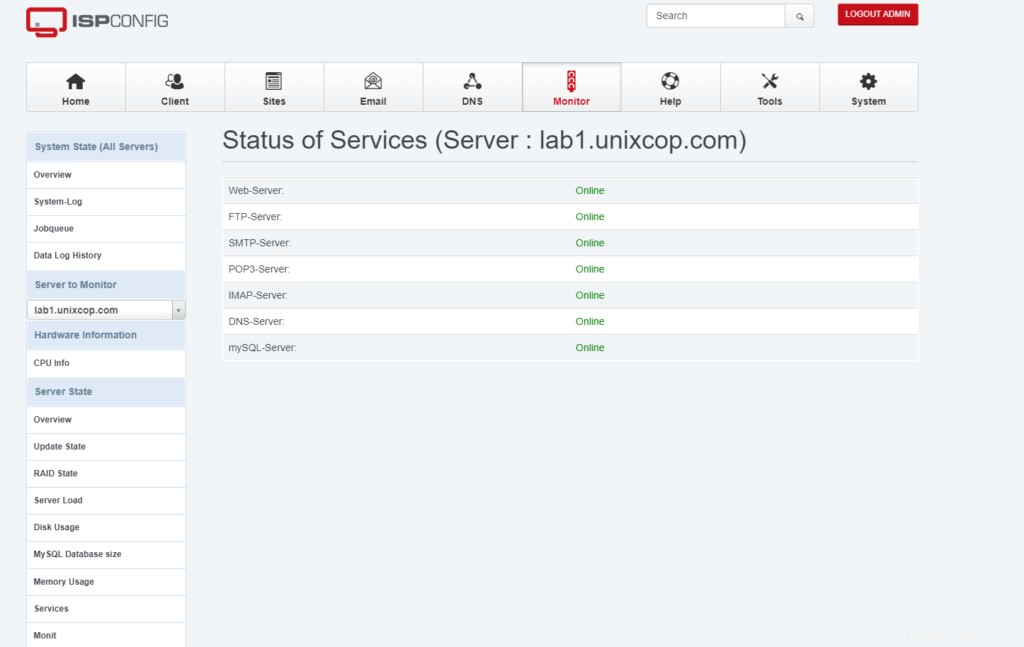
Now you can use ISPConfig as per your need.