phpPgAdmin adalah alat administrasi berbasis web untuk mengelola database PostgreSQL, dan sangat mirip dengan phpMyAdmin, alat berbasis web untuk mengelola MySQL (MariaDB).
Jika Anda memiliki pengalaman kerja di phpMyAdmin, maka sangat mudah bagi Anda untuk memahami fungsionalitas phpPgAdmin.
Panduan ini akan membantu Anda menginstal phpPgAdmin di Ubuntu 18.04 / Ubuntu 16.04 &LinuxMint 19 / Linux Mint 18.
Prasyarat
Sebelum menyiapkan phpPgAdmin, lihat cara menginstal PostgreSQL di Ubuntu 18.04 / Ubuntu 16.04 &LinuxMint 19 / Linux Mint 18.
Periksa apakah layanan PostgreSQL berjalan di server.
sudo systemctl status postgresql
Keluaran:
● postgresql.service - PostgreSQL RDBMS
   Loaded: loaded (/lib/systemd/system/postgresql.service; enabled; vendor preset: enabled)
   Active: active (exited) since Sat 2019-02-23 11:43:07 IST; 23h ago
 Main PID: 6536 (code=exited, status=0/SUCCESS)
    Tasks: 0 (limit: 2323)
   CGroup: /system.slice/postgresql.service

Feb 23 11:43:07 server systemd[1]: Starting PostgreSQL RDBMS...
Feb 23 11:43:07 server systemd[1]: Started PostgreSQL RDBMS.
Instal phpPgAdmin
phpPgAdmin tersedia di repositori dasar, jadi, Anda dapat menginstalnya menggunakan perintah apt-get install.
sudo apt-get install -y phppgadmin apache2
Konfigurasi PostgreSQL
Secara default, PostgreSQL menerima otentikasi hanya dari localhost . Jika Anda ingin menghubungkan PostgreSQL dari mesin eksternal, Anda perlu mengedit pg_hba.conf berkas.
### PostgreSQL 11 ###

sudo nano /etc/postgresql/11/main/pg_hba.conf

### PostgreSQL 10 ###

sudo nano /etc/postgresql/10/main/pg_hba.conf
Masukkan nilai sesuai kebutuhan Anda di IPv4 dan pastikan itu menerima kata sandi md5.
# IPv4 local connections:
host    all             all             127.0.0.1/32            md5

host    all             all             192.168.1.0/24          md5
Konfigurasi phpPgAdmin
Edit /etc/phppgadmin/config.inc.php berkas.
sudo nano /etc/phppgadmin/config.inc.php
Tambahkan instance PostgreSQL Anda di sini.
        // Display name for the server on the login screen
        $conf['servers'][0]['desc'] = 'PostgreSQL 11';


        // Hostname or IP address for server.  Use '' for UNIX domain socket.
        // use 'localhost' for TCP/IP connection on this computer
        $conf['servers'][0]['host'] = 'localhost';


        // Database port on server (5432 is the PostgreSQL default)
        $conf['servers'][0]['port'] = 5432;
phpPgAdmin tidak akan mengizinkan pengguna tanpa kata sandi atau nama pengguna tertentu (pgsql, postgres, root, administrator) untuk masuk.
Untuk mengganti keamanan ekstra ini, ubah ke false.
$conf['extra_login_security'] = false;
Menyetel ini menjadi benar cukup sembunyikan basis data pengguna lain dari daftar basis data. Namun, mereka bisa mendapatkan data (dari database lain) menggunakan kueri SQL.
$conf['owned_only'] = false;
Konfigurasi Apache
Karena pembatasan, phpPgAdmin hanya dapat diakses di localhost. Jika Anda ingin mengakses antarmuka web phpPgAdmin dari mesin eksternal, maka Anda perlu mengedit file konfigurasi apache (phppgadmin.conf).
sudo nano /etc/apache2/conf-enabled/phppgadmin.conf
Konfigurasi default akan terlihat seperti di bawah ini.
Alias /phppgadmin /usr/share/phppgadmin

<Directory /usr/share/phppgadmin>

<IfModule mod_dir.c>
DirectoryIndex index.php
</IfModule>
AllowOverride None

# Only allow connections from localhost:
Require local

<IfModule mod_php.c>
  php_flag magic_quotes_gpc Off
  php_flag track_vars On
  #php_value include_path .
</IfModule>
<IfModule !mod_php.c>
  <IfModule mod_actions.c>
    <IfModule mod_cgi.c>
      AddType application/x-httpd-php .php
      Action application/x-httpd-php /cgi-bin/php
    </IfModule>
    <IfModule mod_cgid.c>
     AddType application/x-httpd-php .php
     Action application/x-httpd-php /cgi-bin/php
    </IfModule>
  </IfModule>
</IfModule>

</Directory>
Harap beri komentar Perlu lokal baris dan tambahkan Wajibkan semua diberikan tepat di bawah ke baris komentar.
Tampilannya akan seperti di bawah ini.
Alias /phppgadmin /usr/share/phppgadmin

<Directory /usr/share/phppgadmin>

<IfModule mod_dir.c>
DirectoryIndex index.php
</IfModule>
AllowOverride None

# Only allow connections from localhost:
# Require local
Require all granted
<IfModule mod_php.c>
  php_flag magic_quotes_gpc Off
  php_flag track_vars On
  #php_value include_path .
</IfModule>
<IfModule !mod_php.c>
  <IfModule mod_actions.c>
    <IfModule mod_cgi.c>
       AddType application/x-httpd-php .php
       Action application/x-httpd-php /cgi-bin/php
    </IfModule>
    <IfModule mod_cgid.c>
       AddType application/x-httpd-php .php
       Action application/x-httpd-php /cgi-bin/php
    </IfModule>
   </IfModule>
</IfModule>

</Directory
Mulai ulang layanan.
sudo systemctl restart postgresql
sudo systemctl restart apache2
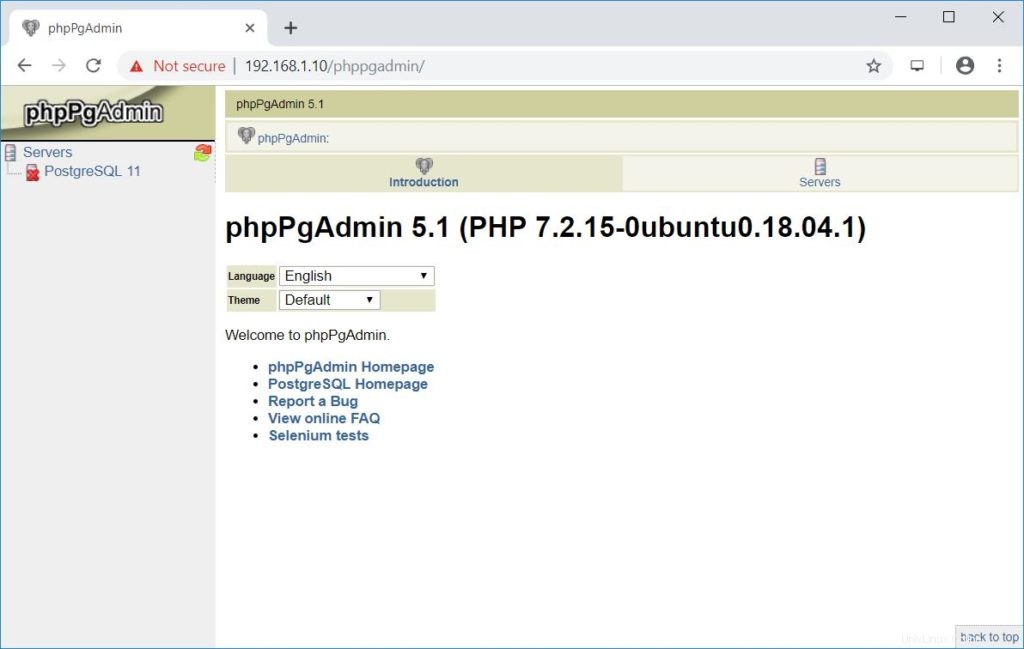
Akses phpPgAdmin
Sekarang akses phpPgAdmin dari browser web Anda, URL akan menjadi
http://alamat-ip-anda/phppgadminATAU:
http://localhost/phppgaminHalaman awal phpPgAdmin:
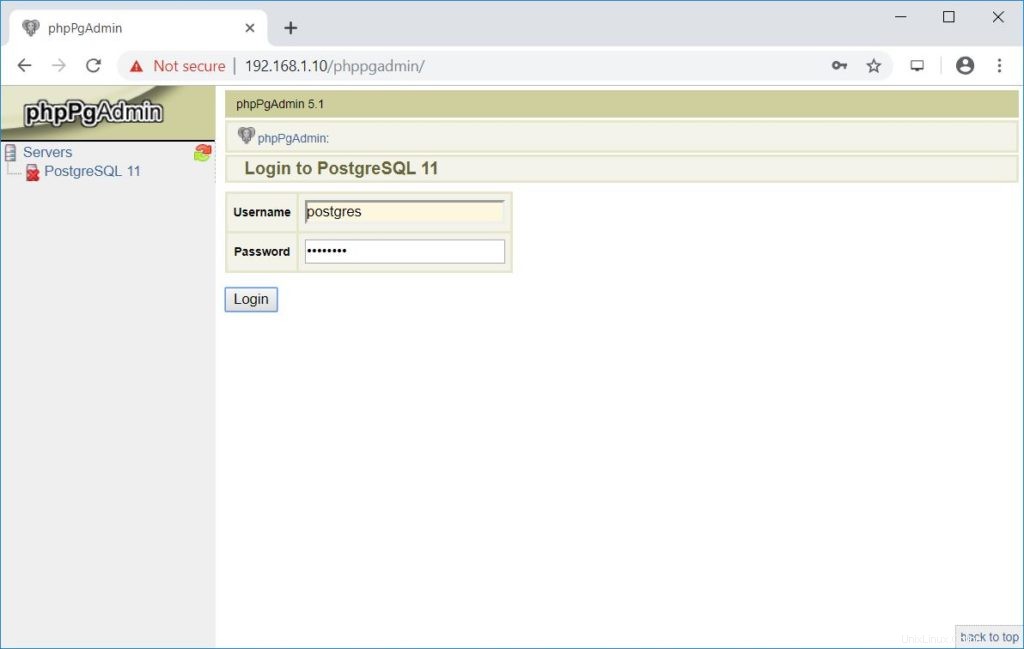
Bekerja dengan phpPgAdmin
Klik server yang terdaftar di panel kiri untuk masuk ke instance PostgreSQL. Masuk menggunakan pengguna basis data.
Anda sekarang akan mendapatkan daftar database.
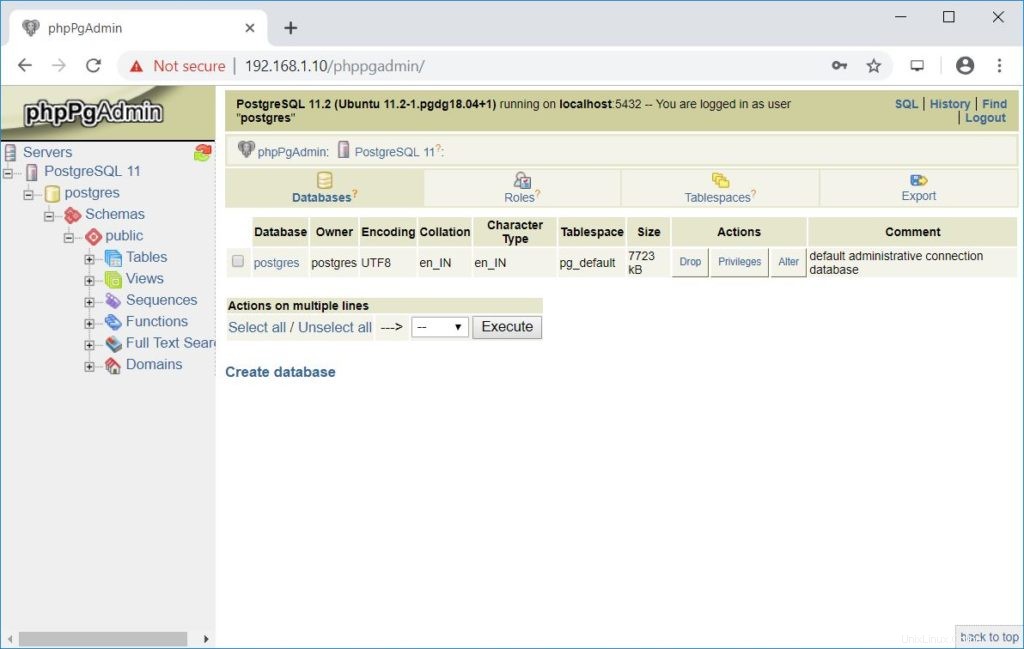
Itu saja.